Fall is here, and what better way to celebrate the season than with a fresh set of green nails? Whether you’re looking for something subtle or bold, green nails are a versatile choice for autumn. Let’s dive into some of the best fall green nail designs that will have you booking your next nail appointment ASAP.
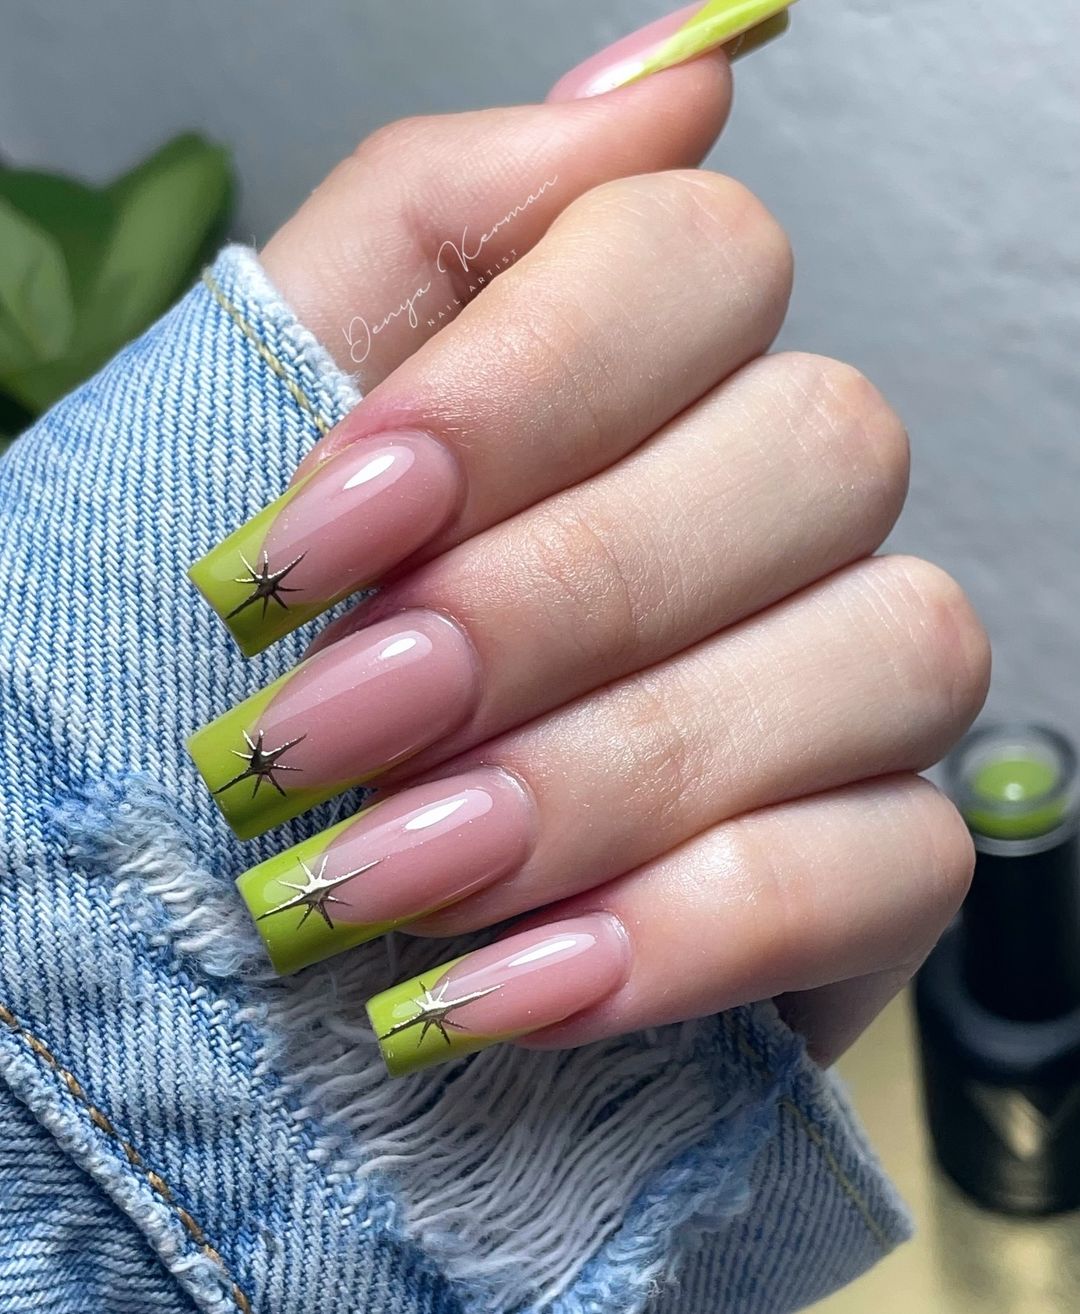
Chic Lime Green with Star Accents
One of my favorite looks for the fall season is this chic lime green manicure with star accents. The lime green tips provide a fresh and modern twist, perfectly complemented by the delicate star details. This design is perfect for those who want to stand out without going over the top. The contrast between the natural nail base and the vibrant green tips makes this look both edgy and elegant.
-
- Lime green nail polish (e.g., OPI “Lime Time”)
- Star nail stickers or stamping kit
- Clear top coat for sealing
- Base coat for nail protection
Application Tips:
-
- Start with a clean nail base and apply a base coat.
- Paint the tips of your nails with the lime green polish. Use nail tape for a sharp line.
- Apply the star stickers or use a stamping kit to add the star accents.
- Finish with a clear top coat to seal the design and add shine.
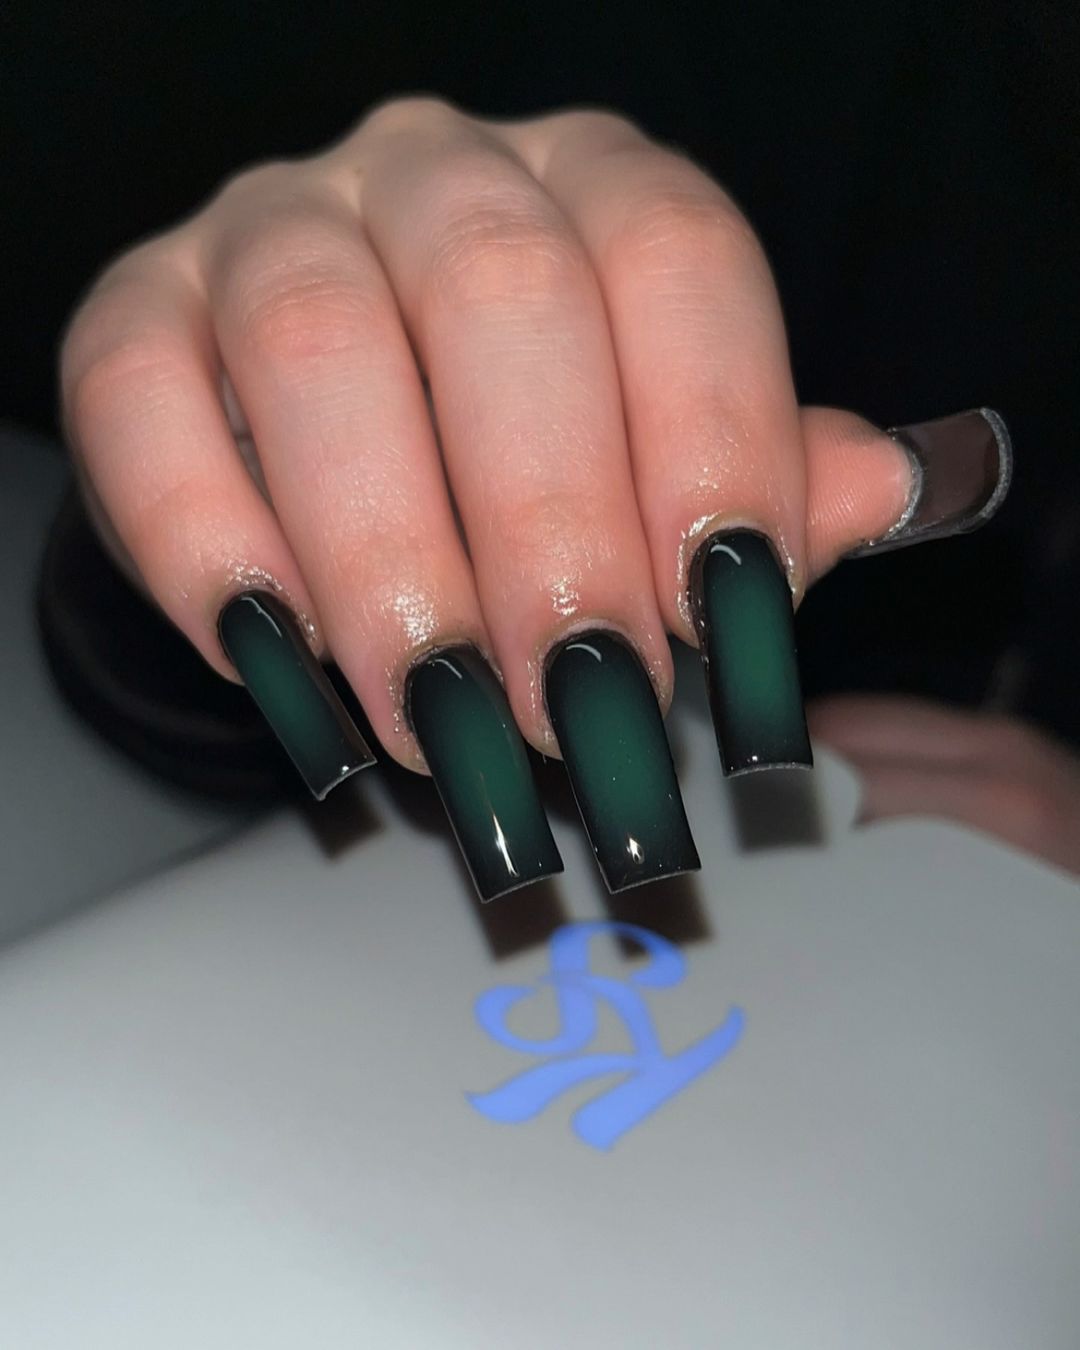
Dark Green Gradient with Glossy Finish
For a more dramatic look, the dark green gradient is a perfect choice. This design transitions from a deep, almost black green at the cuticle to a lighter shade at the tips, creating a mysterious and captivating effect. The glossy finish adds an extra layer of sophistication, making these nails perfect for any fall occasion.
-
- Dark green nail polish (e.g., Essie “Off Tropic”)
- Gradient sponge
- Clear top coat
- Base coat
Application Tips:
-
- Apply a base coat to protect your nails.
- Using a sponge, apply the dark green polish at the cuticle, gradually fading to a lighter shade towards the tips.
- Blend the colors smoothly with the sponge for a seamless gradient effect.
- Seal with a clear top coat to enhance the glossy finish.
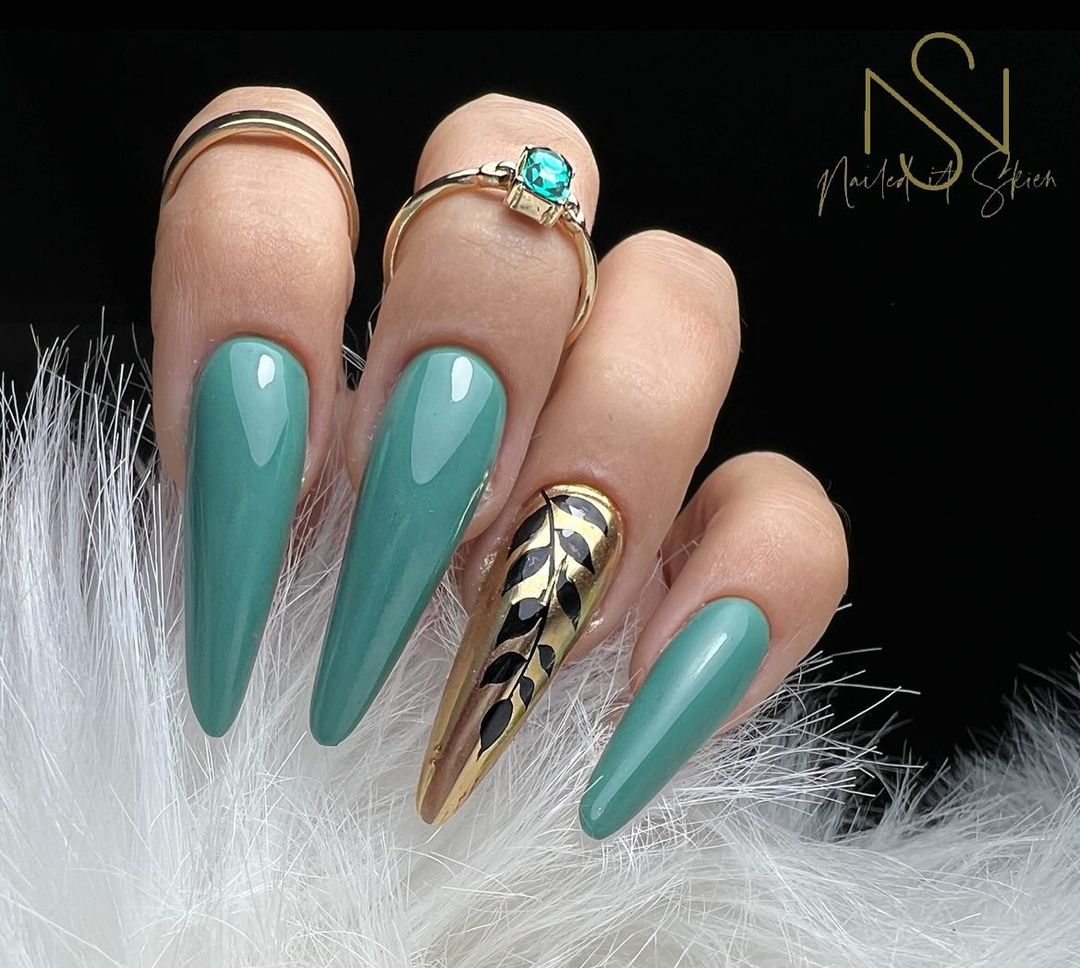
Teal and Gold Leaf Accent
If you’re looking for something luxurious yet understated, the teal nails with a gold leaf accent nail are perfect. The rich teal color is complemented by the opulent gold leaf, adding a touch of glamour. This design is perfect for those who want a sophisticated look with a bit of sparkle.
-
- Teal nail polish (e.g., OPI “Teal the Cows Come Home”)
- Gold leaf or gold foil
- Nail adhesive
- Clear top coat
- Base coat
Application Tips:
-
- Begin with a base coat.
- Apply the teal polish to all nails.
- On the accent nail, use nail adhesive to apply the gold leaf. Press it gently to ensure it sticks.
- Finish with a clear top coat to protect the design and add shine.
Green Marble French Tips
The green marble French tips are a sophisticated yet modern twist on the classic French manicure. The blend of white and green creates a marble effect that is both elegant and eye-catching. The almond shape adds a touch of femininity and elongates the fingers, making this design perfect for those who prefer a chic and polished look. The matte finish on the white base enhances the contrast and brings out the marble details beautifully.

-
- White matte nail polish (e.g., OPI “Alpine Snow”)
- Green marble effect polish or green polish with a marble technique (e.g., Essie “Jade to Measure”)
- Clear top coat
- Base coat
Application Tips:
-
- Apply a base coat to protect your nails.
- Paint the nails with a white matte polish and let it dry completely.
- Use a thin brush or a marble tool to create green marble lines over the white base.
- Finish with a clear top coat to seal and protect the design.
Save Pin
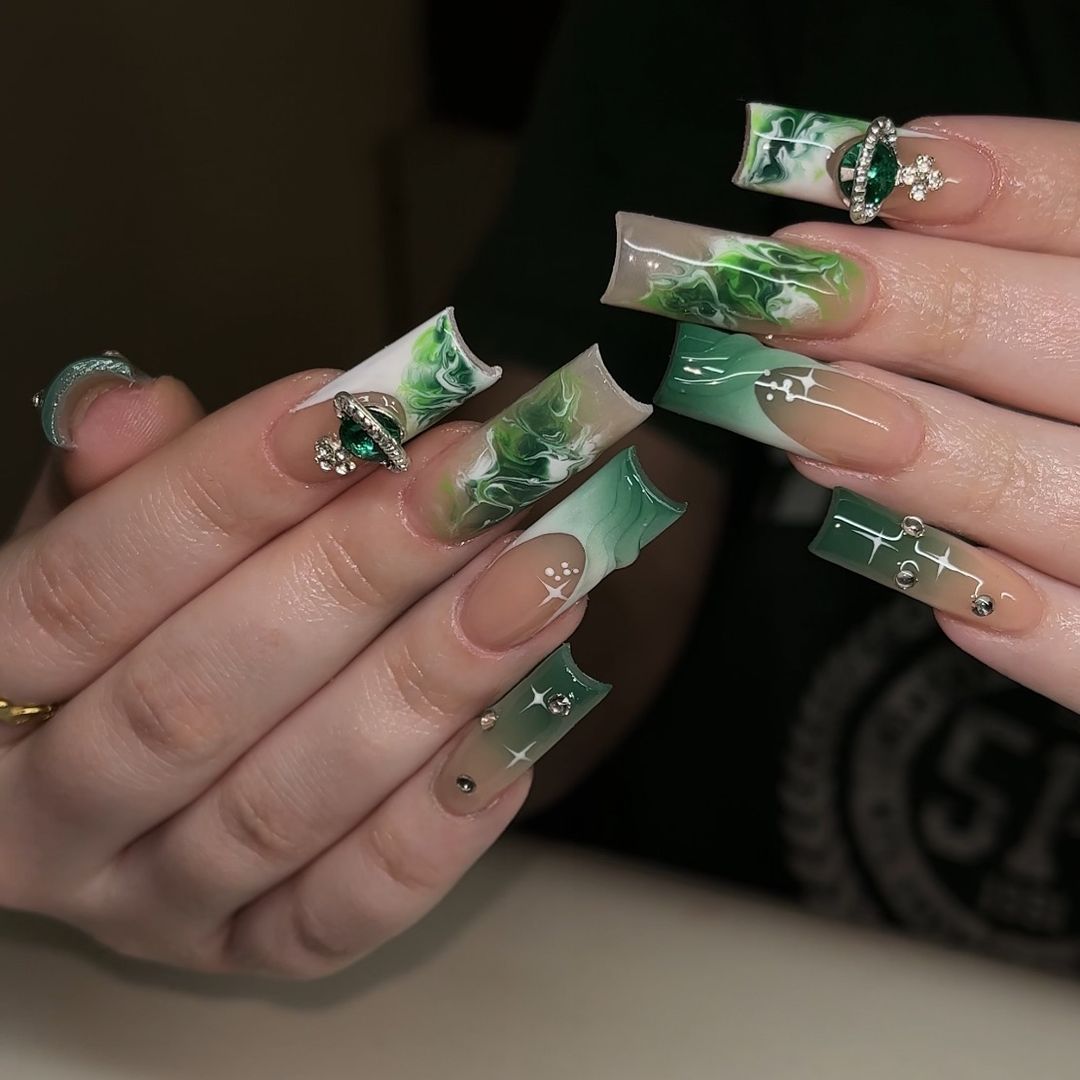
Forest Green and Marble Extravaganza
This intricate nail design combines forest green with marble effects and metallic embellishments, creating a luxurious and dramatic look. The coffin shape adds a bold and edgy vibe, while the 3D elements and intricate designs make this a standout manicure. Perfect for those who love detailed nail art and want to make a statement.
-
- Forest green nail polish (e.g., Sally Hansen “Moss Have”)
- White and green marble polishes or marble effect tools
- Metallic embellishments (e.g., studs, rings)
- Clear top coat
- Base coat
Application Tips:
-
- Start with a base coat to protect your nails.
- Apply the forest green polish to some nails and create a marble effect on others using white and green polishes.
- Add metallic embellishments using nail glue.
- Finish with a clear top coat to secure the embellishments and add shine.
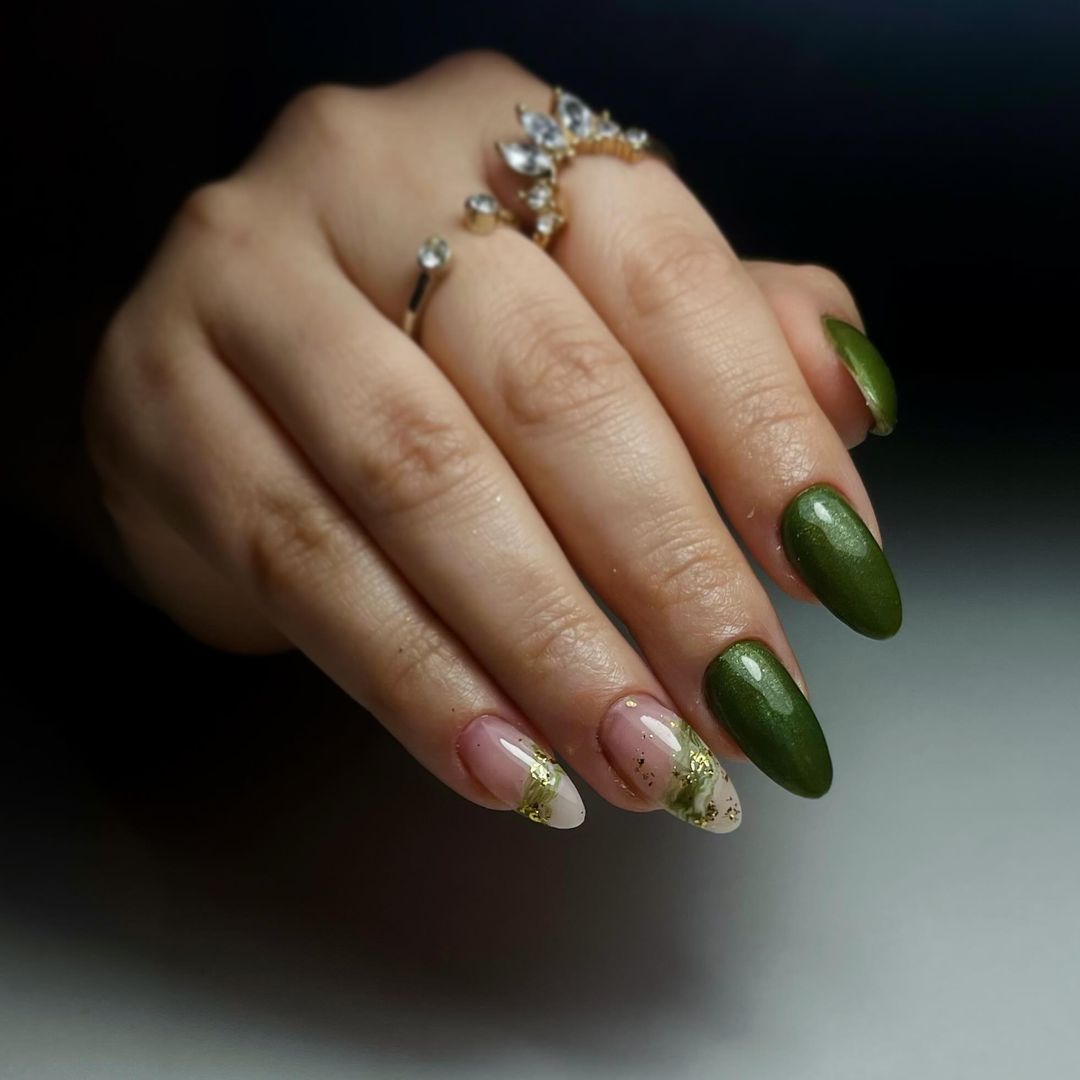
Olive Green Elegance
The olive green elegance design is perfect for a sophisticated and understated look. The rich olive green polish paired with gold foil accents creates a luxurious feel, while the almond shape keeps the design feminine and elegant. This manicure is perfect for those who prefer a more classic and refined look but still want to add a touch of glam.
-
- Olive green nail polish (e.g., OPI “Olive for Green”)
- Gold foil or gold leaf
- Clear top coat
- Base coat
Application Tips:
-
- Apply a base coat to protect your nails.
- Paint the nails with the olive green polish.
- Apply gold foil accents to the tips or as an accent nail using nail adhesive.
- Finish with a clear top coat to seal the design and add a glossy finish.
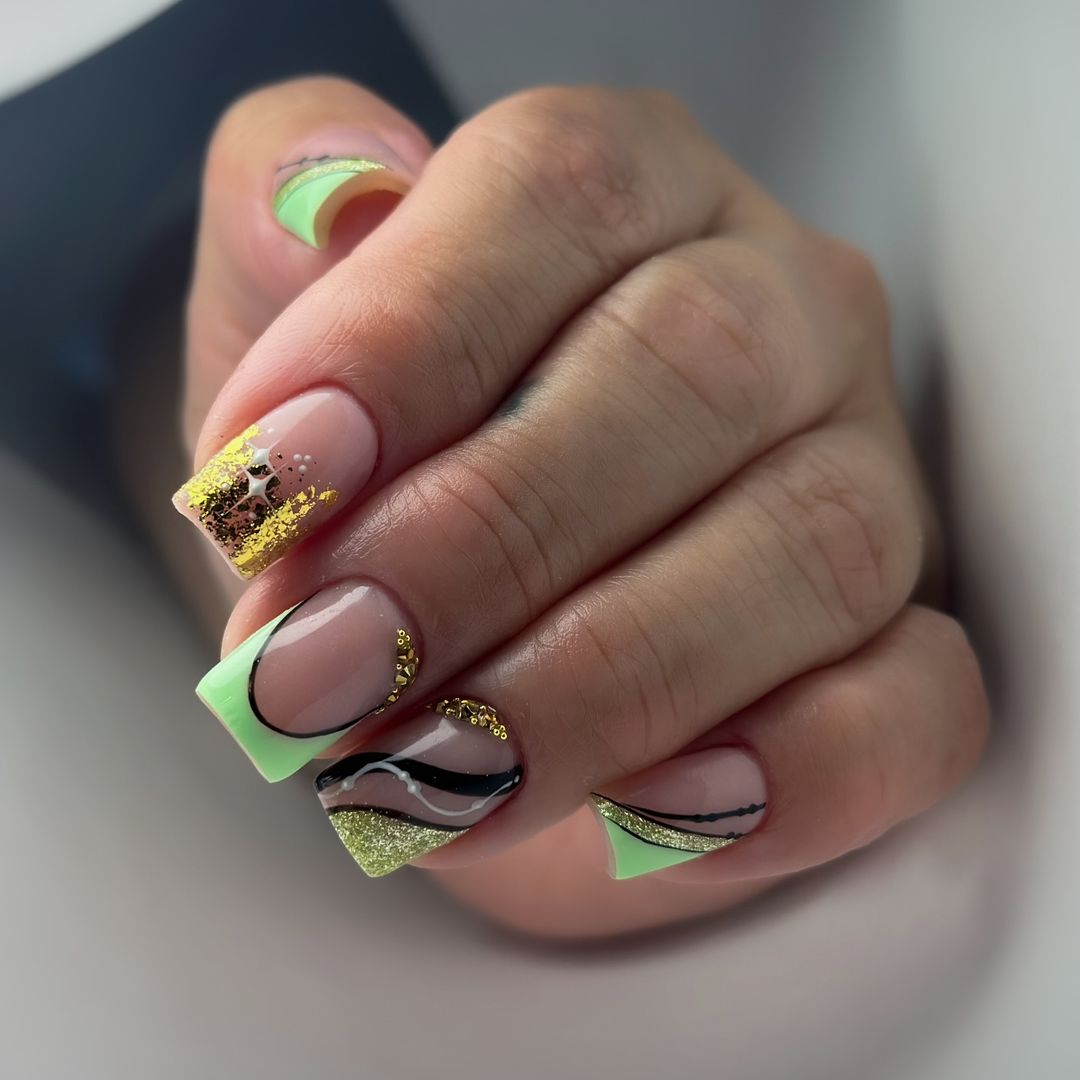
Geometric Green and Gold Glam
This geometric design combines lime green with black and gold accents, creating a vibrant and artistic look. The use of gold glitter and abstract lines adds a touch of glamour, making this design perfect for those who want their nails to be a statement piece. The squared shape complements the bold design, giving it a modern and stylish finish.
-
- Lime green nail polish (e.g., OPI “Lime Time”)
- Black nail polish (e.g., Essie “Licorice”)
- Gold glitter polish (e.g., Sally Hansen “Golden-I”)
- Clear top coat
- Base coat
- Nail striping tape for precision
Application Tips:
-
- Apply a base coat to protect your nails.
- Use striping tape to create geometric shapes and paint with lime green and black polishes.
- Apply gold glitter polish to selected sections for added sparkle.
- Finish with a clear top coat to seal the design and enhance the shine.
Minimalist Mint French Tips
For a clean and elegant look, these minimalist mint French tips are perfect. The soft mint green contrasts beautifully with the natural nail base, creating a fresh and understated design. The squared shape adds a modern twist, making it a great choice for everyday wear or special occasions.
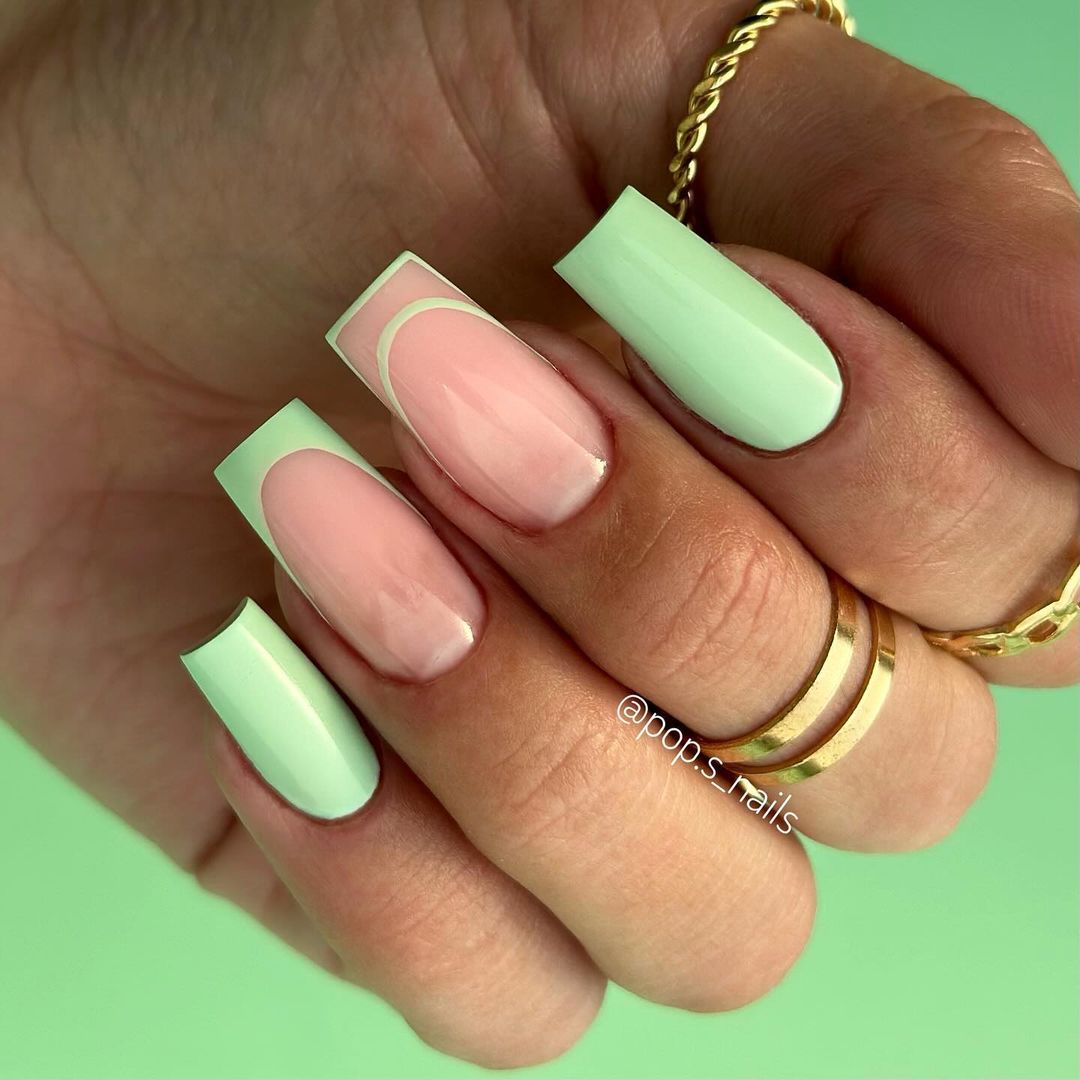
-
- Mint green nail polish (e.g., Essie “Mint Candy Apple”)
- Clear top coat
- Base coat
- Nail tape for sharp lines
Application Tips:
-
- Apply a base coat to protect your nails.
- Use nail tape to section off the tips and paint with mint green polish.
- Remove the tape carefully to reveal clean lines.
- Finish with a clear top coat to protect the design and add shine.
Leopard Print Accents
This playful design combines bright green polish with leopard print accents, creating a fun and trendy look. The contrast between the solid green and the animal print makes this manicure stand out, perfect for those who love bold and eye-catching designs. The square shape enhances the overall style, making it chic and fashionable.
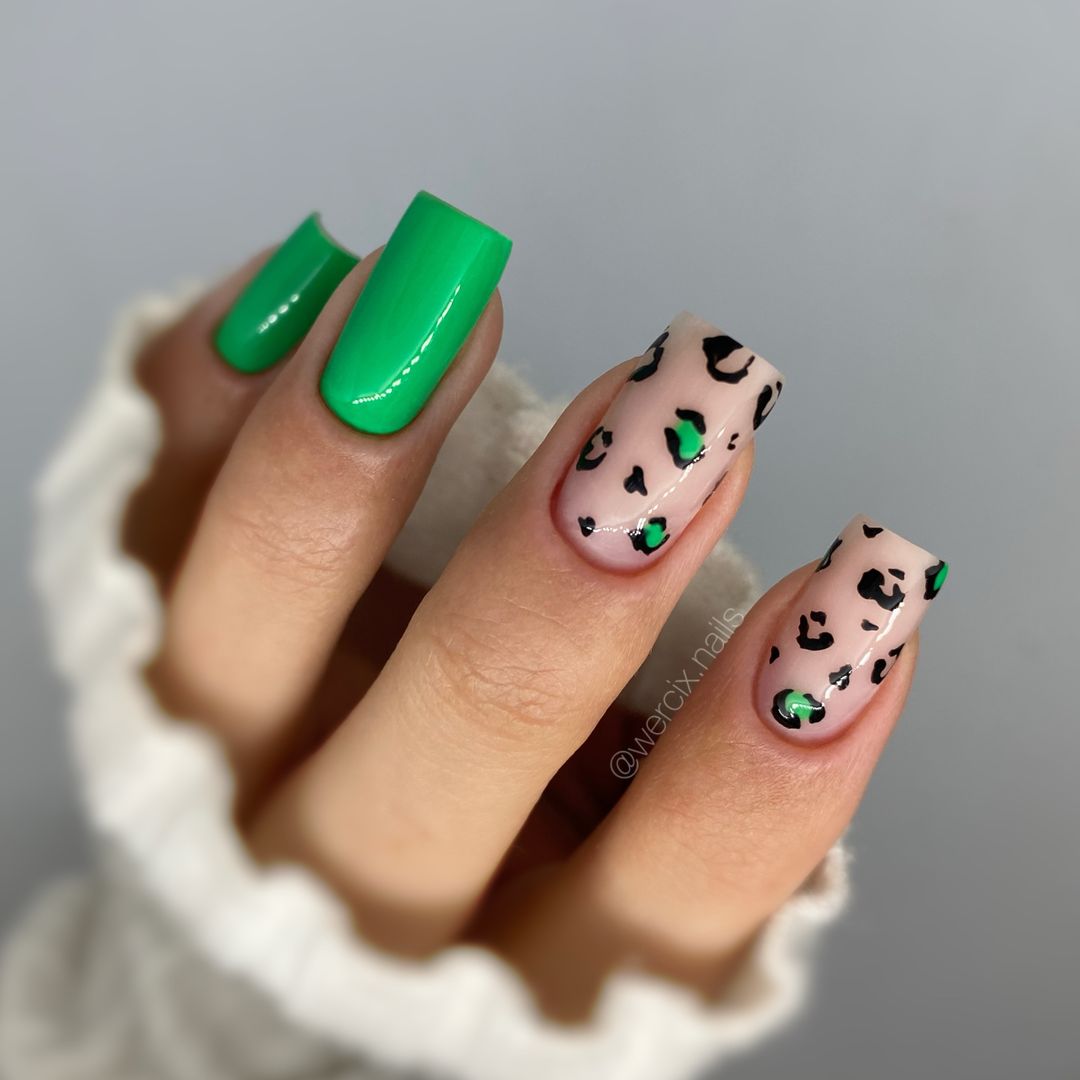
-
- Bright green nail polish (e.g., OPI “I’m So Swamped”)
- Black and white nail polishes for leopard spots
- Clear top coat
- Base coat
- Fine brush or dotting tool for creating leopard print
Application Tips:
-
- Apply a base coat to protect your nails.
- Paint some nails with bright green polish and others with a nude base for the leopard print.
- Use a fine brush or dotting tool to create black and white leopard spots on the nude base.
- Finish with a clear top coat to seal the design and add shine.
Save Pin
Shimmering Green Chrome
The shimmering green chrome nails are perfect for a luxurious and futuristic look. The metallic finish catches the light beautifully, making your nails sparkle with every movement. The almond shape adds a touch of elegance, making this design ideal for both everyday wear and special occasions.
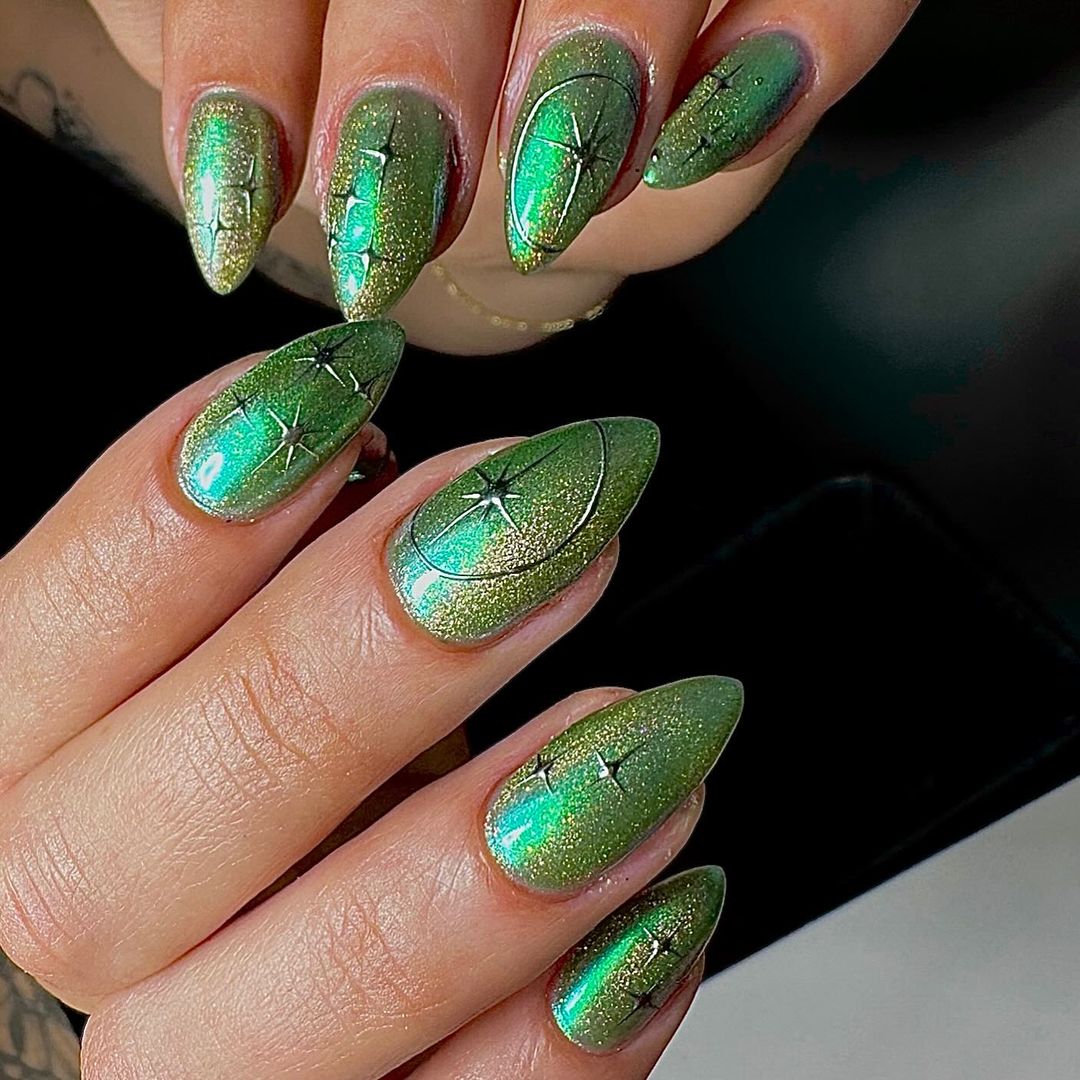
-
- Green chrome powder (e.g., Born Pretty Green Chrome Powder)
- Gel base coat
- Gel top coat
- UV/LED lamp for curing
Application Tips:
-
- Apply a gel base coat and cure under a UV/LED lamp.
- Rub the green chrome powder onto the nails until you achieve a smooth metallic finish.
- Apply a gel top coat and cure under the UV/LED lamp.
- Wipe with alcohol to remove any excess powder and enhance the shine.
Green Flames and Embellishments
This design features striking green flames and embellishments on a long stiletto nail shape. The dramatic flames create a bold and edgy look, while the rhinestones add a touch of glamour. Perfect for those who love to make a statement with their nails, this design is sure to turn heads.
-
- Green nail polish (e.g., OPI “Green Come True”)
- White nail polish for flames
- Rhinestones and nail glue
- Clear top coat
- Base coat
- Fine brush for flame design
Application Tips:
-
- Apply a base coat to protect your nails.
- Paint the nails with green polish.
- Use a fine brush to draw white flames over the green base.
- Apply rhinestones with nail glue for added embellishment.
- Finish with a clear top coat to seal the design and add shine.
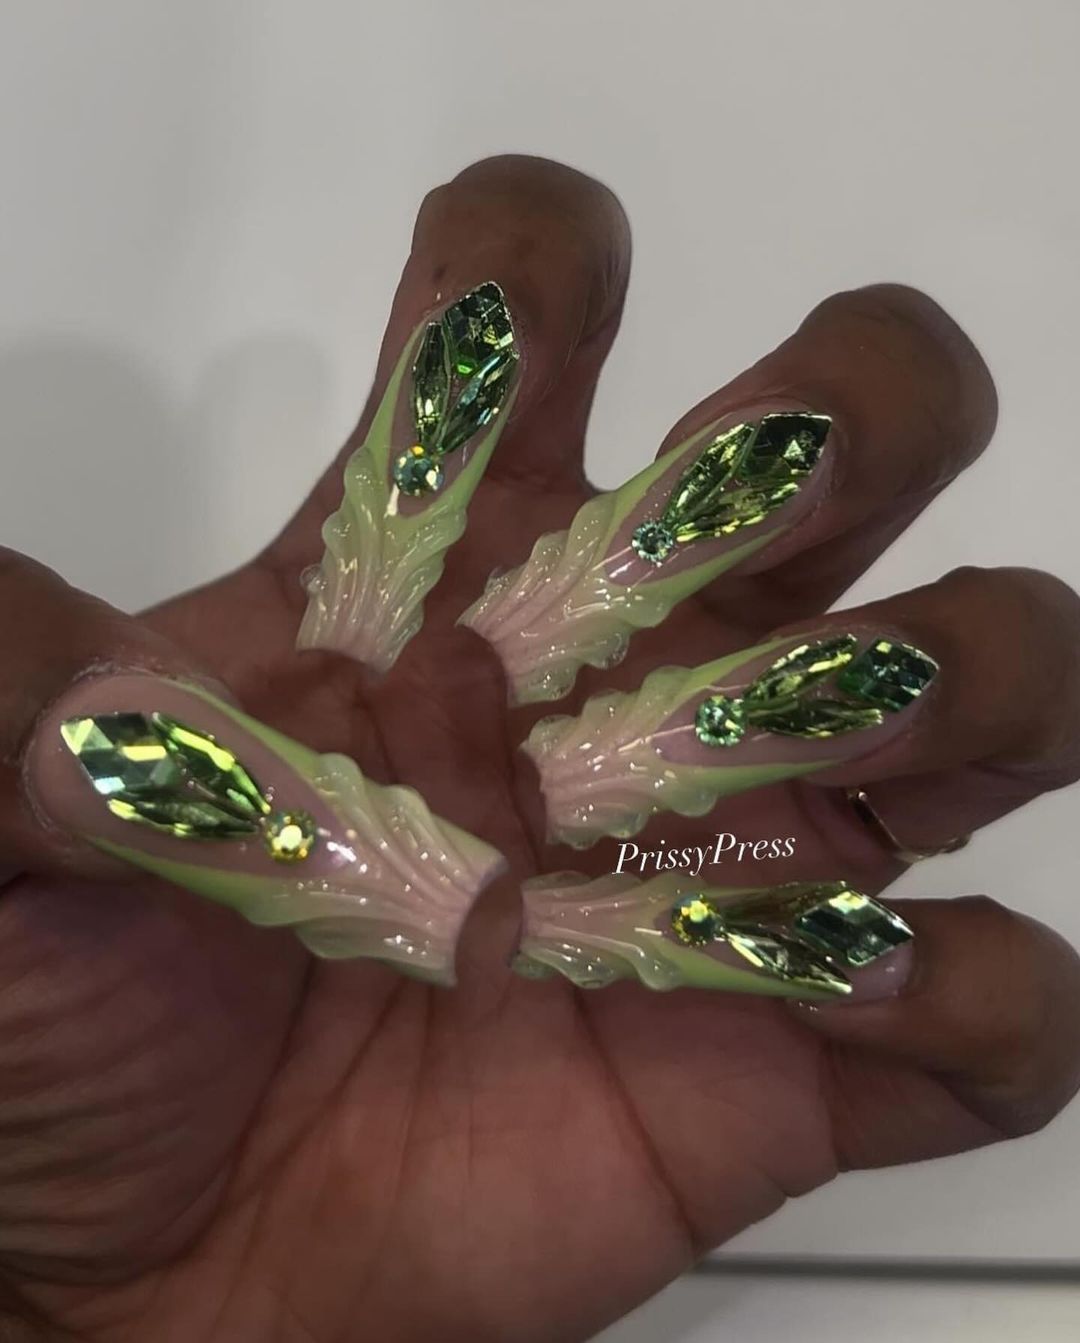
Textured Green Gems
These textured green gem nails are all about luxury and extravagance. The 3D green gems create a stunning and unique look that’s perfect for special occasions. The intricate design and the glossy finish make these nails a true work of art, ideal for anyone who loves detailed and ornate manicures.
-
- Nude or clear base nail polish
- Green rhinestones or gems
- Nail glue
- Clear top coat
- Base coat
Application Tips:
-
- Apply a base coat to protect your nails.
- Paint the nails with a nude or clear base polish.
- Apply green rhinestones or gems using nail glue in a desired pattern.
- Finish with a clear top coat to secure the gems and add a glossy finish.
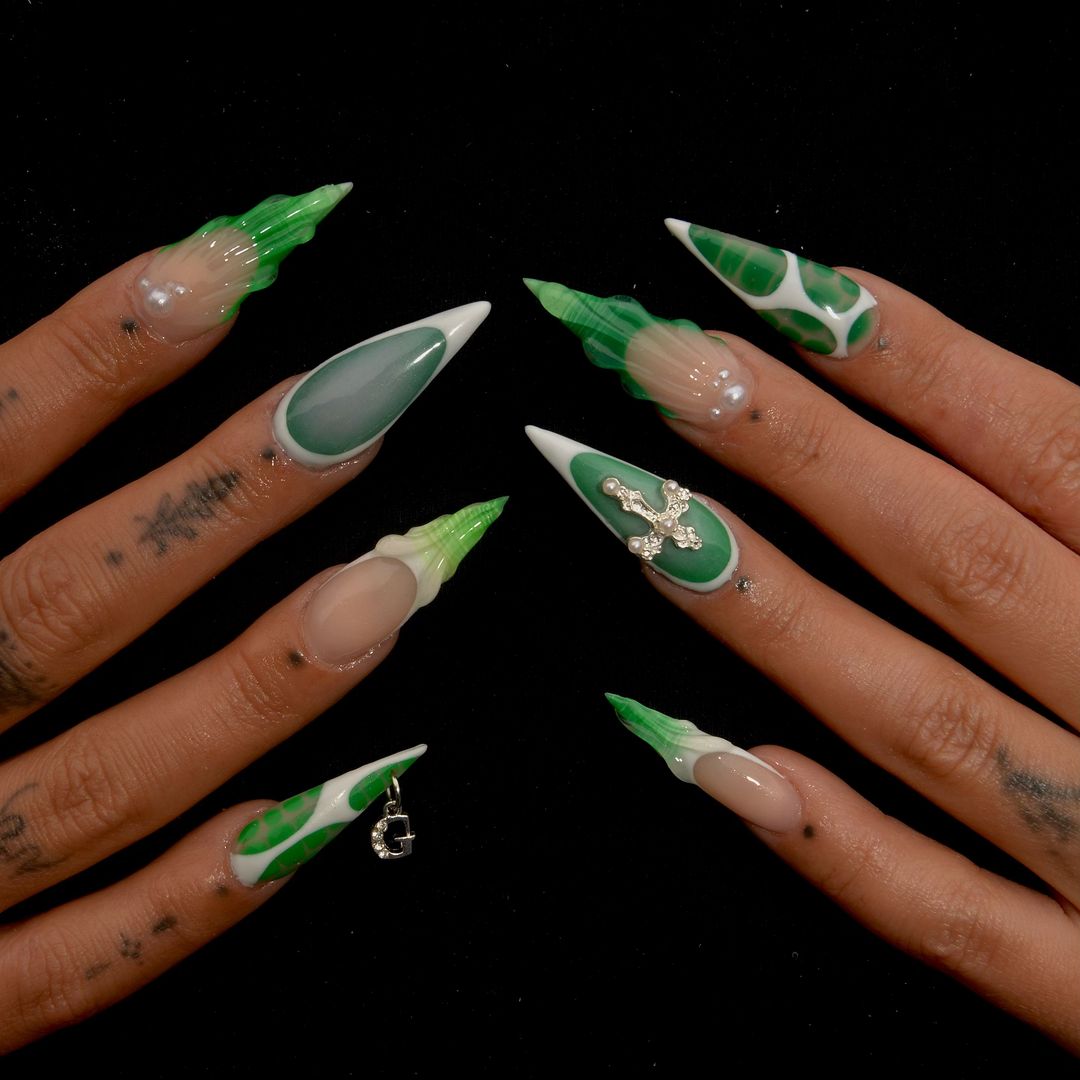
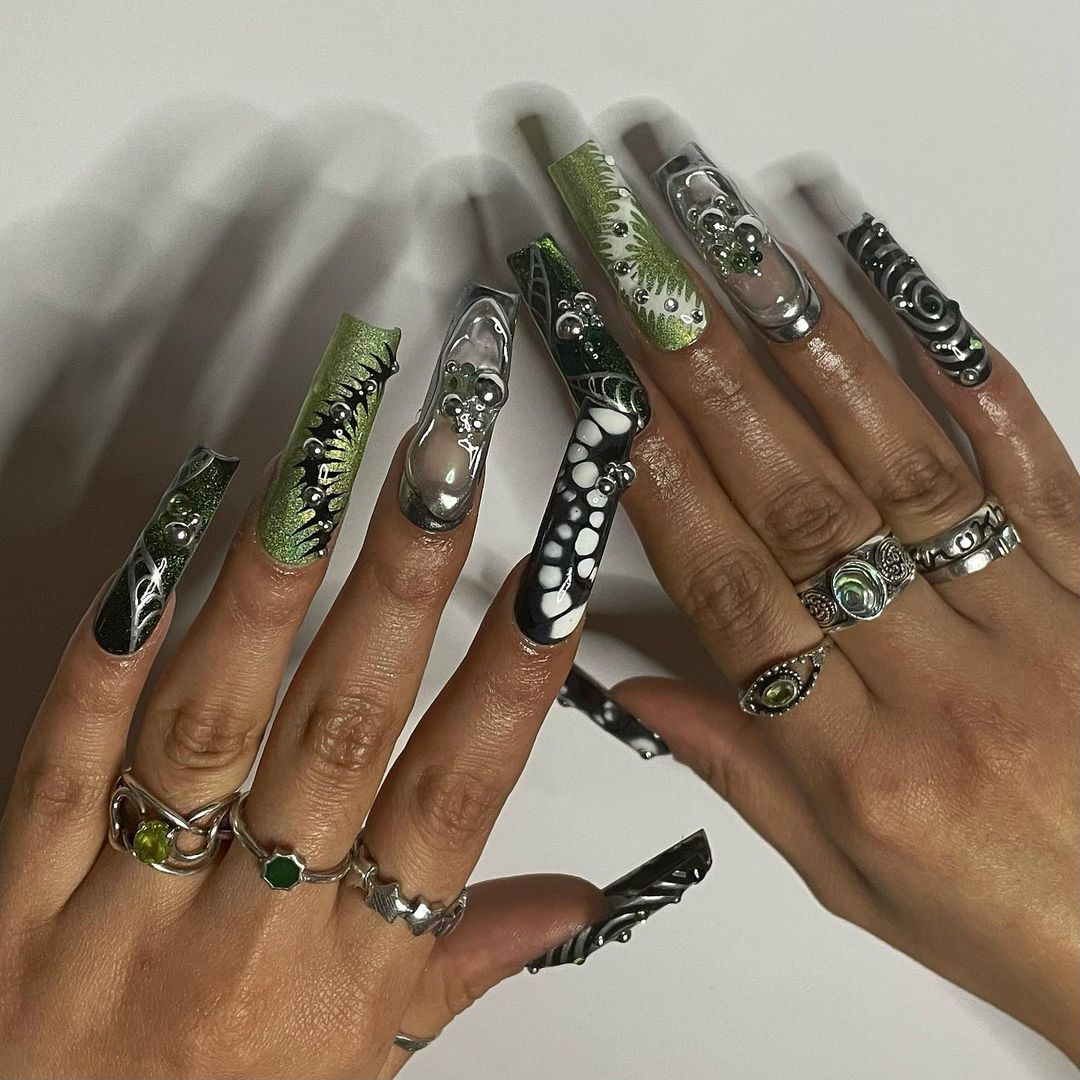
Futuristic Green and Black Fantasy
This nail design is a blend of futuristic and fantasy elements with a combination of green, black, and metallic accents. The elongated coffin shape adds drama, while the intricate details such as pearls, gems, and abstract patterns make these nails a work of art. The different textures and finishes create a visually captivating look that’s perfect for those who want to push the boundaries of nail art.
-
- Green nail polish (e.g., Essie “Tropical Lights”)
- Black nail polish (e.g., OPI “Black Onyx”)
- Silver metallic polish
- Pearls and gems
- Nail glue
- Fine brush for detailed designs
- Clear top coat
- Base coat
Application Tips:
-
- Start with a base coat to protect your nails.
- Apply green polish to some nails and black to others.
- Use a fine brush to create detailed patterns with silver metallic polish.
- Add pearls and gems using nail glue for a 3D effect.
- Seal with a clear top coat to protect the design and add shine.
Psychedelic Swirls
These nails feature a psychedelic swirl design in green and white, creating a mesmerizing and vibrant look. The long coffin shape adds elegance, while the swirling patterns give a playful and artistic feel. This design is perfect for those who love bold and eye-catching nails.
-
- Green nail polish (e.g., Sally Hansen “In the Groove”)
- White nail polish (e.g., OPI “Alpine Snow”)
- Clear top coat
- Base coat
- Nail art brush or toothpick for swirling effect
Application Tips:
-
- Apply a base coat to protect your nails.
- Paint the nails with white polish and let it dry.
- Apply green polish in random spots and use a brush or toothpick to create swirls.
- Finish with a clear top coat to seal the design and add a glossy finish.
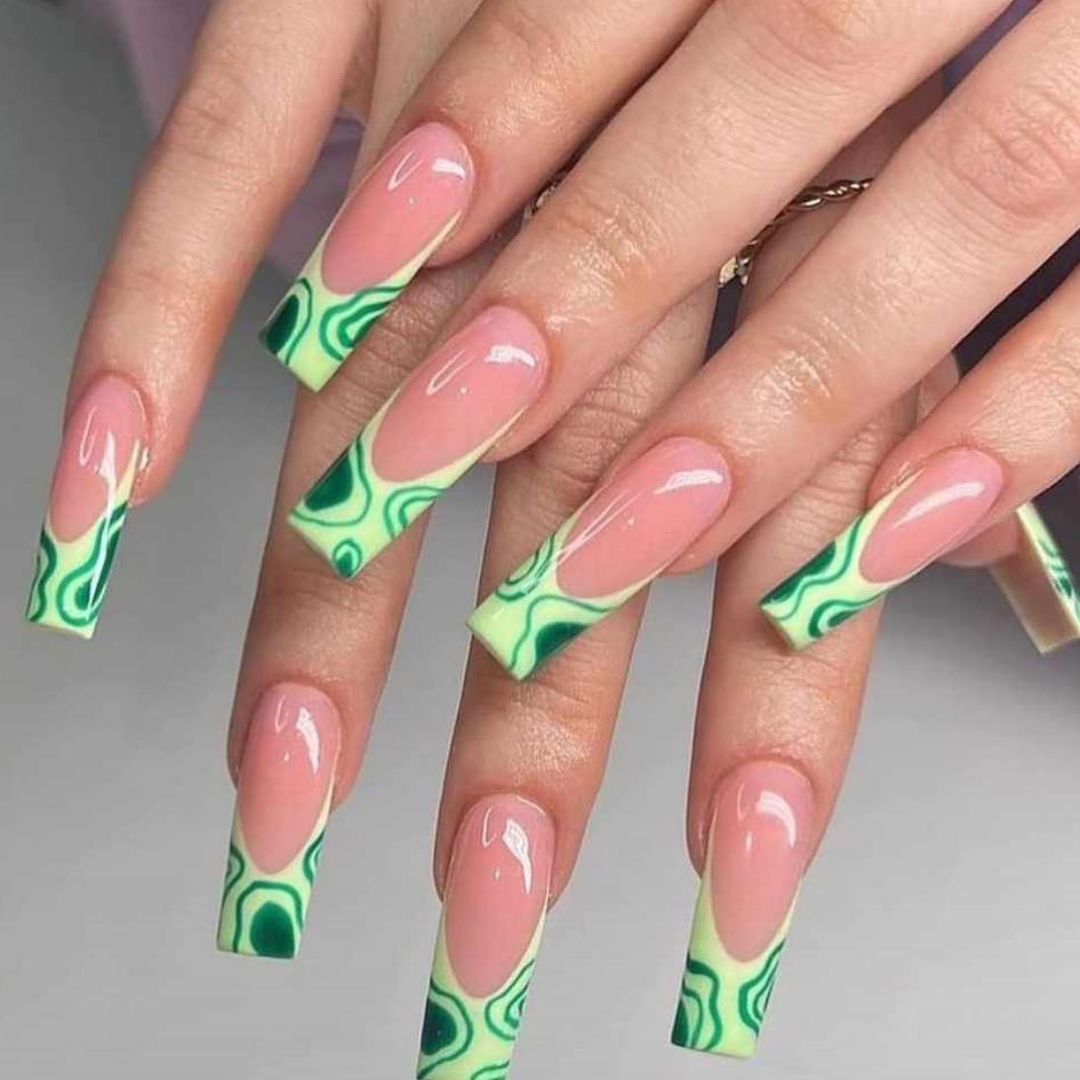
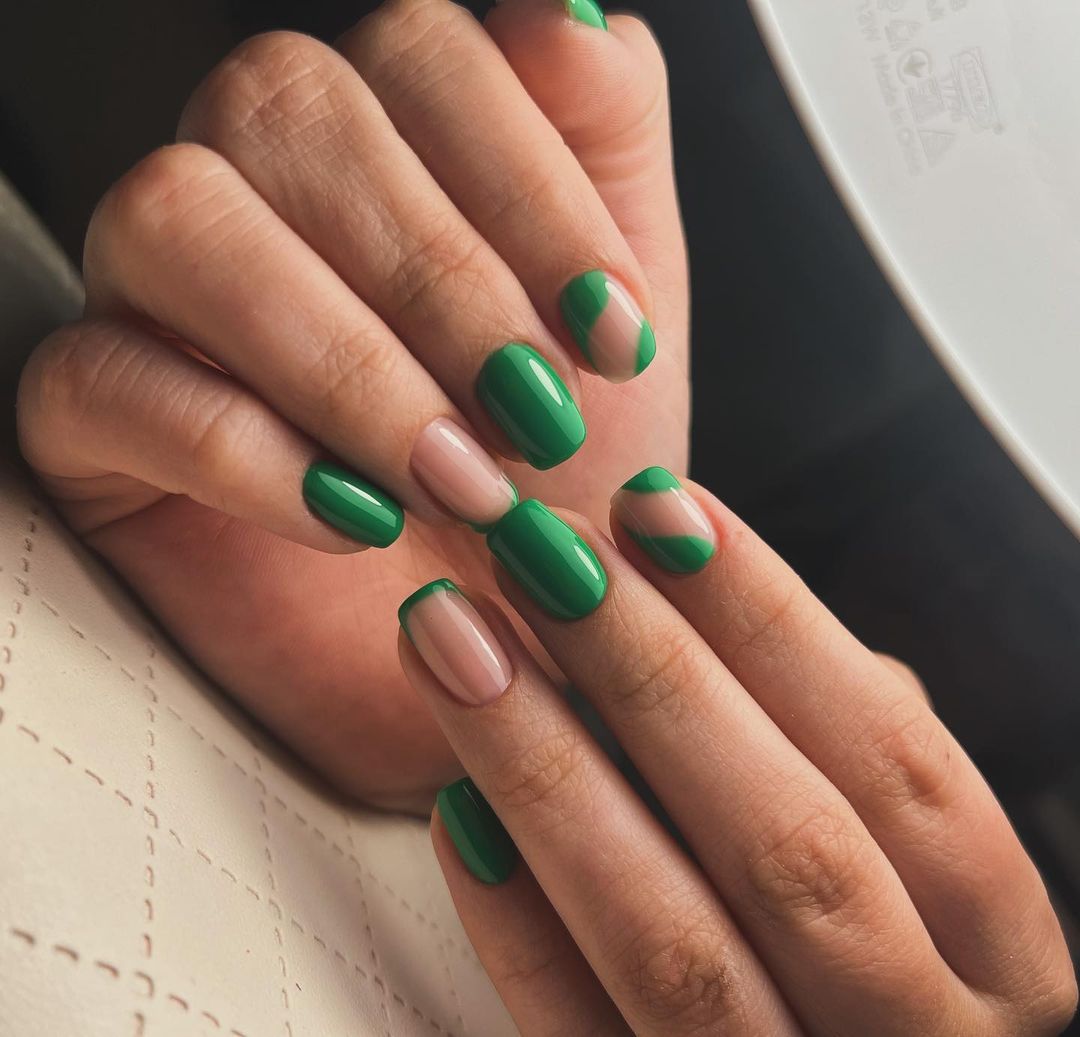
Modern Green French Tips
This modern take on the French tip features bold green polish with a nude base, creating a fresh and stylish look. The short square shape makes it perfect for everyday wear while still being trendy and chic. This simple yet elegant design is ideal for those who love minimalist nail art with a twist.
-
- Green nail polish (e.g., OPI “I’m So Swamped”)
- Nude base coat
- Clear top coat
- Base coat
- Nail tape for sharp lines
Application Tips:
-
- Apply a base coat to protect your nails.
- Use nail tape to section off the tips and paint with green polish.
- Remove the tape carefully to reveal clean lines.
- Finish with a clear top coat to protect the design and add shine.
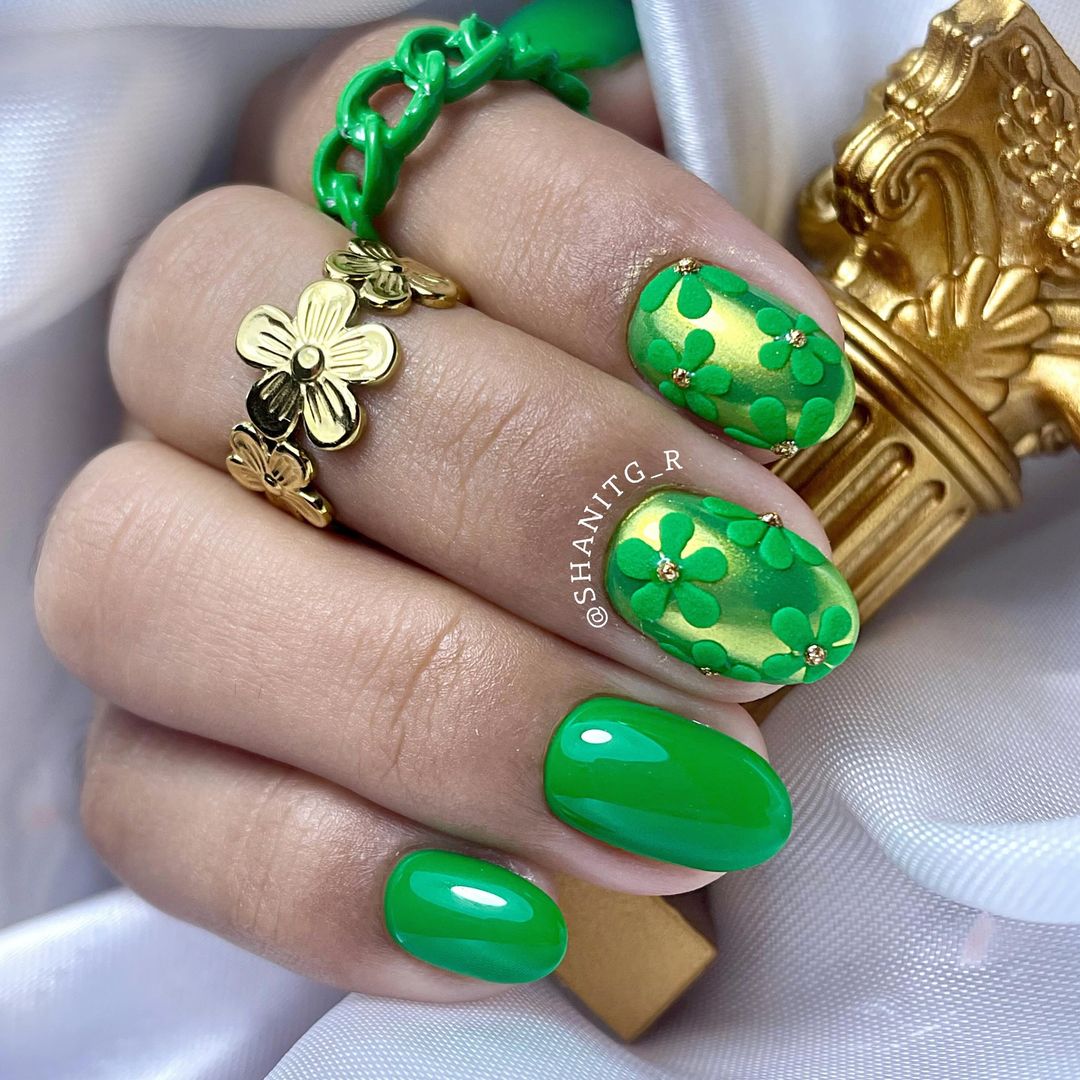
Green Floral Delight
These nails feature a delightful green floral design with gold accents, creating a whimsical and elegant look. The combination of matte and glossy finishes adds depth and interest, making this design perfect for those who love detailed and artistic nail art. The almond shape enhances the feminine and delicate feel of the design.
-
- Green nail polish (e.g., Essie “Mojito Madness”)
- Gold nail polish (e.g., Sally Hansen “Golden-I”)
- Clear top coat
- Base coat
- Fine brush for floral design
Application Tips:
-
- Apply a base coat to protect your nails.
- Paint the nails with green polish.
- Use a fine brush to draw floral patterns with gold polish.
- Finish with a clear top coat to protect the design and add a glossy finish.
Classic Green Elegance
This classic green nail design features a rich, solid green color that exudes elegance and sophistication. The almond shape adds a touch of femininity and elongates the fingers, making this design perfect for any occasion. The glossy finish enhances the richness of the green polish, creating a timeless and chic look.

-
- Green nail polish (e.g., OPI “Stay Off the Lawn”)
- Clear top coat
- Base coat
Application Tips:
-
- Apply a base coat to protect your nails.
- Paint the nails with green polish and let it dry completely.
- Finish with a clear top coat to seal the design and add a glossy finish.
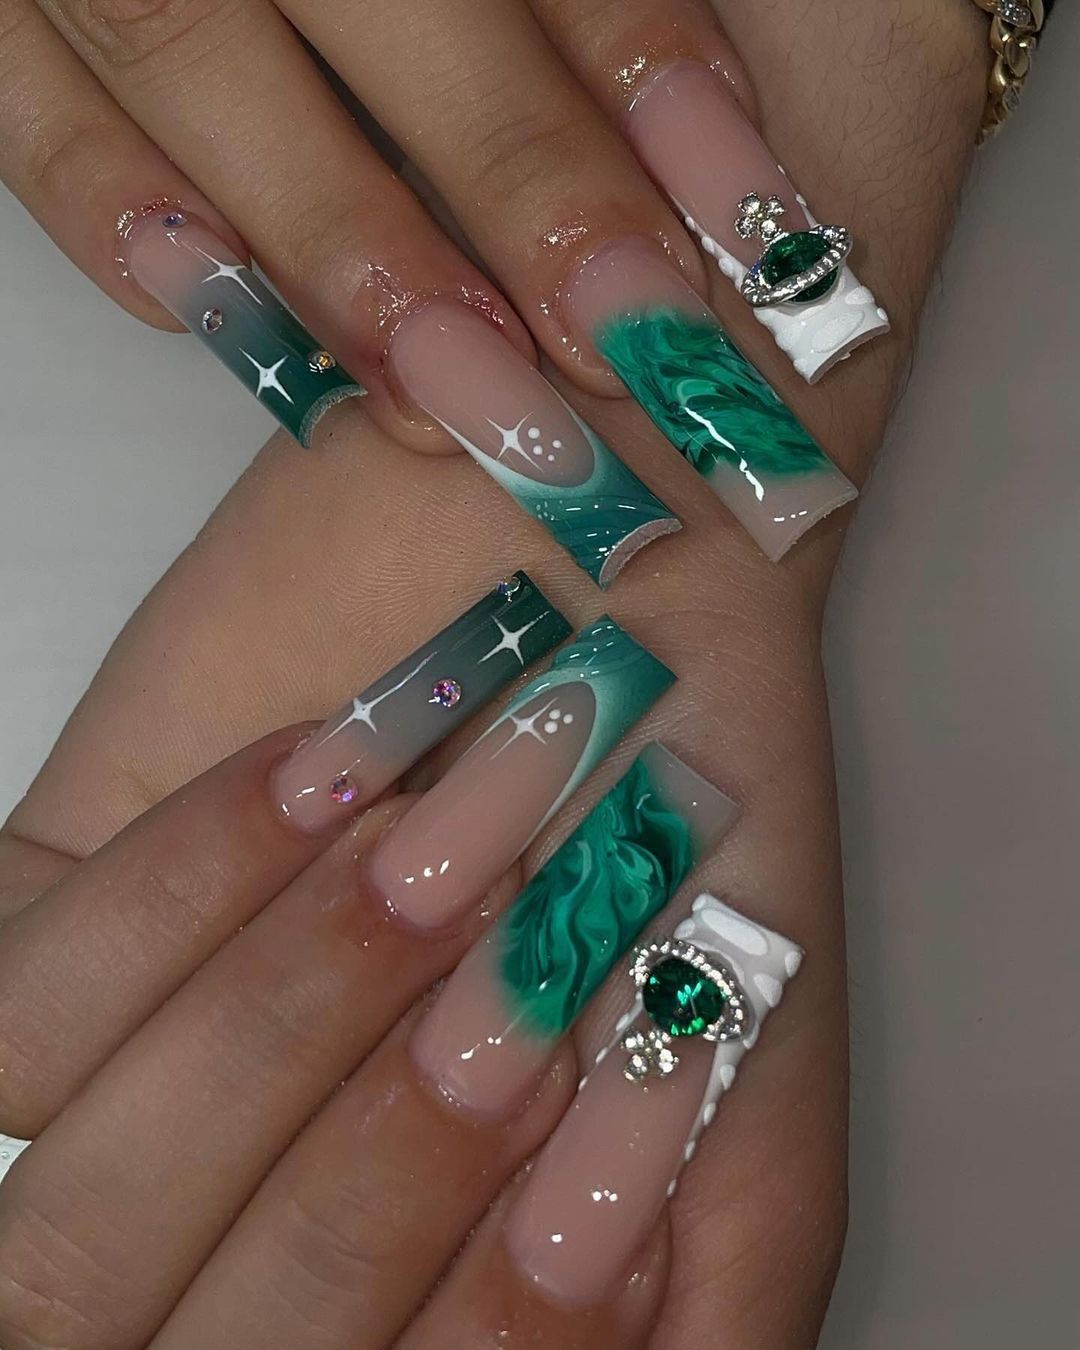
Emerald Swirl Extravaganza
This extravagant design features emerald green swirls with white accents and gem embellishments. The long coffin shape adds drama, while the detailed patterns and rhinestones create a luxurious and eye-catching look. Perfect for those who love intricate nail art and want to make a statement.
-
- Emerald green nail polish (e.g., OPI “Emerald Illusion”)
- White nail polish (e.g., Essie “Blanc”)
- Rhinestones and nail glue
- Clear top coat
- Base coat
- Fine brush for detailed designs
Application Tips:
-
- Apply a base coat to protect your nails.
- Paint the nails with emerald green polish.
- Use a fine brush to create white swirl patterns over the green base.
- Apply rhinestones with nail glue for added embellishment.
- Finish with a clear top coat to seal the design and add shine.
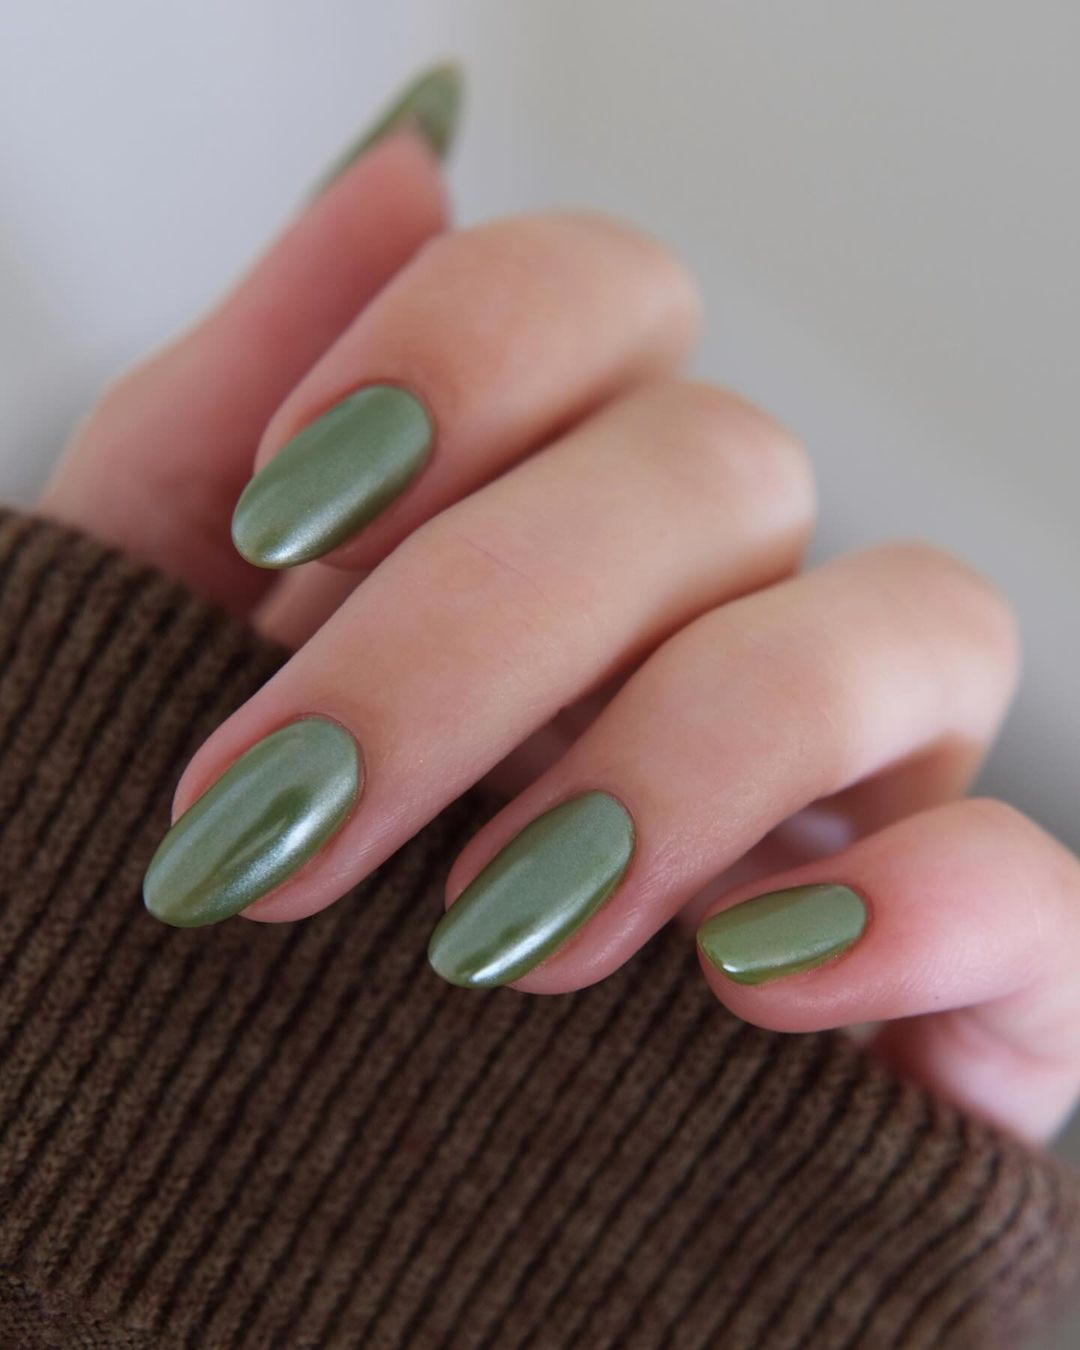
Satin Olive Elegance
This design features a satin olive green finish that exudes subtle elegance and sophistication. The soft sheen of the satin finish provides a chic and refined look, perfect for both everyday wear and special occasions. The almond shape enhances the overall graceful appearance, making these nails a timeless choice.
-
- Olive green nail polish (e.g., OPI “Olive for Green”)
- Satin top coat
- Base coat
Application Tips:
-
- Start with a base coat to protect your nails.
- Apply two coats of olive green polish, allowing each layer to dry completely.
- Finish with a satin top coat to achieve the soft, elegant sheen.
Neon Green Flames
For a bold and striking look, these neon green flames are a perfect choice. The vibrant green color stands out against the natural nail base, creating a fiery and eye-catching design. The almond shape adds a touch of elegance to the otherwise daring look, making these nails perfect for those who love to make a statement.

-
- Neon green nail polish (e.g., China Glaze “In the Limelight”)
- Clear base coat
- Clear top coat
- Fine brush for flame design
Application Tips:
-
- Apply a base coat to protect your nails.
- Paint the nails with a clear base to keep the natural look.
- Use a fine brush to draw neon green flames starting from the tips towards the middle of the nails.
- Seal with a clear top coat to protect the design and add shine.
Deep Forest Green
The deep forest green nails are a classic and sophisticated choice. The rich green color is both timeless and versatile, making it perfect for any season. The almond shape adds elegance and elongates the fingers, enhancing the overall look.

-
- Deep forest green nail polish (e.g., Essie “Off Tropic”)
- Clear top coat
- Base coat
Application Tips:
-
- Apply a base coat to protect your nails.
- Apply two coats of deep forest green polish, letting each coat dry completely.
- Finish with a clear top coat to seal the design and add a glossy finish.
Teal and Gold Sunburst
This teal and gold sunburst design is perfect for those who love a bit of glam with their nails. The teal base color is complemented by the gold sunburst details, creating a striking and stylish look. The almond shape adds to the elegance, making this design suitable for both casual and formal occasions.
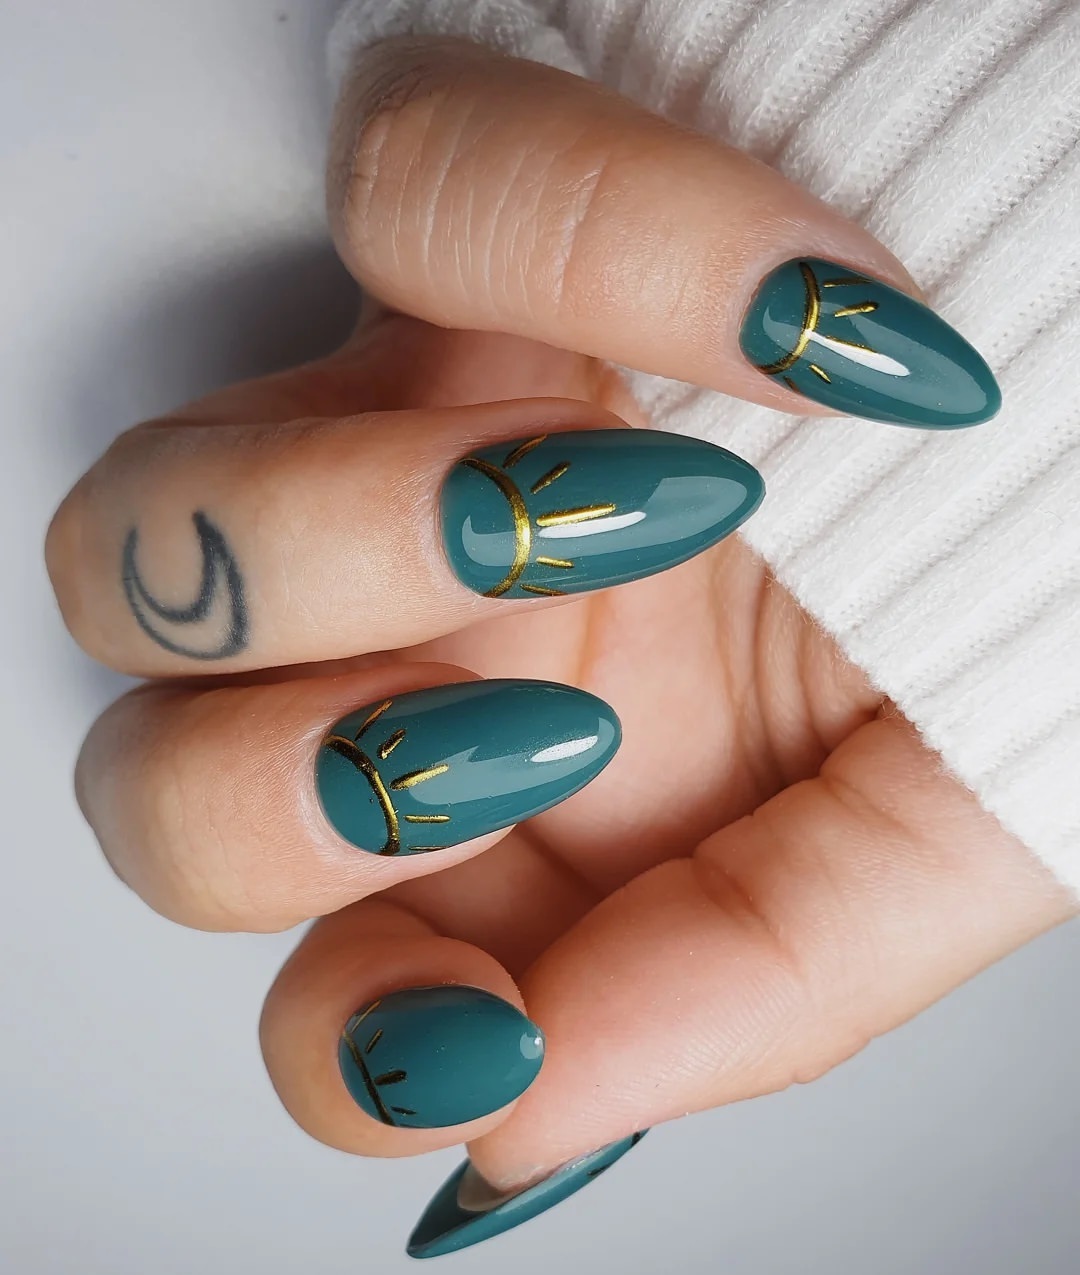
-
- Teal nail polish (e.g., OPI “Teal the Cows Come Home”)
- Gold nail polish (e.g., Sally Hansen “Golden-I”)
- Clear top coat
- Base coat
- Fine brush for sunburst design
Application Tips:
-
- Apply a base coat to protect your nails.
- Paint the nails with teal polish.
- Use a fine brush to draw gold sunburst details near the cuticle area.
- Finish with a clear top coat to seal the design and add a glossy finish.
Classic Glossy Green
This classic glossy green manicure is both timeless and elegant. The rich green color, combined with a high-gloss finish, makes this design a staple for any season. The almond shape adds a touch of sophistication, making it perfect for both everyday wear and special occasions.
-
- Green nail polish (e.g., OPI “Stay Off the Lawn”)
- Clear top coat
- Base coat
Application Tips:
-
- Apply a base coat to protect your nails.
- Apply two coats of green polish, allowing each layer to dry completely.
- Finish with a clear top coat to achieve a high-gloss finish.
Pearlescent Beige
For a subtle and elegant look, these pearlescent beige nails are perfect. The soft beige color with a pearlescent finish adds a touch of sophistication and class. The almond shape enhances the delicate and feminine feel, making this design ideal for any occasion.
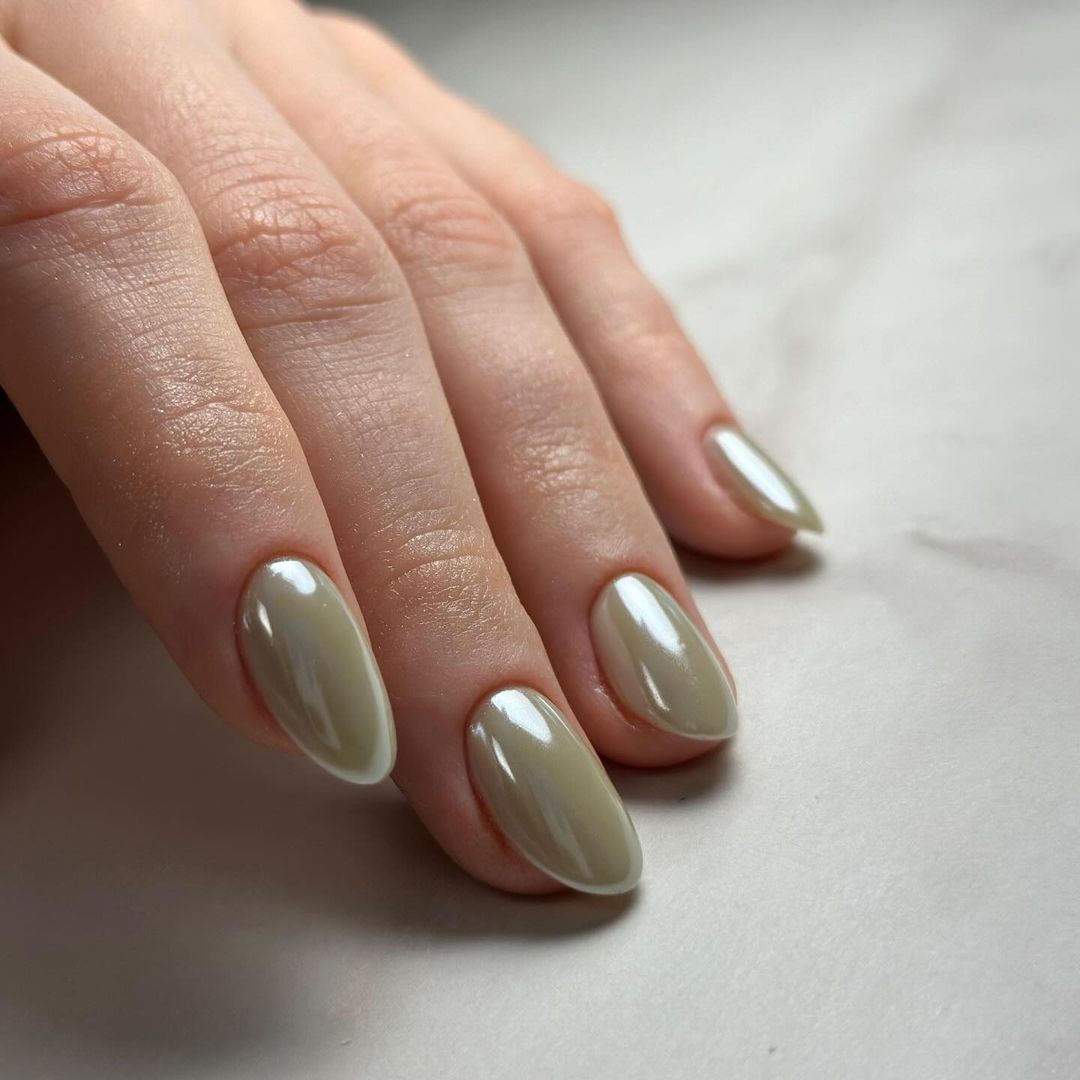
-
- Pearlescent beige nail polish (e.g., Essie “Pearl Perfection”)
- Clear top coat
- Base coat
Application Tips:
-
- Apply a base coat to protect your nails.
- Apply two coats of pearlescent beige polish, letting each coat dry completely.
- Finish with a clear top coat to seal the design and add a pearlescent finish.
Glossy Olive Green Nails
These glossy olive green nails are the epitome of elegance and simplicity. The rich olive color is accentuated by a high-gloss finish, making the nails look sleek and sophisticated. This classic design is perfect for those who prefer a minimalist yet polished look. The short, rounded shape adds to the overall neat appearance, making it suitable for everyday wear.
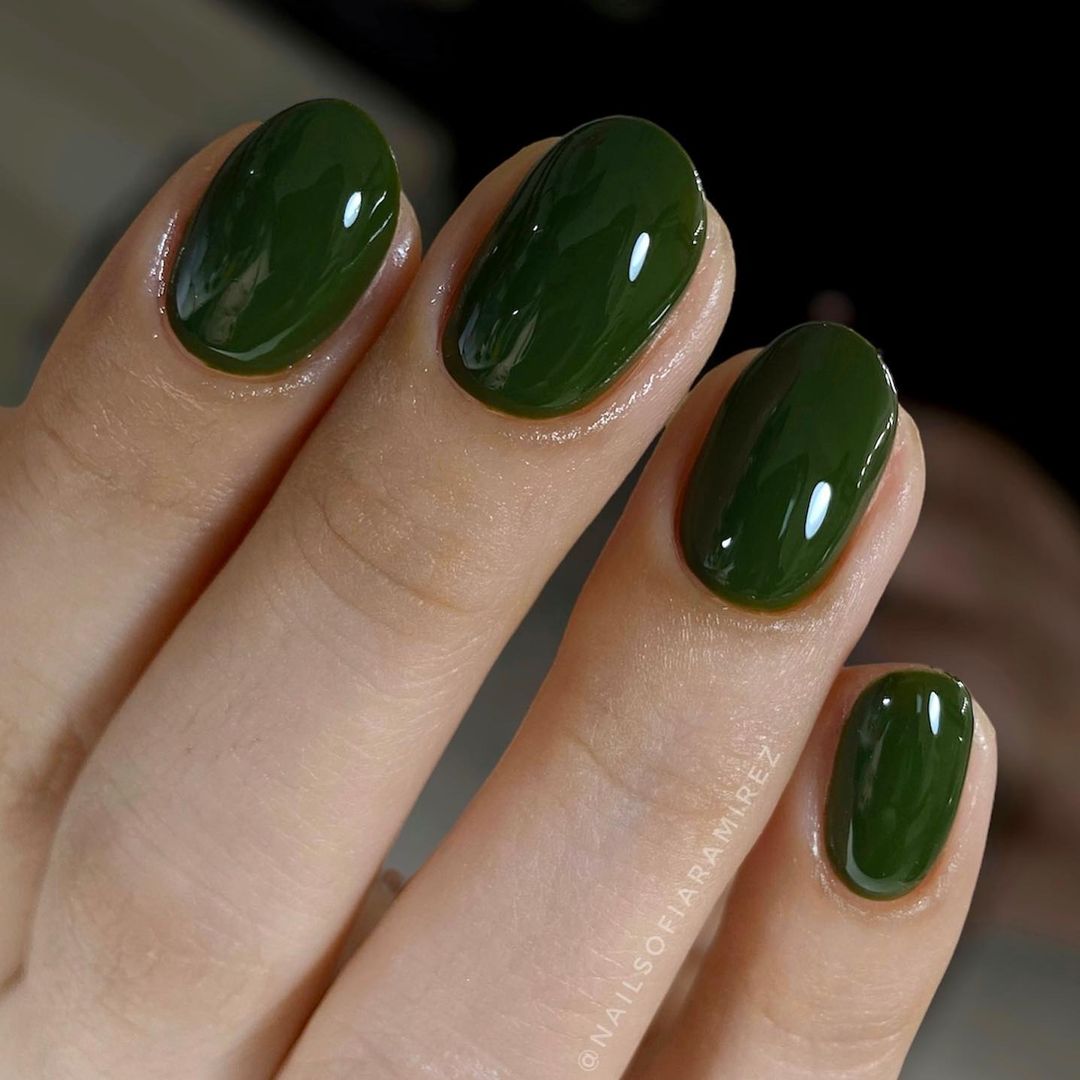
-
- Olive green nail polish (e.g., OPI “Olive for Green”)
- Clear top coat
- Base coat
Application Tips:
-
- Apply a base coat to protect your nails.
- Apply two coats of olive green polish, allowing each layer to dry completely.
- Finish with a clear top coat to achieve a high-gloss finish.
3D Green Metallic Drops
This innovative design features 3D green metallic drops on a nude base, creating a unique and artistic look. The raised drops add texture and dimension, making these nails a true statement piece. The combination of the metallic green with the natural base is both striking and stylish, perfect for those who love creative nail art.
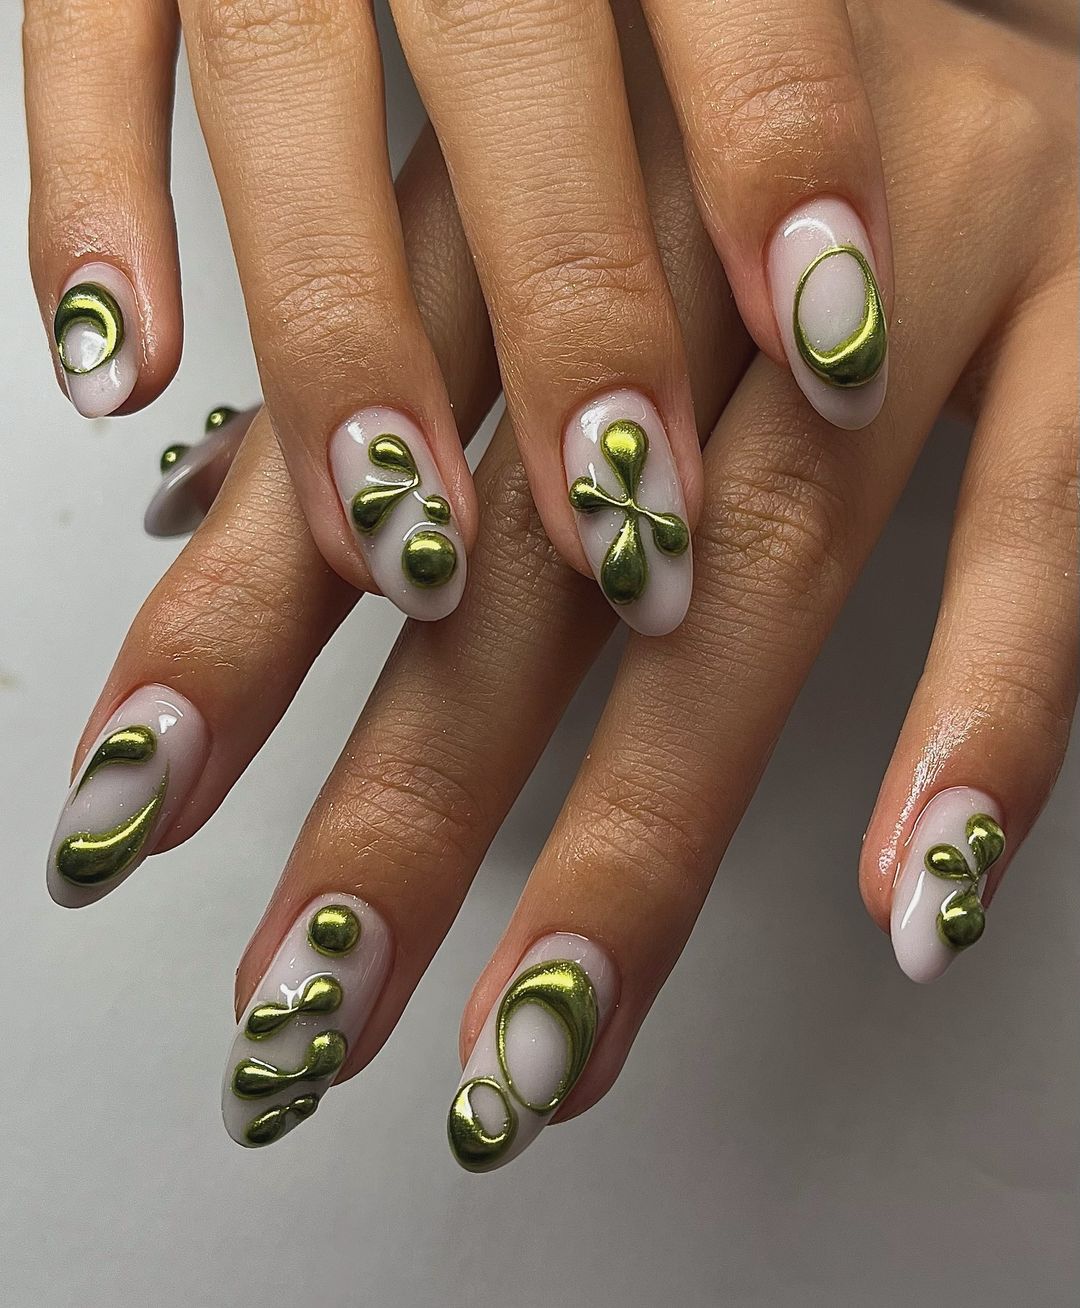
-
- Nude base coat
- Green metallic polish (e.g., Essie “Trophy Wife”)
- Nail art gel for 3D effect
- UV/LED lamp for curing
- Clear top coat
Application Tips:
-
- Apply a nude base coat and cure under a UV/LED lamp.
- Use a nail art gel to create raised drops and cure under the lamp.
- Paint the drops with green metallic polish.
- Finish with a clear top coat to protect the design.
Olive Green and Floral Accents
These nails combine solid olive green with delicate floral accents, creating a balanced and charming look. The olive green adds a touch of sophistication, while the floral designs bring a hint of whimsy. The almond shape enhances the overall feminine and elegant feel, making this design perfect for both casual and formal occasions.
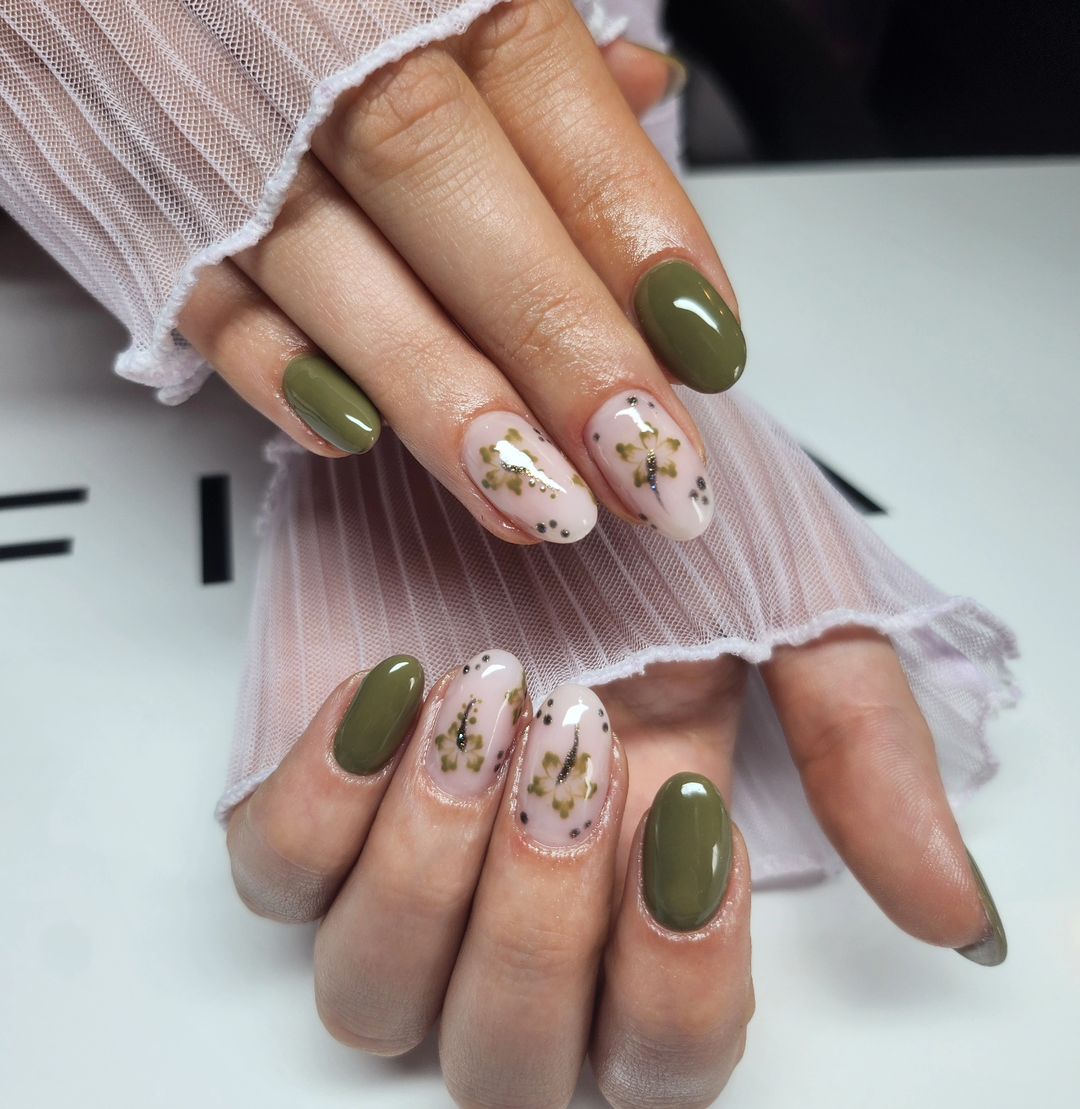
-
- Olive green nail polish (e.g., Sally Hansen “Basil Beauty”)
- Nude base coat for floral nails
- Floral nail stickers or fine brush for hand-drawn designs
- Clear top coat
- Base coat
Application Tips:
-
- Apply a base coat to protect your nails.
- Paint some nails with olive green polish and others with a nude base.
- Apply floral stickers or use a fine brush to draw floral designs on the nude base.
- Finish with a clear top coat to seal the design and add shine.
Green Floral Nail Art
This cute nail design features simple green floral patterns on a clear base, creating a fresh and playful look. The small flowers are adorned with tiny rhinestones at their centers, adding a touch of sparkle. This design is perfect for short nails, offering a charming and understated elegance.
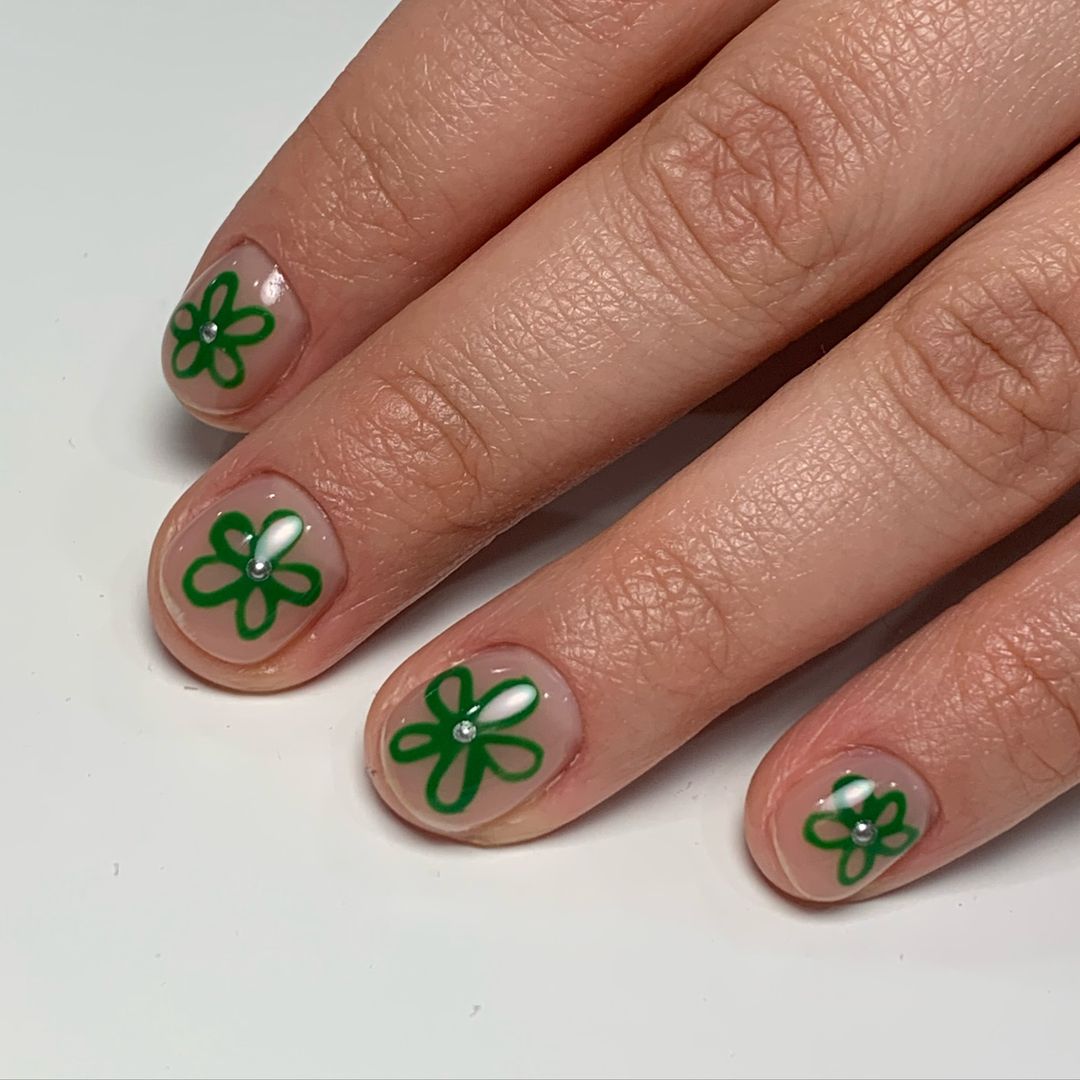
-
- Clear base coat
- Green nail polish (e.g., OPI “I’m So Swamped”)
- Tiny rhinestones
- Nail glue
- Clear top coat
- Fine brush for floral designs
Application Tips:
-
- Apply a clear base coat to protect your nails.
- Use a fine brush to draw small green flowers on each nail.
- Apply tiny rhinestones at the center of each flower with nail glue.
- Finish with a clear top coat to secure the design and add shine.
Abstract Green Swirls
These abstract green swirls create a dynamic and modern look. The mix of green shades with white and yellow accents gives the design a fresh and vibrant feel. The almond shape enhances the artistic style, making these nails perfect for those who love unique and creative designs.
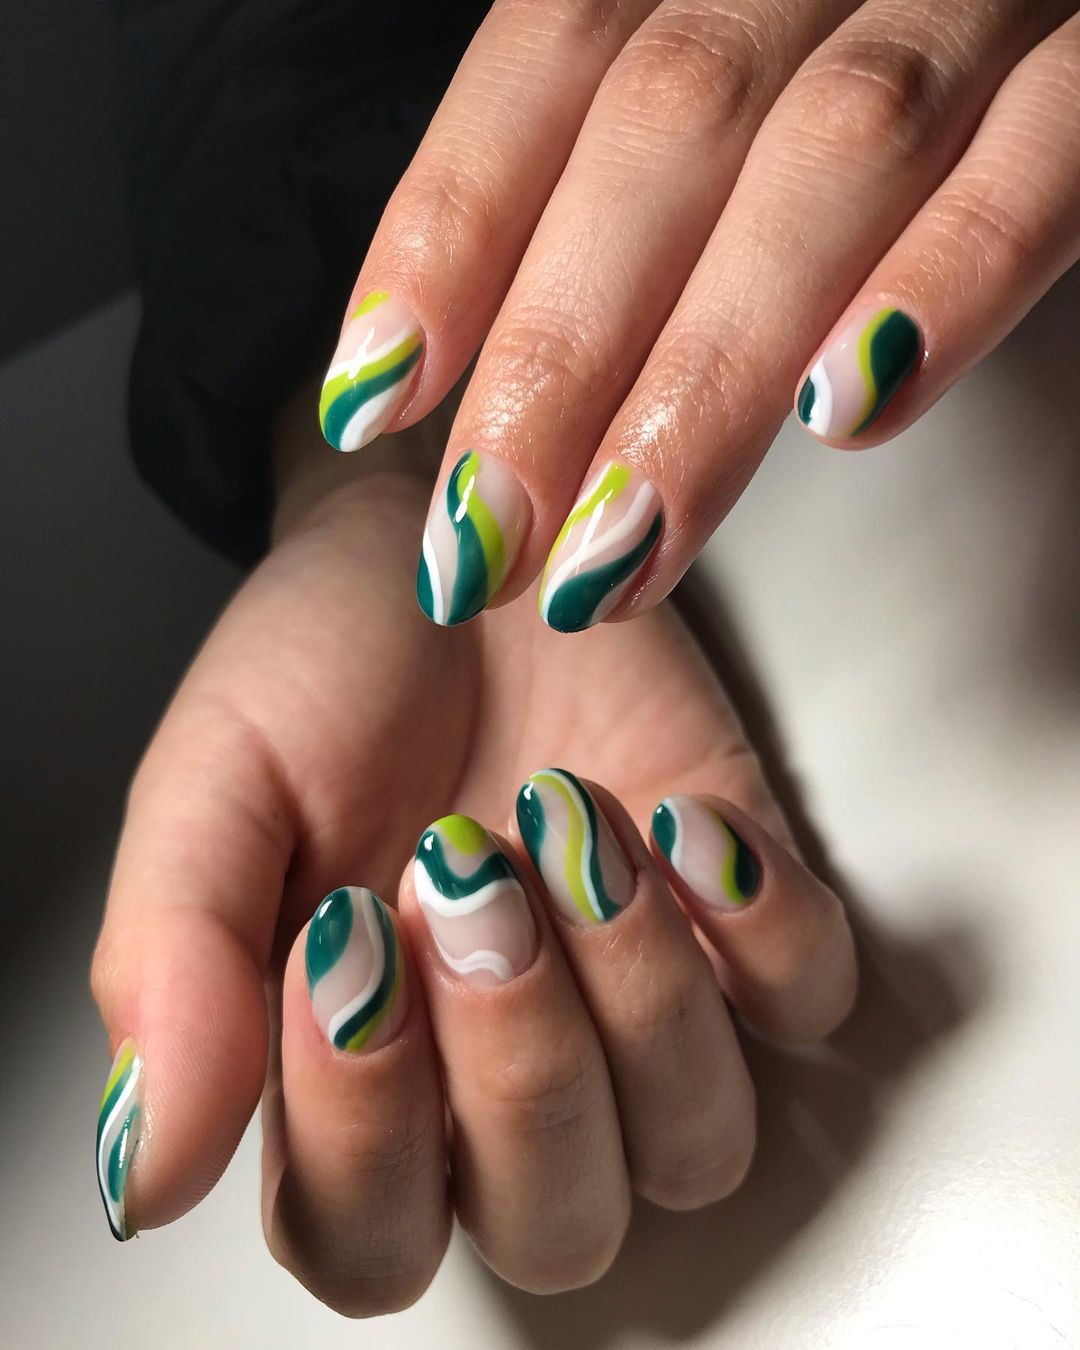
-
- Green nail polish (e.g., Essie “Tropic Like It’s Hot”)
- White nail polish (e.g., OPI “Alpine Snow”)
- Yellow nail polish (e.g., China Glaze “Lemon Fizz”)
- Clear top coat
- Base coat
- Fine brush for swirling effect
Application Tips:
-
- Apply a base coat to protect your nails.
- Paint the nails with a nude base.
- Use a fine brush to create swirling patterns with green, white, and yellow polishes.
- Finish with a clear top coat to seal the design and add a glossy finish.
FAQ
Q: What is the best way to maintain these nail designs? A: Always use a high-quality top coat to seal your design and protect against chipping. Reapply the top coat every few days to keep your nails looking fresh.
Q: Can I achieve these designs with gel polish? A: Absolutely! Gel polish can enhance the longevity of your design and give a more professional finish. Follow the same steps but cure each layer under a UV lamp.
Q: How can I remove these nail designs without damaging my nails? A: Use an acetone-based nail polish remover. Soak a cotton ball in the remover, place it on your nail, and wrap it in foil. Leave it for about 10-15 minutes before gently removing the polish.
Save Pin