Dive into Summer Vacation & Beach Nail Trends 2024: Nail Art Inspiration for Sandy Toes
Have you ever wondered how a simple change in your nails can take your summer vibe from fun to fabulous? Whether you’re sipping a cool drink by the ocean or exploring the vibrant streets of a tropical getaway, your nails are a canvas for expressing your holiday spirit. So, what are the trendiest summer vacation & beach nail 2024 ideas to complement those breezy dresses and sandy toes? Let’s dive into some stylish designs that promise to be as hot as the summer sun!
The Wave of Elegance
Elegance rides the summer wave with this delightful design. At first glance, the white backdrop with abstract black waves evokes a sense of beachy waves without being too on-the-nose. It’s a clever nod to the ocean’s timeless allure while keeping the look simple and sophisticated. This manicure whispers rather than shouts, making it a classy choice for your summer escapades.

Essentials for the Wave
- Base: Luxe White Gel Polish
- Accents: Onyx Acrylic Paint
- Top Coat: Seashine Finish Gel
- Tools: Fine Detailing Brush Professional Tip: Go for a gel polish that promises longevity and a top coat that resists the sun’s glare for an enduring holiday shine.
DIY Waves at Home
Start with a pristine white base, allowing each layer to cure under a UV lamp. Dip your detailing brush in black acrylic paint and let your hand dance across the nail to create these free-flowing waves. Seal with a glossy top coat for a manicure that’s as enduring as it is enchanting.
A Flight of Fantasy
Soaring birds captured mid-flight turn this simple design into a whimsical escape. The matte finish juxtaposed with glossy birds creates an intriguing contrast, making it an art idea that speaks of freedom and fun. Perfect for a day out in Florida or a playful evening in Jamaica, this simple gel design will carry you away.

Bird’s Eye View Kit
- Base: Soft Matte Peach Polish
- Bird Accents: Glossy White Gel
- Top Coat: Matte Finish Protector
- Tools: Precision Dotting Pen Professional Tip: Choose a matte base that won’t compete with the glossy detail for a truly natural look.
Crafting Your Avian Accent
Paint your nails with a soft peach matte polish, wait to dry, and then use a dotting pen to add white gel polish birds. Create each bird with three simple strokes: two for the wings and one for the body. Finish with a matte top coat everywhere except the birds for a multi-dimensional effect.
The Shimmer of the Sea
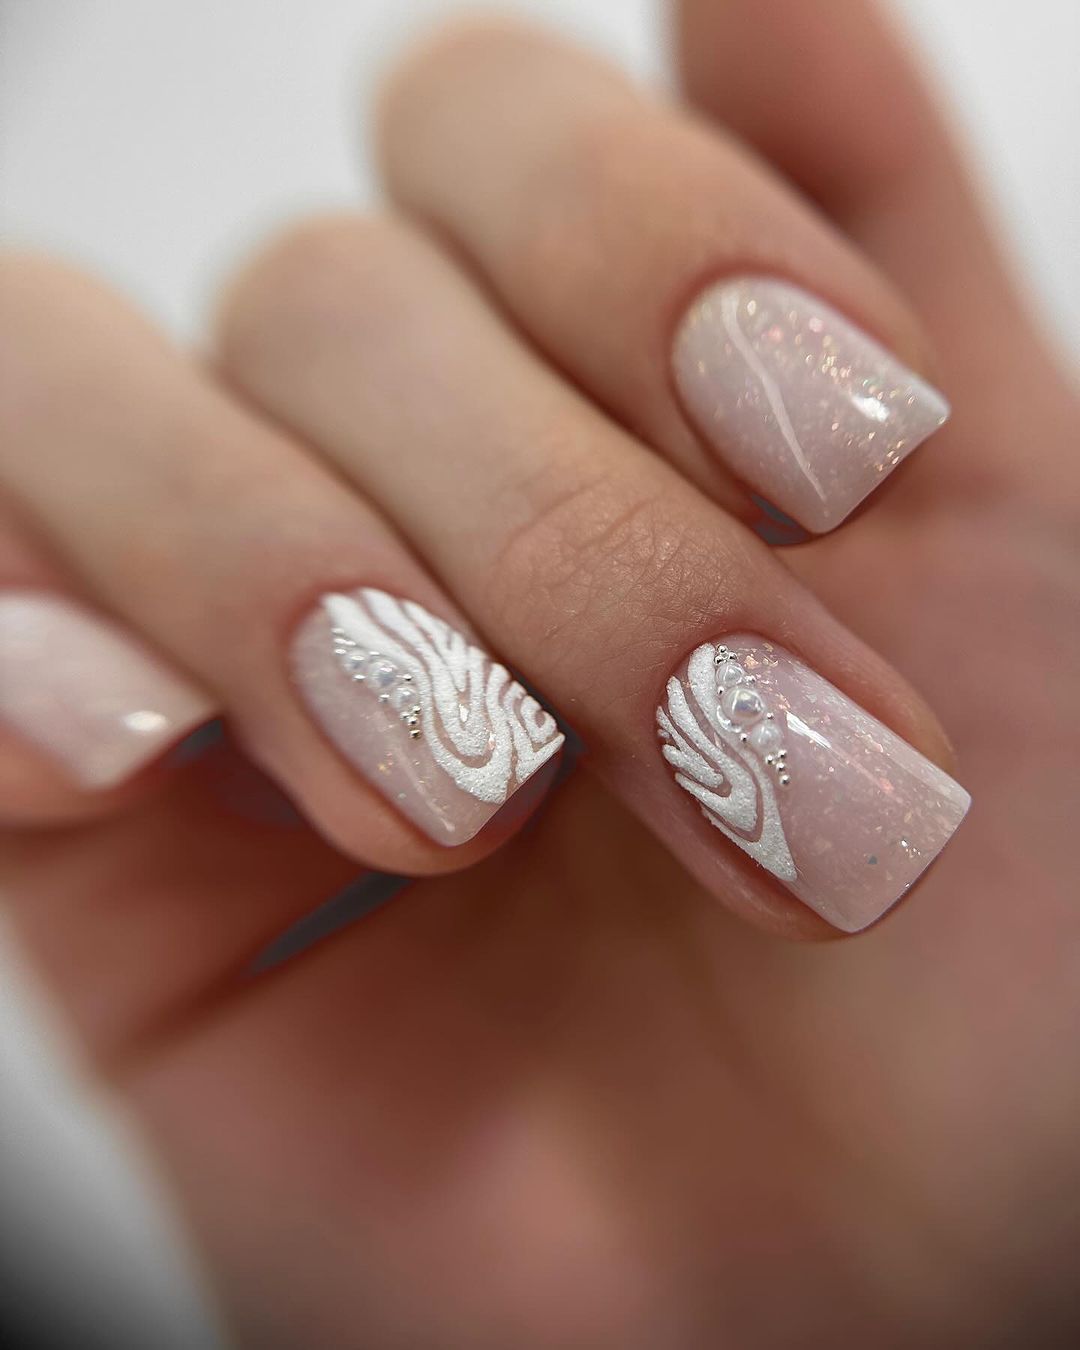
Capturing the iridescent shimmer of the sea, this nail design glints with hidden depths. The use of glitter gives it a tactile texture that’s as enticing to the touch as it is to the eye. Ideal for a moonlit walk along the beach or a day at the sea, this is a versatile look that can swing from casual to glam with ease.
Glimmering Ocean Essentials
- Base: Pearly Pink Gel Polish
- Glitter: Mermaid’s Tail Embellishment
- Top Coat: High-Gloss Finish
- Tools: Fan Brush Professional Tip: A fan brush can delicately disperse glitter for an even and enchanting tropical look.
Sea Sparkle Technique
Lay down a base of pearly pink and while still tacky, use a fan brush to sprinkle on the glitter, creating a gradient effect reminiscent of sunlight hitting the ocean. Once satisfied, apply a layer of high-gloss to seal in the magic. Now you’re ready to sparkle like the summer sea.
Gentle Whispers of the Sea
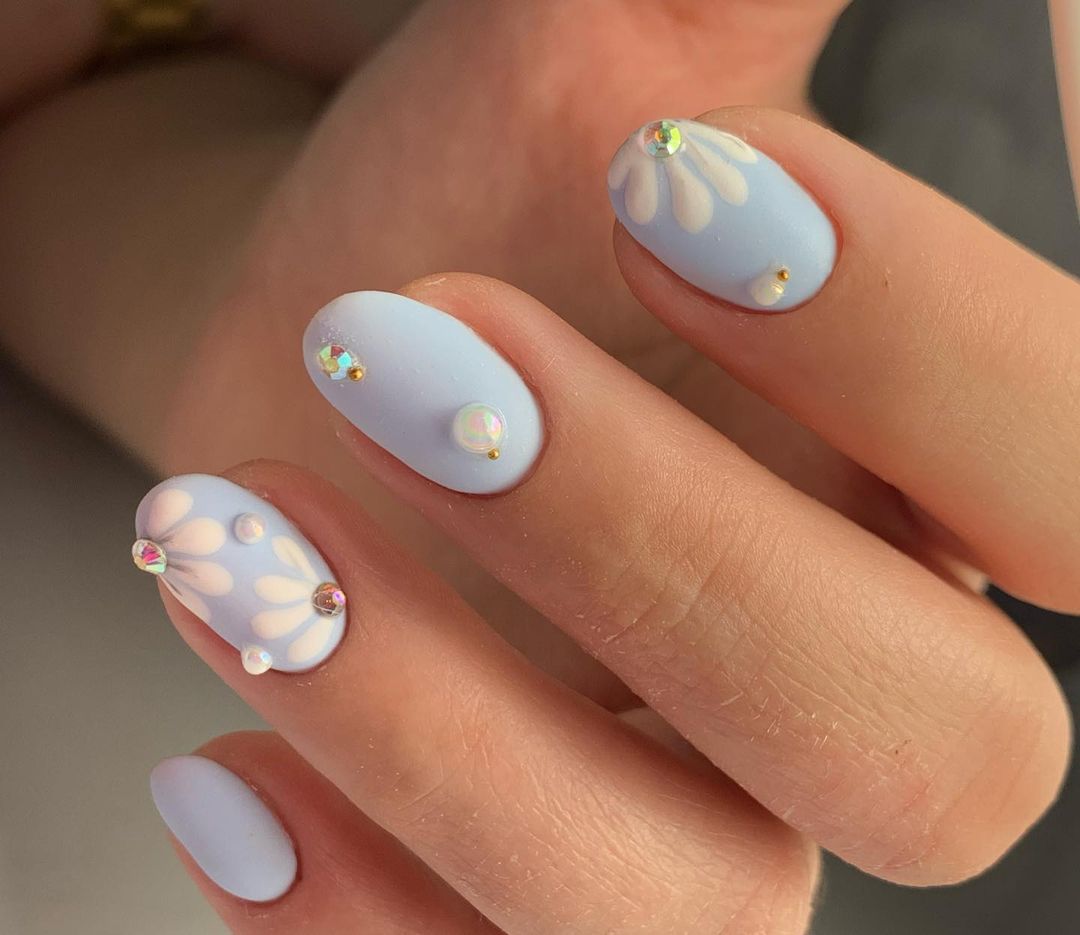
The soft blue hues reminiscent of a tranquil sea make a sublime statement in this design. Embellished with delicate white floral patterns and iridescent gems, these nails are a treasure trove of understated elegance. This look is all about the harmonious blend of simplicity with a touch of glamour—perfect for those seeking a natural but bright aesthetic for their summer vacation.
The Essentials List
- Base: Serene Blue Gel Polish
- Art Accents: Alpine Snow White Paint, Iridescent Rhinestones
- Top Coat: Crystal Clear Shine
- Tools: Detailing Brush, Picker Pencil Professional Tip: For the gems, opt for a gel adhesive instead of regular top coat to ensure they stay put through all your holiday adventures.
DIY Serenity Steps
Apply the serene blue as a base and cure it. With a fine brush, create the white floral accents, cure again, and strategically place the rhinestones for that touch of summer sparkle. Remember, less is more when aiming for a classy summer look.
Save Pin

Gold-Framed Sunset
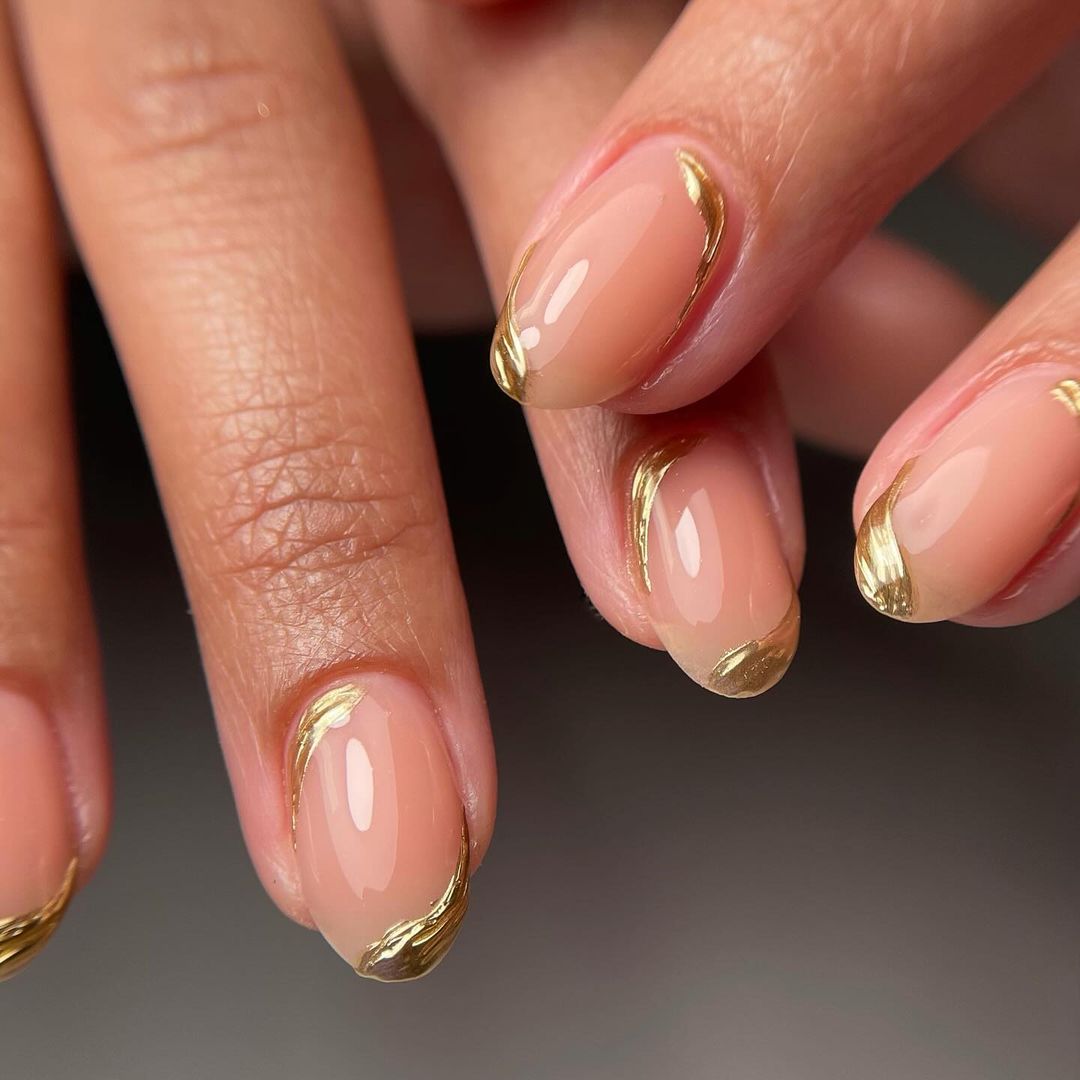
Nothing says classy like the golden frame on a natural nail. The minimalist approach, paired with the luxurious outline, speaks of a summer sunset bordering the horizon—ideal for a simple yet bright holiday evening.
Sunset Silhouette Supplies
- Base: Nude Gel Polish
- Accents: Metallic Gold Paint
- Top Coat: Satin Smooth Finish
- Tools: Striping Brush Professional Tip: The trick to a flawless golden edge is a steady hand and a high-pigment paint that doesn’t require multiple layers.
Sunset Creation
A nude base sets the stage for the metallic gold to shine. Use a striping brush to apply the gold paint around the edge of the nail. It’s a simple technique but requires a precise hand to capture that golden hour glow.
A Carnival of Colors
This vibrant medley of bright colors and bold shapes is a celebration on your nails. Each nail tells its own story with a unique design—acrylic bubbles, matte finishes, and a glossy French tip. It’s the art design embodiment of a tropical Mexico fiesta, where every detail is an invitation to dance and enjoy.
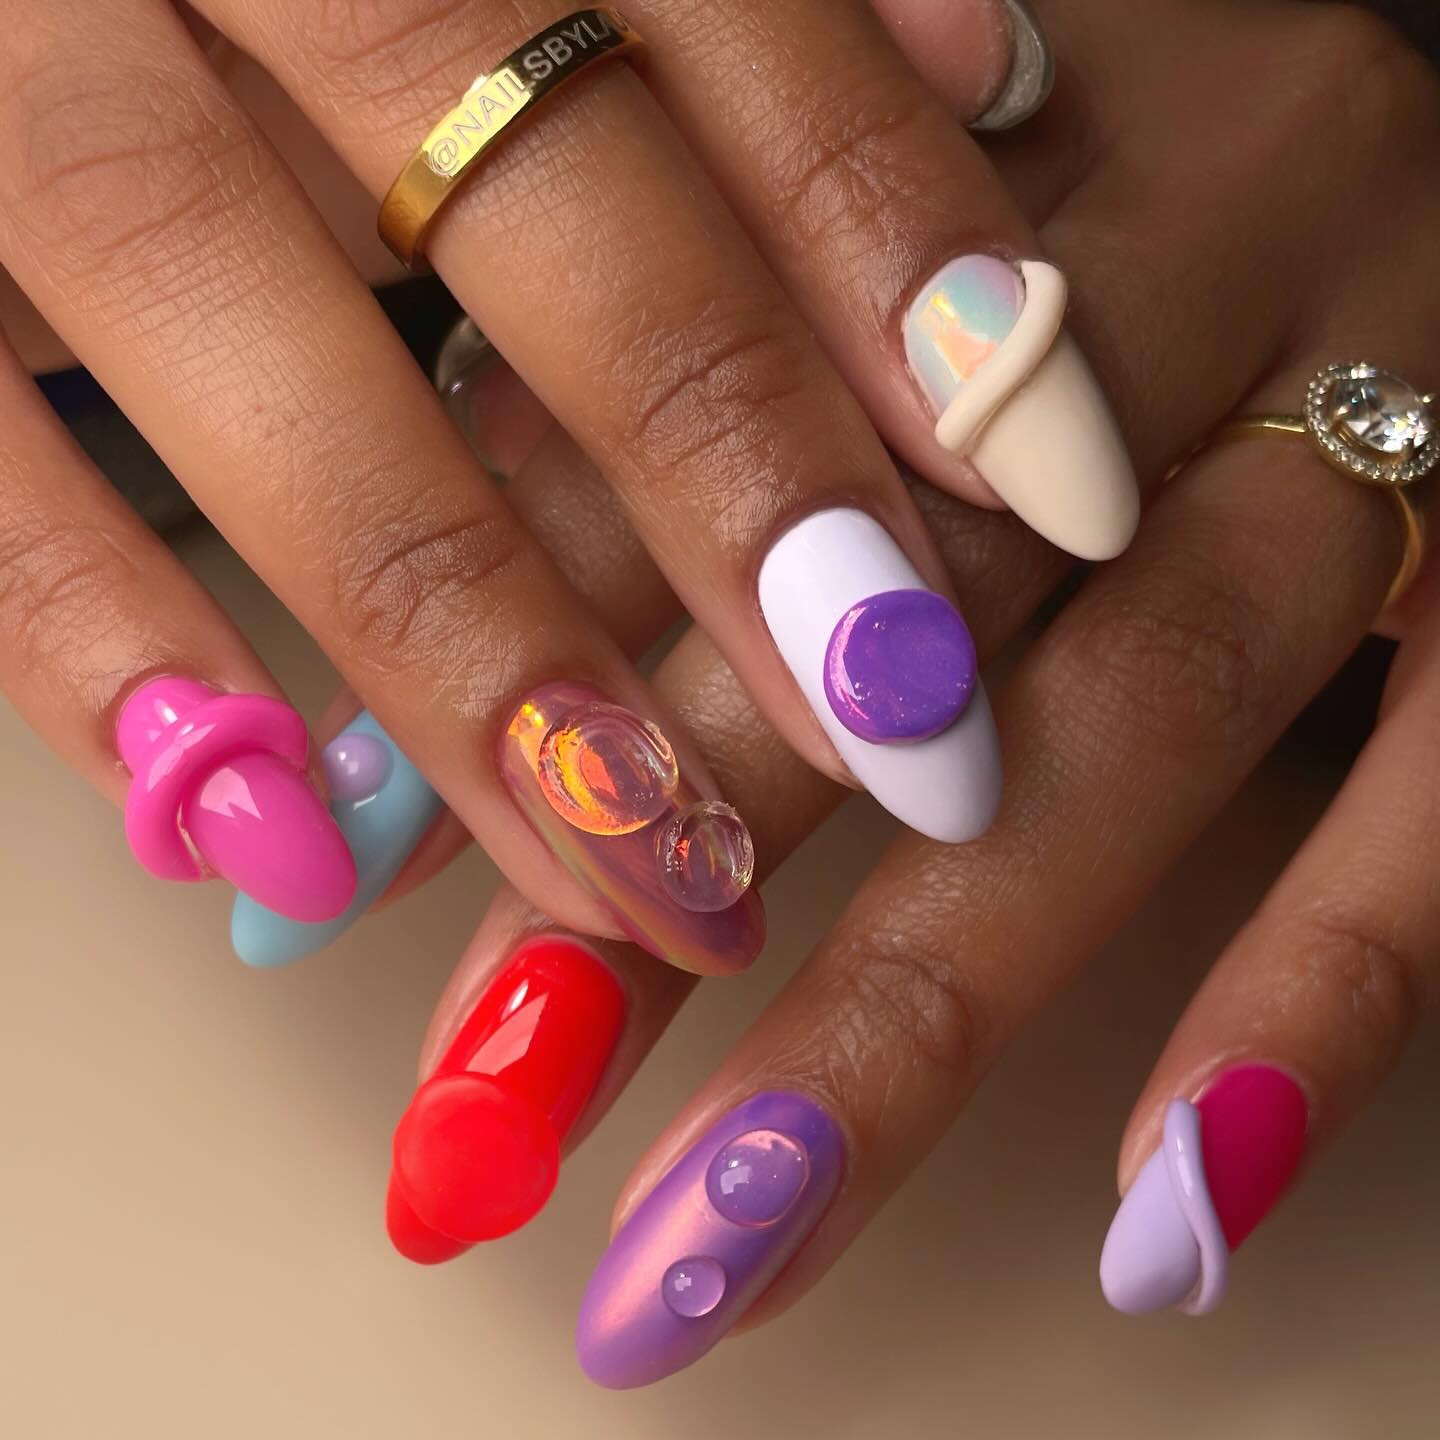
Color Fiesta Kit
- Base Colors: Eclectic Array of Gel Polishes
- Finish Variety: Matte and Gloss Top Coats
- Accents: Acrylic Powder, Holographic Foils
- Tools: Dotting Tools, Foil Adhesive Professional Tip: Mixing finishes adds an unexpected twist that catches the eye and sets trends.
Crafting the Carnival
Let your imagination run wild. Apply the base colors, play with matte and gloss finishes for diversity, and for the acrylic bubbles, use a dotting tool to create the bead before curing. For the foil, apply adhesive, press the foil, and reveal the pattern.
Aqua Dreams
The soft interchange between the aqua tones and the delicate milky transparency on these nails evokes the dreamy tranquility of tropical waters. It’s a sophisticated rendition of summer themes, marrying the ocean’s depth with the playfulness of beachy waves—ideal for those who adore a theme that’s both natural and mystical.
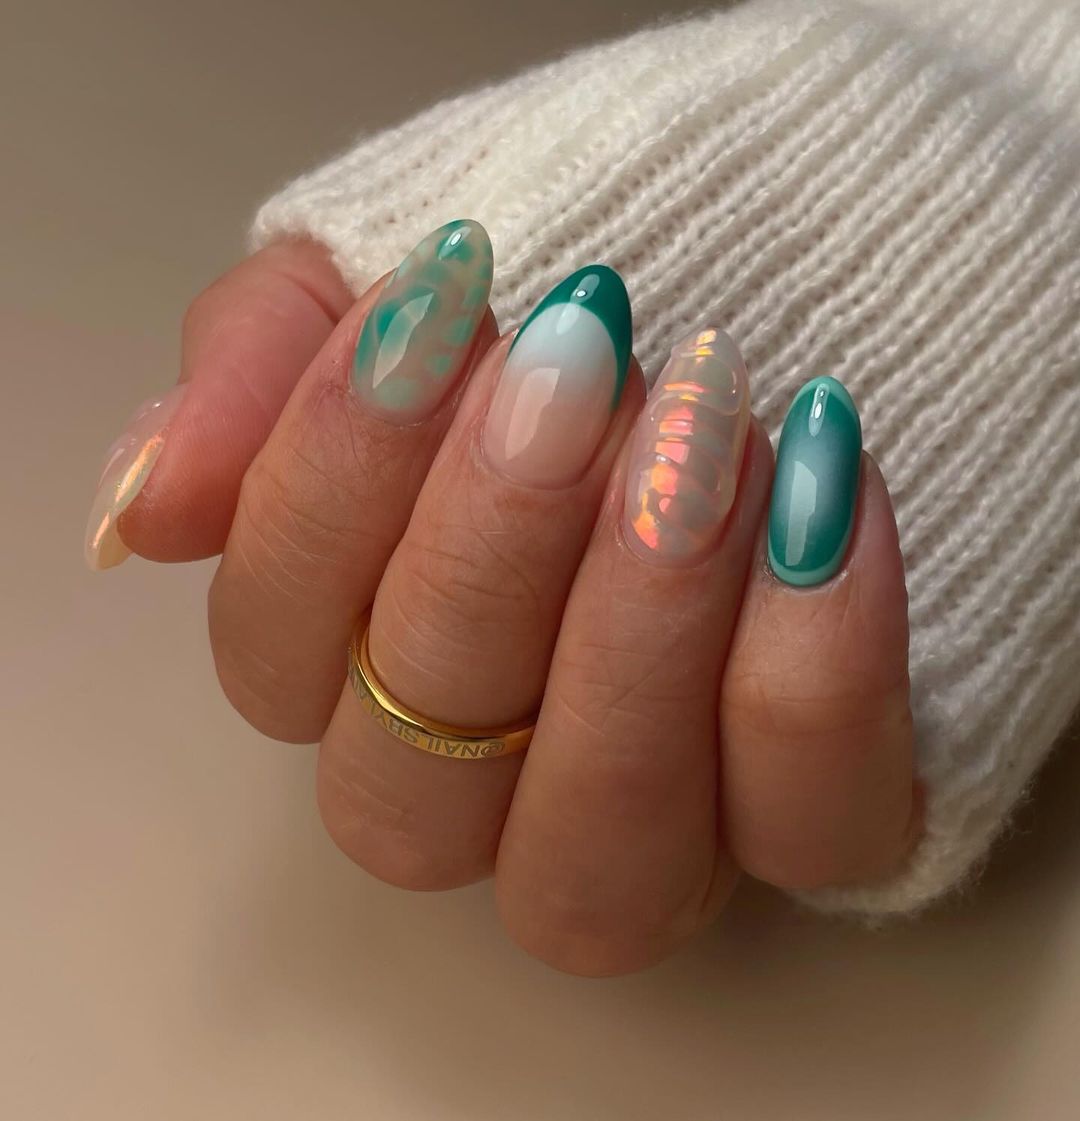
The Tranquil Toolkit
- Base: Aqua Gel Polish, Clear Builder Gel
- Technique: Water Marble, Encapsulation
- Top Coat: Glossy Finish
- Tools: Dotting Tool, Detailing Brush Professional Tip: The water marble technique requires practice, but it’s worth it for this captivating look that’s as fluid as the tides.
Crafting Aqua Illusions
Lay a clear base and then swirl together white and aqua polishes in water to create that marble effect. Dip your nail in to transfer the design, cure, and encapsulate with clear gel for depth. Finish with a glossy top coat to bring out the ethereal art design.
Sunset Silhouette
These nails stand out with their vivid pink shades and bold geometric silhouettes, reminiscent of a sunset’s reflection on a skyscraper. The simple gel technique elevates the design, making it perfect for an evening of fine dining during a luxurious Florida retreat or a vibrant night out in Mexico.
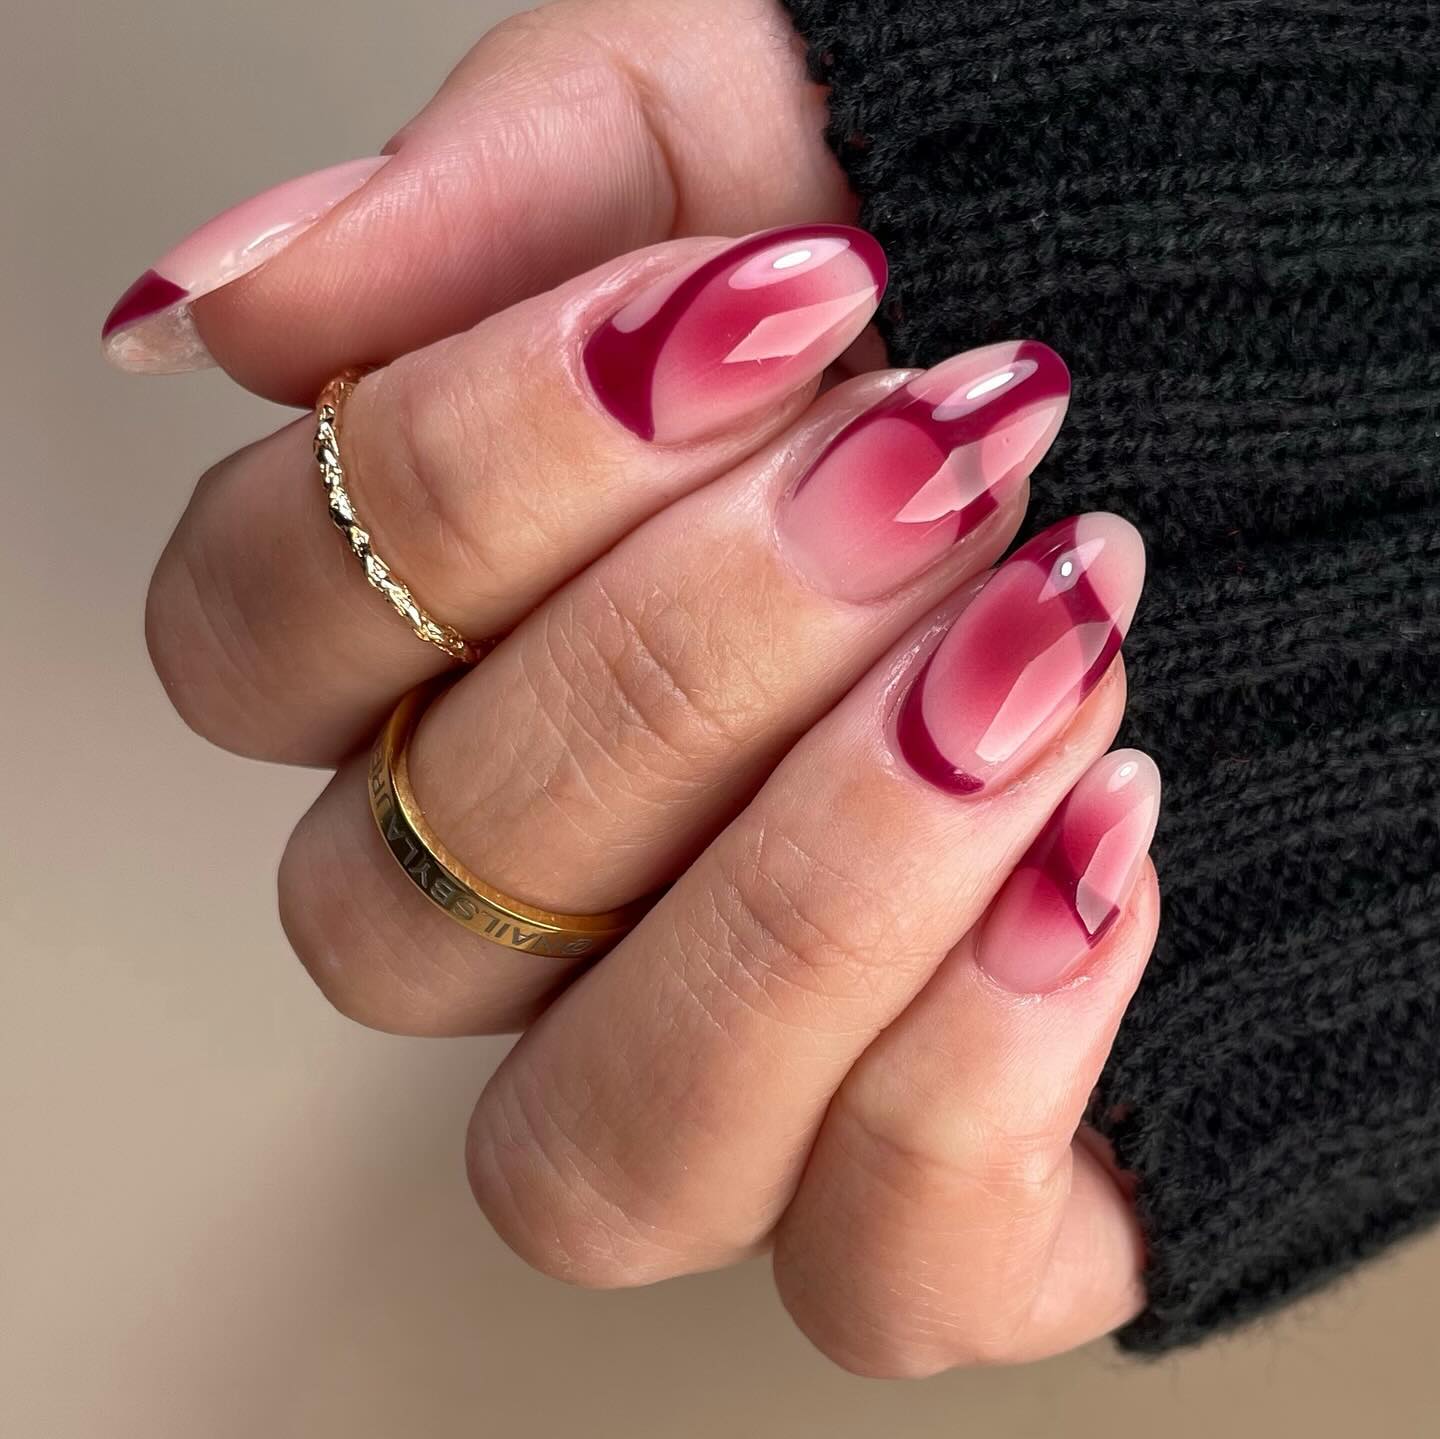
The Sunset Supplies
- Base: Varying shades of pink gel polish
- Accent: Clear builder gel for the silhouette effect
- Top Coat: High-gloss finish
- Tools: Angular brush for sharp lines Professional Tip: Creating sharp lines with gel polish requires a precise brush and a steady hand. Practice the silhouette on paper before taking it to the nail.
Crafting the Sunset
Begin with a pale pink base. Using darker shades of pink, create the geometric silhouette shapes. Then, carefully use a brush to apply clear builder gel along the edges for a 3D effect. Seal everything with a top coat for lasting shine.
Tropical Fiesta
Embrace the festive spirit with nails that are a canvas of bright, playful colors and floral art designs. The matte orange nails juxtapose brilliantly against the detailed, colorful floral patterns, perfect for a holiday in Jamaica or a beach party in Hawaii.
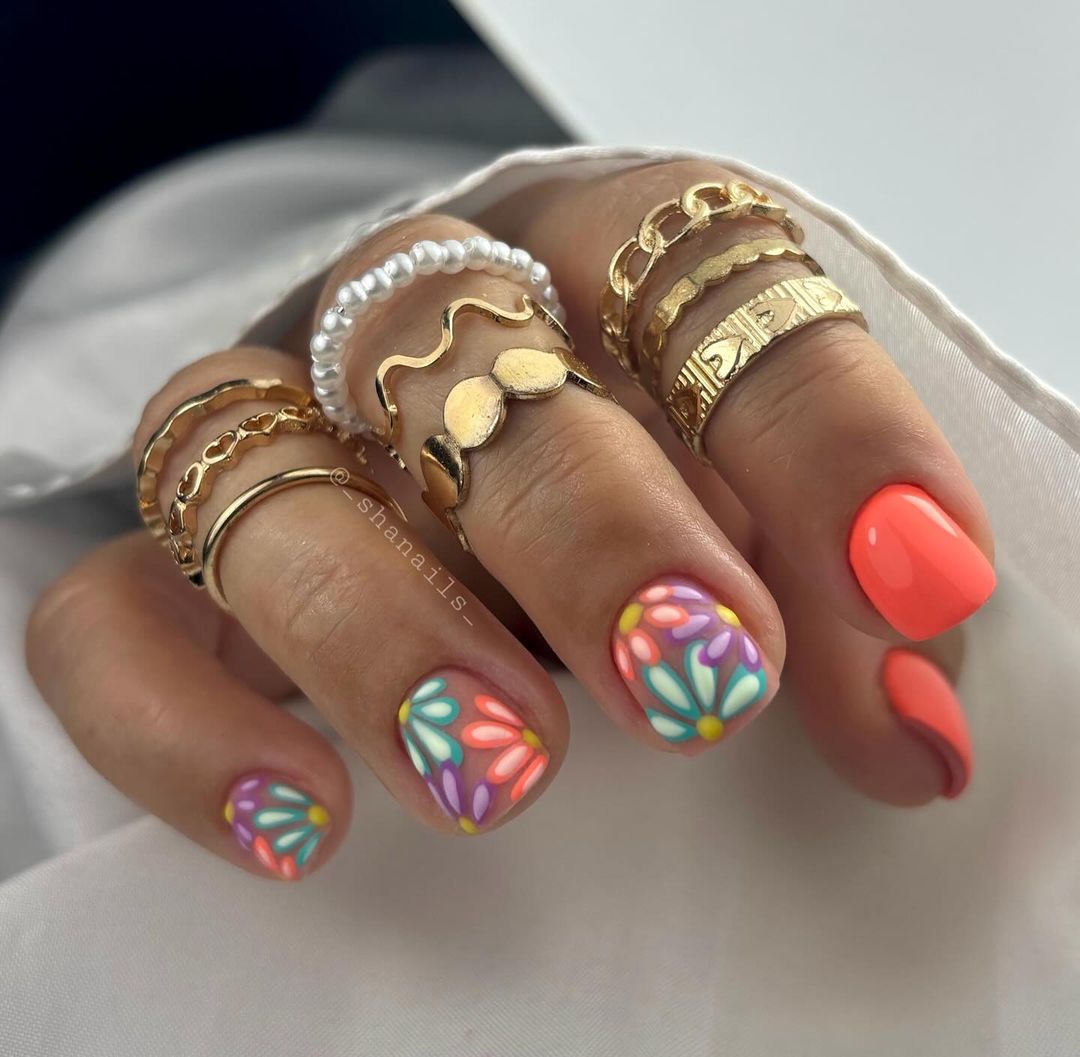
Fiesta Essentials
- Base: Matte Orange Gel, Multicolor Acrylic Paints
- Design: Hand-painted Floral Accents
- Top Coat: Matte for the base, Gloss for the flowers
- Tools: Fine Liner Brushes, Dotting Tool Professional Tip: To make the floral designs pop, apply a glossy top coat only on the flowers for a subtle but effective contrast.
Creating Your Own Fiesta
Start with a matte orange base. Once cured, use fine brushes to paint the colorful flowers. Add a touch of gloss to just the flowers to enhance their vibrance. This playful design celebrates the exuberance of summer in full bloom.
Save Pin

Ebb and Flow
Sleek and modern, these nails feature an ocean-inspired monochrome design that’s all about flow and movement. The contrasting matte and glossy finishes add depth and interest, making this simple yet impactful design a staple for those seeking a classy, natural look with a twist.
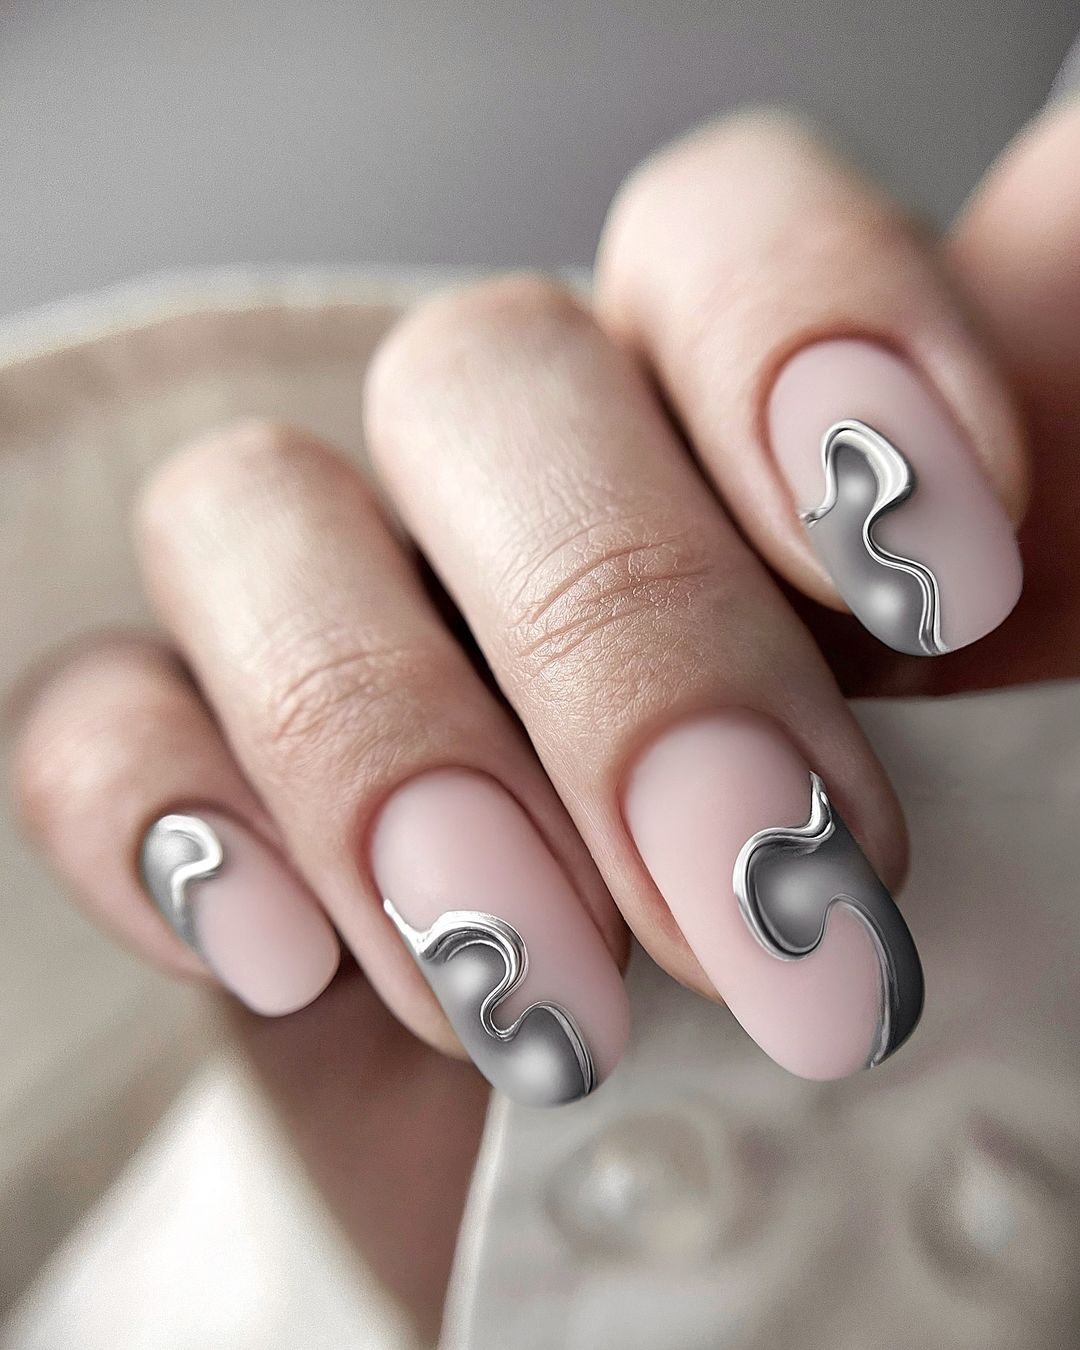
The Monochrome Method
- Base: Soft Pink Gel Polish
- Accent: Black and White Gel Polish for the design
- Top Coat: Matte Finish, Gloss for the wave pattern
- Tools: Detailing Brush Professional Tip: The wave design is delicate work; keep a steady hand and wipe the brush between strokes for crisp lines.
Creating the Ebb and Flow
Paint your nails with the soft pink base, and once cured, paint the black wave pattern. Add touches of white to highlight the waves and finish with a matte top coat. Apply gloss over the waves for a multi-dimensional effect that’s as mesmerizing as the sea.
Frosted Elegance
The sheer elegance of these nails lies in their understated approach. A matte nude base paired with frosted lace patterns exudes a refined sophistication that is perfect for any classy event. The white lace detail adds a touch of texture and intrigue, while the overall matte finish keeps it simple and natural, allowing the delicate art to shine subtly.
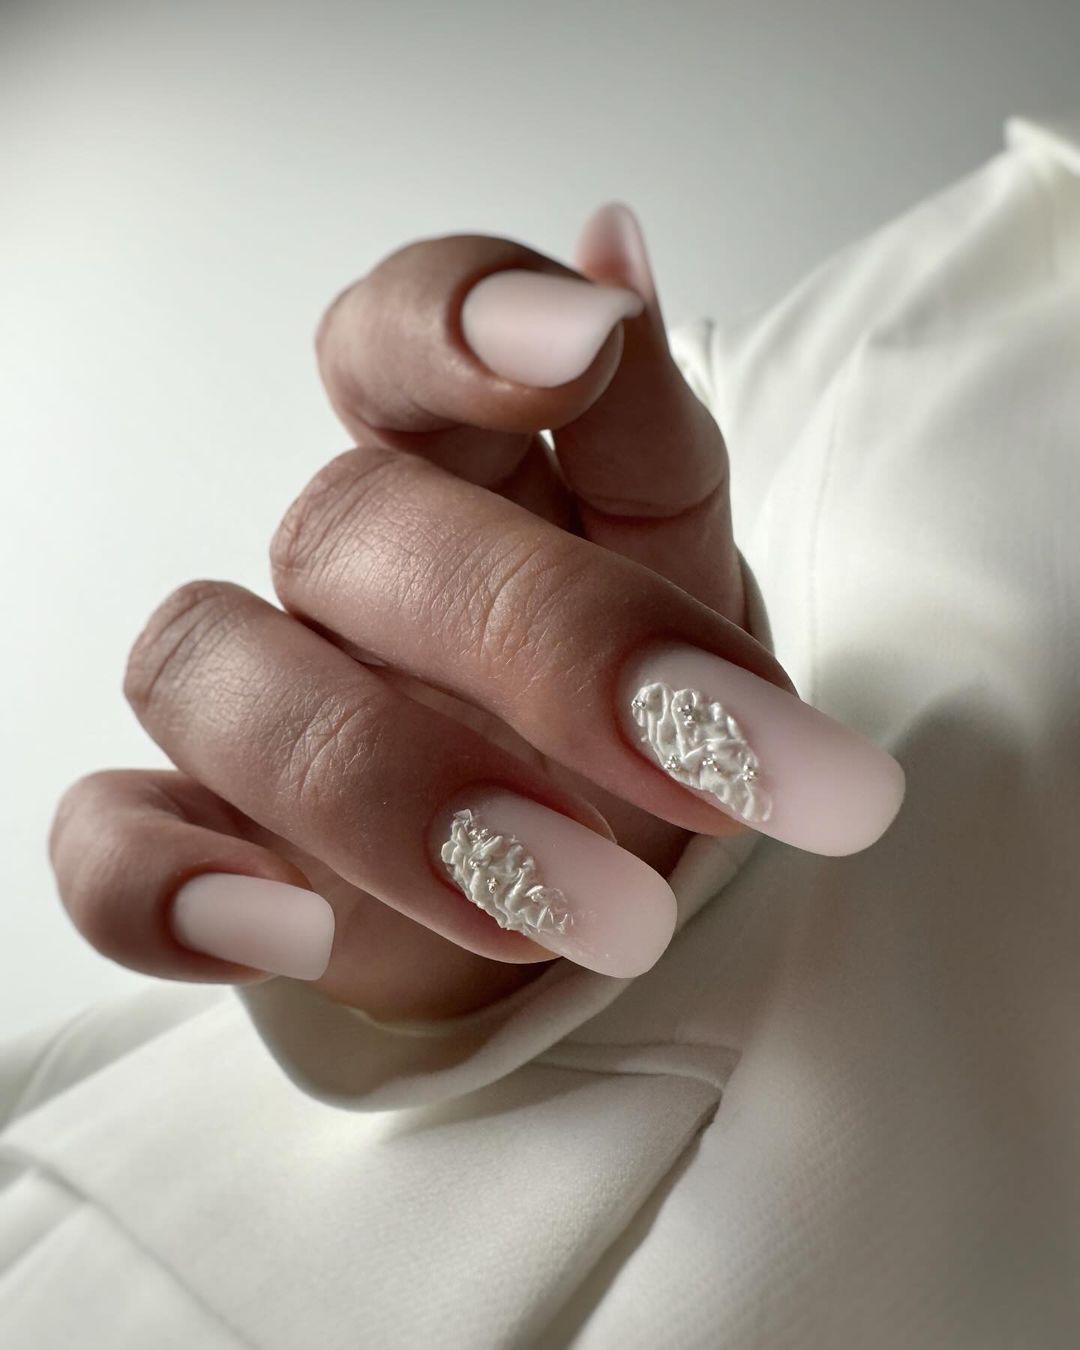
The Essentials
- Base: Matte Nude Gel Polish
- Accent: White Lace Stickers or Hand-Painted with Gel
- Top Coat: Matte Finish
- Tools: Tweezers (for stickers) or Detailing Brush (for hand-painted art) Professional Tip: Precision is key when placing lace patterns—whether stickers or paint, ensure each is applied flawlessly for a seamless look.
Crafting the Look
Apply the matte nude polish as a base. For the lace, if using stickers, apply them with tweezers on the tacky layer of the base coat. If painting by hand, use a fine brush to create the lace pattern. Finish with a matte top coat to blend the art with the base for an enchanting natural look.
Gilded Petals
These nails are the epitome of luxury, with gold foil accents creating a lush floral scene on a white matte background. The dimensional gold petals offer a stunning contrast against the soft backdrop, perfect for any holiday soirée or a classy summer dinner under the stars.
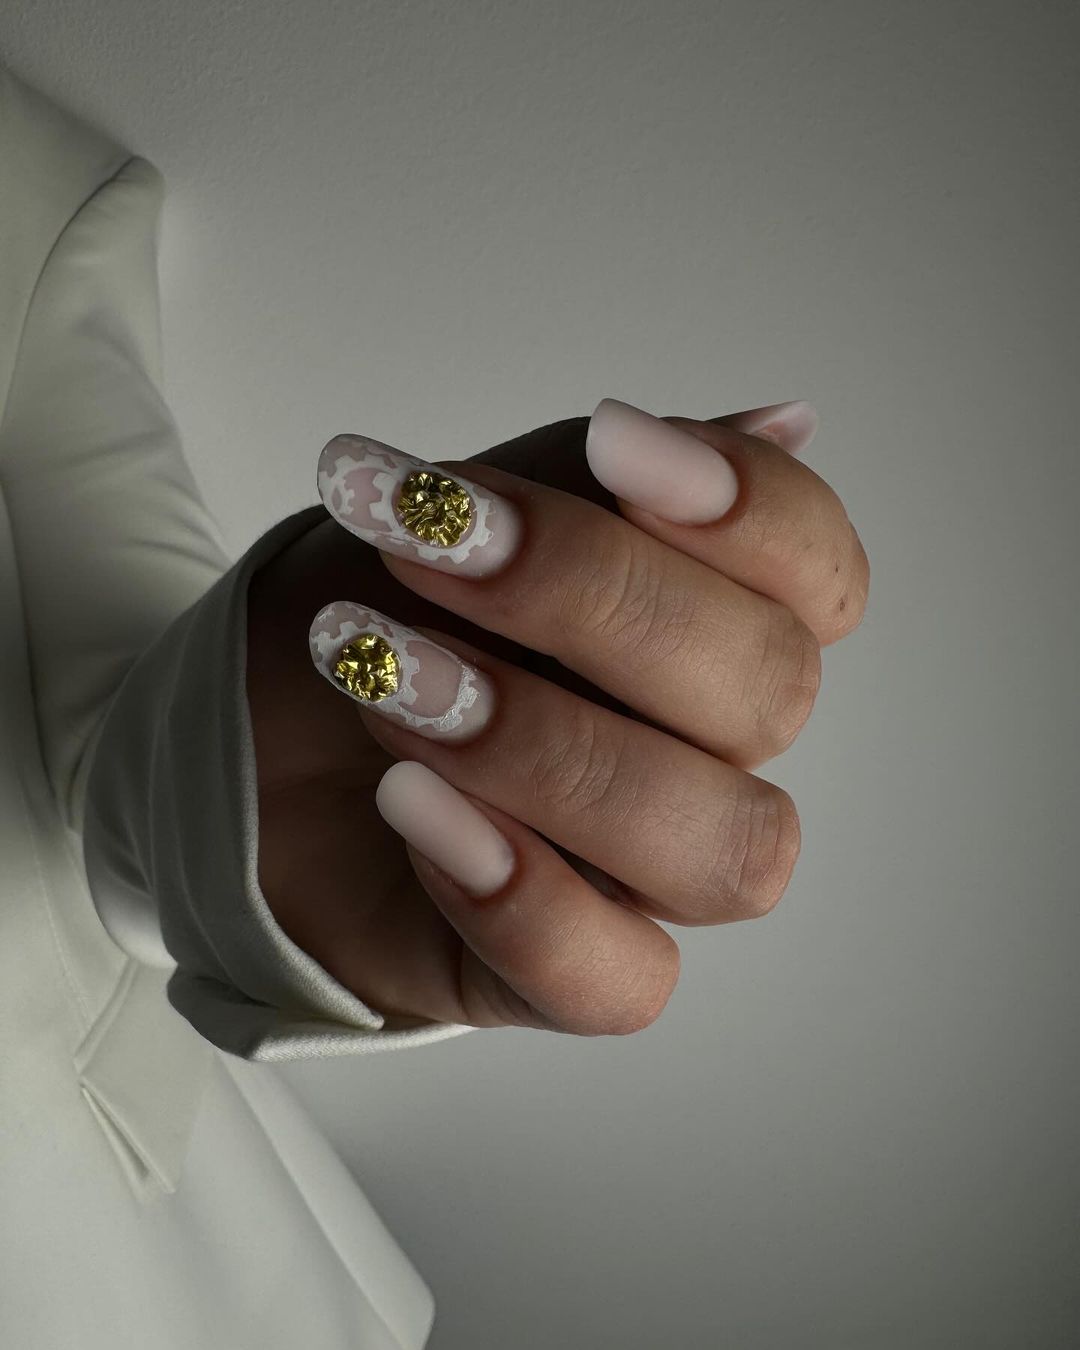
The Luxe List
- Base: Matte White Gel Polish
- Accent: Gold Leaf Foil
- Top Coat: Matte Finish
- Tools: Foil Adhesive, Tweezers Professional Tip: Apply the foil only to the tacky layer of the gel polish, avoiding the need for extra adhesive, and ensure the top coat is applied gently to preserve the foil’s texture.
Creating the Luxe Floral
With a matte white base prepared, carefully place gold leaf foil to form petal shapes. Finish with a matte top coat, taking care not to smudge the foil, leaving a breathtakingly luxurious finish.
Tropical Night Sky
The vibrant purple and pink swirls set against a dark background on these nails call to mind a tropical night sky. This daring design, blending colors in a swirling pattern, radiates confidence and is sure to be a conversation starter at any holiday event.
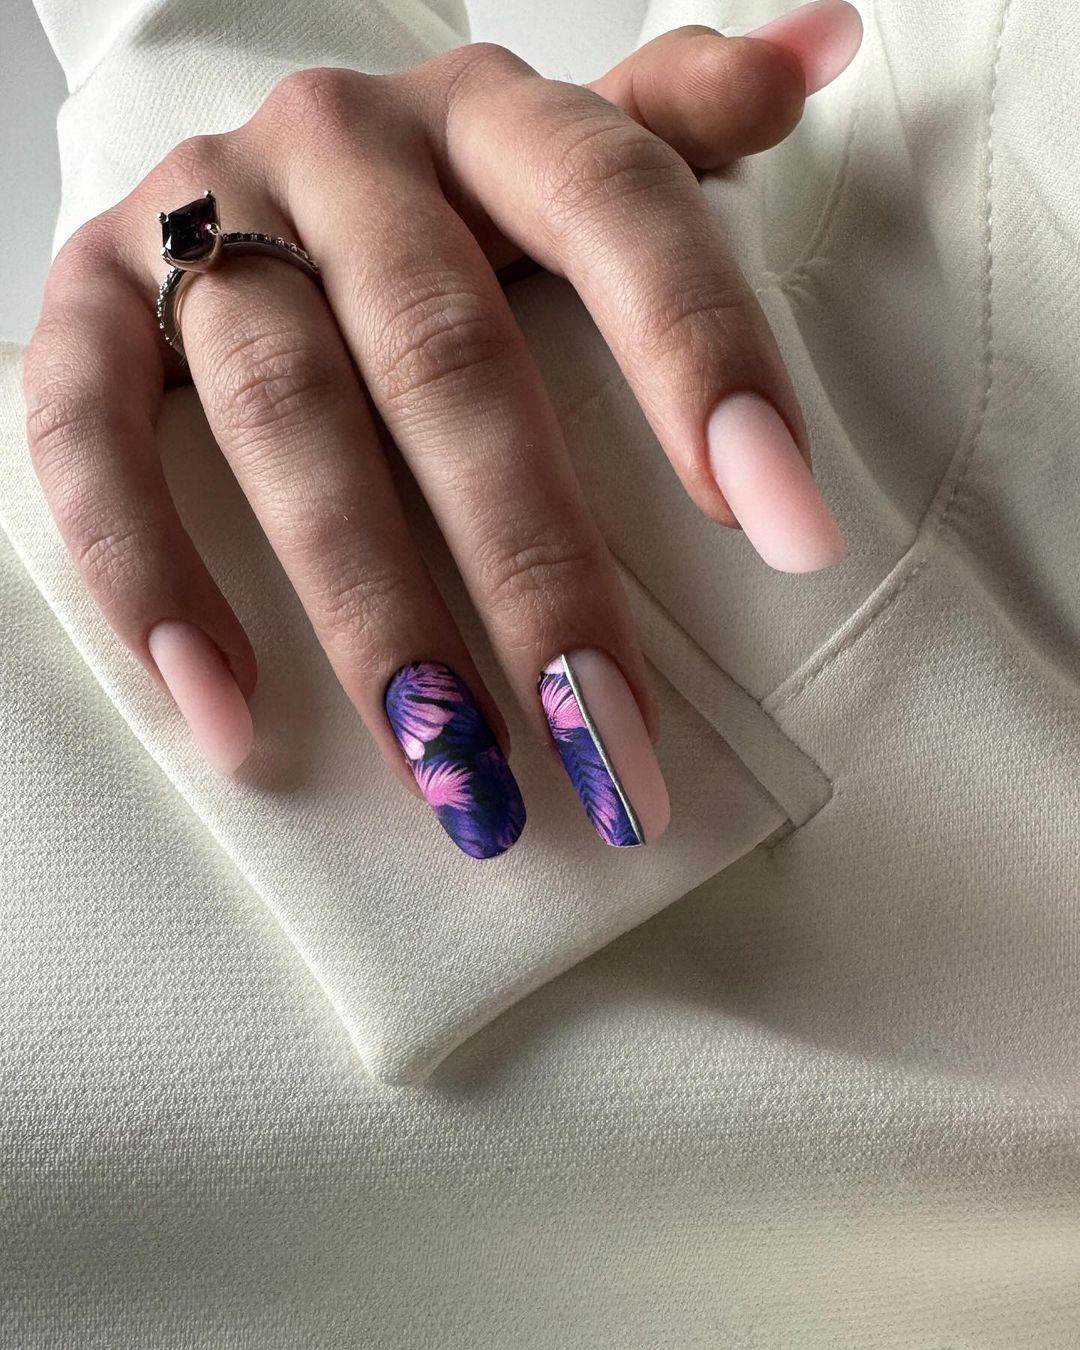
The Twilight Toolkit
- Base: Deep Purple Gel Polish
- Swirls: Pink and Light Purple Gel Paints
- Top Coat: High-Gloss Finish
- Tools: Detailing Brush, Dotting Tool Professional Tip: Use the dotting tool to place the colors before swirling with the brush for a natural, organic look.
Crafting the Tropical Swirl
Start with a dark purple base. Dot on the lighter colors, then use a brush to swirl them together while still wet, creating a nebulous effect. Finish with a high-gloss top coat for a stunning sheen that catches the light like stars.
Sparkling Sands
Emulating the sparkle of sunlight on sandy beaches, these nails are a harmonious blend of simple elegance and beach-inspired artistry. The French tip design is elevated with a crystal-clear embellishment, like water droplets catching the sunlight, making it an ideal choice for a summer holiday or a seaside vacation.
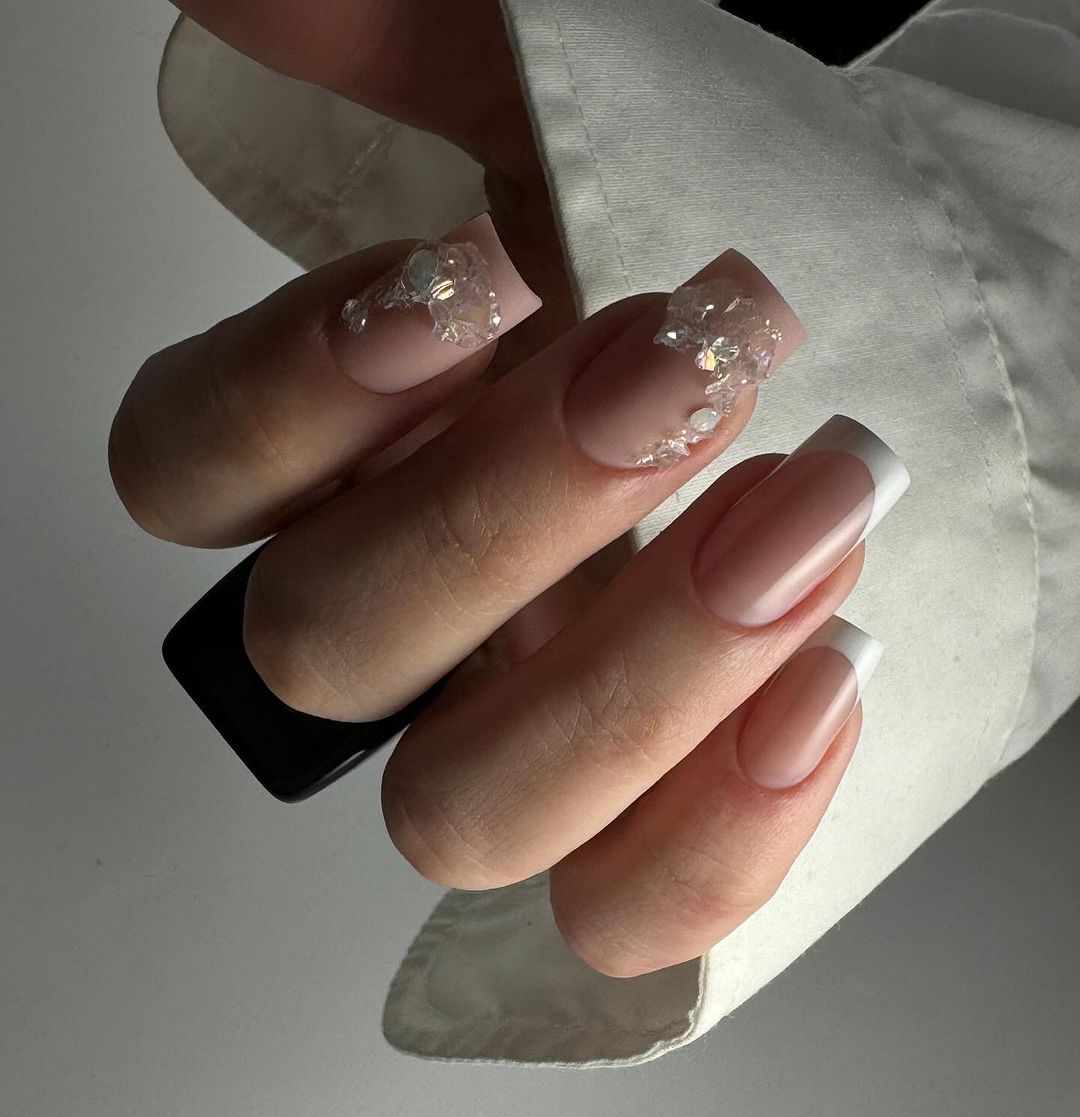
The Sparkling Selection
- Base: Nude Gel Polish
- French Tip: White Gel Polish
- Embellishments: Clear Rhinestones
- Top Coat: High-Gloss Finish
- Tools: Rhinestone Picker, Fine Liner Brush Professional Tip: For a natural look, keep the French tip thin and apply rhinestones sparingly to mimic the random beauty of sparkling water droplets.
Creating the Sparkle
Apply a nude base and carefully paint a thin white French tip. While the tip is still tacky, use the picker to place clear rhinestones strategically along the smile line. Seal with a high-gloss top coat to enhance the stones’ reflective quality.
Molten Glamour
On a backdrop of soft matte pink, these nails flaunt a decadent touch of gold foil, giving the impression of molten luxury draping over the edges. This design is perfect for the summer fashionista looking to add a dash of opulence to their holiday wardrobe, embodying both fun and classy in one look.
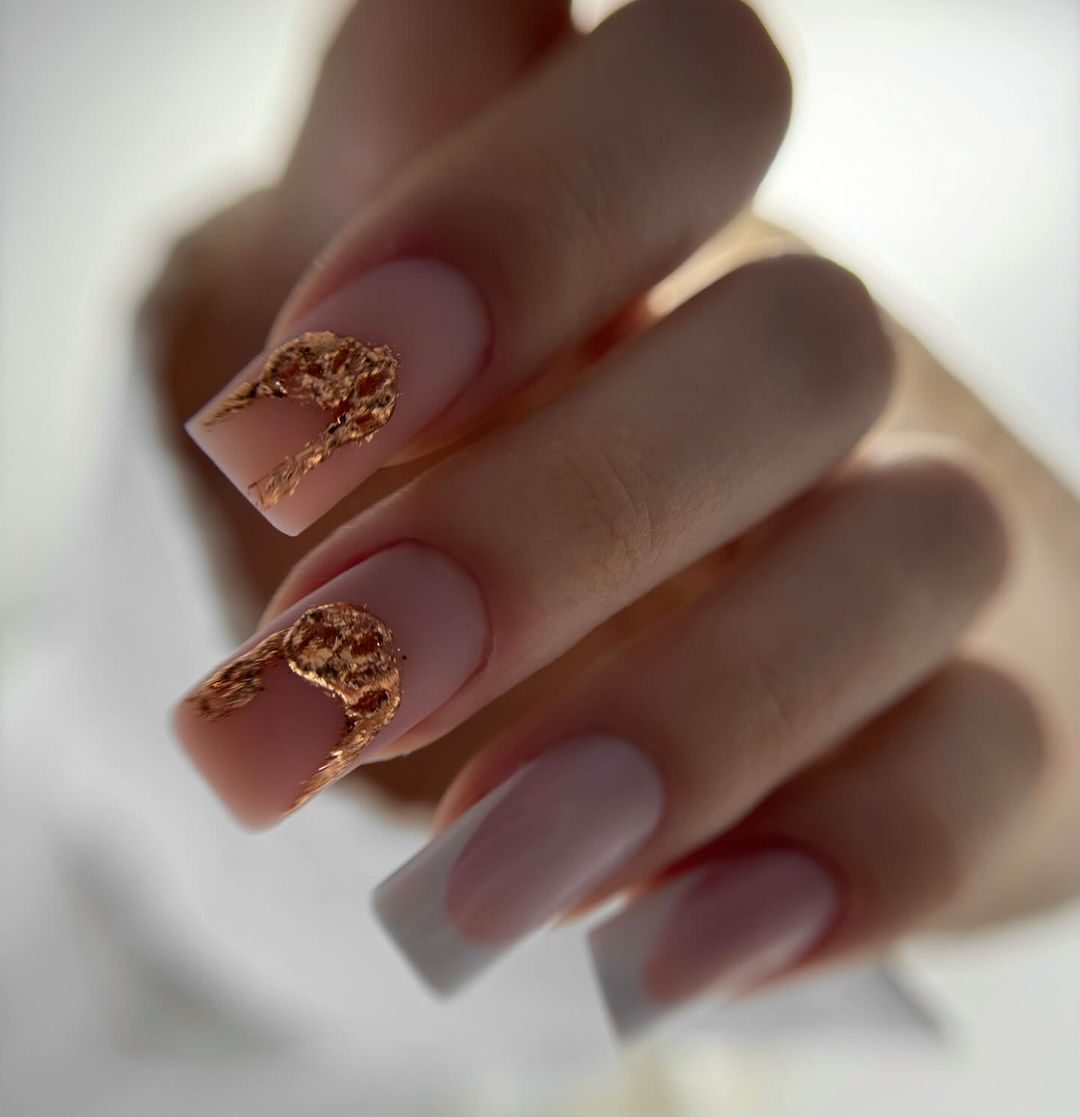
The Essentials
- Base: Matte Baby Pink Gel Polish
- Accent: Gold Leaf Foil
- Top Coat: Matte Finish
- Tools: Tweezers Professional Tip: Use the tweezers to tear off pieces of the gold foil and apply them while the base polish is still tacky for that imperfectly perfect molten gold effect.
Crafting the Look
Begin with a baby pink gel polish in a matte finish. Once set, add gold foil accents along the tips, creating a dripping effect. The juxtaposition of the matte base with the metallic foil is a true celebration of summer’s contrasting designs.
Marble Majesty
Combining the elegance of a French tip with the artistry of marble, these nails are a testament to timeless beauty. The metallic veining adds a regal flair, ideal for someone who enjoys classy aesthetics with an artistic twist.
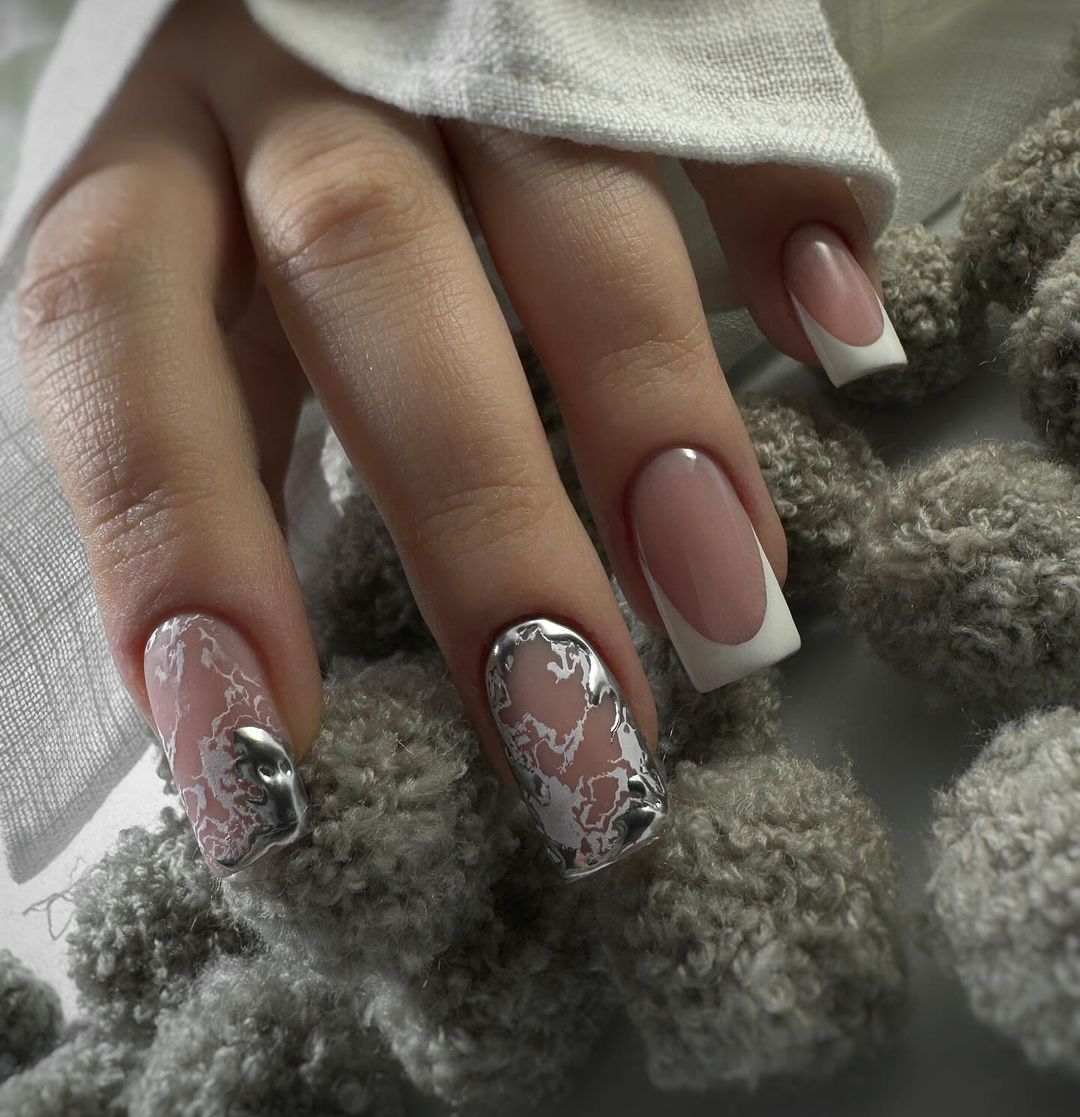
The Essentials
- Base: Nude Gel Polish
- French Tip: White Gel Polish
- Marble Accents: Silver Gel Paint
- Top Coat: High-Gloss Finish
- Tools: Detailing Brush Professional Tip: Drag the detailing brush gently through the white polish before it cures to create the marble effect, then add silver lines for the veins.
Creating the Majesty
Apply the nude base and then the white French tip. Before curing, use a brush to swirl in the marble effect and add silver lines for the metallic veins. Finish with a glossy top coat to bring out the intricate details.
Lava Flow
These nails make a bold statement with a fiery lava-like design that’s sure to turn heads. The black base is a canvas for the glowing red and orange, perfect for a night out or a summer event where making an impression is the goal.
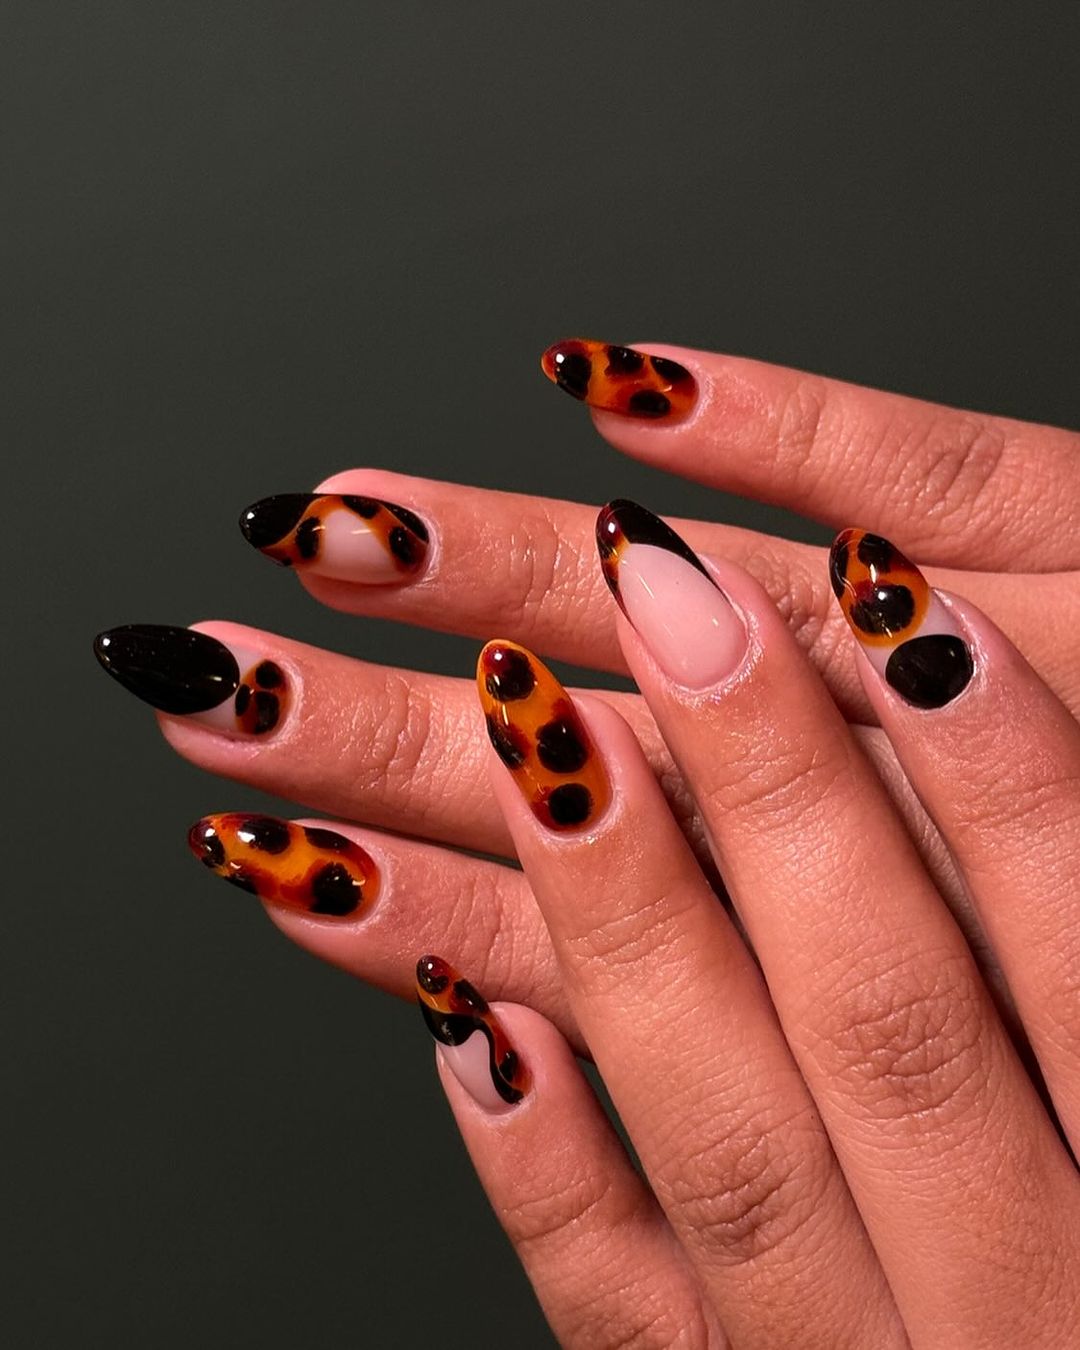
The Essentials
- Base: Black Gel Polish
- Accents: Red and Orange Gel Polishes
- Top Coat: High-Gloss Finish
- Tools: Detailing Brush Professional Tip: Work quickly to blend the red and orange accents while the base is still uncured to achieve a seamless lava effect.
Crafting the Fire
Start with a black base, then add red and orange strokes while it’s still wet. Use a brush to blend them into the black for a fiery design. The high-gloss finish adds to the illusion of molten lava.
Pearl Serenity
These nails bring the serene essence of the ocean to life with delicate pearl embellishments. The sheer pink and clear tips create a fresh, airy look that’s perfect for those who favor a subtle yet natural style, with a touch of summer whimsy.
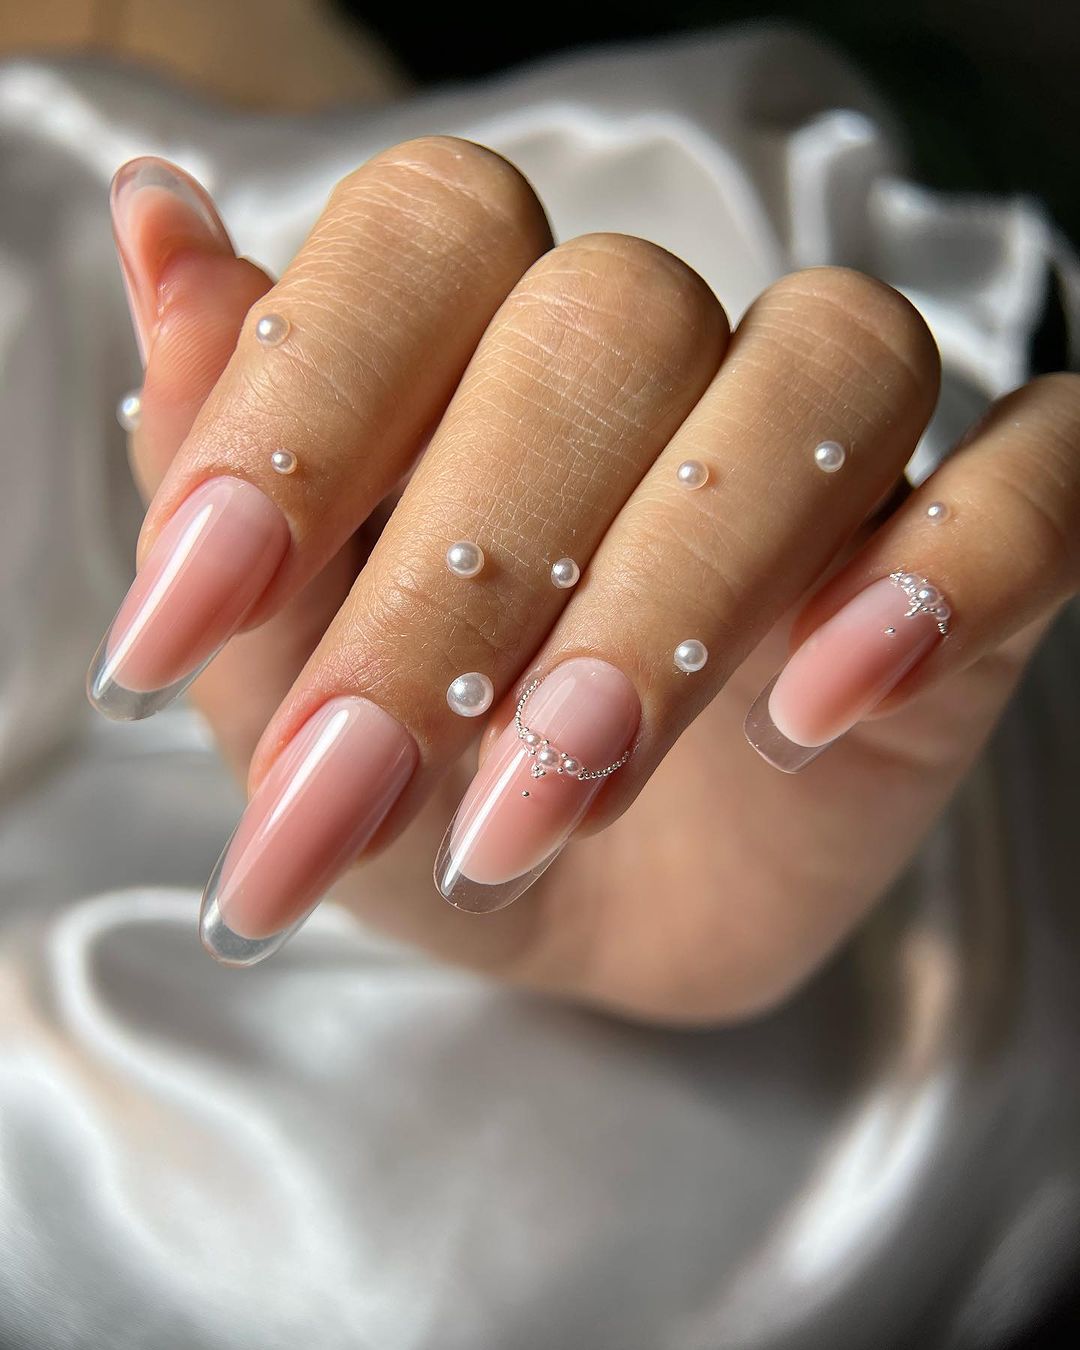
The Essentials
- Base: Sheer Pink Gel Polish
- Tips: Clear Gel for the Illusion of Length
- Embellishments: Small Pearl Accents
- Top Coat: High-Gloss Finish
- Tools: Pearl Picker Professional Tip: When applying pearls, use a dab of clear gel over your base coat to ensure they adhere well without disrupting the sheer elegance of the base.
Creating the Calm
Apply a sheer pink base, then sculpt the tips with clear gel to extend the nail. Once set, use a pearl picker to apply small pearls along the nail bed or tips. Seal with a high-gloss top coat to enhance the pearls’ luster.
Celestial Blush
These nails bring the ethereal beauty of a cosmic dusk to your fingertips, with a delicate blend of lilac and blush hues dusted with a golden shimmer that mimics the twilight sky. Perfect for those who seek a touch of the heavens in their summer vacation & beach nail 2024 look, these nails suggest sophistication and a love for the art of the universe.
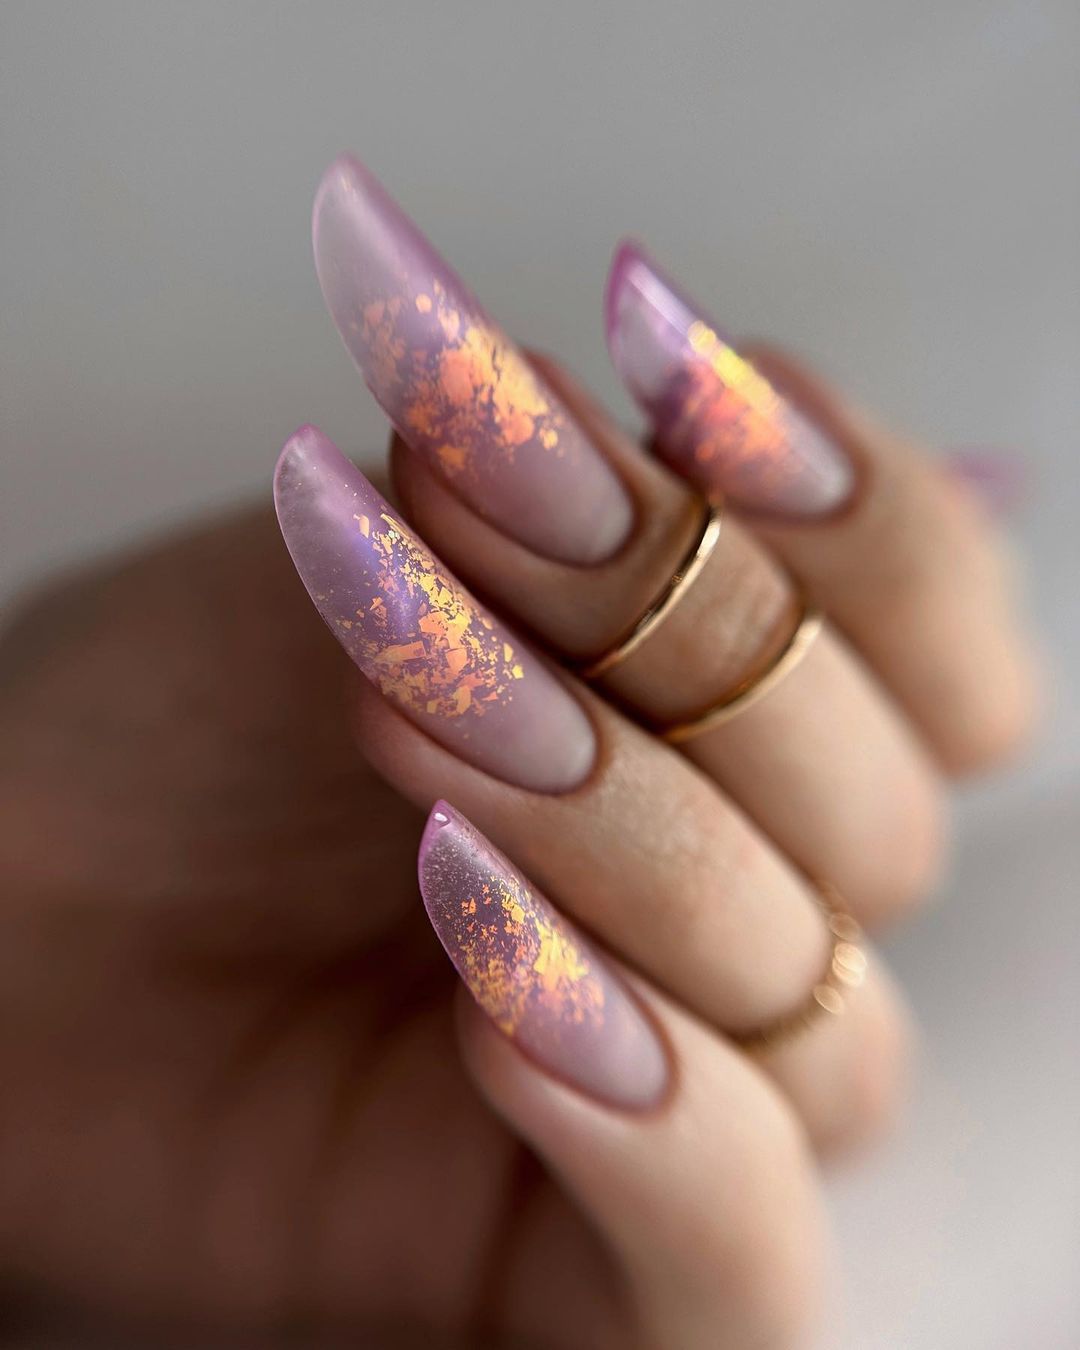
The Essentials
- Base: Lilac to Blush Gradient Gel Polish
- Accent: Gold Foil Flakes
- Top Coat: High-Gloss Finish
- Tools: Sponge (for gradient), Tweezers (for foil) Professional Tip: For the gradient, apply the two colors on a sponge and dab onto the nail, blending as you go. Add the gold foil for a celestial touch.
Crafting the Cosmos
Start with a clear base coat. Use a sponge to create a soft gradient from lilac to blush. While the polish is still tacky, place gold foil flakes with tweezers. Seal with a glossy top coat to capture the cosmic shimmer.
White Caps
These nails capture the majestic beauty of ocean waves cresting and breaking. The white tips are enhanced with golden accents that reflect the sunlight off the water’s surface, ideal for a beachy day or an ocean-themed event.
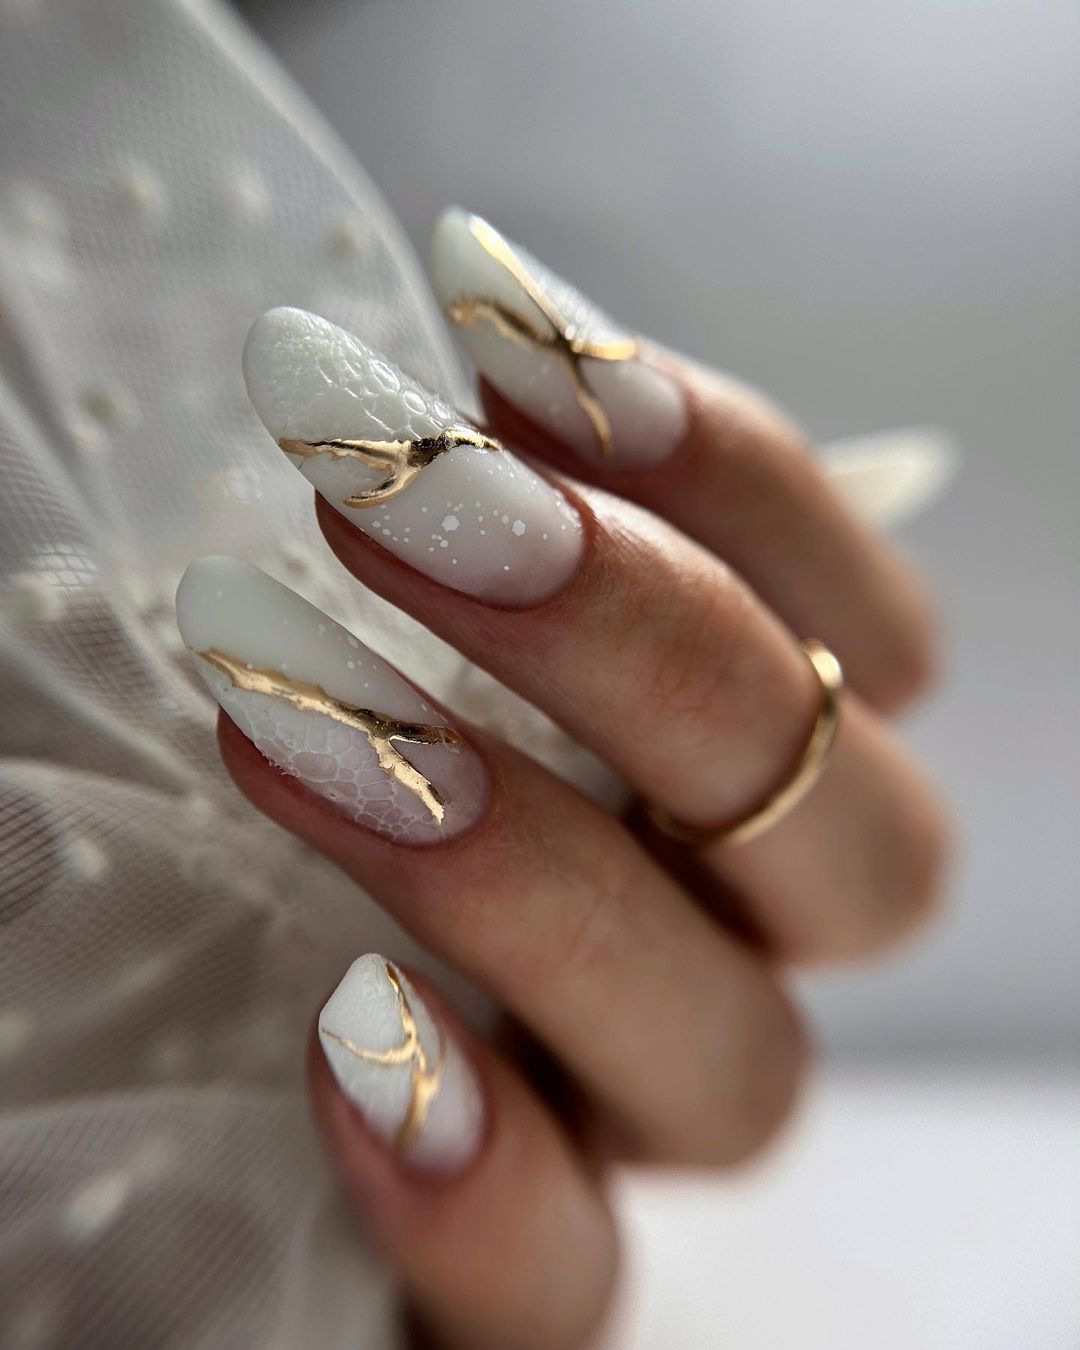
The Essentials
- Base: Matte White Gel Polish
- Detail: Gold Leaf Accents
- Top Coat: Matte Finish
- Tools: Tweezers Professional Tip: Apply the gold leaf in random patterns to emulate the unpredictable nature of waves catching the light.
Creating the Tide
Apply a matte white polish as a base. Use tweezers to add gold leaf accents in a pattern that mimics waves breaking at their peak. Finish with a matte top coat to maintain the soft, frothy look of the sea.
Floral Whisper
Delicate floral accents on a soft pink base make these nails a whisper of spring on the cusp of summer. The dark blue flowers provide a subtle yet bold contrast, making this design perfect for a casual summer outing or a simple day look.
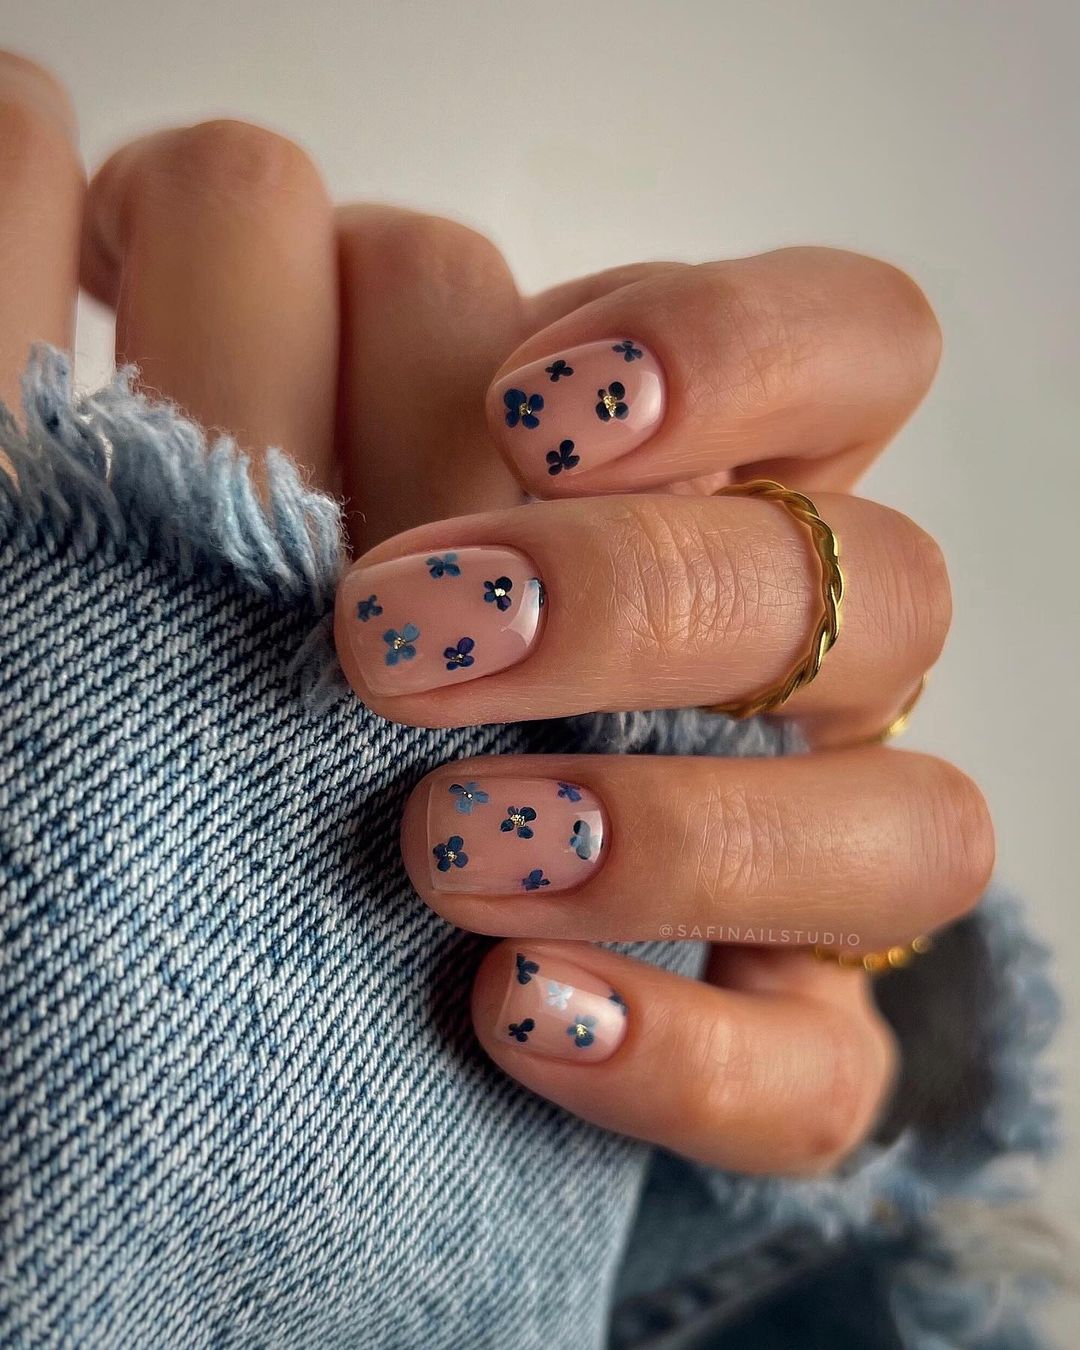
The Essentials
- Base: Soft Pink Gel Polish
- Accents: Dark Blue Floral Decals
- Top Coat: High-Gloss Finish
- Tools: Tweezers Professional Tip: Use decals for a quick and easy floral application, ensuring each flower is placed with intention.
Crafting the Bloom
After applying a soft pink base, use tweezers to place dark blue floral decals on the nail. Seal the design with a high-gloss top coat for durability and shine that lasts throughout your holiday.
Siren’s Call
Dive into the depths of oceanic fantasy with these stiletto nails, showcasing a mesmerizing underwater scene. The blue gradient echoes the sea’s vastness, while the intricate shell and scale details hint at the treasures and mysteries of the deep. This design is for those who carry the spirit of the sea in their hearts, perfect for a summer of seaside adventures or enchanting evenings.
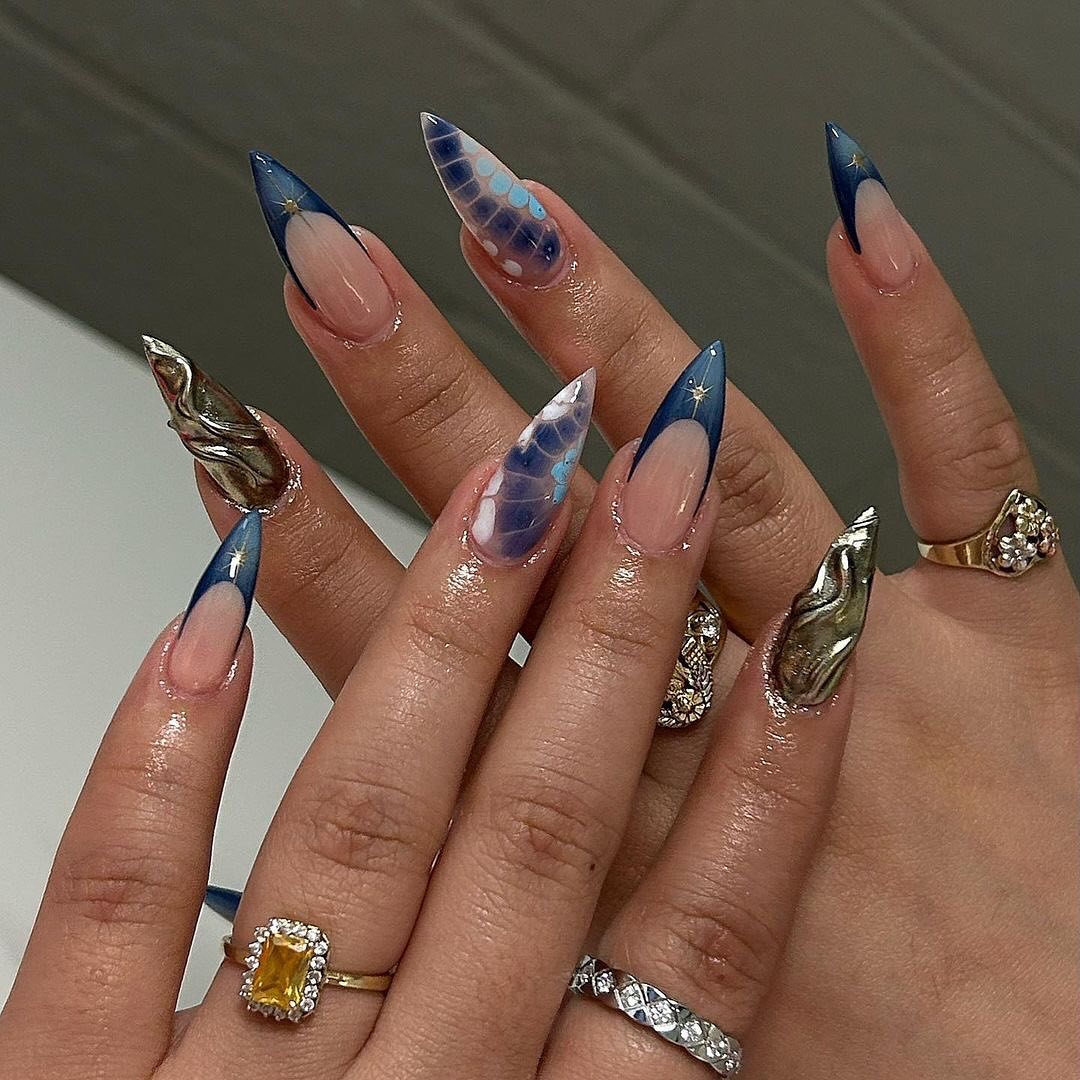
The Deep Sea Kit
- Base: Graduated blue gel polish for depth
- Accents: Metallic shell and scale decals
- Top Coat: High-gloss for a wet look
- Tools: Fine brush for detail work, tweezers for decal placement Professional Tip: Layer different shades of blue to give the illusion of depth, like the ocean itself. Use a fine brush to paint delicate stars for a touch of whimsy.
Crafting the Ocean Dream
Apply the lightest blue at the base, blending into darker shades towards the tips to mimic the sea’s gradient. Carefully place metallic decals to suggest scales and shells. Add tiny painted stars for a magical touch. Seal with a glossy top coat to achieve that fresh-from-the-water shine.
Pink Swirl
With a swirl of vibrant pink against a soft pink base, these nails are like a cotton candy daydream. This look strikes a delightful balance between playfulness and sophistication, suited for both daytime frolics and evening soirees. It’s a statement of joy and a celebration of color for the fun-loving individual.
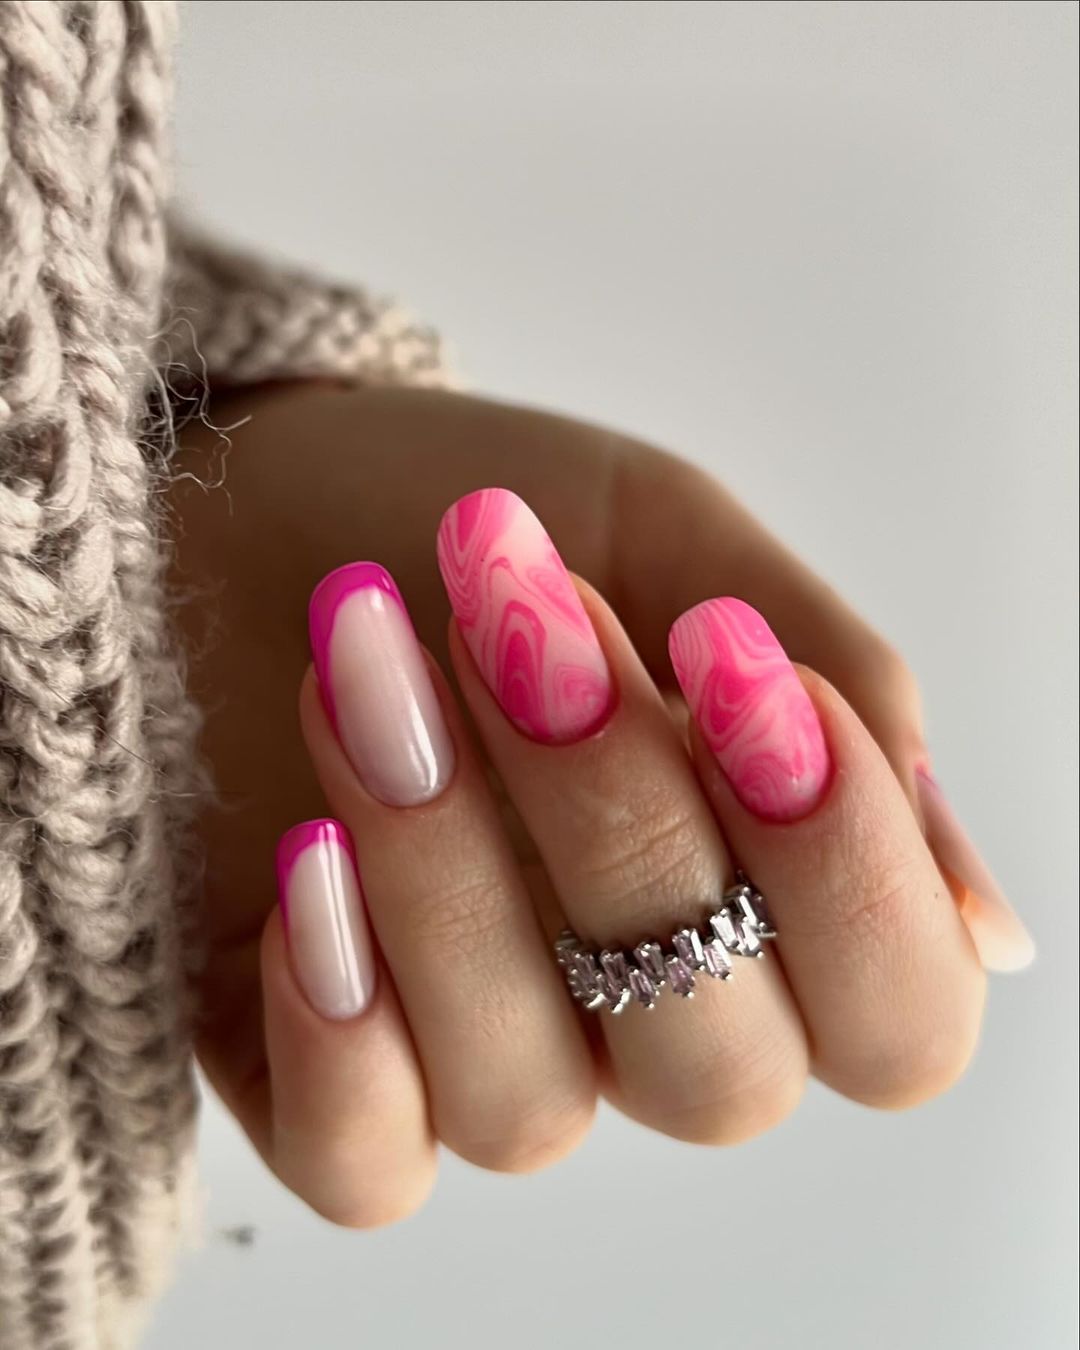
The Whirlwind Kit
- Base: Soft pink gel polish
- Swirl: Neon pink gel paint
- Top Coat: Matte for contrast with the glossy swirl
- Tools: Dotting tool or toothpick for swirling Professional Tip: Apply the neon pink in random patterns, then use a dotting tool or toothpick to swirl the paint before it sets for that perfect marbled effect.
Crafting the Candy Dream
After your base of soft pink, add dollops of neon pink and use your tool to gently swirl the colors together, creating a marbled masterpiece. A matte top coat over the base with a clear gloss on the swirls will add dimension and highlight the motion in the design.
Dainty Florals Meet Sunny Cheer
Imagine your nails as the canvas for a springtime meadow under a sunny sky. The pale yellow base serves as a backdrop for a scattering of delicate blue and white flowers, reminiscent of forget-me-nots dancing in a light breeze. This charming design would be perfect for a daytime garden party or a breezy beach picnic, giving off vibes of freshness and simple joy.
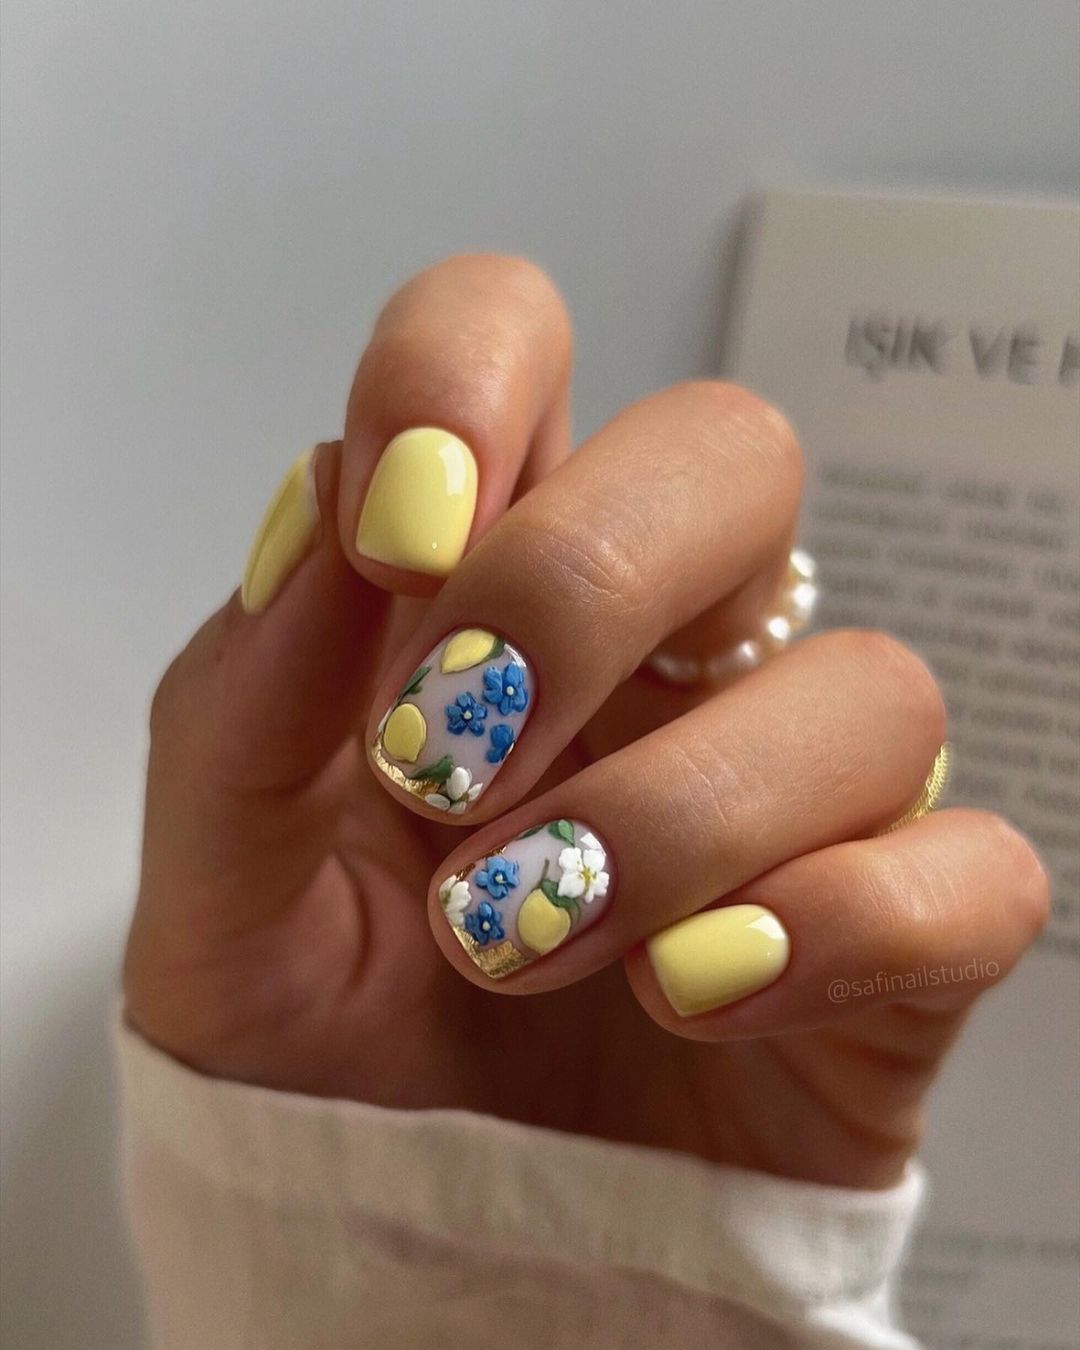
The Essentials
- Base: Pale Yellow Gel Polish
- Accents: Blue and White Acrylic Paint for Flowers, Green for Leaves
- Top Coat: High-Gloss Finish to Make the Colors Pop
- Tools: Fine Detail Brush Professional Tip: Use a light touch when painting the flowers to keep them looking airy and delicate against the soft yellow.
Crafting the Meadow
After laying down the yellow gel polish, use a fine brush to hand-paint the tiny flowers. Add a few green strokes for leaves to bring the design together. A glossy top coat will provide the perfect finish, enhancing the vibrant colors and giving the design a sunny disposition.
Coastal Artistry
This nail design is like an abstract painting of a coastal scene, with soothing blue tones and sandy textures coming together to create a serene beach atmosphere. The addition of metallic gold leaf is like the sun glinting off the water, perfect for those who carry the calm of the beach with them.
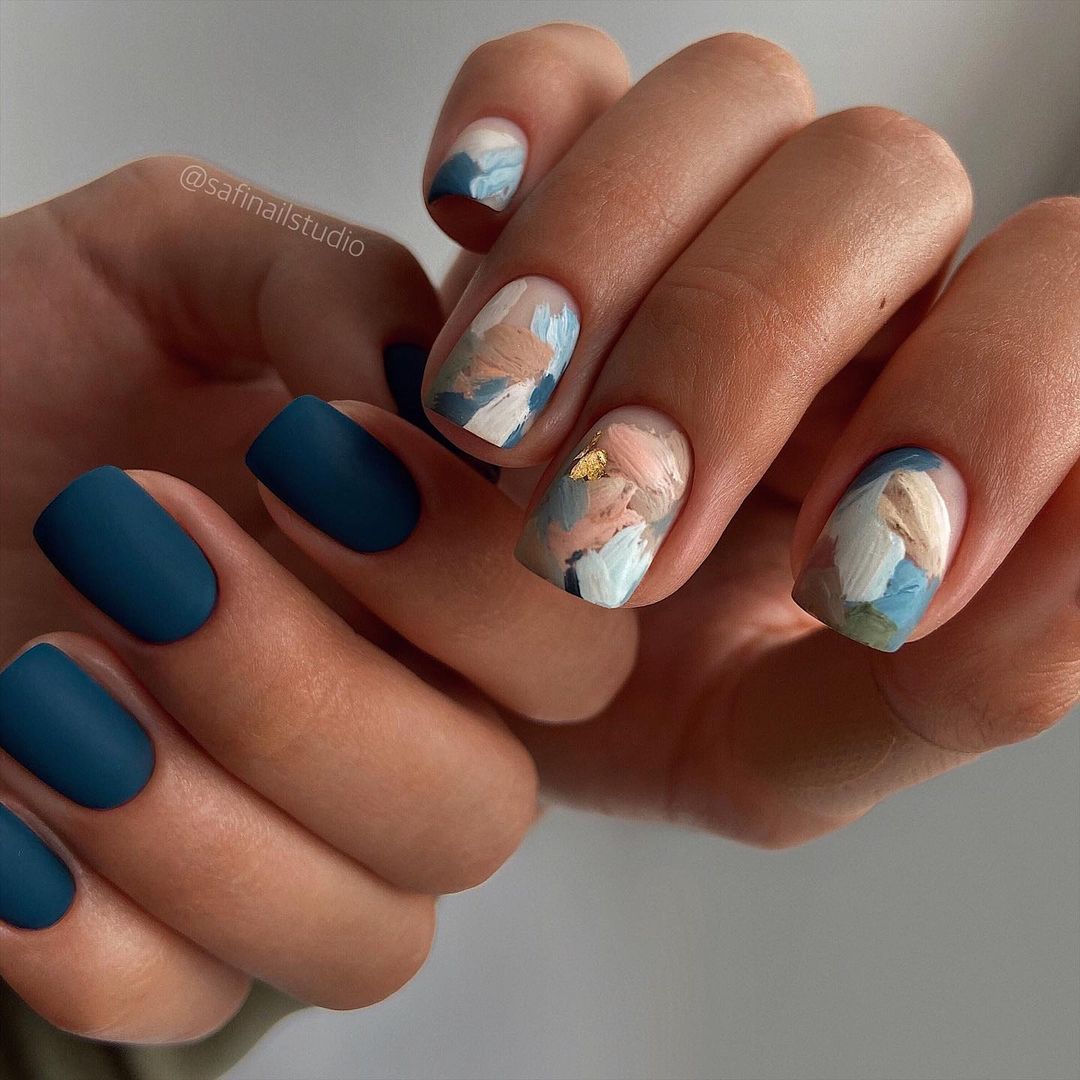
The Essentials
- Base: Matte Blue Gel Polish in Various Shades for Depth
- Accents: Nude and White Polish for Sandy Textures, Gold Leaf for Sunlight Reflection
- Top Coat: Matte Finish for an Artistic, Painted Effect
- Tools: Sponge for Texture, Tweezers for Gold Leaf Professional Tip: Create depth by layering different shades of blue, and use the sponge to dab on the nude and white polishes for a textured look resembling sand.
Crafting the Seascape
Begin with a base of matte blue polish. Sponge on the nude and white to mimic sand, then add touches of gold leaf to catch the light. Seal with a matte top coat for an evocative, artful finish that will transport you straight to the shoreline.
FAQ: Your Guide to Summer Nail Perfection
Q: What colors are in for summer vacation & beach nail 2024?
A: Bright whites, ocean blues, and tropical pinks are making waves this season, with accents of glitter and gloss for that sun-catching sparkle.
Q: Can I achieve these designs with short nails?
A: Absolutely! Short nails are perfect canvases for simple yet stunning designs. They’re practical for a holiday and can sport any look, from French tips to fun art designs.
Q: How can I prevent my nail art from chipping during my vacation?
A: Invest in a good quality top coat and apply it every few days to maintain the integrity of your nail art. Avoiding excessive contact with chlorinated water and applying cuticle oil daily can also extend the life of your designs.
Q: Are there any trending pedicure ideas to match my manicure?
A: For a cohesive look, match your pedicure with elements from your manicure. A bright polish paired with a simple French tip can echo your hand’s design. Or, opt for pedicure designs toenails that complement the theme, like a singular accent nail mirroring the manicure’s art.
Save Pin
