Autumn is a season full of rich colors and natural beauty, making it the perfect inspiration for nail art. Whether you’re a nail art enthusiast or a professional manicurist, fall leaves nail art offers a delightful blend of creativity and sophistication. From simple designs to intricate 3D art, there’s something for everyone. Let’s dive into some stunning fall leaves nail art ideas that will make your nails the center of attention this season.
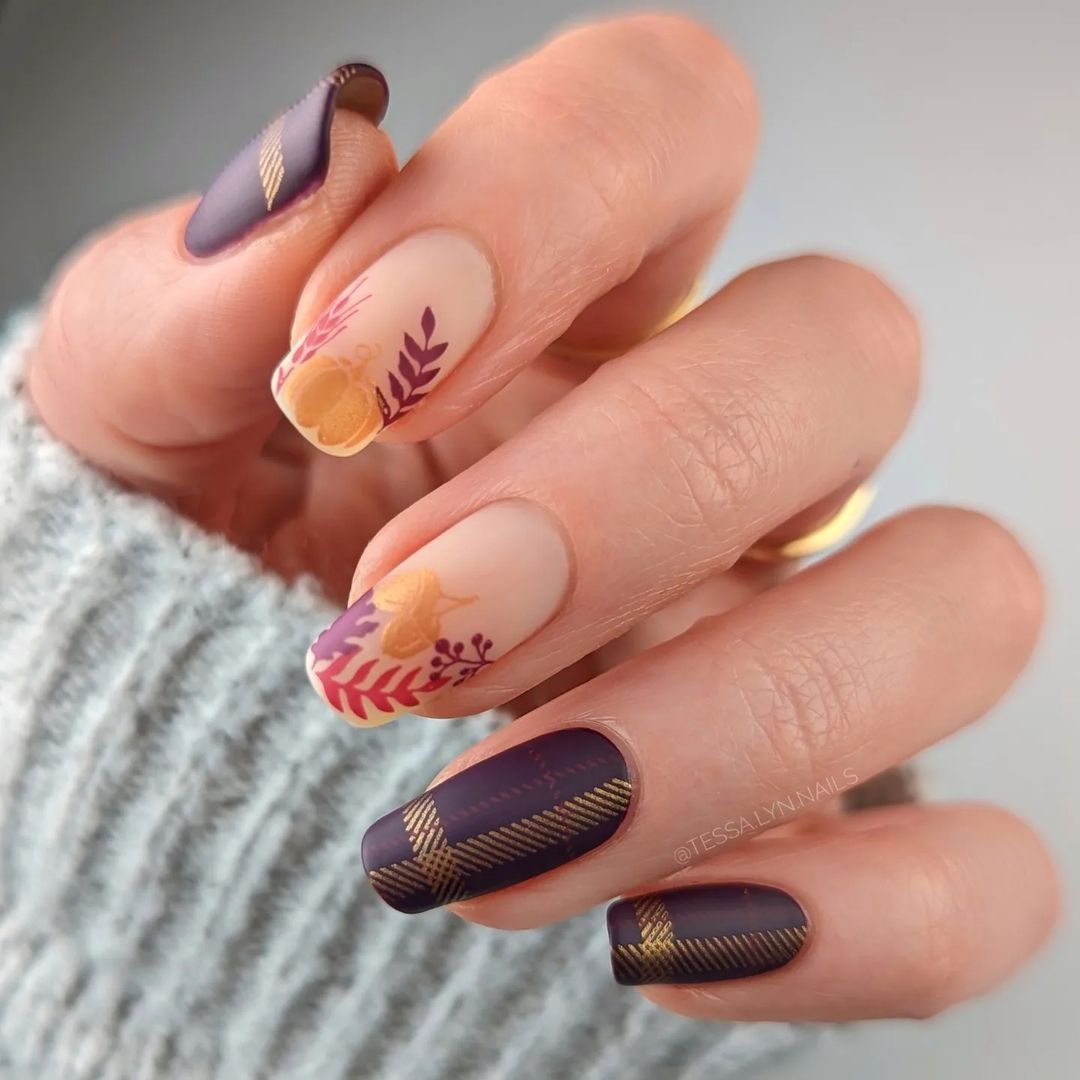
Burgundy Elegance
As a professional manicurist, I adore the elegance and warmth that burgundy brings to any nail design. In this particular look, the deep burgundy tips are paired with delicate, golden leaf accents, creating a sophisticated yet understated look. The fall leaves nail art here captures the essence of autumn, combining gold and burgundy for a timeless style.
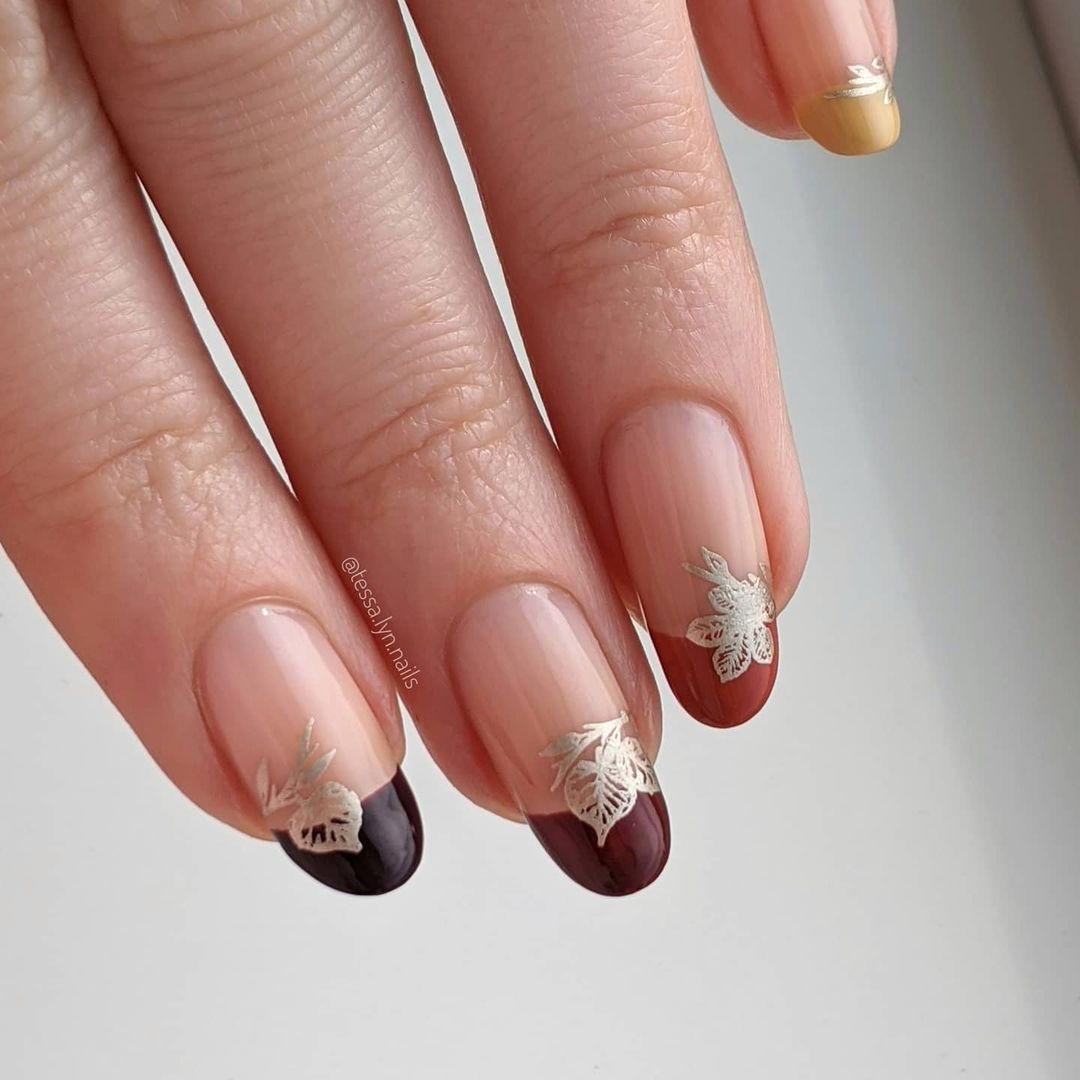
- OPI Nail Lacquer in “Malaga Wine”
- Sally Hansen Xtreme Wear in “Golden-I”
- Nail stamping kit with leaf designs
- Top coat and base coat
Step-by-Step Tutorial:
- Apply a base coat to protect your nails.
- Paint the tips with OPI’s “Malaga Wine.”
- Using the stamping kit, apply the gold leaf designs to the nails.
- Finish with a top coat to seal in the design and add shine.
Plaid Perfection
Plaid patterns are synonymous with fall fashion, and incorporating them into nail art can be a fun and stylish choice. This design combines plaid with fall leaves for a unique twist. The brown, green, and red tones used here are quintessential autumn colors that bring a cozy vibe to your nails.
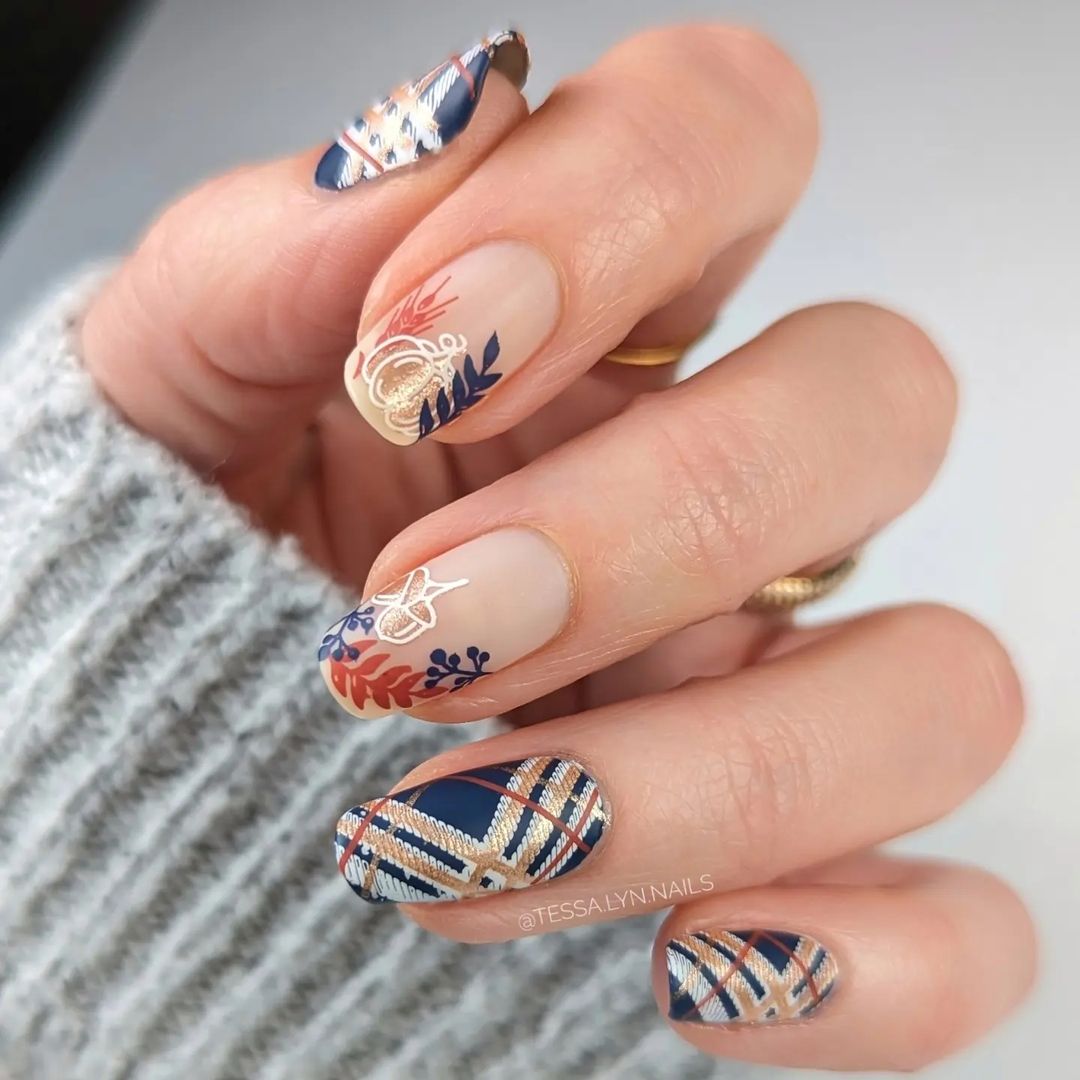
- Essie Nail Polish in “Mochachino”
- China Glaze Nail Lacquer in “Harvest Moon”
- Striper brush for plaid patterns
- Nail stamping kit for leaf designs
Step-by-Step Tutorial:
- Apply a base coat.
- Paint the nails with Essie’s “Mochachino.”
- Use the striper brush to create plaid patterns with “Harvest Moon” and additional fall colors.
- Stamp the leaf designs over the plaid pattern.
- Seal with a top coat.
Abstract Autumn
For those who love a more modern take on fall leaves nail art, this abstract design is perfect. Using a mix of red, black, and neutral tones, this manicure captures the spirit of falling leaves in a contemporary style. The playful use of colors and shapes makes it a standout look for any autumn occasion.
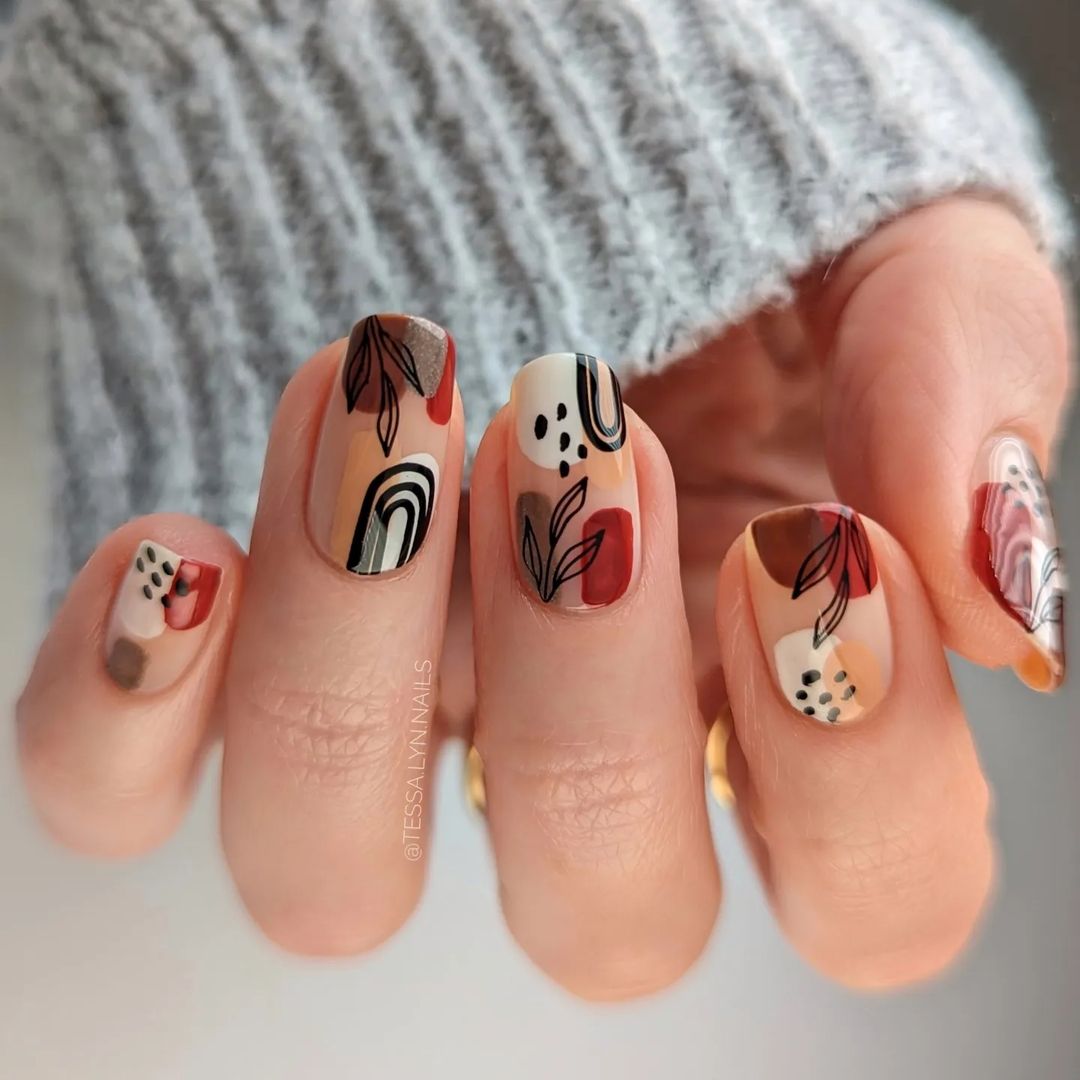
- Zoya Nail Polish in “Sahara”
- OPI Nail Lacquer in “Big Apple Red”
- Black nail art pen
- Top coat and base coat
Step-by-Step Tutorial:
- Start with a base coat.
- Apply Zoya’s “Sahara” as the base color.
- Using the black nail art pen, draw abstract leaf shapes and patterns.
- Add accents of red with OPI’s “Big Apple Red.”
- Finish with a top coat to protect the design.
Golden Autumn Leaves
This design beautifully captures the essence of fall with its rich golden hues and intricate leaf patterns. The use of orange and brown leaves against a creamy backdrop creates a warm and inviting look that’s perfect for the season. The accent nail in a shimmering gold polish adds a touch of glamour, making this design both elegant and festive.
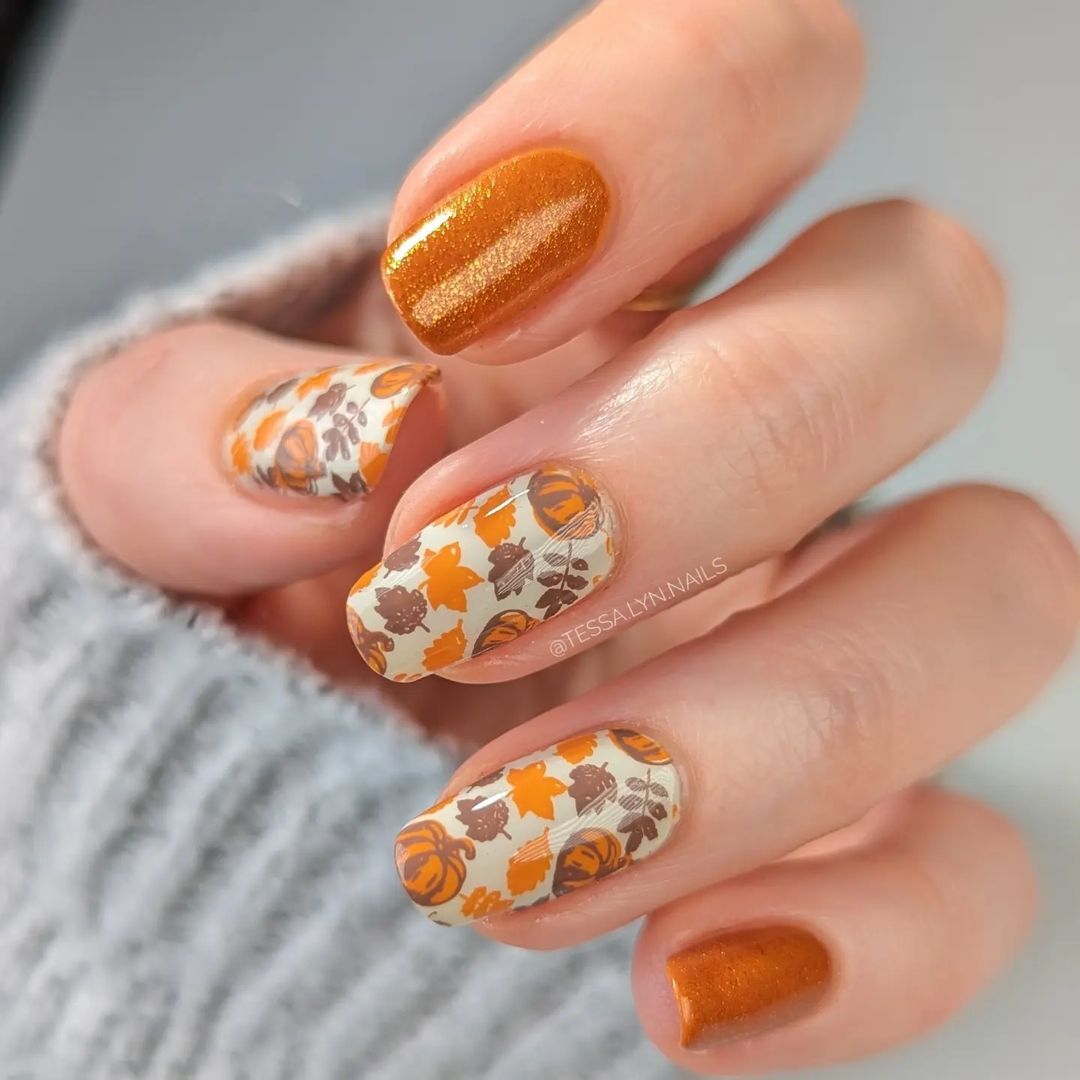
- Essie Nail Polish in “Playing Koi”
- Zoya Nail Polish in “Hunter”
- Gold shimmer polish like Sally Hansen Xtreme Wear in “Golden-I”
- Nail stamping kit with autumn leaf designs
- Top coat and base coat
Step-by-Step Tutorial:
- Apply a base coat to protect your nails.
- Paint all nails with a creamy white base color.
- Use the nail stamping kit to apply orange and brown leaf designs on the nails.
- Accent one nail with a gold shimmer polish.
- Finish with a top coat to seal in the design and add shine.
Save Pin

Cozy Plaid and Florals
This nail design combines cozy plaid patterns with delicate floral accents, creating a stylish and sophisticated look. The muted blue and brown tones are perfect for autumn, offering a chic and modern twist on traditional fall colors. The mix of patterns adds visual interest, making this design stand out while still being understated.
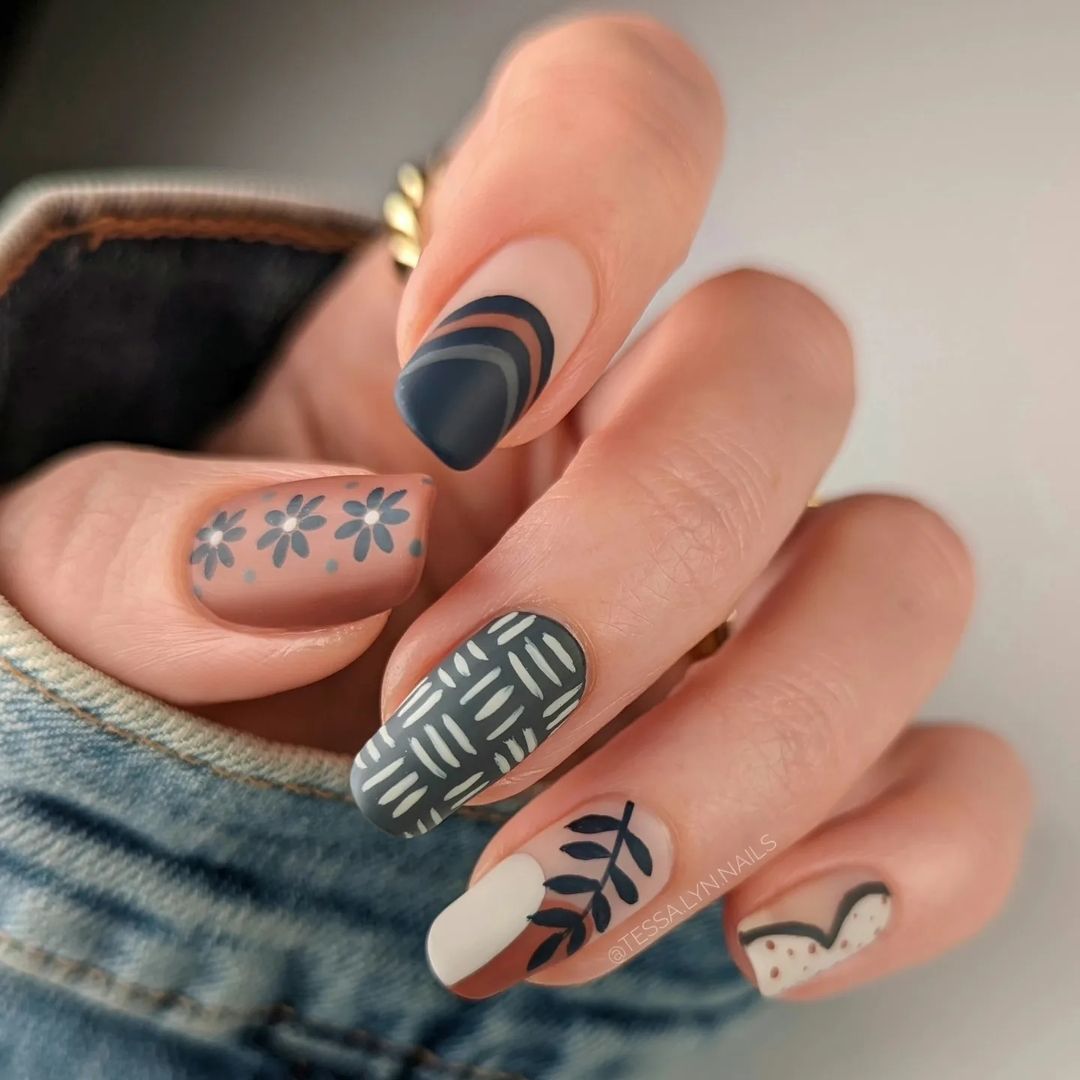
- OPI Nail Lacquer in “Less is Norse”
- Essie Nail Polish in “Clothing Optional”
- Matte top coat
- Nail art brushes for detailed patterns
- Top coat and base coat
Step-by-Step Tutorial:
- Apply a base coat.
- Paint nails with the base colors: some nails in blue, others in brown.
- Use nail art brushes to create plaid patterns on the blue nails.
- Add delicate floral accents on the brown nails.
- Apply a matte top coat to give the design a sophisticated finish.
Autumn Ombre Leaves
This stunning nail art features an ombre effect in red, green, and orange, with delicate black leaf designs overlaying the gradient. The ombre background mimics the changing colors of fall leaves, while the black leaf outlines add a touch of elegance. This design is perfect for those who love intricate nail art that reflects the beauty of the season.
- China Glaze Nail Lacquer in “Spice to Meet You”
- OPI Nail Lacquer in “Stay Off the Lawn!”
- Black nail art pen
- Makeup sponge for the ombre effect
- Top coat and base coat
Step-by-Step Tutorial:
- Apply a base coat.
- Use a makeup sponge to create an ombre effect with red, green, and orange polishes.
- Once dry, use a black nail art pen to draw delicate leaf designs over the ombre background.
- Seal with a top coat to protect the design and add a glossy finish.
Delicate Autumn Leaves
This design perfectly embodies the gentle transition of fall with its soft, neutral base and delicate orange and brown leaf accents. The subtle hints of gold shimmer throughout add a touch of elegance and sophistication, making it a timeless autumn look.
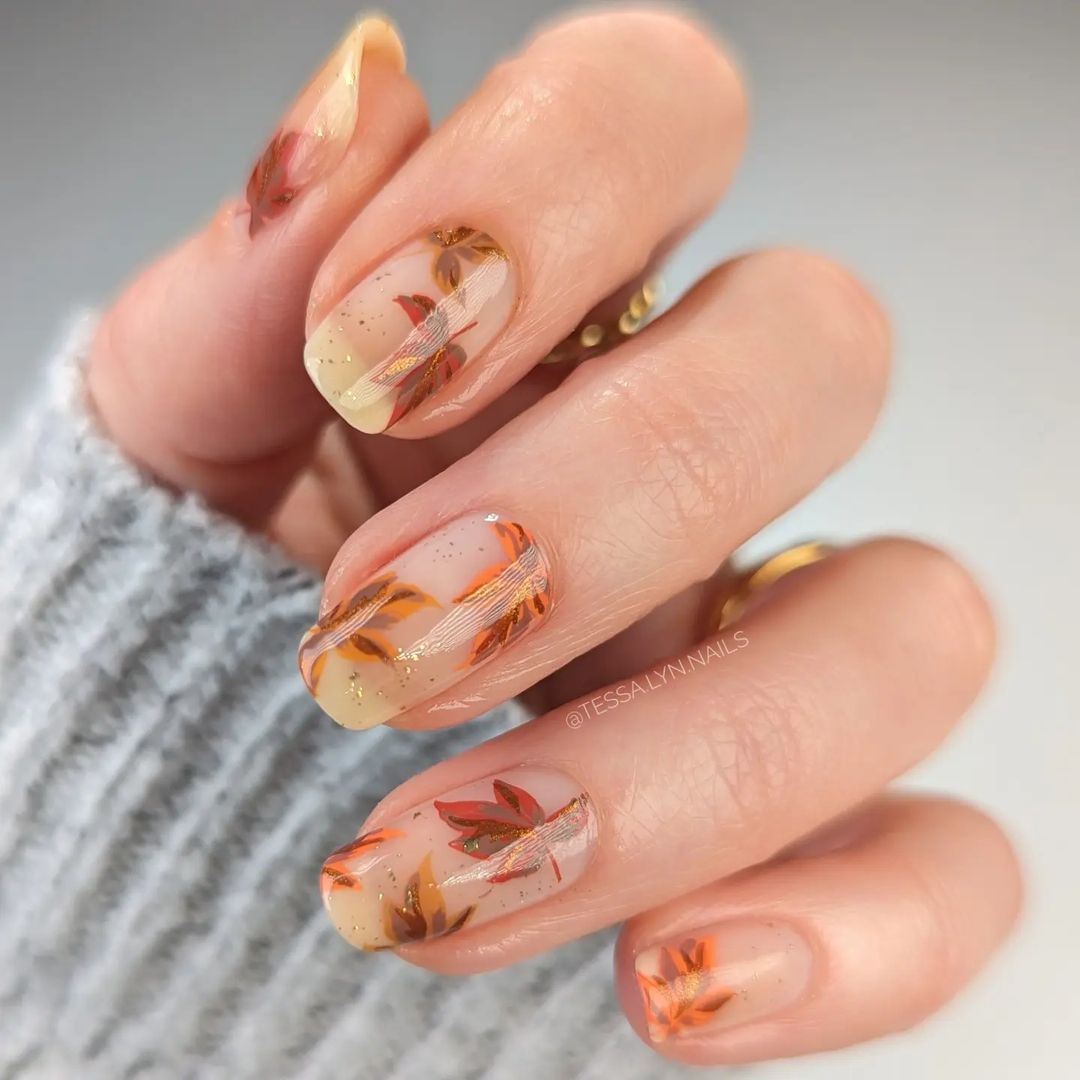
- Essie Nail Polish in “Bare with Me”
- OPI Nail Lacquer in “Cinnamon Sweet”
- Gold shimmer polish like Sally Hansen Xtreme Wear in “Golden-I”
- Nail art brushes for leaf details
- Top coat and base coat
Step-by-Step Tutorial:
- Apply a base coat.
- Paint nails with Essie’s “Bare with Me.”
- Using a fine nail art brush, draw leaf shapes with OPI’s “Cinnamon Sweet.”
- Add subtle gold shimmer accents to the leaves for added depth.
- Finish with a top coat to seal the design.
Earthy Fall Layers
This design features an earthy mix of green, brown, and black tones, layered with abstract leaves and branches. The combination of colors and patterns creates a harmonious and grounded look that’s perfect for fall.

- Zoya Nail Polish in “Eartha”
- China Glaze Nail Lacquer in “Wood You Wanna?”
- Black nail art pen
- Nail art brushes for layering
- Top coat and base coat
Step-by-Step Tutorial:
- Start with a base coat.
- Apply Zoya’s “Eartha” as the base color.
- Use a nail art brush to layer green and brown tones in abstract patterns.
- Draw delicate branches and leaves with a black nail art pen.
- Seal with a top coat.
Plaid and Maple Leaves
This design combines the classic look of plaid with bold maple leaf accents. The yellow and blue color scheme offers a fresh take on traditional fall colors, while the white leaves add a crisp contrast.
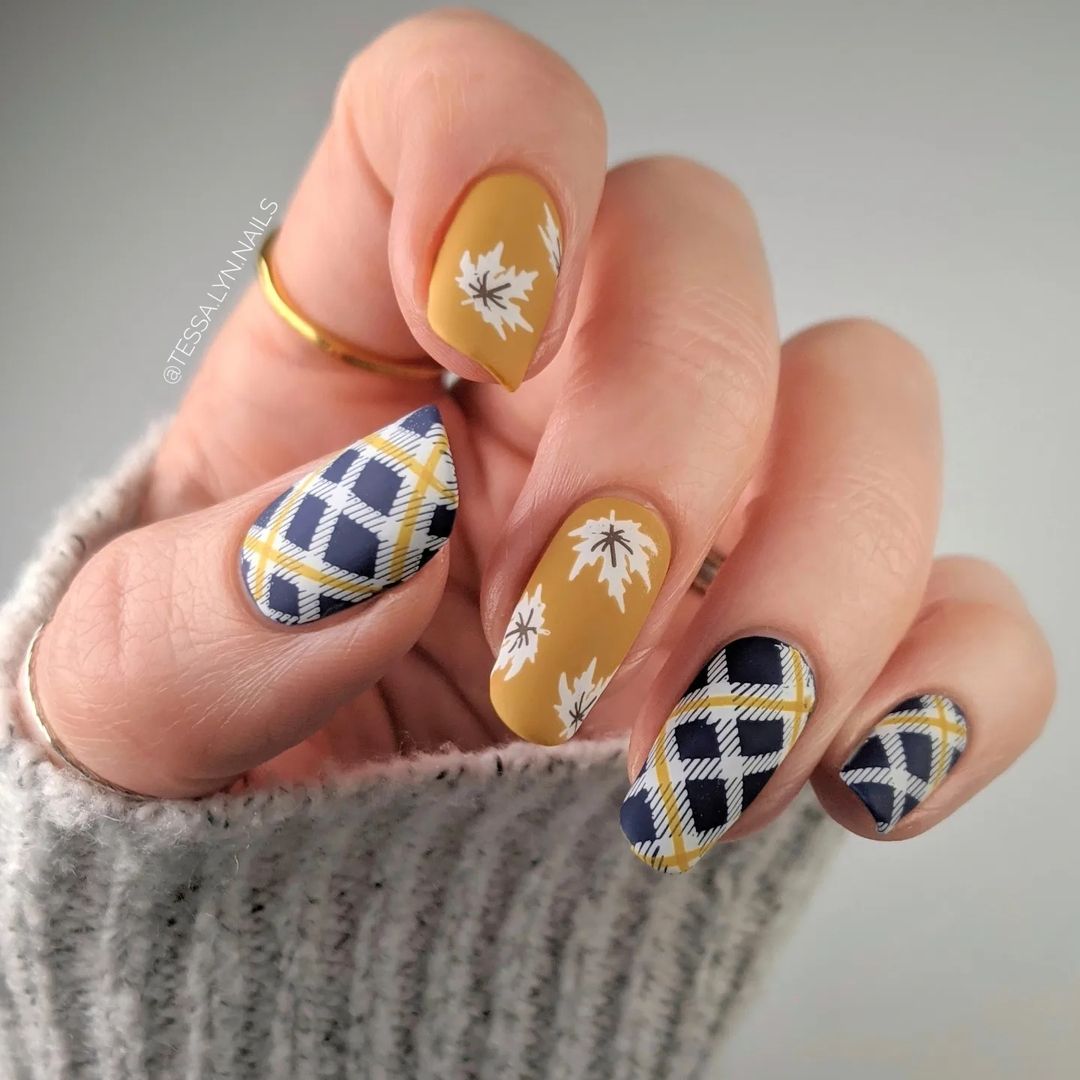
- OPI Nail Lacquer in “Sun, Sea, and Sand in My Pants”
- Essie Nail Polish in “Aruba Blue”
- White nail art pen
- Plaid stamping kit
- Top coat and base coat
Step-by-Step Tutorial:
- Apply a base coat.
- Paint some nails with OPI’s “Sun, Sea, and Sand in My Pants” and others with Essie’s “Aruba Blue.”
- Use the plaid stamping kit to create plaid patterns on the blue nails.
- Draw white maple leaves on the yellow nails.
- Finish with a top coat to seal the design.
Save Pin
Floral Fall Accents
This charming design features delicate fall flowers in orange and blue tones against a white backdrop. The addition of a shimmery orange accent nail adds a touch of warmth and sparkle, perfect for embracing the autumn season.
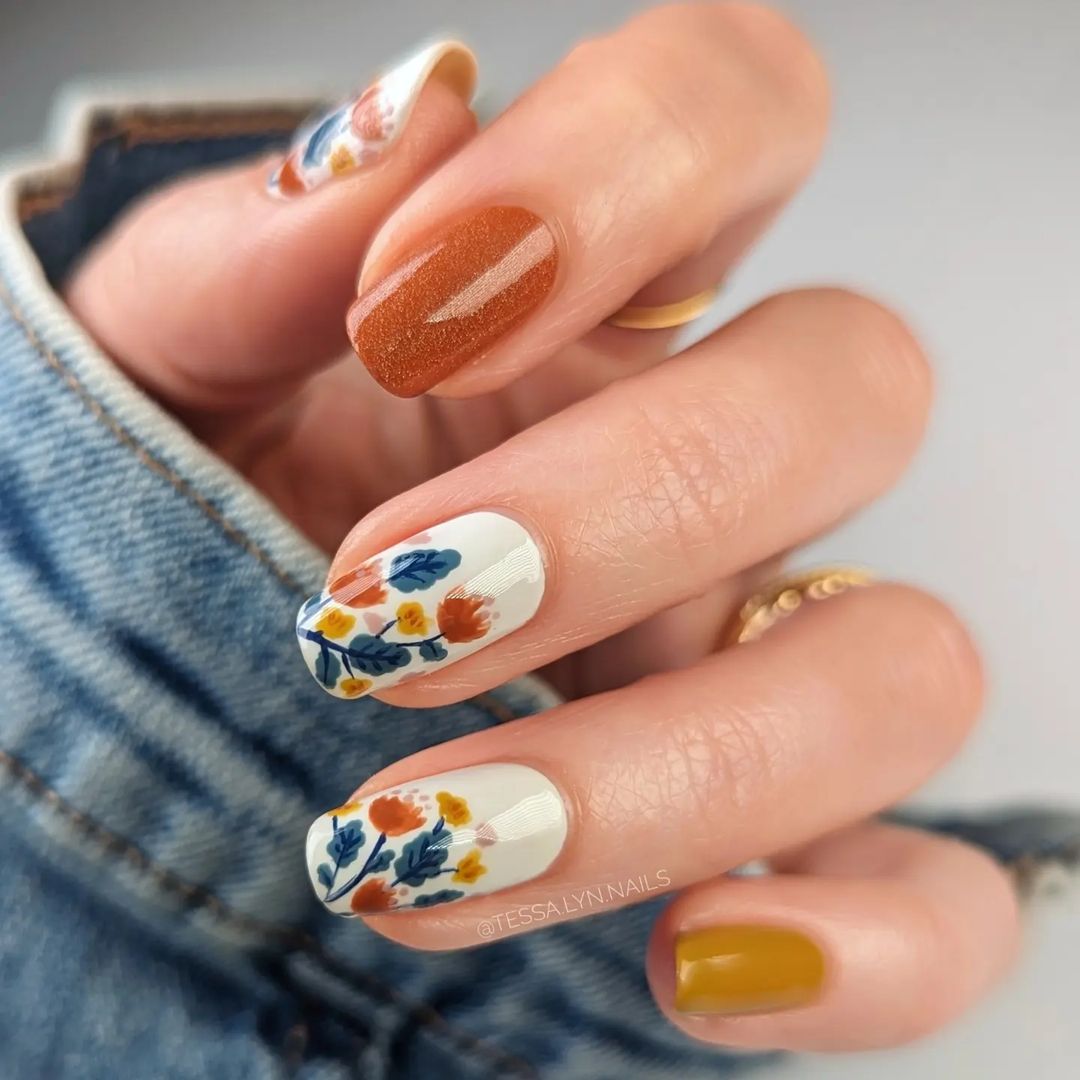
- Essie Nail Polish in “Blanc”
- OPI Nail Lacquer in “Big Apple Red”
- Blue nail art pen
- Orange shimmer polish like Zoya’s “Autumn”
- Top coat and base coat
Step-by-Step Tutorial:
- Apply a base coat.
- Paint nails with Essie’s “Blanc.”
- Use a nail art pen to draw delicate flowers in orange and blue.
- Accent one nail with a shimmery orange polish.
- Seal with a top coat.
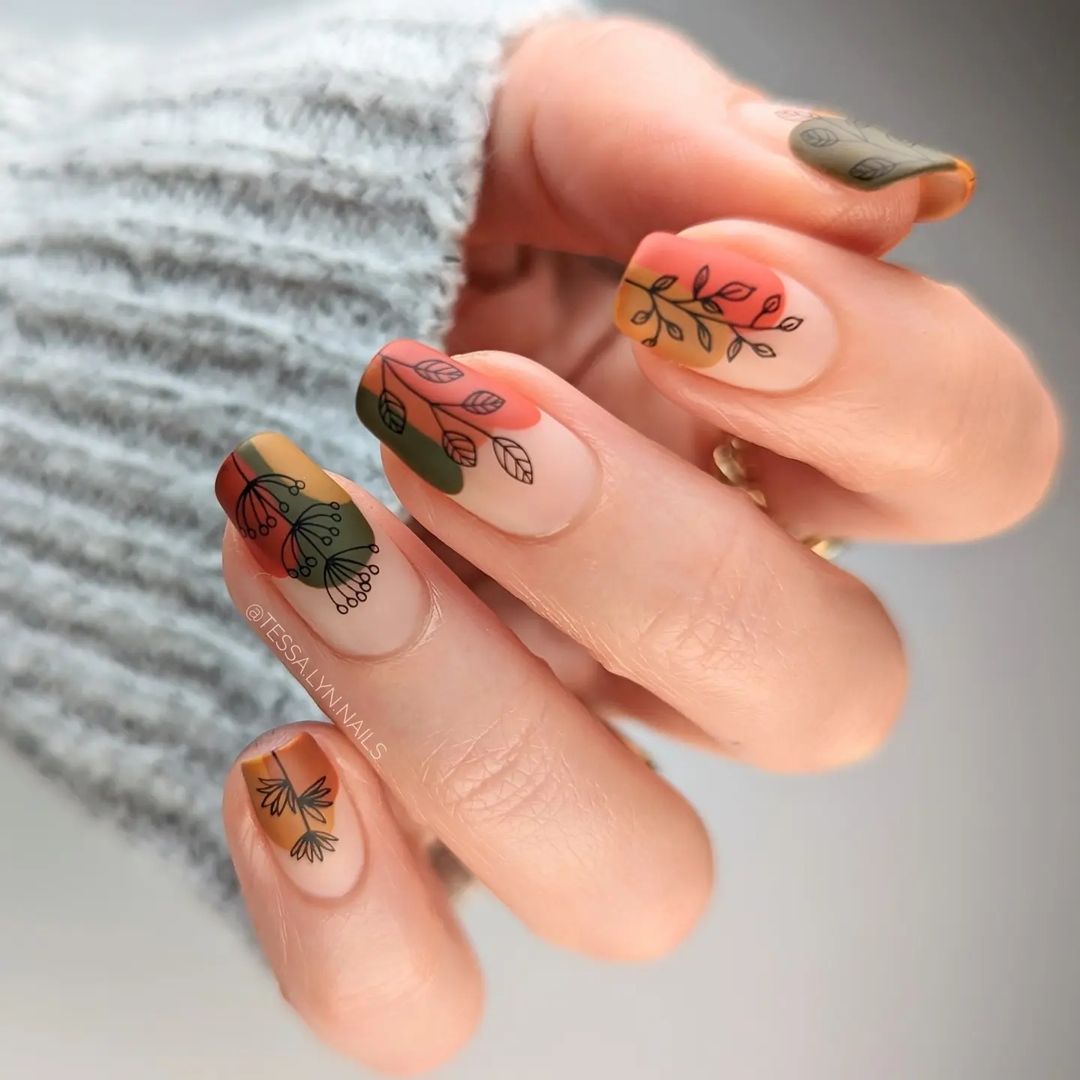
Abstract Fall Hues
This design uses a blend of green, brown, and red tones to create an abstract, artistic look. The soft, blended colors mimic the natural transition of leaves in the fall, offering a stylish yet understated design.
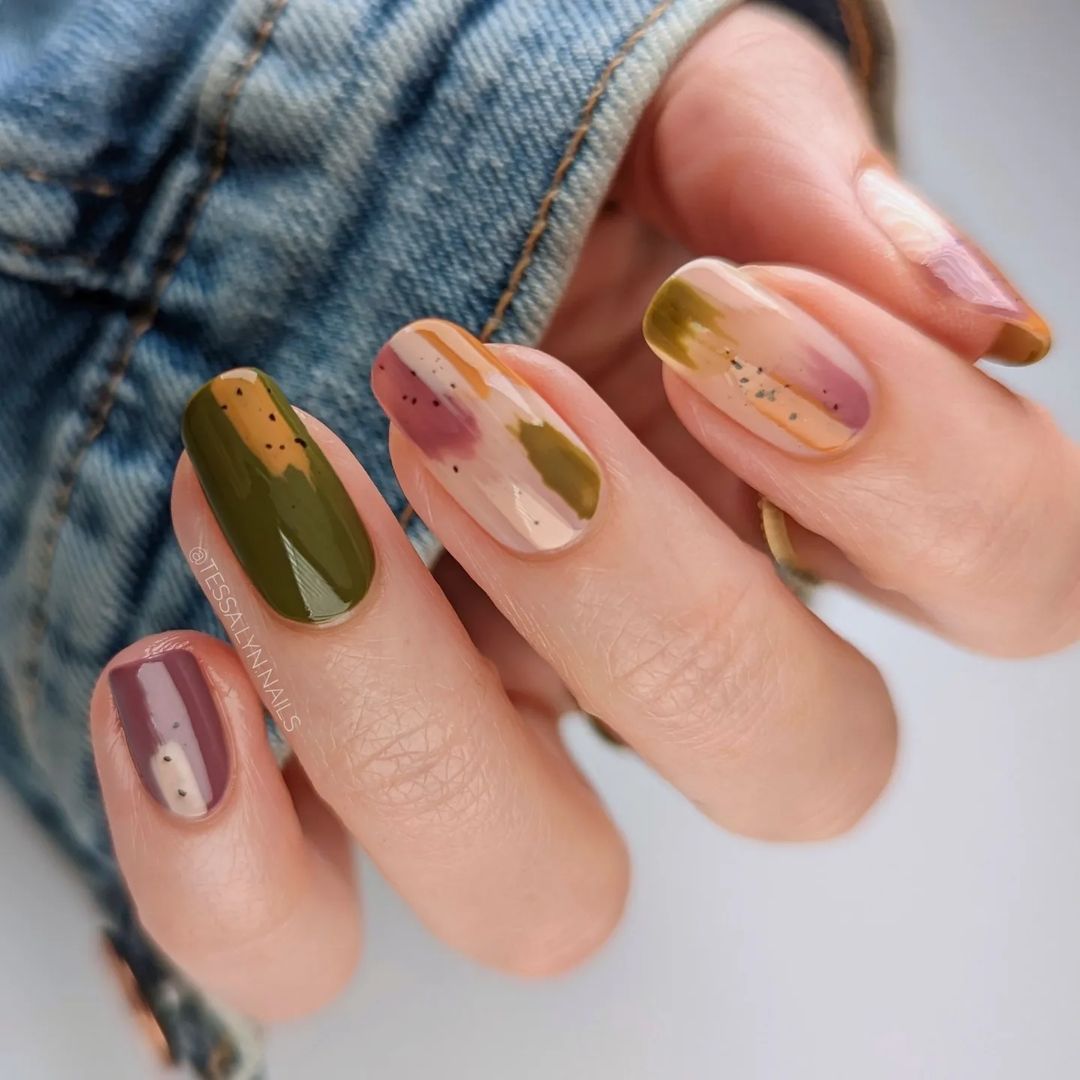
- China Glaze Nail Lacquer in “Central Parka”
- OPI Nail Lacquer in “Chocolate Moose”
- Red nail art pen
- Makeup sponge for blending
- Top coat and base coat
Step-by-Step Tutorial:
- Apply a base coat.
- Use a makeup sponge to blend green, brown, and red polishes on the nails.
- Add subtle accents with a red nail art pen.
- Finish with a top coat to protect the design.
Matte Autumn Geometrics
This design features a matte finish with geometric patterns in brown and black tones. The mix of dots, stripes, and leaf motifs creates a modern and sophisticated look that’s perfect for the fall season.
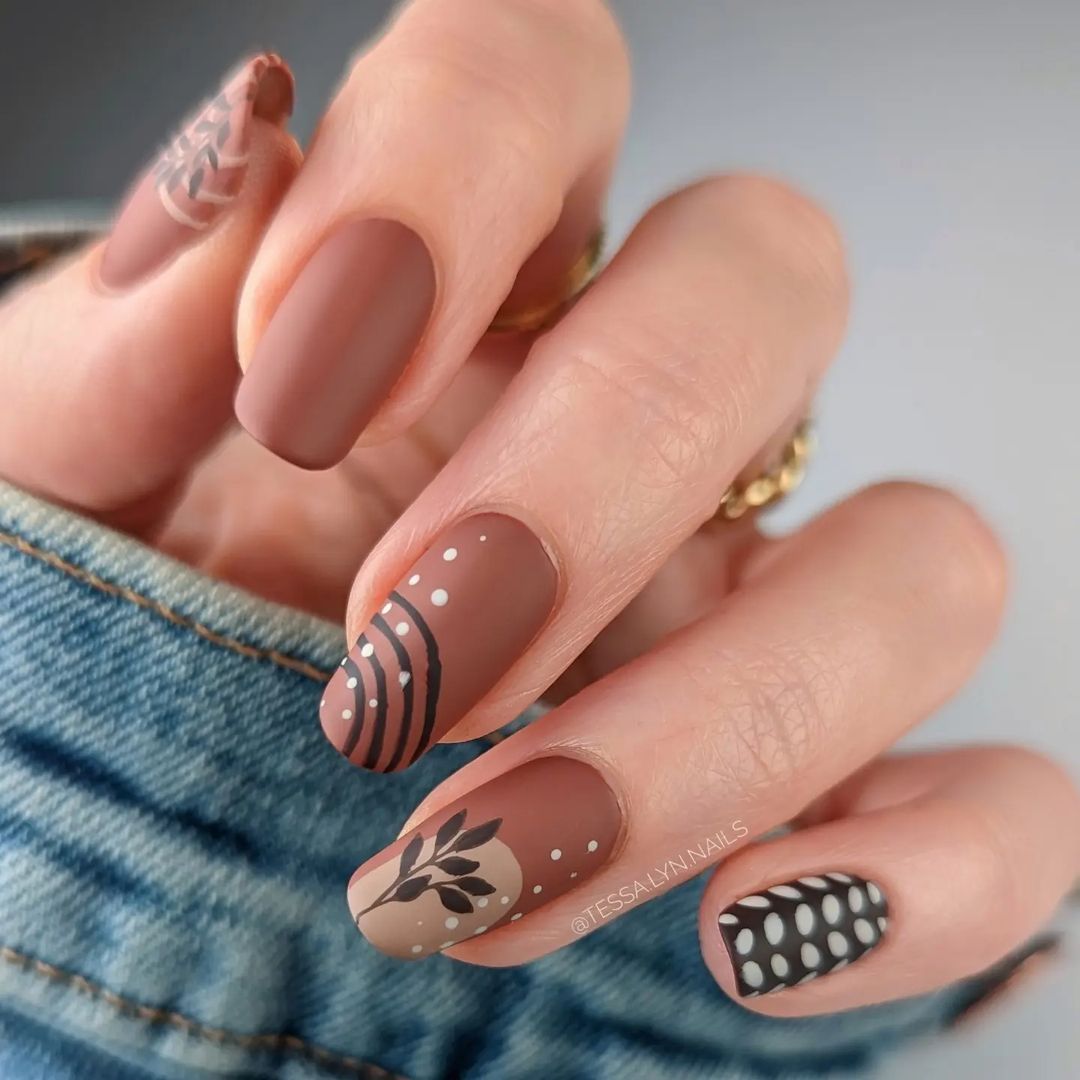
- Essie Nail Polish in “Clothing Optional”
- Black matte nail polish
- Nail art brushes for geometric patterns
- Matte top coat
- Top coat and base coat
Step-by-Step Tutorial:
- Apply a base coat.
- Paint nails with Essie’s “Clothing Optional.”
- Use nail art brushes to create geometric patterns with black matte polish.
- Finish with a matte top coat to seal the design.
Vibrant Fall Trees
This design captures the vibrant colors of fall with a playful depiction of autumn trees. The combination of orange, yellow, and red trees against a soft blue sky creates a cheerful and eye-catching look. The use of different shapes and sizes of trees adds depth and interest to the design.
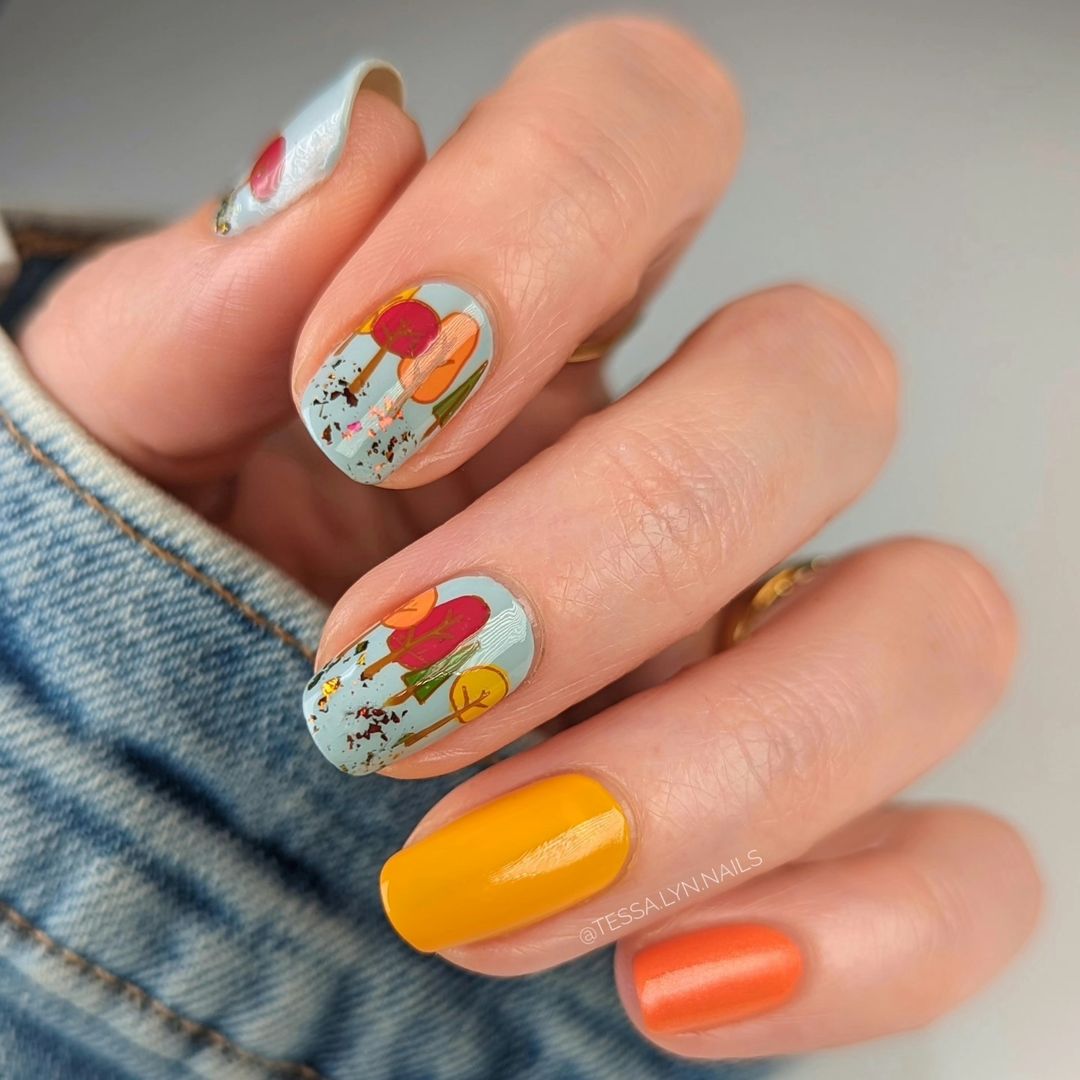
- Essie Nail Polish in “Baby’s Breath”
- OPI Nail Lacquer in “Sun, Sea, and Sand in My Pants”
- China Glaze Nail Lacquer in “Life Preserved”
- Nail art brushes for detailed trees
- Top coat and base coat
Step-by-Step Tutorial:
- Apply a base coat.
- Paint nails with Essie’s “Baby’s Breath.”
- Using nail art brushes, draw various tree shapes with yellow, orange, and red polishes.
- Add details like branches and leaves with a fine brush.
- Finish with a top coat to protect the design.
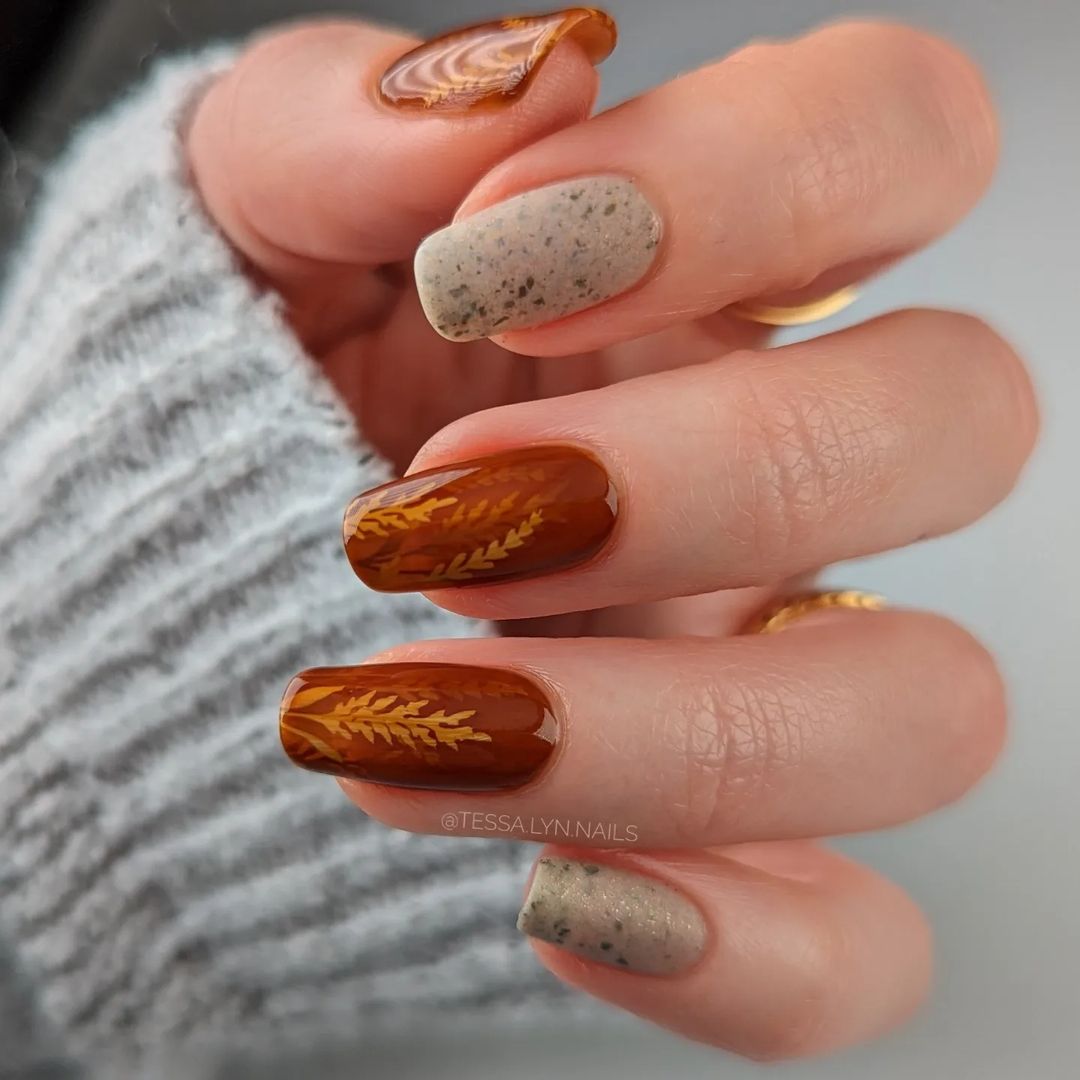
Berry and Foliage Accents
This design combines green and berry tones with delicate foliage accents, creating a sophisticated and seasonal look. The muted colors are perfect for fall, offering a stylish and subtle design that works for any occasion.

- OPI Nail Lacquer in “My Italian is a Little Rusty”
- Zoya Nail Polish in “Hunter”
- Essie Nail Polish in “Matte About You” top coat
- Nail art brushes for foliage details
- Top coat and base coat
Step-by-Step Tutorial:
- Apply a base coat.
- Paint nails with a combination of berry and green polishes.
- Use nail art brushes to draw foliage and berry accents.
- Apply a matte top coat for a sophisticated finish.
- Seal with a regular top coat on any accent nails.
Autumn Brush Strokes
This design features abstract brush strokes in orange, yellow, and brown, mimicking the falling leaves of autumn. The playful and artistic strokes create a dynamic and engaging look that’s perfect for the season.
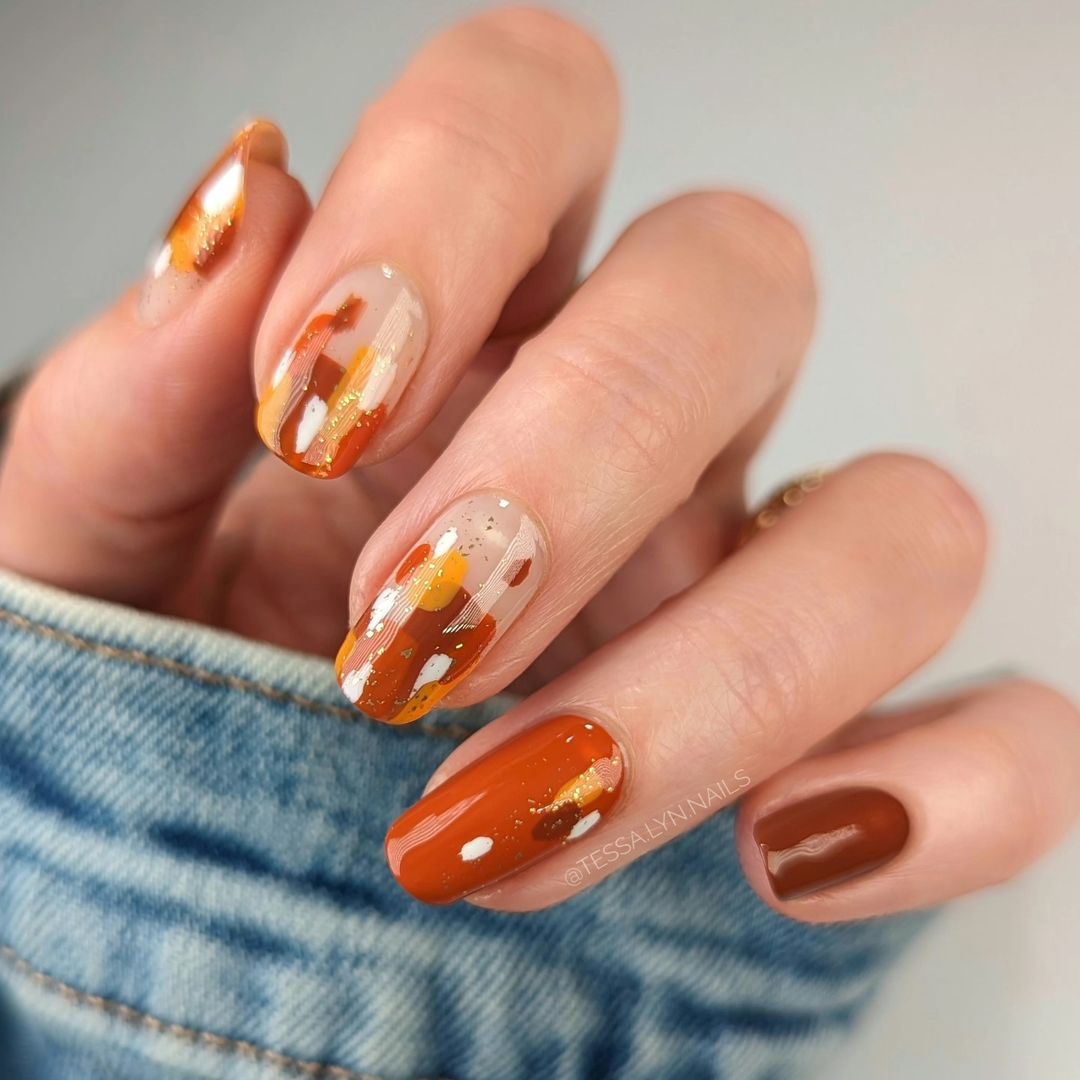
- China Glaze Nail Lacquer in “Desert Sun”
- OPI Nail Lacquer in “Don’t Pretzel My Buttons”
- Yellow nail art pen
- Nail art brushes for brush stroke effect
- Top coat and base coat
Step-by-Step Tutorial:
- Apply a base coat.
- Paint nails with a nude or light base color.
- Using a nail art brush, create brush stroke effects with orange, yellow, and brown polishes.
- Add accents with a yellow nail art pen for depth.
- Finish with a top coat to seal the design.
Tortoiseshell and Olive
This elegant design combines tortoiseshell patterns with rich olive green accents, creating a chic and modern look. The mix of patterns and colors offers a sophisticated style that’s perfect for the fall season.
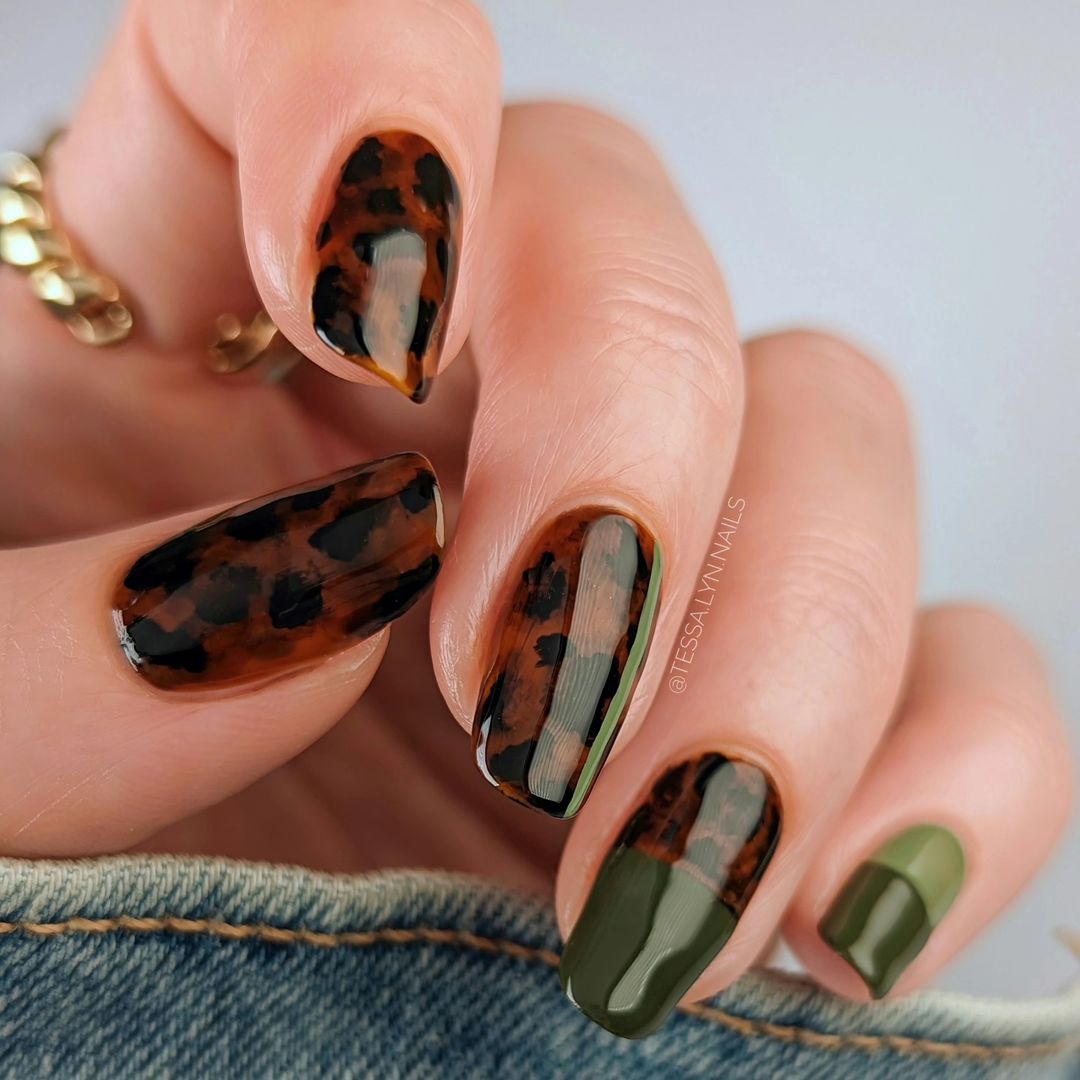
- Essie Nail Polish in “Partner in Crime”
- OPI Nail Lacquer in “Suzi – The First Lady of Nails”
- Brown nail art pen
- Top coat and base coat
Step-by-Step Tutorial:
- Apply a base coat.
- Paint some nails with Essie’s “Partner in Crime” and others with OPI’s “Suzi – The First Lady of Nails.”
- Use a brown nail art pen to create tortoiseshell patterns.
- Seal with a top coat to protect the design and add shine.
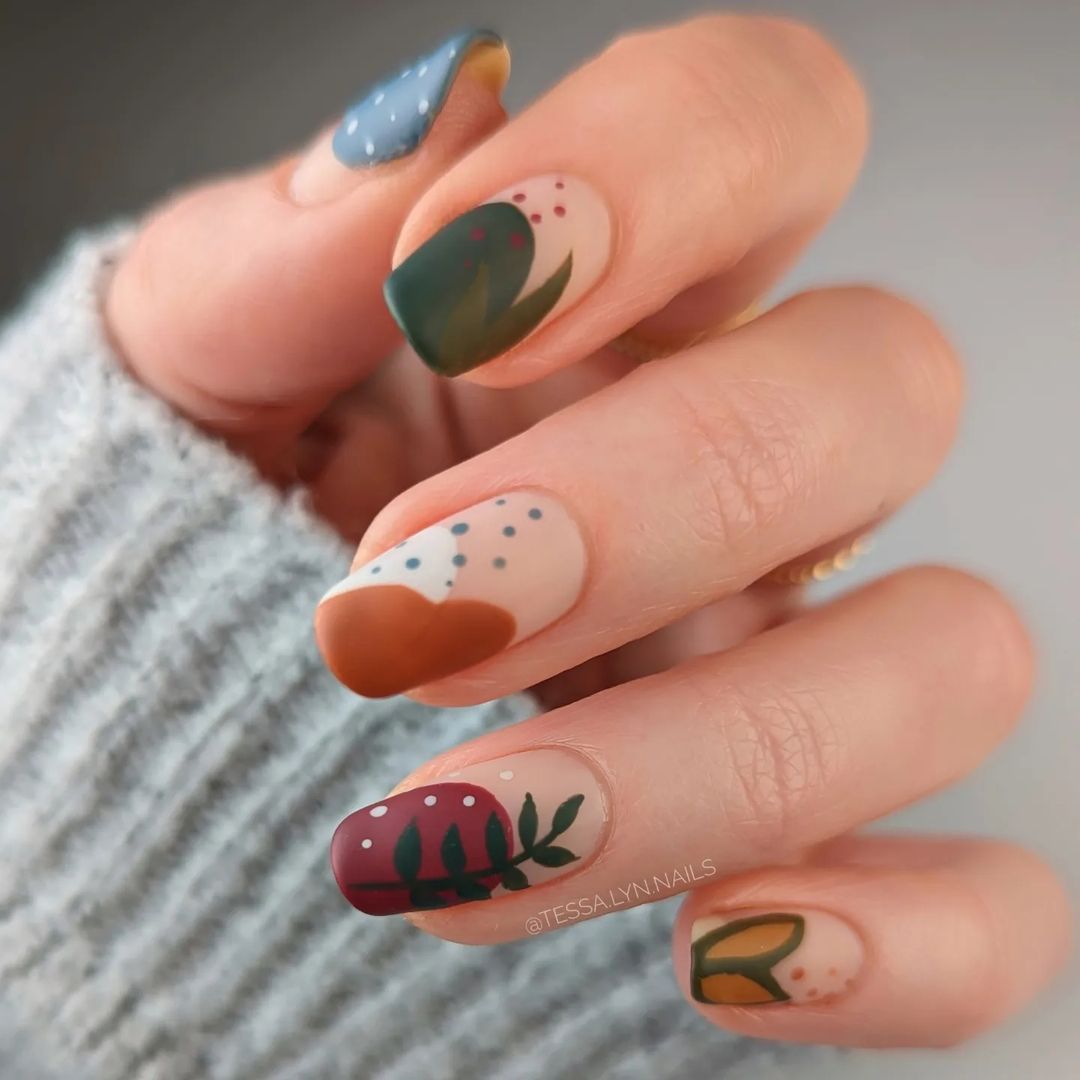
Hearts and Dots
This playful design features cute white hearts and dots on a warm brown background, paired with solid green and beige accents. The mix of patterns and solid colors creates a fun and whimsical look perfect for fall.
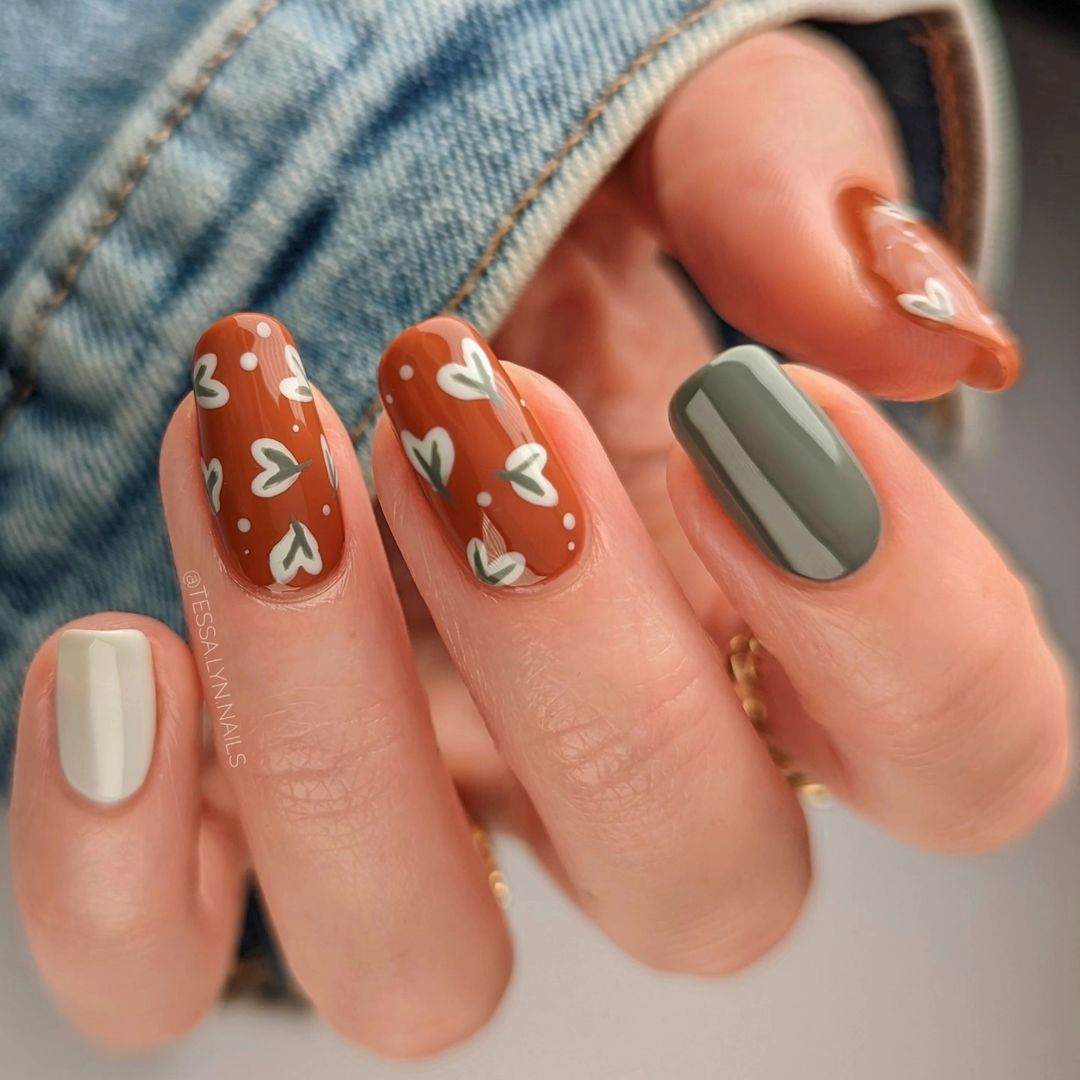
- OPI Nail Lacquer in “My Italian is a Little Rusty”
- Essie Nail Polish in “Maximillian Strasse Her”
- White nail art pen
- Top coat and base coat
Step-by-Step Tutorial:
- Apply a base coat.
- Paint some nails with OPI’s “My Italian is a Little Rusty” and others with Essie’s “Maximillian Strasse Her.”
- Use a white nail art pen to draw hearts and dots on the brown nails.
- Finish with a top coat to seal the design.
Neutral Abstract
This modern design features abstract shapes in black, brown, and nude tones, creating a minimalist yet striking look. The matte finish adds a touch of sophistication, making this design perfect for any fall occasion.
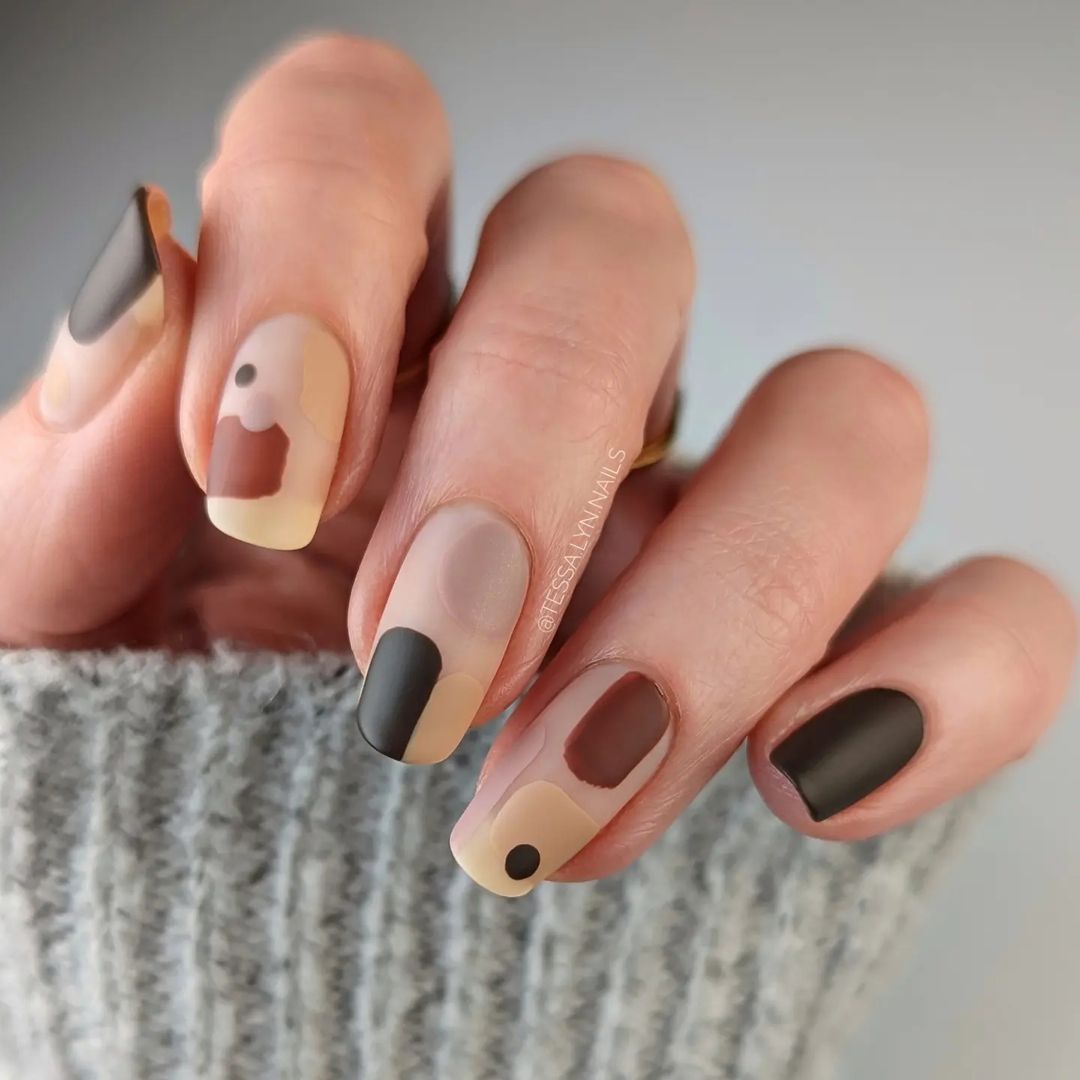
- OPI Nail Lacquer in “Black Onyx”
- Essie Nail Polish in “Sand Tropez”
- Matte top coat
- Nail art brushes for abstract shapes
- Top coat and base coat
Step-by-Step Tutorial:
- Apply a base coat.
- Paint nails with Essie’s “Sand Tropez.”
- Using nail art brushes, create abstract shapes with black and brown polishes.
- Apply a matte top coat for a sophisticated finish.
- Seal with a top coat to protect the design.
Colorful Autumn Leaves
This design is a vibrant blend of orange, purple, and yellow tones, with abstract strokes mimicking the beautiful fall foliage. The addition of gold leaf accents adds a touch of elegance and sophistication to this lively autumn look.
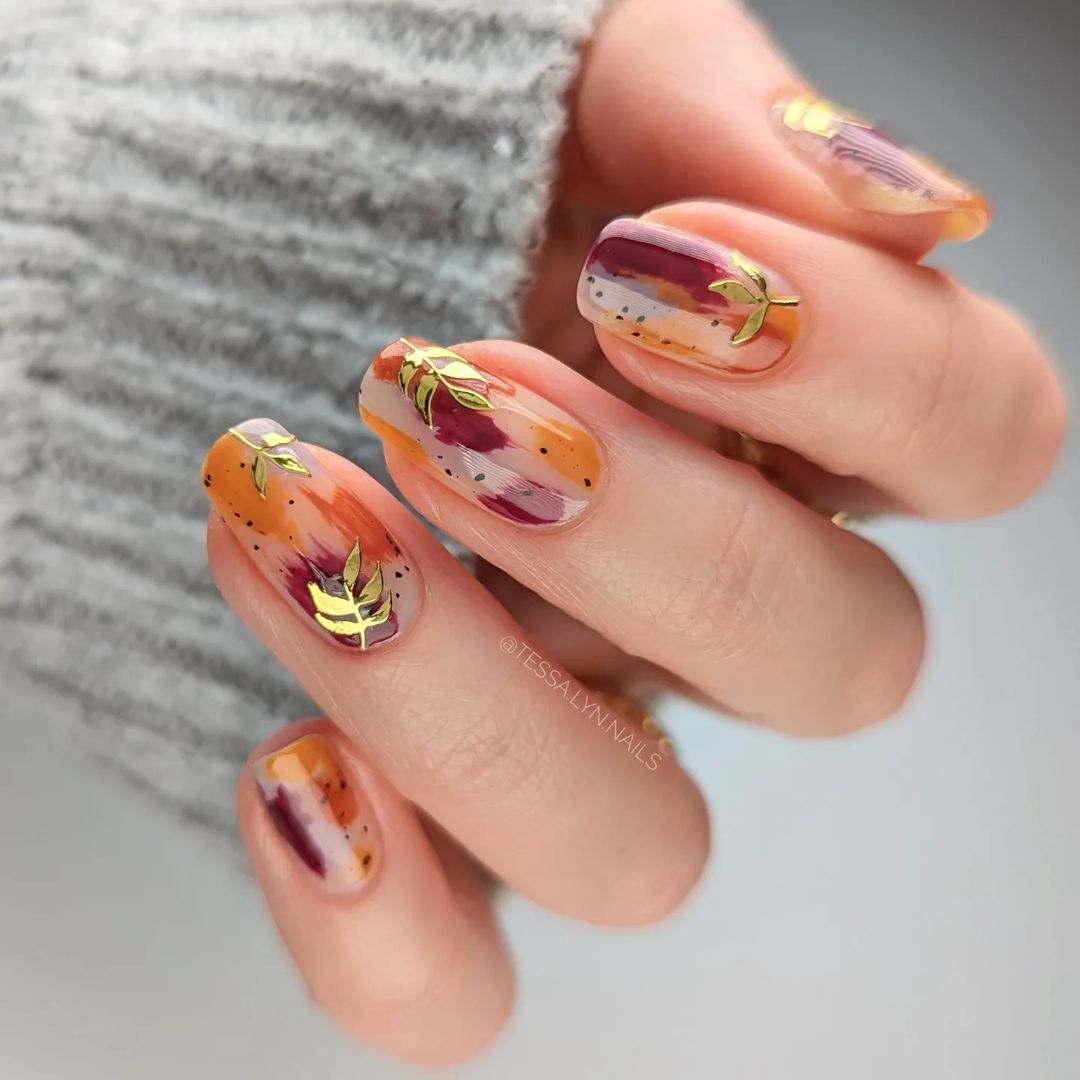
- Essie Nail Polish in “Playing Koi”
- OPI Nail Lacquer in “I’m Not Really a Waitress”
- Zoya Nail Polish in “Bee”
- Gold leaf flakes
- Nail art brushes for detailed strokes
- Top coat and base coat
Step-by-Step Tutorial:
- Apply a base coat.
- Paint nails with a nude base color.
- Use nail art brushes to create abstract strokes with orange, purple, and yellow polishes.
- Add gold leaf flakes to accentuate the design.
- Finish with a top coat to seal the design and add shine.
Delicate Floral Fall
This design features a delicate and soft fall floral pattern with orange, red, and yellow flowers against a clear or nude base. The subtle addition of white dots and gold accents brings a whimsical and elegant touch to this charming autumn look.
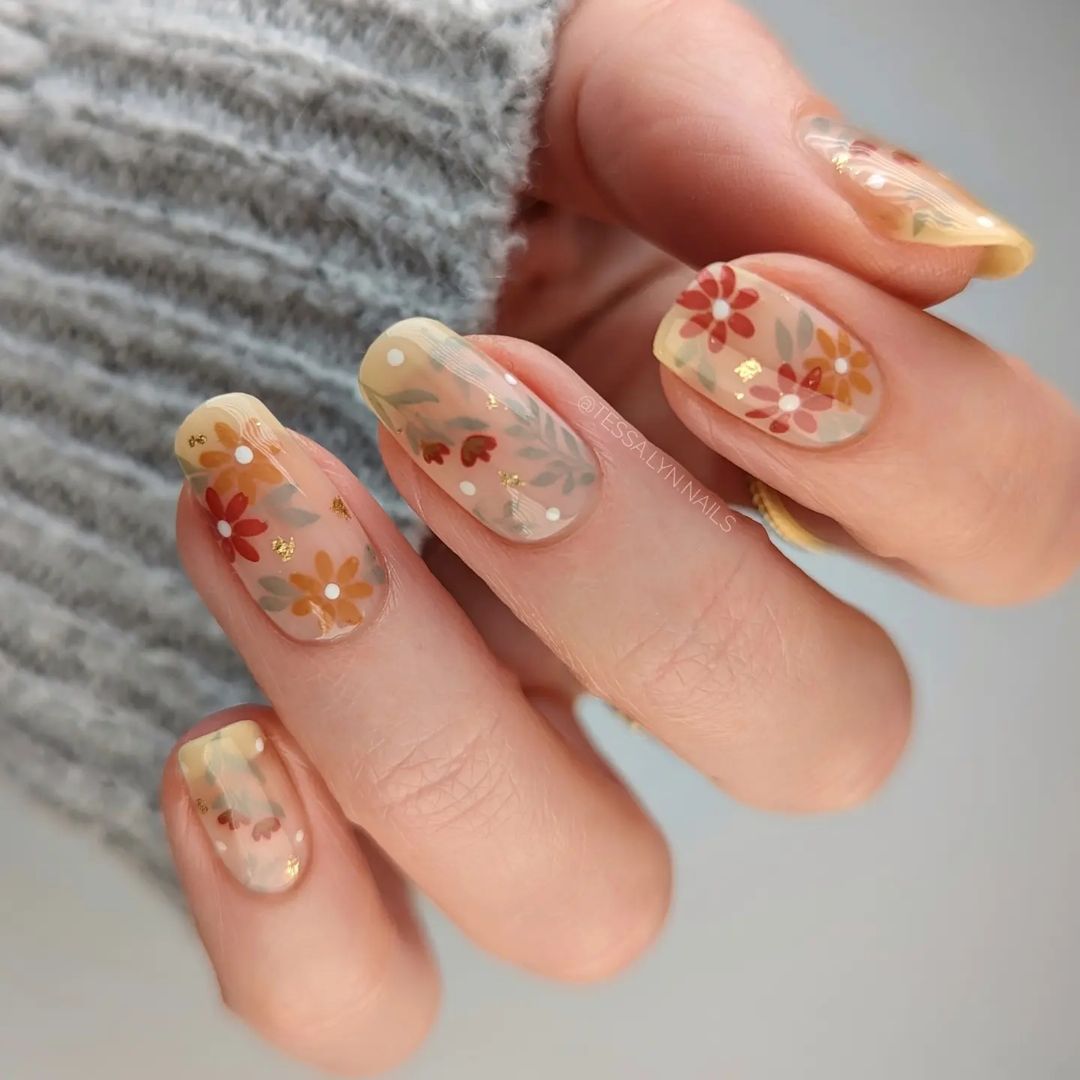
- OPI Nail Lacquer in “Samoan Sand”
- Essie Nail Polish in “Blanc”
- Zoya Nail Polish in “Clementine”
- Gold glitter polish
- Nail art brushes for floral details
- Top coat and base coat
Step-by-Step Tutorial:
- Apply a base coat.
- Paint nails with OPI’s “Samoan Sand.”
- Use nail art brushes to draw small flowers with orange, red, and yellow polishes.
- Add white dots and gold glitter accents for extra detail.
- Finish with a top coat to seal the design.
Earthy Leaf Patterns
This design combines earthy tones with minimalist leaf patterns, creating a sophisticated and stylish autumn look. The green, brown, and blue shades blend seamlessly, and the matte finish adds a modern touch to the design.
- OPI Nail Lacquer in “You Don’t Know Jacques!”
- Essie Nail Polish in “Fall for NYC”
- Zoya Nail Polish in “Wyatt”
- Matte top coat
- Nail art brushes for leaf patterns
- Top coat and base coat
Step-by-Step Tutorial:
- Apply a base coat.
- Paint nails with a combination of green, brown, and blue polishes.
- Use nail art brushes to draw minimalist leaf patterns.
- Apply a matte top coat for a sophisticated finish.
- Seal with a top coat.
Golden Leaf Accents
This design features a luxurious matte finish with golden leaf accents over rich mustard and olive green bases. The understated elegance of the matte finish combined with the striking gold details makes this a standout look for fall.
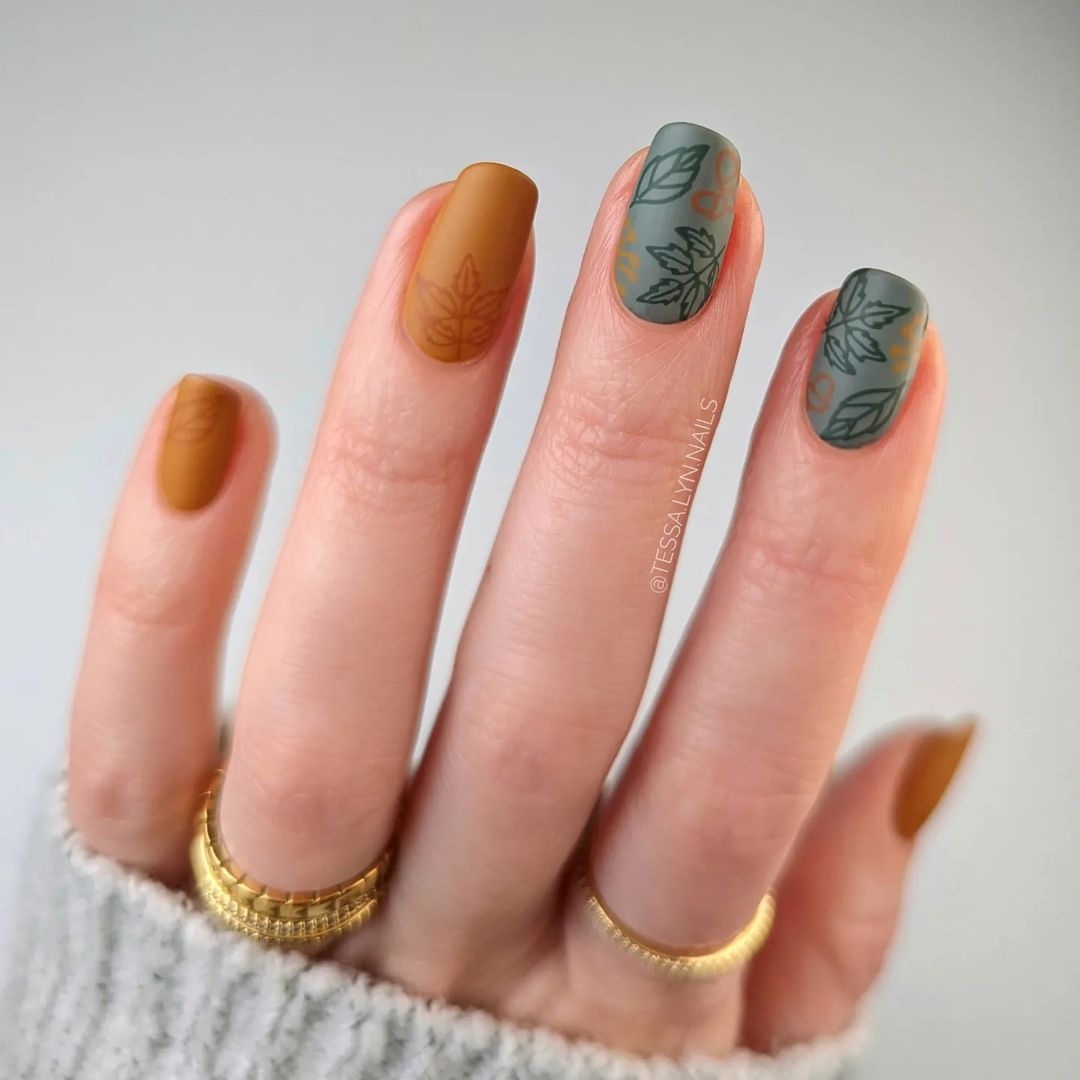
- Essie Nail Polish in “Fall for NYC”
- OPI Nail Lacquer in “Suzi – The First Lady of Nails”
- Gold leaf flakes
- Matte top coat
- Top coat and base coat
Step-by-Step Tutorial:
- Apply a base coat.
- Paint nails with a combination of mustard yellow and olive green polishes.
- Apply gold leaf flakes to add luxurious accents.
- Finish with a matte top coat to seal the design.
Plaid and Leaves
This charming design features a combination of plaid patterns and delicate leaf motifs in warm orange and red tones. The mix of patterns creates a cozy and stylish look that’s perfect for embracing the autumn season.
- Essie Nail Polish in “Playing Koi”
- OPI Nail Lacquer in “Big Apple Red”
- White nail art pen
- Plaid stamping kit
- Top coat and base coat
Step-by-Step Tutorial:
- Apply a base coat.
- Paint nails with a nude base color.
- Use a plaid stamping kit to create plaid patterns.
- Draw leaf motifs with a white nail art pen.
- Finish with a top coat to seal the design.
Warm Tones and Texture
This design combines warm brown tones with textured accents, creating a cozy and inviting fall look. The mix of different textures and finishes adds depth and interest to the design, making it perfect for autumn.
- OPI Nail Lacquer in “My Italian is a Little Rusty”
- Essie Nail Polish in “Clothing Optional”
- Textured nail polish in beige
- Nail art brushes for details
- Top coat and base coat
Step-by-Step Tutorial:
- Apply a base coat.
- Paint nails with OPI’s “My Italian is a Little Rusty.”
- Use a textured nail polish to add accents on some nails.
- Add fine details with a nail art brush.
- Finish with a top coat to seal the design.
Leafy Plaid Fusion
This design merges the classic plaid pattern with delicate leaf motifs in warm autumn tones. The combination of plaid and leaves creates a festive and stylish look that’s perfect for celebrating the fall season.
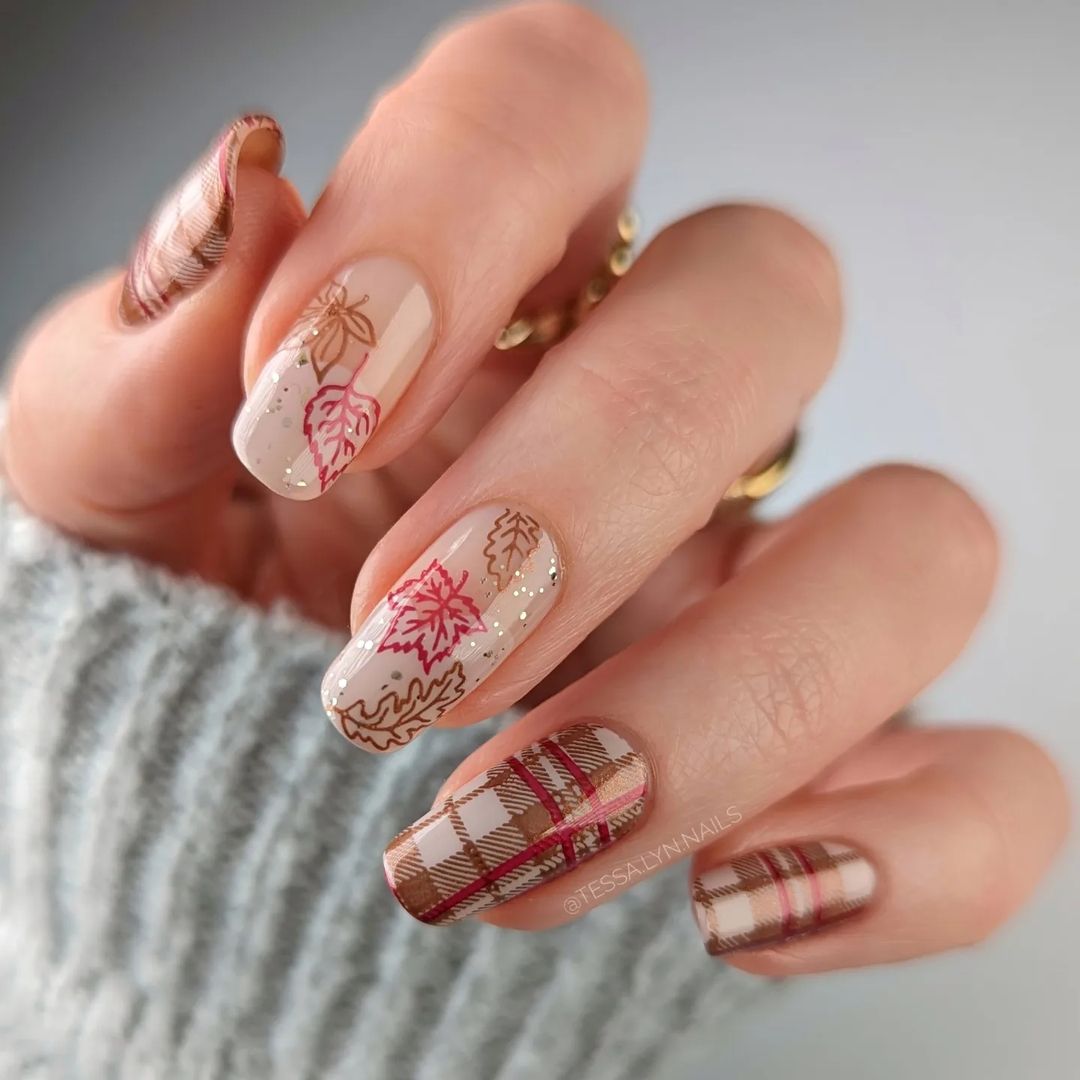
- Essie Nail Polish in “Merino Cool”
- OPI Nail Lacquer in “Malaga Wine”
- Plaid stamping kit
- Nail art brushes for leaf details
- Top coat and base coat
Step-by-Step Tutorial:
- Apply a base coat.
- Paint nails with a nude or light base color.
- Use a plaid stamping kit to create plaid patterns.
- Draw leaf motifs with a fine nail art brush.
- Finish with a top coat to seal the design.
FAQ
Q: How can I make my fall leaves nail art last longer?
A: Start with a high-quality base coat and finish with a durable top coat. Reapply the top coat every few days to maintain the shine and protection.
Q: Are there any easy fall leaves nail art designs for beginners?
A: Yes, start with simple leaf patterns using stamping kits or nail stickers. These tools make it easy to achieve professional-looking designs without advanced skills.
Q: Can I use gel polish for fall leaves nail art?
A: Absolutely! Gel polish can enhance the durability and shine of your fall leaves nail art. Just be sure to cure each layer under a UV or LED lamp.
Save Pin