Fall Nail Colors: 27 Trendy Ideas to Elevate Your Style
As the leaves change color and the air turns crisp, it’s the perfect time to update your manicure with the latest fall nail colors. Whether you’re into bold, dark shades or subtle, pretty hues, we’ve got you covered. Let’s dive into some of the best nail designs for the season that will keep your nails looking trendy and fun.
Shades of Autumn Bliss
This nail design captures the essence of fall with a stunning gradient from a soft pink to a vibrant orange. The smooth transition between the colors is enhanced with a glossy finish, making it a perfect choice for those looking to embrace the warm, cozy vibes of the season. The subtle gold flakes add a touch of elegance, elevating the overall look.

- OPI GelColor in “Put It in Neutral” and “Hot & Spicy”
- Gold Flakes from Born Pretty
- Base coat: OPI GelColor Base Coat
- Top coat: OPI GelColor Top Coat
How to DIY:
- Prep your nails: Start with clean, filed nails.
- Base coat: Apply a thin layer of the OPI GelColor Base Coat and cure under a UV lamp.
- Gradient application: Using a makeup sponge, dab “Put It in Neutral” at the base of your nails and “Hot & Spicy” at the tips, blending them together in the middle. Cure each layer.
- Gold flakes: Apply the gold flakes strategically for a touch of sparkle.
- Top coat: Finish with the OPI GelColor Top Coat and cure.
Winter Wonderland Swirls
This design features a cool-toned palette with intricate white swirls over a light blue base. The minimalistic approach is both chic and elegant, perfect for transitioning into winter. The subtle use of black dots adds a unique touch, making this design stand out without being overpowering.

- Gel polish in “Baby Blue” by OPI
- White Nail Art Pen from Sally Hansen
- Black Dotting Tool from Makartt
- Base coat: OPI GelColor Base Coat
- Top coat: OPI GelColor Top Coat
How to DIY:
- Prep your nails: Ensure nails are clean and shaped.
- Base coat: Apply OPI GelColor Base Coat and cure.
- Blue base: Paint your nails with “Baby Blue” gel polish and cure.
- White swirls: Use the white nail art pen to create swirls and cure.
- Black dots: Add black dots using the dotting tool and cure.
- Top coat: Seal the design with the OPI GelColor Top Coat and cure.
Floral Fantasy
Embrace the softer side of fall with this floral nail art. The pink base is adorned with delicate black and pink floral designs, creating a feminine and elegant look. This design is versatile enough for both everyday wear and special occasions.

- Gel polish in “Rosy Posy” by Essie
- Black Nail Art Pen from Sally Hansen
- Pink Glitter Gel from Modelones
- Base coat: Essie Gel Couture Base Coat
- Top coat: Essie Gel Couture Top Coat
How to DIY:
- Prep your nails: Start with clean, trimmed nails.
- Base coat: Apply Essie Gel Couture Base Coat and cure.
- Pink base: Paint nails with “Rosy Posy” gel polish and cure.
- Floral design: Use the black nail art pen to draw floral patterns. Add pink glitter gel for accents and cure.
- Top coat: Finish with Essie Gel Couture Top Coat and cure.
Playful Pastels and Bold Splashes
This fun and vibrant nail design mixes pastel and bright shades, creating a playful contrast. The base colors are a delicate pastel blue with speckles of black, and a bold neon pink and blue combo. The black speckles add a whimsical touch to the pastel base, while the neon pink and blue accent nails make a striking statement. The design is perfect for those who want to add a pop of color to their fall look while keeping it playful and trendy.

- OPI GelColor in “It’s a Boy!” for the pastel blue base
- OPI GelColor in “La Paz-itively Hot” for the neon pink
- OPI GelColor in “No Room for the Blues” for the neon blue
- Black Speckle Nail Polish from China Glaze
- Base coat: OPI GelColor Base Coat
- Top coat: OPI GelColor Top Coat
How to DIY:
- Prep your nails: Start with clean, filed nails.
- Base coat: Apply a thin layer of the OPI GelColor Base Coat and cure under a UV lamp.
- Pastel base: Paint your nails with “It’s a Boy!” gel polish and cure.
- Speckles: Apply the black speckle polish over the pastel blue nails and cure.
- Neon accents: Paint two nails with “La Paz-itively Hot” and one with “No Room for the Blues” and cure.
- Top coat: Finish with the OPI GelColor Top Coat and cure.
Save Pin

Electric Blue Elegance
This stunning manicure features a bold electric blue that’s perfect for making a statement. The glossy finish adds depth and sophistication to the color, making it suitable for both casual and formal occasions. This design is particularly striking for fall and winter, providing a pop of color that stands out against the muted tones of the season.

- Gel polish in “Electric Blue” by OPI
- Base coat: OPI GelColor Base Coat
- Top coat: OPI GelColor Top Coat
How to DIY:
- Prep your nails: Ensure your nails are clean and shaped.
- Base coat: Apply OPI GelColor Base Coat and cure.
- Blue base: Apply two coats of “Electric Blue” gel polish, curing each layer.
- Top coat: Seal the design with the OPI GelColor Top Coat and cure.
Sunset Gradient
This beautiful gradient design transitions from a deep purple to a warm orange, reminiscent of a stunning fall sunset. The addition of fine glitter gives it a magical touch, making the nails sparkle as they catch the light. This look is perfect for those who want to embrace the warm, rich colors of fall while adding a bit of sparkle to their manicure.

- Gel polish in “Violet Vibes” by Essie for the purple base
- Gel polish in “Tangerine Tease” by OPI for the orange tips
- Fine Glitter from Born Pretty
- Base coat: Essie Gel Couture Base Coat
- Top coat: Essie Gel Couture Top Coat
How to DIY:
- Prep your nails: Start with clean, filed nails.
- Base coat: Apply Essie Gel Couture Base Coat and cure.
- Gradient base: Using a makeup sponge, dab “Violet Vibes” at the base and “Tangerine Tease” at the tips, blending them in the middle. Cure each layer.
- Glitter: Apply fine glitter over the gradient and cure.
- Top coat: Finish with Essie Gel Couture Top Coat and cure.
Neon Flames
This vibrant and bold design features a striking combination of neon orange flames against a pastel purple base. The contrast between the fiery orange and the cool purple creates a dynamic and eye-catching look that’s perfect for making a statement this fall. The fluid, flame-like patterns add a touch of fierceness and fun to the nails, making them stand out in any setting.

- Gel polish in “Lavender Bliss” by Essie
- Gel polish in “Neon Orange” by China Glaze
- Nail Art Brush Set from Makartt
- Base coat: Essie Gel Couture Base Coat
- Top coat: Essie Gel Couture Top Coat
How to DIY:
- Prep your nails: Clean and shape your nails.
- Base coat: Apply Essie Gel Couture Base Coat and cure.
- Purple base: Paint your nails with “Lavender Bliss” and cure.
- Neon flames: Use the nail art brush to paint neon orange flames on each nail. Cure each nail after painting.
- Top coat: Seal the design with Essie Gel Couture Top Coat and cure.
Aquatic Textures
This design combines a shimmering aqua blue base with textured, blue reptile-like patterns on two accent nails. The shimmering polish adds depth and a touch of glamour, while the textured patterns create an intriguing contrast. This look is perfect for those who love unique and artistic nail designs.

- Gel polish in “Aqua Shimmer” by OPI
- Blue Reptile Nail Wraps from Born Pretty
- Base coat: OPI GelColor Base Coat
- Top coat: OPI GelColor Top Coat
How to DIY:
- Prep your nails: Ensure nails are clean and filed.
- Base coat: Apply OPI GelColor Base Coat and cure.
- Aqua base: Paint all nails with “Aqua Shimmer” gel polish and cure.
- Reptile texture: Apply the blue reptile nail wraps on two accent nails and cure.
- Top coat: Finish with OPI GelColor Top Coat and cure.
Sunset Tips
This delightful design features a nude base with bright pink and orange French tips. The combination of soft and bold colors creates a refreshing and modern take on the classic French manicure. The subtle glitter overlay adds a touch of sparkle, making these nails perfect for any occasion.

- Gel polish in “Nude Beige” by OPI
- Gel polish in “Bright Pink” by Essie
- Gel polish in “Tangerine” by China Glaze
- Fine Glitter from Born Pretty
- Base coat: OPI GelColor Base Coat
- Top coat: OPI GelColor Top Coat
How to DIY:
- Prep your nails: Clean and shape your nails.
- Base coat: Apply OPI GelColor Base Coat and cure.
- Nude base: Paint your nails with “Nude Beige” and cure.
- French tips: Use “Bright Pink” and “Tangerine” to create French tips. Cure each nail after painting.
- Glitter overlay: Apply a thin layer of fine glitter and cure.
- Top coat: Seal the design with OPI GelColor Top Coat and cure.
Save Pin

Rainbow Swirls
This playful and colorful design features vibrant rainbow swirls on a nude base. The multicolored swirls create a fun and lively look that’s perfect for adding a pop of color to your fall manicure. This design is ideal for those who love to experiment with colors and want their nails to reflect their cheerful personality.

- Gel polish in “Nude Base” by Essie
- Rainbow Nail Art Pens from Sally Hansen
- Base coat: Essie Gel Couture Base Coat
- Top coat: Essie Gel Couture Top Coat
How to DIY:
- Prep your nails: Start with clean, filed nails.
- Base coat: Apply Essie Gel Couture Base Coat and cure.
- Nude base: Paint your nails with “Nude Base” gel polish and cure.
- Rainbow swirls: Use the rainbow nail art pens to create colorful swirls on each nail. Cure each nail after painting.
- Top coat: Finish with Essie Gel Couture Top Coat and cure.
Earthy Tones
This elegant design showcases a gradient of earthy green tones, ranging from a soft sage to a deep forest green. The varying shades create a sophisticated and harmonious look, perfect for those who love understated yet chic nails. This design is great for everyday wear and can easily transition from casual to formal settings.
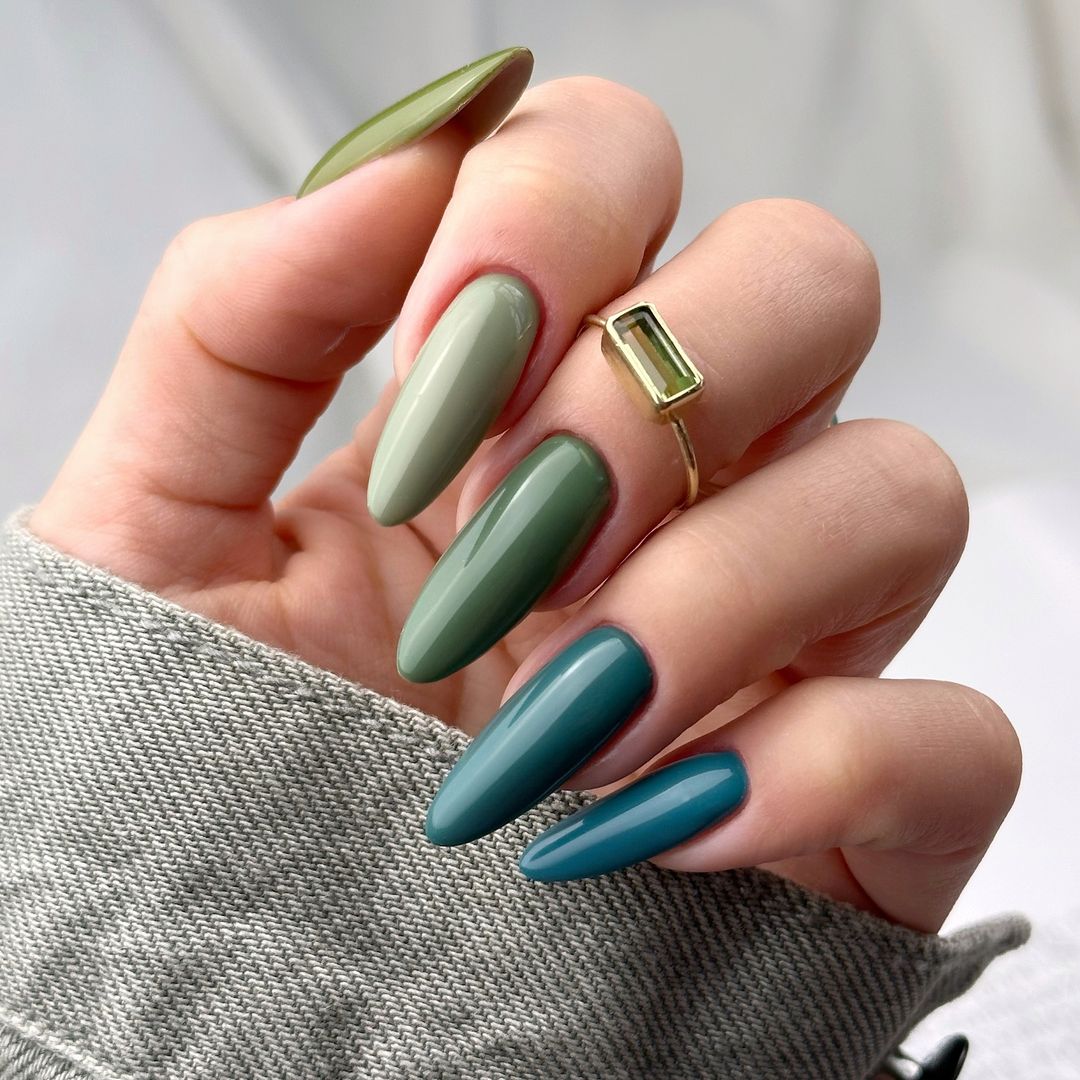
- Gel polish in “Sage” by OPI
- Gel polish in “Olive” by Essie
- Gel polish in “Forest Green” by China Glaze
- Base coat: OPI GelColor Base Coat
- Top coat: OPI GelColor Top Coat
How to DIY:
- Prep your nails: Clean and shape your nails.
- Base coat: Apply OPI GelColor Base Coat and cure.
- Green gradient: Paint your nails with the different shades of green, blending them together to create a gradient effect. Cure each layer.
- Top coat: Seal the design with OPI GelColor Top Coat and cure.
Golden Glow
This stunning design features a shimmery gold base with a glossy finish. The warm golden hue is perfect for fall, adding a touch of luxury and elegance to your manicure. The shimmer catches the light beautifully, making your nails look radiant and glamorous.
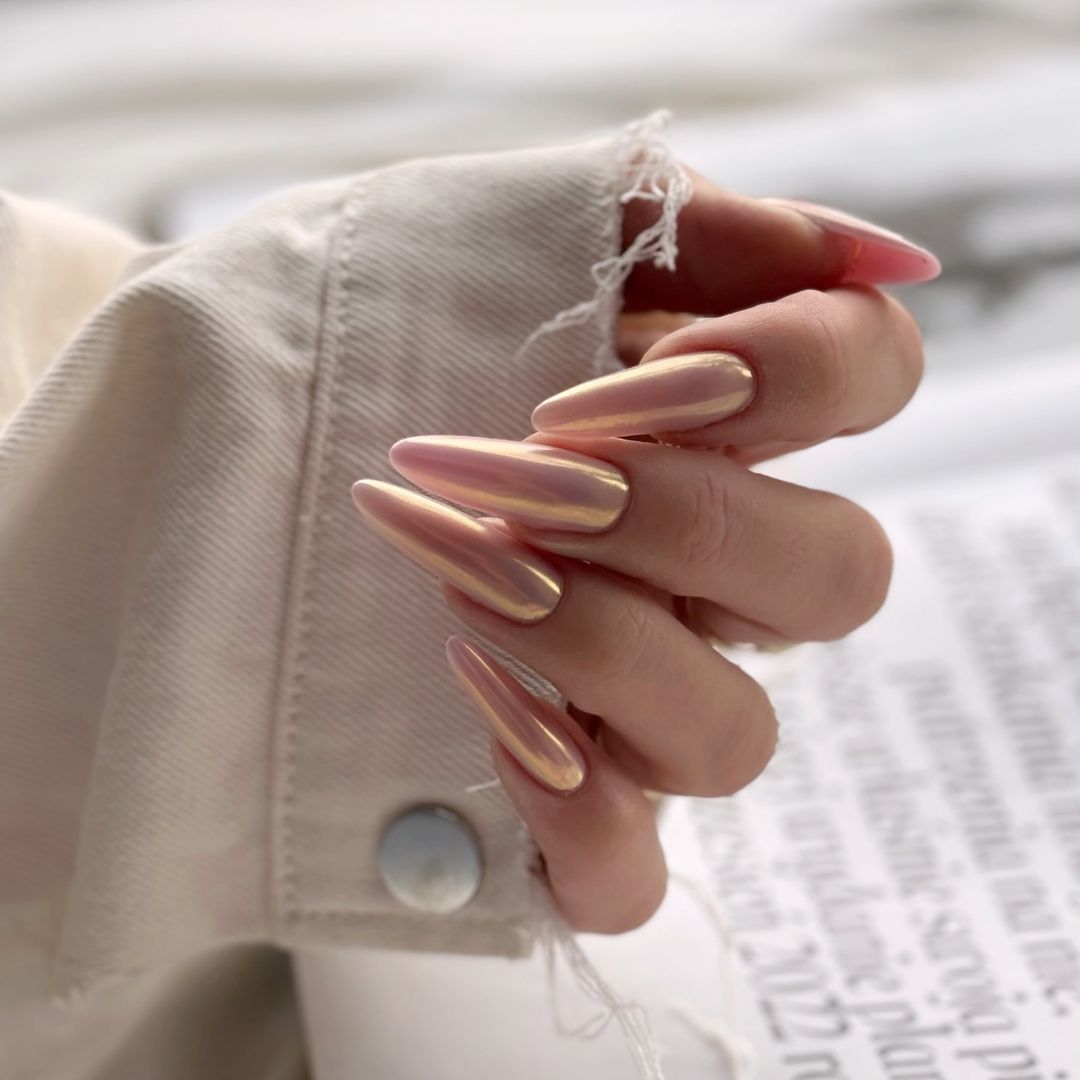
- Gel polish in “Golden Glow” by Essie
- Base coat: Essie Gel Couture Base Coat
- Top coat: Essie Gel Couture Top Coat
How to DIY:
- Prep your nails: Ensure your nails are clean and filed.
- Base coat: Apply Essie Gel Couture Base Coat and cure.
- Golden base: Paint your nails with “Golden Glow” gel polish and cure.
- Top coat: Seal the design with Essie Gel Couture Top Coat and cure.
Abstract Whites
This nail design features a soft, matte pink base with abstract white shapes. The minimalist and modern design makes it versatile for any occasion, while the matte finish adds a touch of sophistication. The playful white shapes bring an element of fun and creativity to the nails.
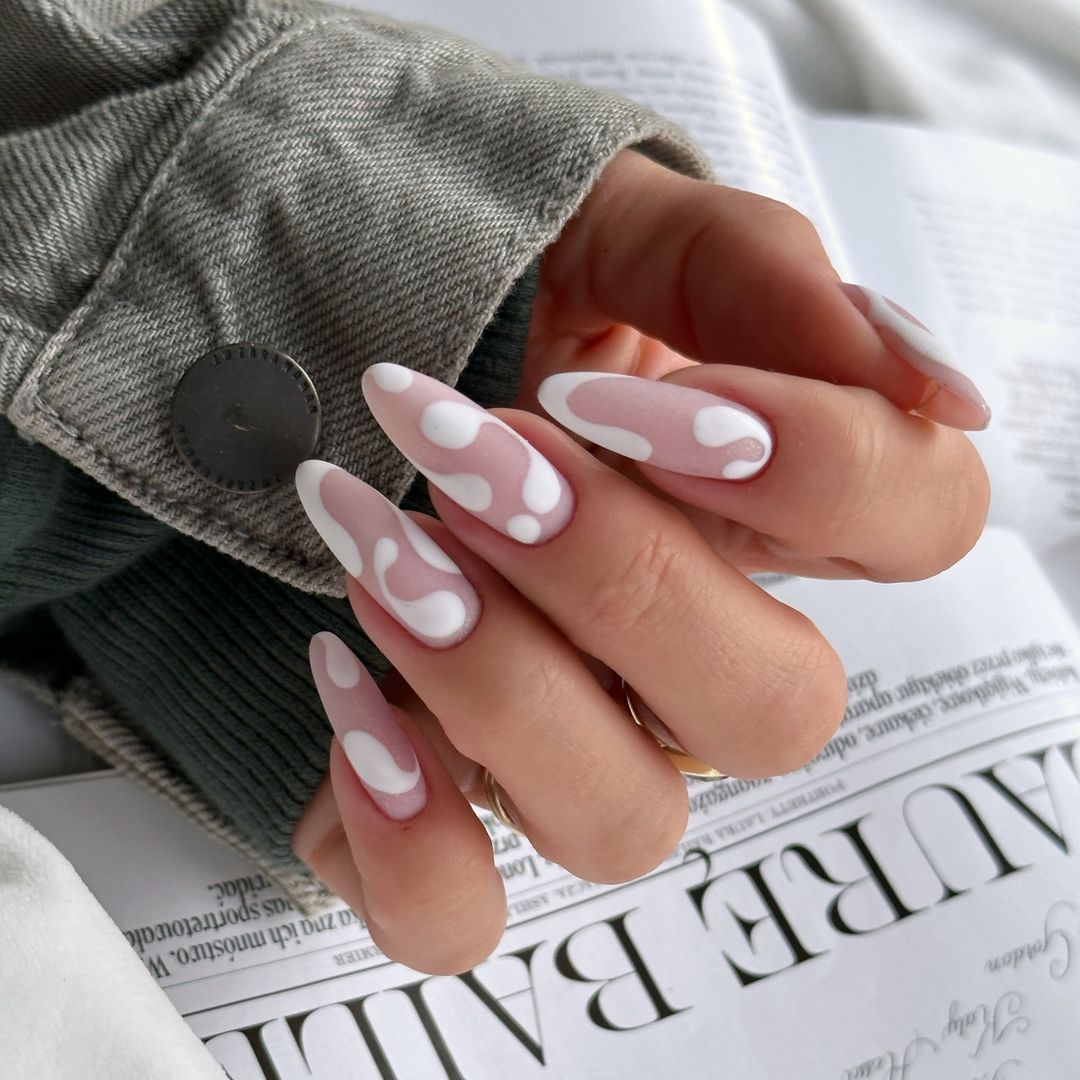
- Gel polish in “Soft Pink” by OPI
- White Nail Art Pen from Sally Hansen
- Matte Top Coat from Essie
- Base coat: OPI GelColor Base Coat
How to DIY:
- Prep your nails: Clean and shape your nails.
- Base coat: Apply OPI GelColor Base Coat and cure.
- Pink base: Paint your nails with “Soft Pink” gel polish and cure.
- Abstract shapes: Use the white nail art pen to draw abstract shapes on each nail and cure.
- Matte top coat: Finish with a matte top coat and cure.
Juicy Oranges
This adorable design features bright orange fruit slices on a white base, creating a fresh and fruity look. The vibrant orange pops against the white, making it a perfect choice for a fun and playful manicure. This design is great for those who love a bit of whimsy in their nail art.
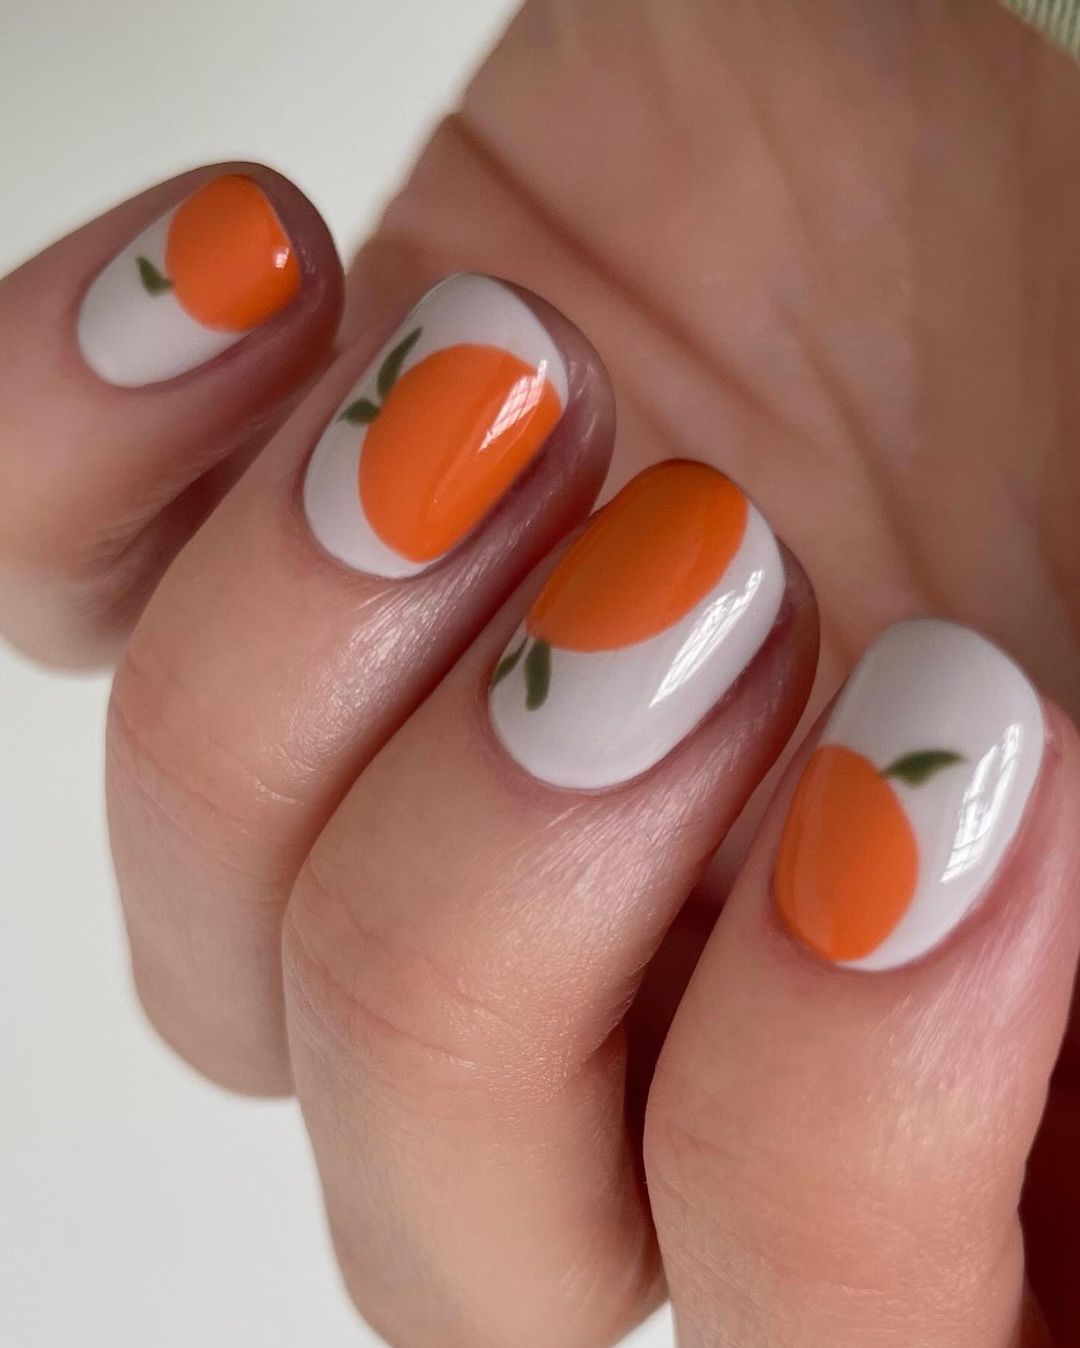
- Gel polish in “White Out” by OPI
- Gel polish in “Bright Orange” by Essie
- Green Nail Art Pen from Sally Hansen
- Base coat: OPI GelColor Base Coat
- Top coat: OPI GelColor Top Coat
How to DIY:
- Prep your nails: Ensure nails are clean and filed.
- Base coat: Apply OPI GelColor Base Coat and cure.
- White base: Paint your nails with “White Out” and cure.
- Orange fruit slices: Use “Bright Orange” to create the orange slices and the green nail art pen for leaves. Cure each layer.
- Top coat: Finish with OPI GelColor Top Coat and cure.
Minimalist Green Lines
This sleek and modern design features thin green lines on a nude base. The simplicity of the design makes it both elegant and chic, perfect for those who prefer understated nail art. The fine lines add a touch of color and interest without overwhelming the overall look.
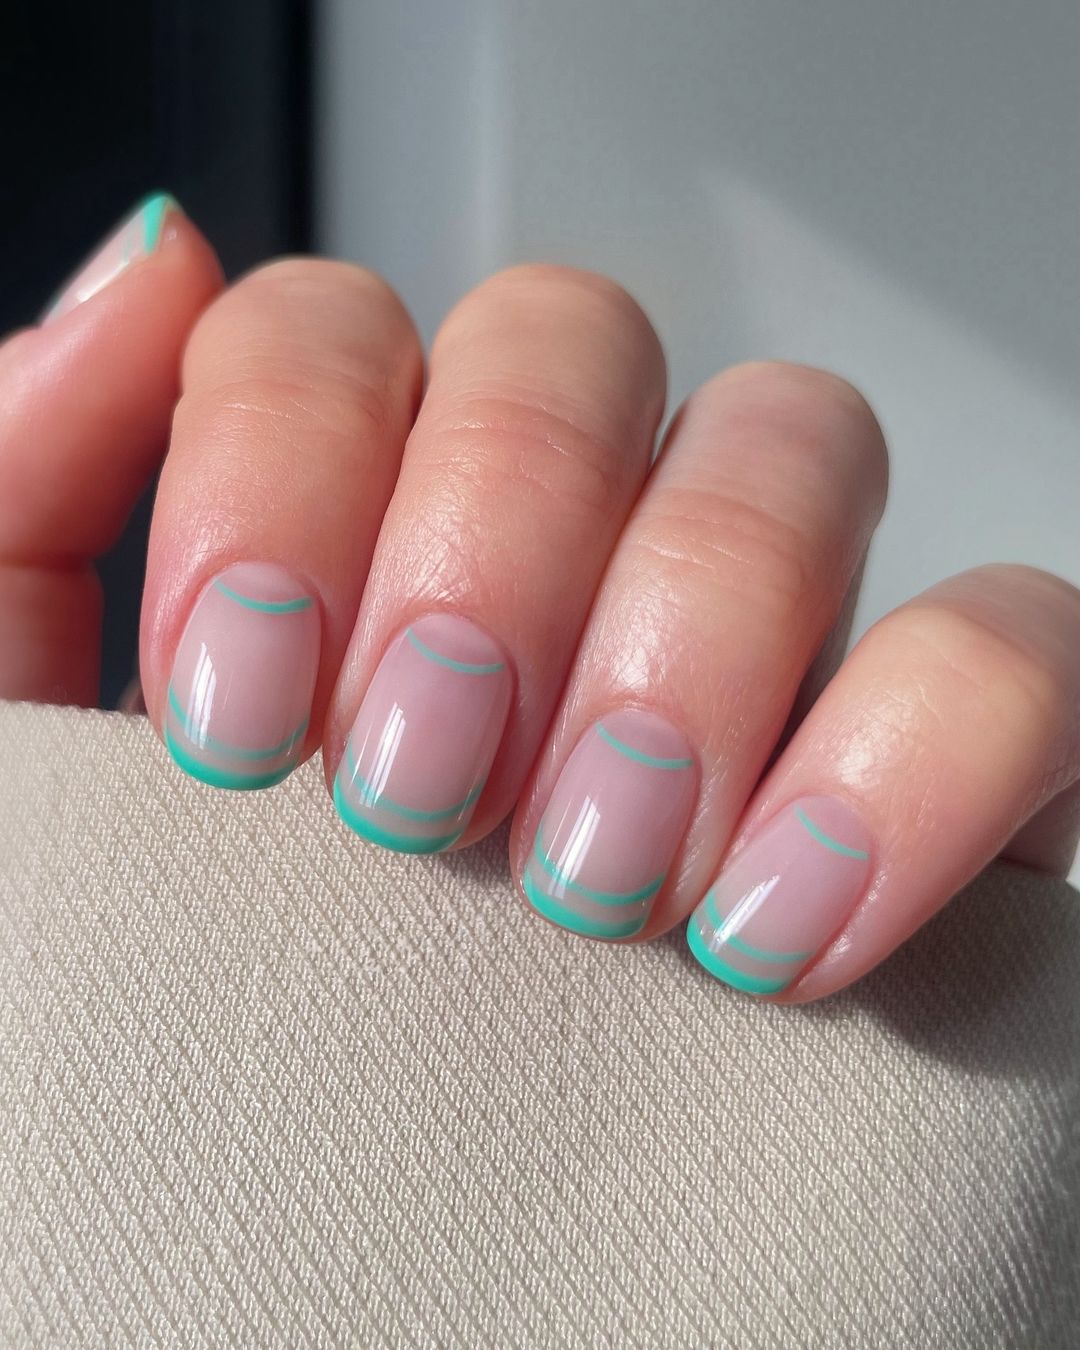
- Gel polish in “Nude Base” by Essie
- Green Nail Art Pen from Sally Hansen
- Base coat: Essie Gel Couture Base Coat
- Top coat: Essie Gel Couture Top Coat
How to DIY:
- Prep your nails: Start with clean, filed nails.
- Base coat: Apply Essie Gel Couture Base Coat and cure.
- Nude base: Paint your nails with “Nude Base” and cure.
- Green lines: Use the green nail art pen to draw thin lines on each nail. Cure each nail after painting.
- Top coat: Finish with Essie Gel Couture Top Coat and cure.
Leopard Print
This fierce and fashionable design features classic leopard print on a bold yellow base. The black spots against the yellow create a striking contrast, making this design perfect for those who love to make a statement with their nails. This trendy pattern is always in style and adds a touch of wildness to your look.
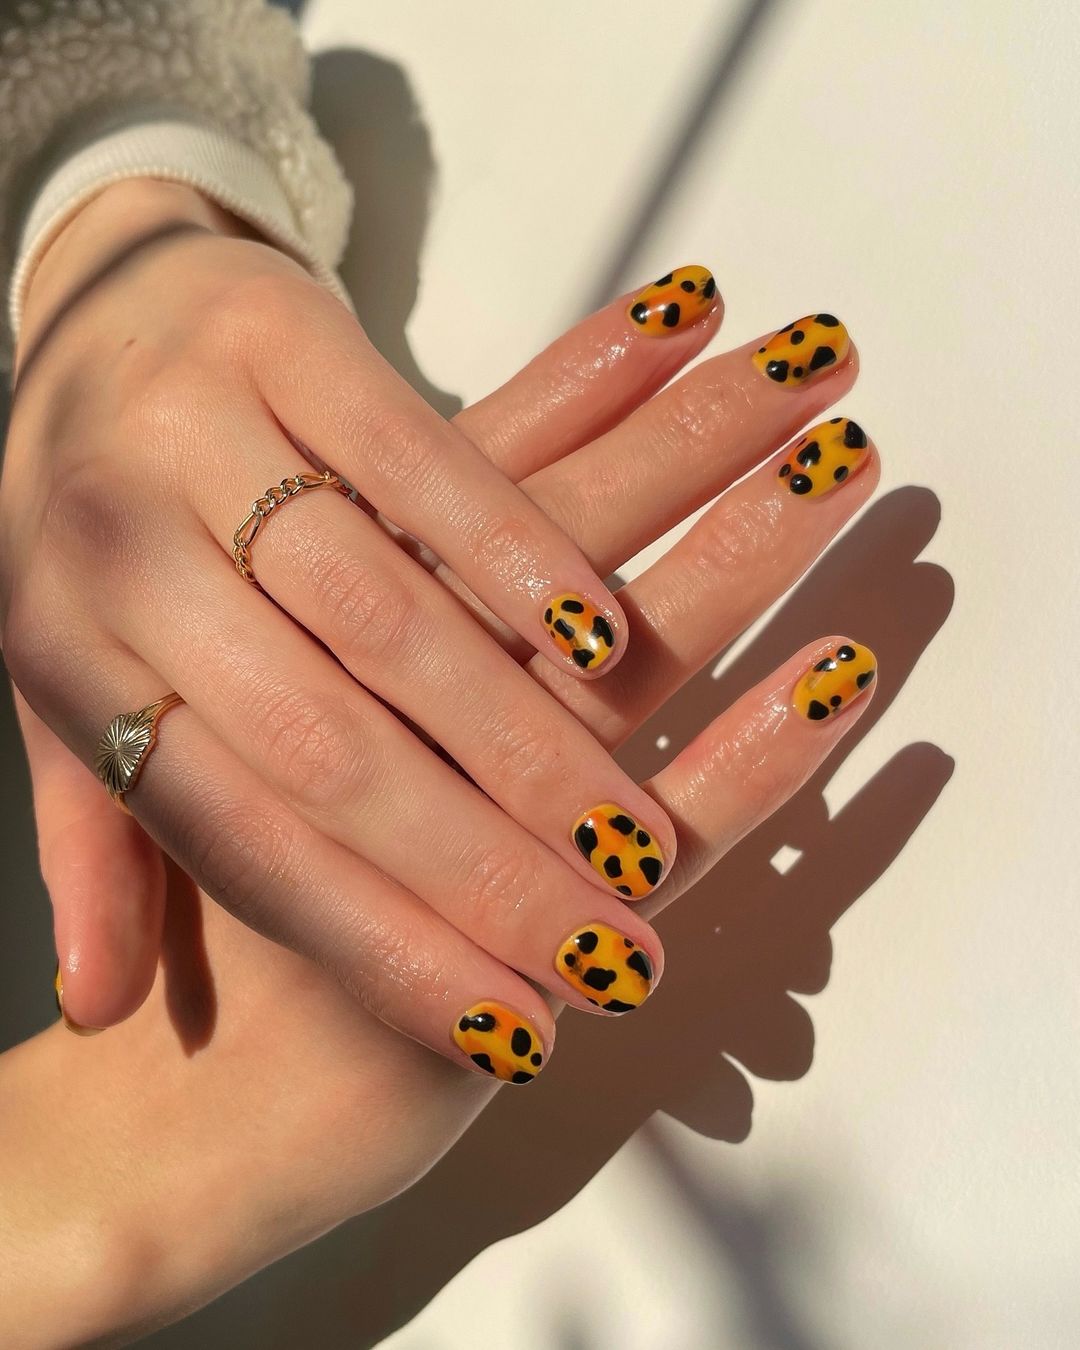
- Gel polish in “Sunny Yellow” by OPI
- Black Nail Art Pen from Sally Hansen
- Base coat: OPI GelColor Base Coat
- Top coat: OPI GelColor Top Coat
How to DIY:
- Prep your nails: Ensure nails are clean and filed.
- Base coat: Apply OPI GelColor Base Coat and cure.
- Yellow base: Paint your nails with “Sunny Yellow” and cure.
- Leopard spots: Use the black nail art pen to draw leopard spots on each nail and cure.
- Top coat: Finish with OPI GelColor Top Coat and cure.
Lemon Yellow
This cheerful design features a bright lemon yellow polish with a subtle shimmer. The vibrant color is perfect for brightening up your look, and the shimmer adds a touch of elegance. This simple yet eye-catching design is great for those who love bold, sunny colors.
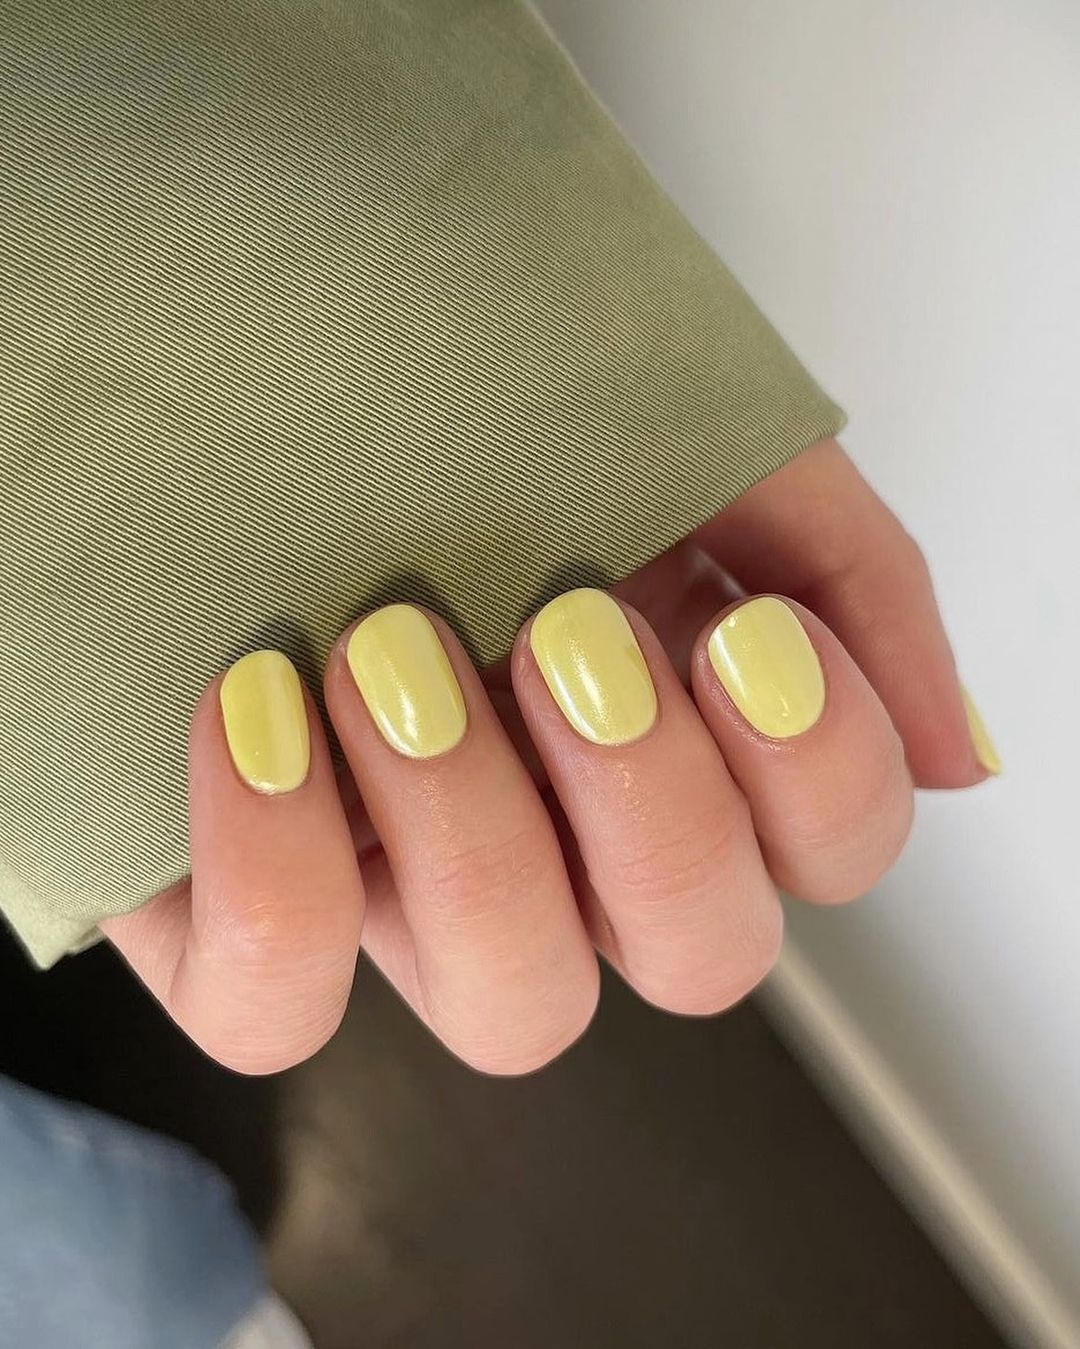
- Gel polish in “Lemon Sherbet” by Essie
- Base coat: Essie Gel Couture Base Coat
- Top coat: Essie Gel Couture Top Coat
How to DIY:
- Prep your nails: Clean and shape your nails.
- Base coat: Apply Essie Gel Couture Base Coat and cure.
- Yellow base: Paint your nails with “Lemon Sherbet” and cure.
- Top coat: Finish with Essie Gel Couture Top Coat and cure.
Red Lips
This bold and playful design features bright red lips on a pale pink base. The contrast between the red and pink creates a striking and fun look, perfect for those who love quirky and unique nail art. This design is sure to catch everyone’s attention and add a bit of flirtiness to your manicure.
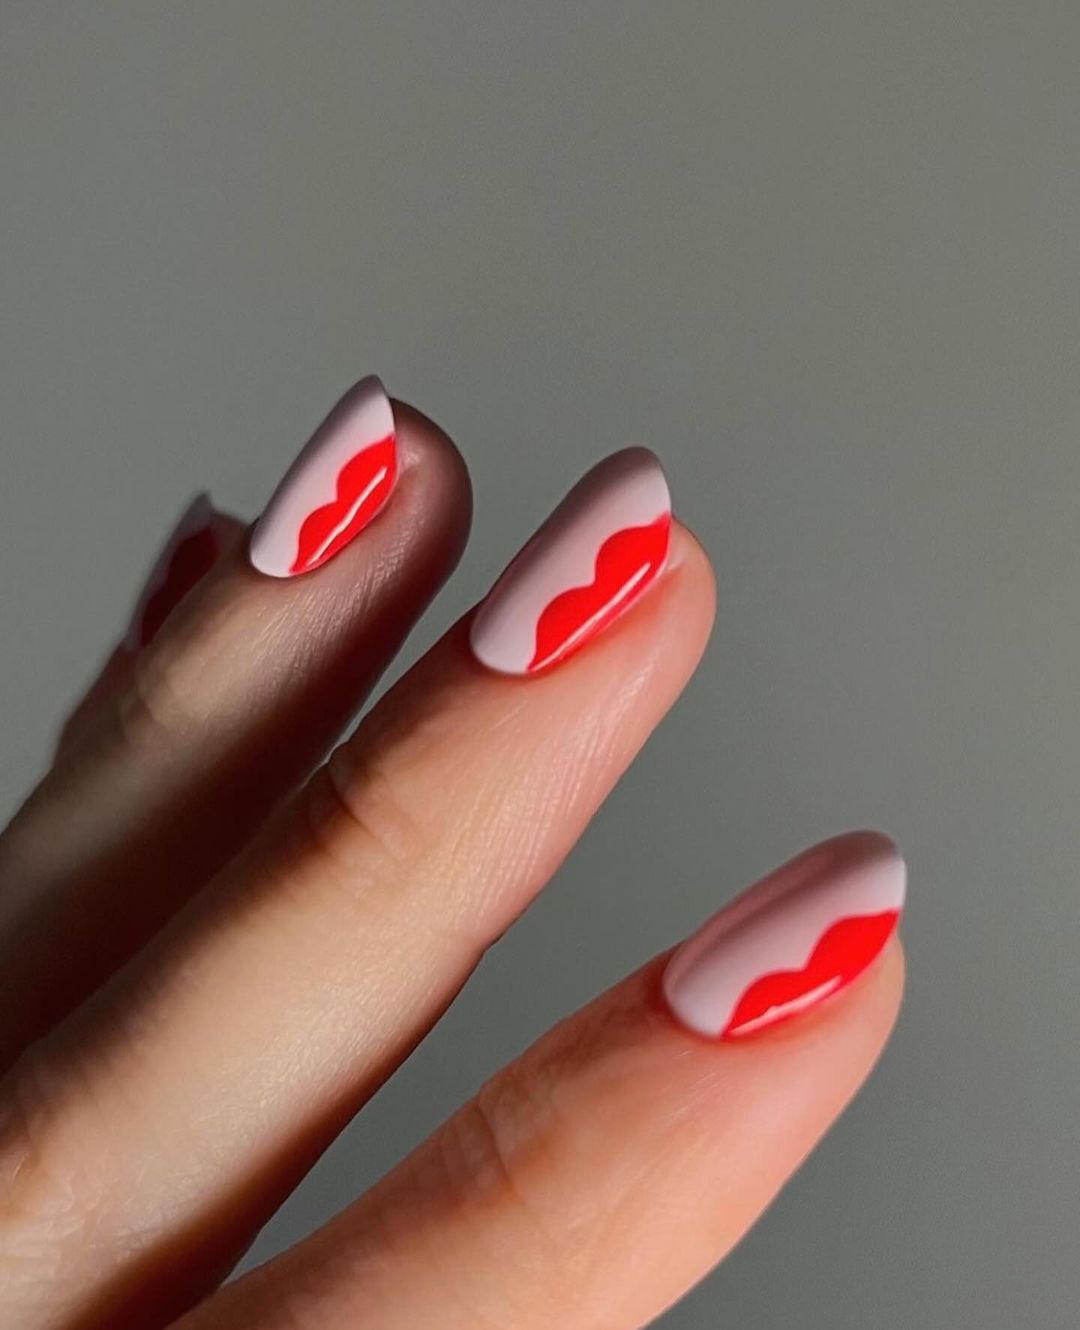
- Gel polish in “Pale Pink” by OPI
- Gel polish in “Red Hot” by Essie
- Nail Art Brush Set from Makartt
- Base coat: OPI GelColor Base Coat
- Top coat: OPI GelColor Top Coat
How to DIY:
- Prep your nails: Ensure nails are clean and filed.
- Base coat: Apply OPI GelColor Base Coat and cure.
- Pink base: Paint your nails with “Pale Pink” and cure.
- Red lips: Use the nail art brush to paint red lips on each nail and cure.
- Top coat: Finish with OPI GelColor Top Coat and cure.
Starry Night Black
This elegant and timeless design features a glossy black base with subtle star patterns in silver glitter. The simplicity of the black nails combined with the delicate sparkle of the stars makes this manicure perfect for evening events or adding a touch of glamour to your everyday look. The short length keeps it practical while still being stylish.
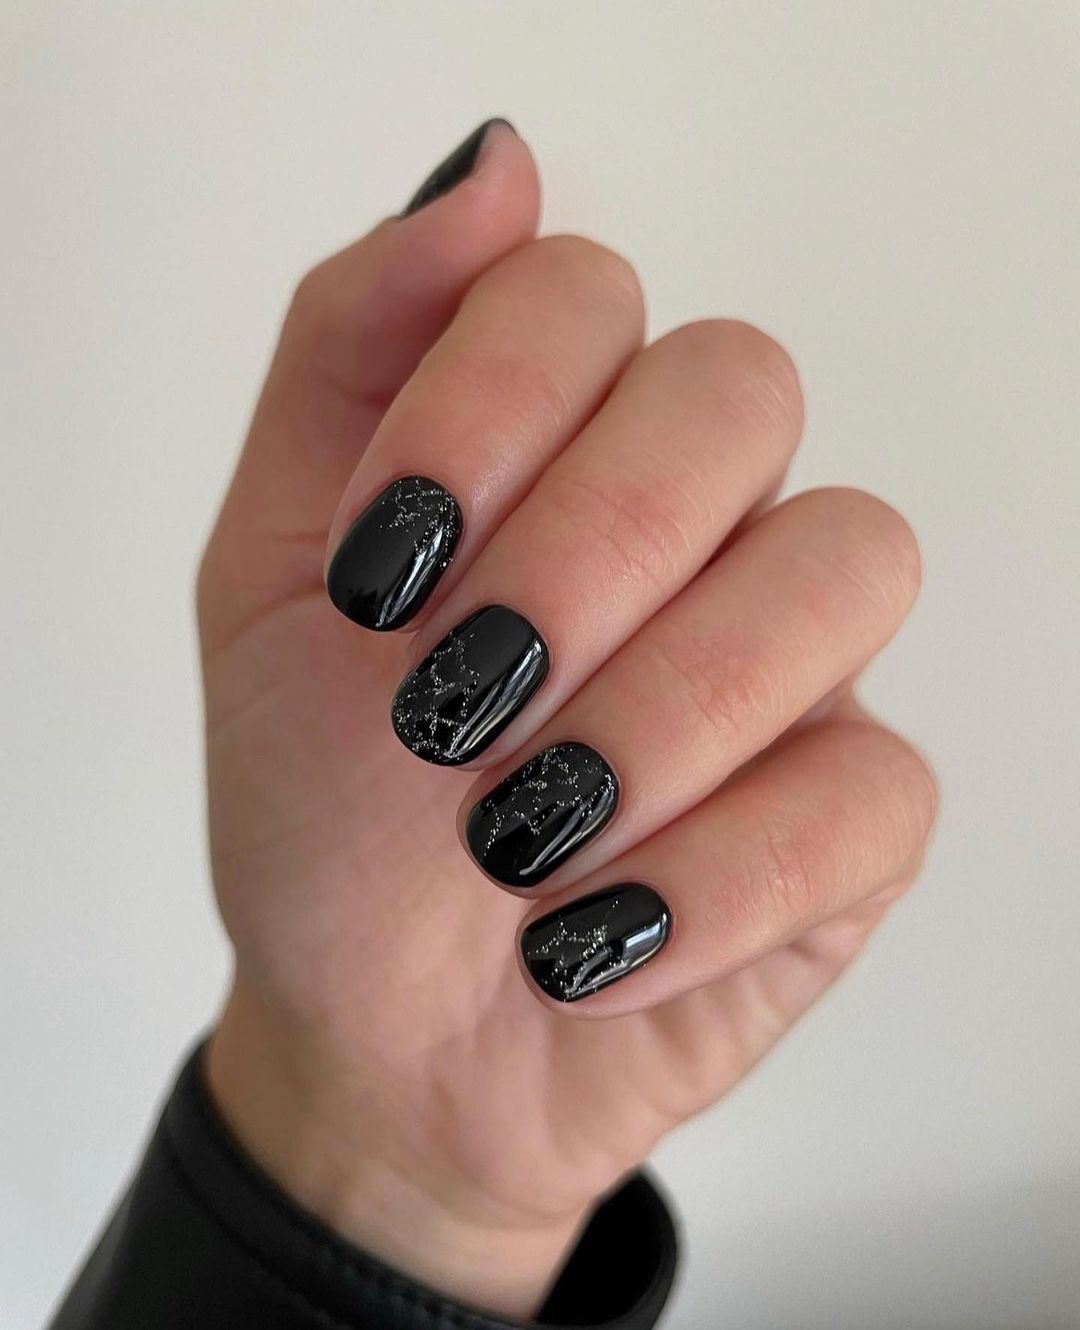
- Gel polish in “Black Onyx” by OPI
- Silver Glitter Nail Polish from China Glaze
- Base coat: OPI GelColor Base Coat
- Top coat: OPI GelColor Top Coat
How to DIY:
- Prep your nails: Clean and shape your nails.
- Base coat: Apply OPI GelColor Base Coat and cure.
- Black base: Paint your nails with “Black Onyx” and cure.
- Star patterns: Use a fine nail art brush to create star patterns with the silver glitter polish and cure.
- Top coat: Finish with OPI GelColor Top Coat and cure.
Autumn Harvest
This fun and festive design features a mix of orange tones, grid patterns, and cute apple accents, capturing the essence of autumn. The variety of designs on each nail adds interest and playfulness to the overall look. This manicure is perfect for those who love seasonal themes and vibrant colors.
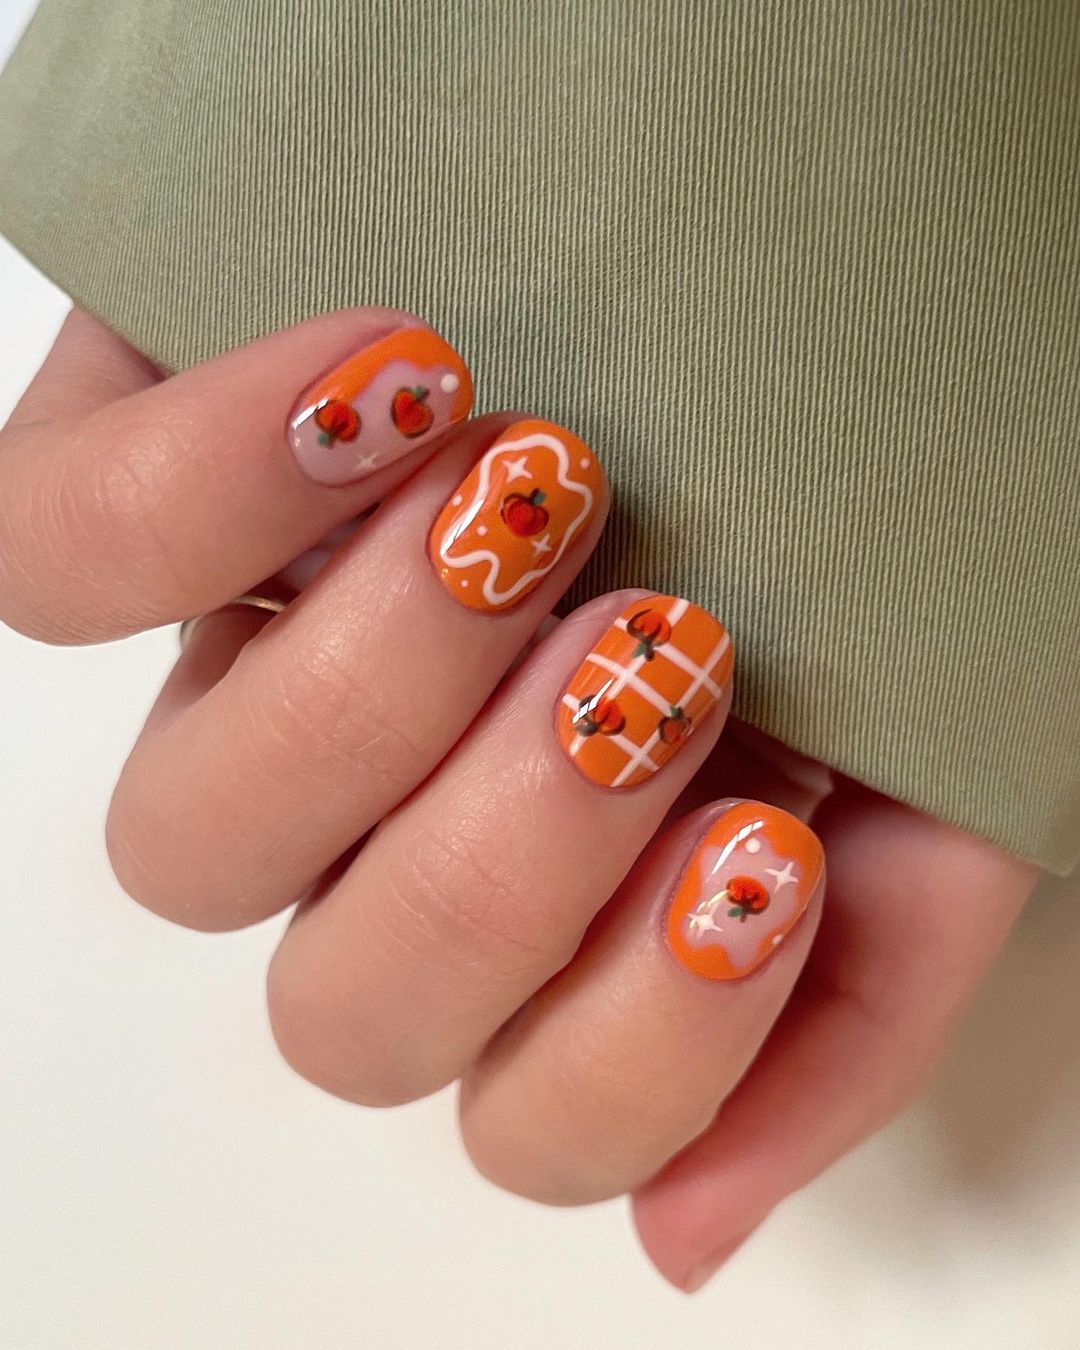
- Gel polish in “Pumpkin Spice” by OPI
- White Nail Art Pen from Sally Hansen
- Red and Green Nail Art Pens from Sally Hansen
- Base coat: OPI GelColor Base Coat
- Top coat: OPI GelColor Top Coat
How to DIY:
- Prep your nails: Ensure nails are clean and filed.
- Base coat: Apply OPI GelColor Base Coat and cure.
- Orange base: Paint your nails with “Pumpkin Spice” and cure.
- Patterns and accents: Use the white nail art pen for grid patterns and the red and green pens to create apple accents. Cure each layer.
- Top coat: Finish with OPI GelColor Top Coat and cure.
Colorful Waves
This minimalistic yet colorful design features wavy lines in different hues on a nude base. The delicate waves add a touch of fun and creativity to the nails while maintaining a clean and sophisticated look. This design is perfect for those who prefer a subtle yet unique manicure.
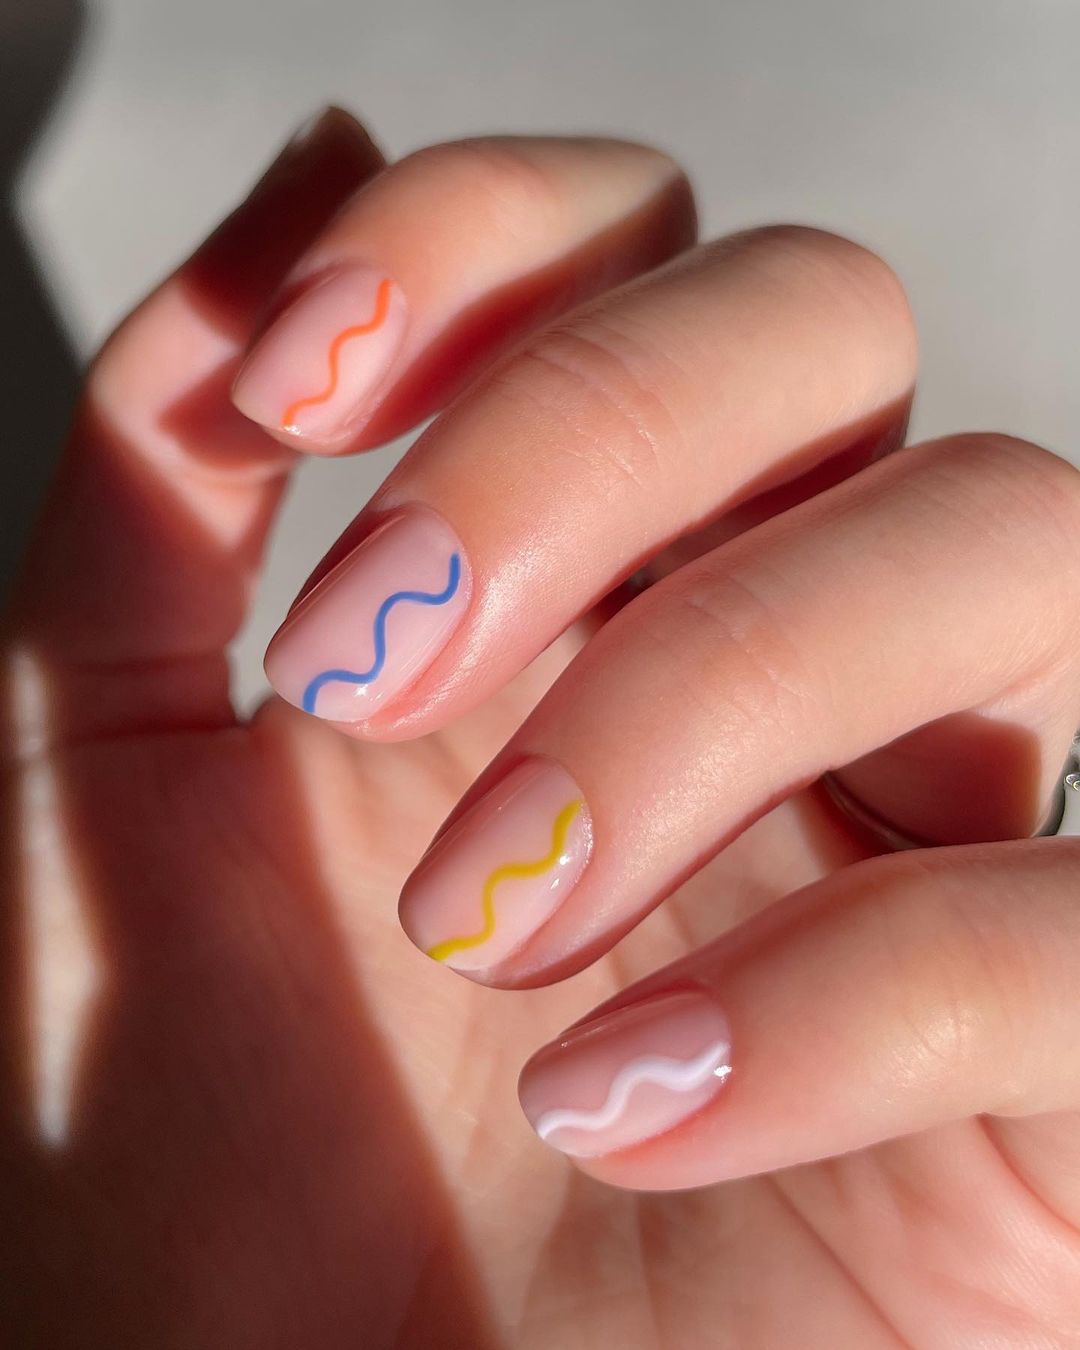
- Gel polish in “Nude Base” by Essie
- Nail Art Pens in various colors from Sally Hansen
- Base coat: Essie Gel Couture Base Coat
- Top coat: Essie Gel Couture Top Coat
How to DIY:
- Prep your nails: Clean and shape your nails.
- Base coat: Apply Essie Gel Couture Base Coat and cure.
- Nude base: Paint your nails with “Nude Base” and cure.
- Colorful waves: Use the nail art pens to draw wavy lines on each nail. Cure each nail after painting.
- Top coat: Finish with Essie Gel Couture Top Coat and cure.
Black and White Chic
This striking design features a monochrome palette with black and white geometric patterns. The contrast between the two colors creates a bold and sophisticated look that is both modern and timeless. This manicure is perfect for those who love classic yet edgy styles.
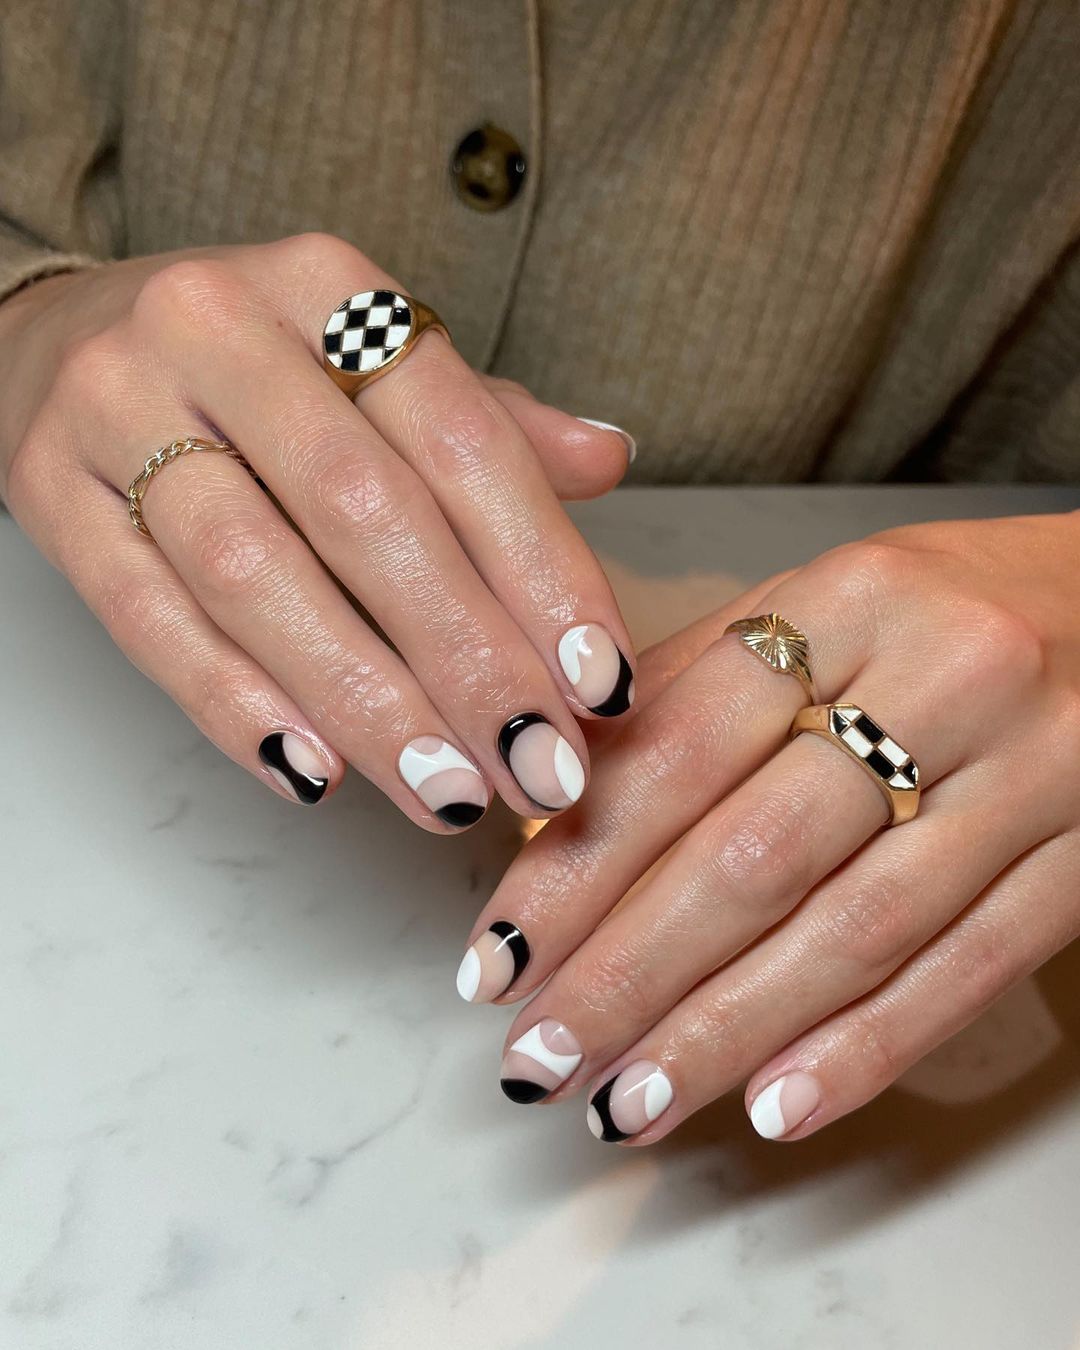
- Gel polish in “White Out” by OPI
- Gel polish in “Black Onyx” by OPI
- Nail Art Brush Set from Makartt
- Base coat: OPI GelColor Base Coat
- Top coat: OPI GelColor Top Coat
How to DIY:
- Prep your nails: Ensure nails are clean and filed.
- Base coat: Apply OPI GelColor Base Coat and cure.
- White and black base: Paint your nails with “White Out” and “Black Onyx” and cure.
- Geometric patterns: Use the nail art brush to create black and white geometric patterns on each nail and cure.
- Top coat: Finish with OPI GelColor Top Coat and cure.
Retro Vibes
This vibrant and retro-inspired design features a mix of blue, orange, and white swirls and dots. The bold colors and playful patterns bring a touch of nostalgia and fun to the nails, making this design perfect for those who love unique and eye-catching manicures.
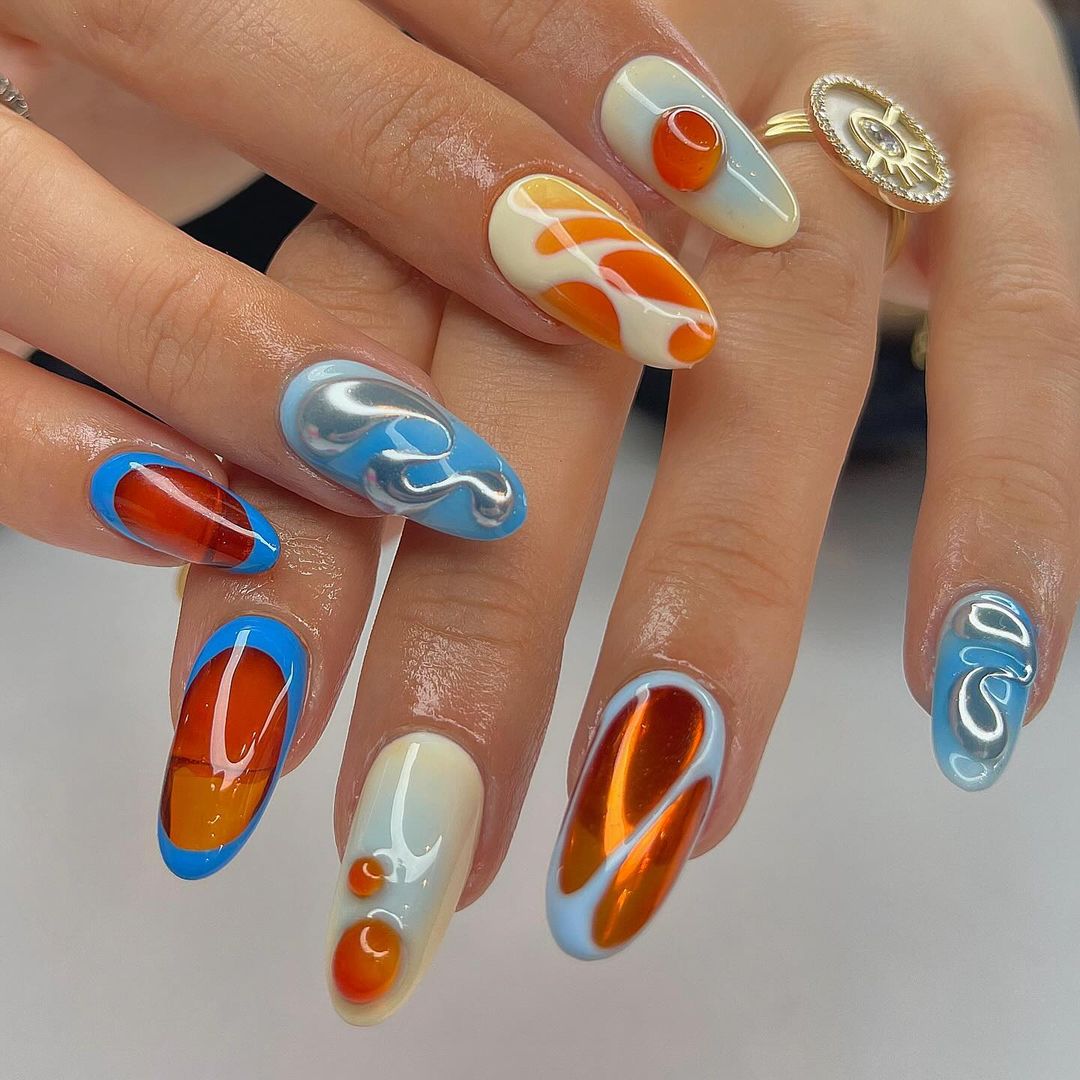
- Gel polish in “Blue Moon” by OPI
- Gel polish in “Sunset Orange” by China Glaze
- White Nail Art Pen from Sally Hansen
- Base coat: OPI GelColor Base Coat
- Top coat: OPI GelColor Top Coat
How to DIY:
- Prep your nails: Clean and shape your nails.
- Base coat: Apply OPI GelColor Base Coat and cure.
- Colorful base: Paint your nails with “Blue Moon” and “Sunset Orange” and cure.
- Swirls and dots: Use the white nail art pen to create swirls and dots on each nail. Cure each layer.
- Top coat: Finish with OPI GelColor Top Coat and cure.
Galactic Chrome
This futuristic design features a purple chrome base with metallic silver patterns. The combination of the chrome finish and the liquid silver details creates a striking, otherworldly look that is perfect for those who love bold and unique nail art. This design is ideal for parties or events where you want to stand out.
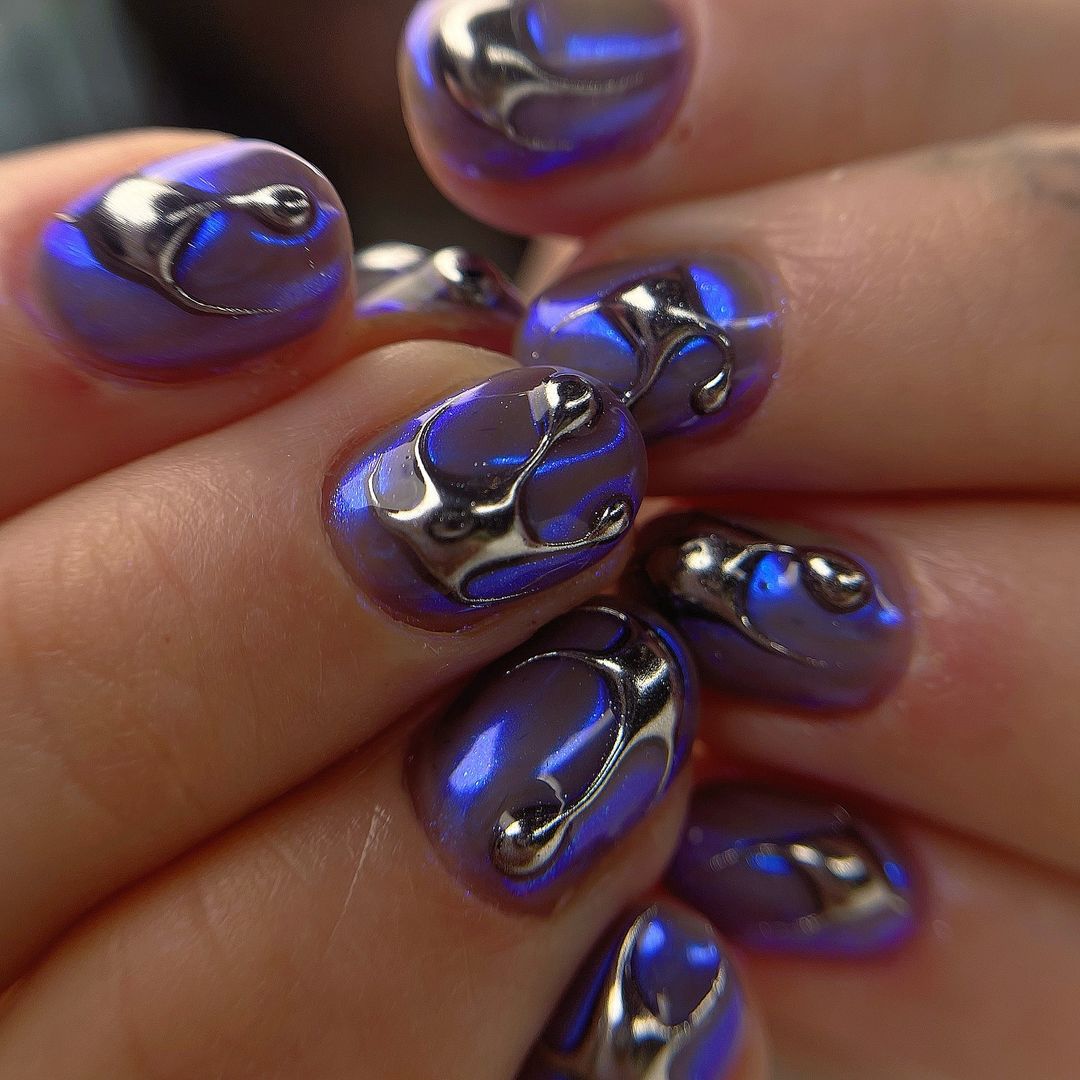
- Gel polish in “Chrome Purple” by Essie
- Metallic Silver Nail Polish from Born Pretty
- Base coat: Essie Gel Couture Base Coat
- Top coat: Essie Gel Couture Top Coat
How to DIY:
- Prep your nails: Clean and shape your nails.
- Base coat: Apply Essie Gel Couture Base Coat and cure.
- Purple chrome base: Paint your nails with “Chrome Purple” and cure.
- Metallic patterns: Use the metallic silver polish to create unique patterns on each nail and cure.
- Top coat: Finish with Essie Gel Couture Top Coat and cure.
Neon Fire
This bold design features a captivating mix of neon and chrome with flame patterns. The striking combination of hot pink and electric blue with shimmering chrome accents creates an otherworldly effect. The nails’ long, square shape enhances the dramatic flair of the design, making them perfect for those who love to stand out with their manicure.
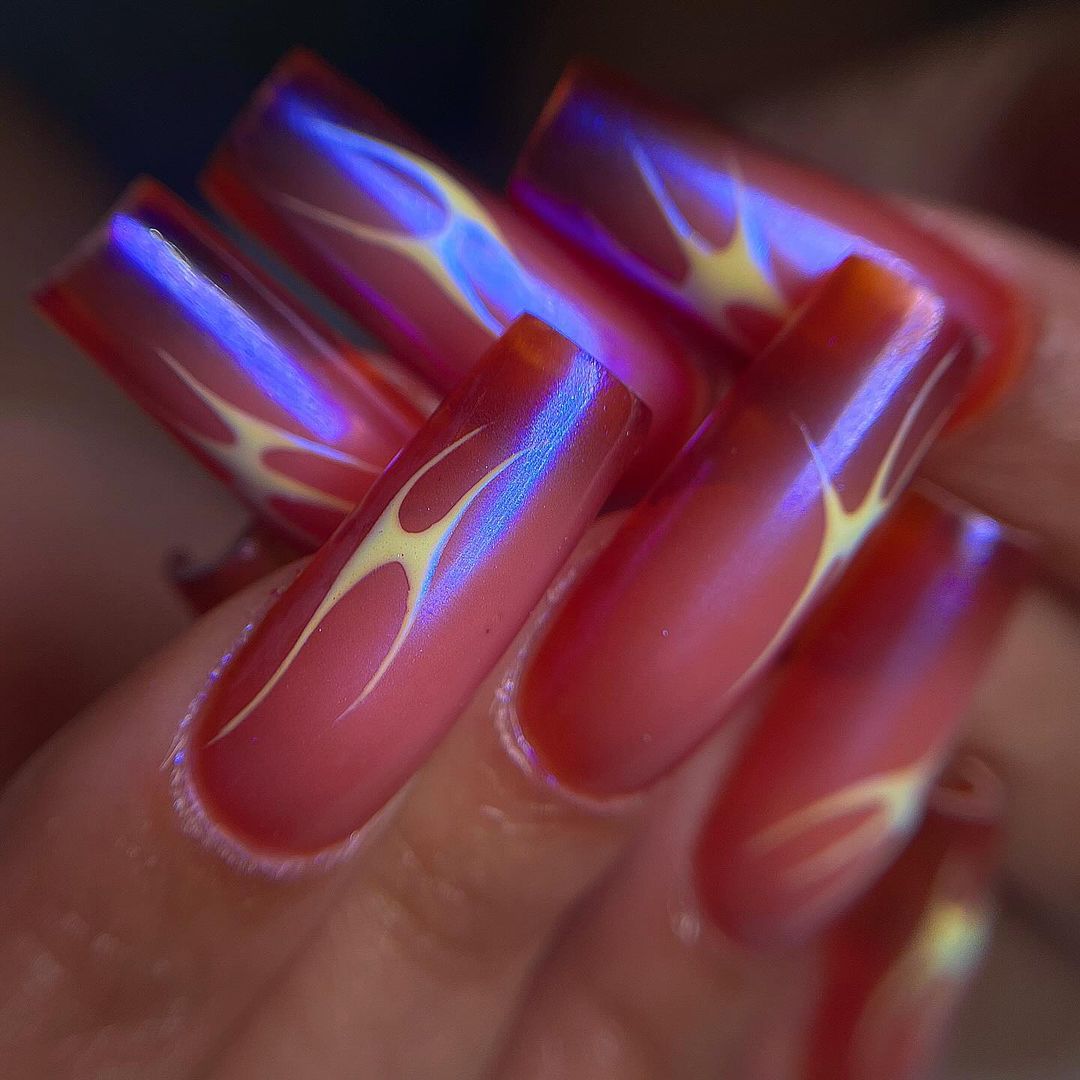
- Gel polish in “Neon Pink” by OPI
- Chrome Powder in “Electric Blue” from Born Pretty
- Yellow Nail Art Pen from Sally Hansen
- Base coat: OPI GelColor Base Coat
- Top coat: OPI GelColor Top Coat
How to DIY:
- Prep your nails: Clean and shape your nails.
- Base coat: Apply OPI GelColor Base Coat and cure.
- Pink base: Paint your nails with “Neon Pink” gel polish and cure.
- Chrome effect: Apply the electric blue chrome powder to the nails and cure.
- Flame patterns: Use the yellow nail art pen to draw flame patterns on each nail and cure.
- Top coat: Finish with OPI GelColor Top Coat and cure.
Sculpted Pearls
This extravagant design features sculpted 3D patterns in pearlescent white with metallic gold and silver accents. The intricate, wavy textures give the nails a luxurious and avant-garde appearance. This design is ideal for those who love to experiment with bold and unique styles.
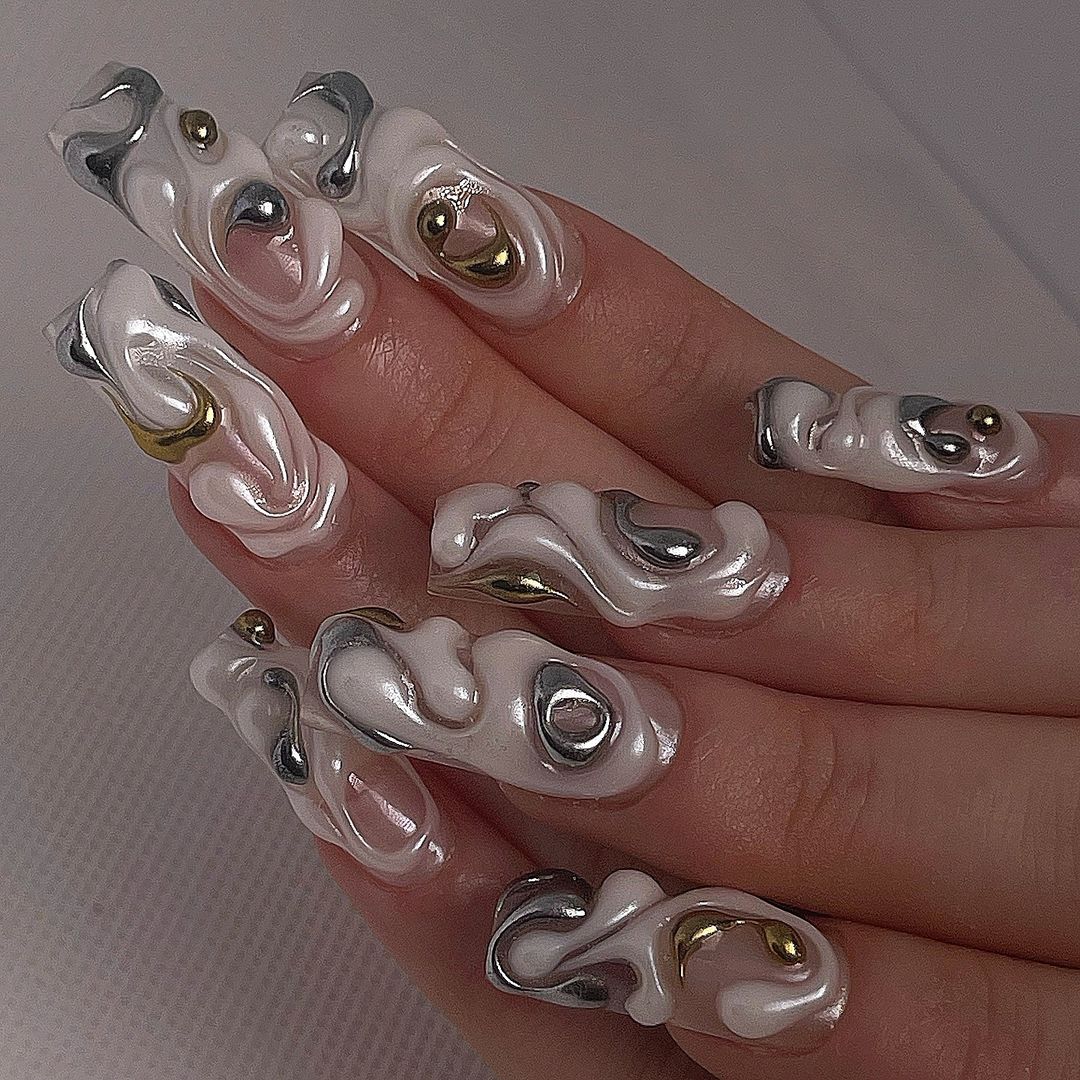
- Gel polish in “Pearlescent White” by Essie
- Metallic Gel Polish in “Gold” and “Silver” from Modelones
- Nail Sculpting Gel from Makartt
- Base coat: Essie Gel Couture Base Coat
- Top coat: Essie Gel Couture Top Coat
How to DIY:
- Prep your nails: Clean and shape your nails.
- Base coat: Apply Essie Gel Couture Base Coat and cure.
- White base: Paint your nails with “Pearlescent White” and cure.
- Sculpting: Use the nail sculpting gel to create wavy 3D patterns on each nail. Cure each layer.
- Metallic accents: Apply gold and silver gel polish to enhance the 3D patterns and cure.
- Top coat: Finish with Essie Gel Couture Top Coat and cure.
Pink Stiletto Glam
This ultra-glamorous design features long, stiletto-shaped nails with a gradient of pink shades. The addition of 3D pink bubbles adds a playful and eye-catching element to the nails. The sharp shape and vibrant colors make this design perfect for those who love bold and daring manicures.
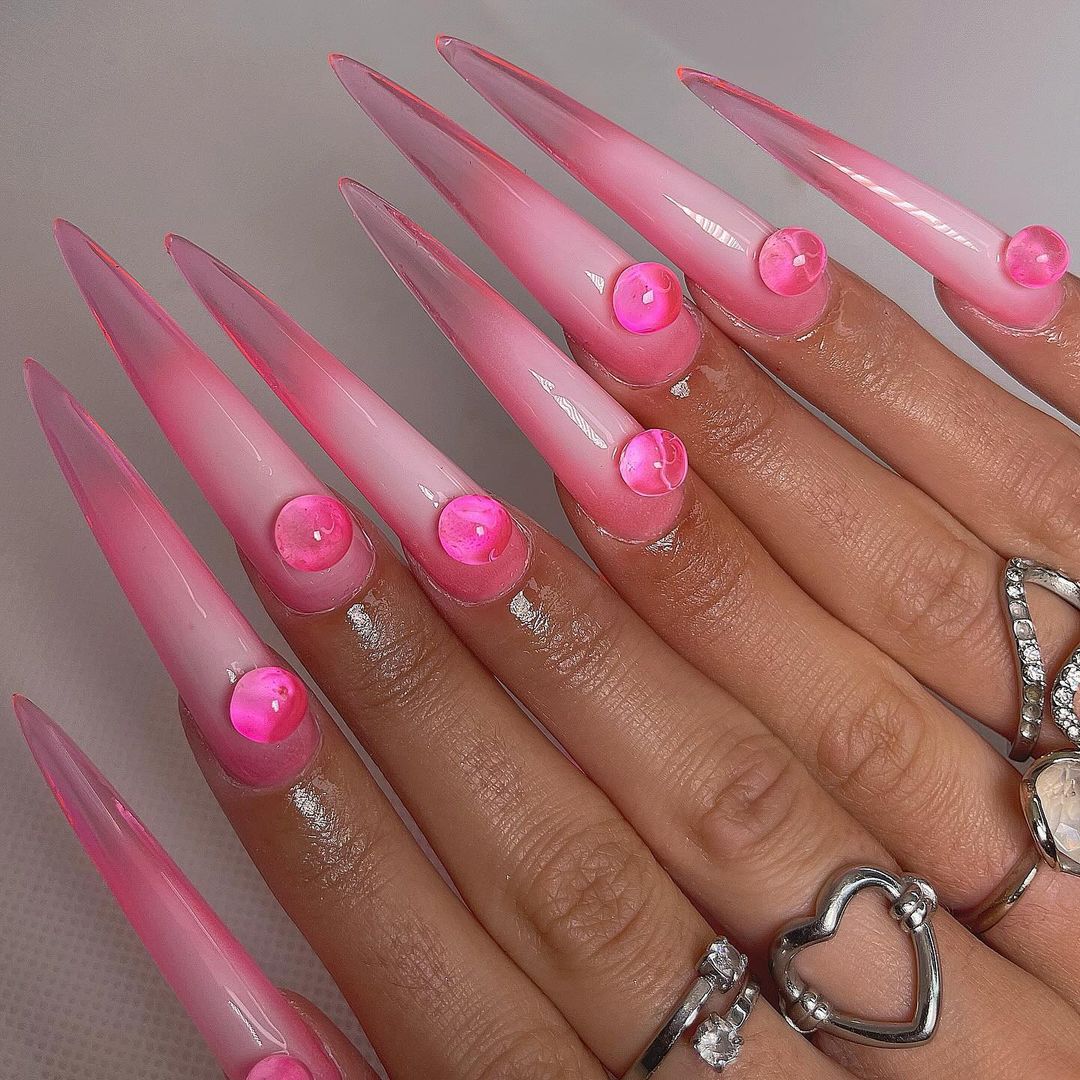
- Gel polish in “Blush Pink” by OPI
- Gel polish in “Hot Pink” by Essie
- 3D Nail Art Bubbles from Born Pretty
- Base coat: OPI GelColor Base Coat
- Top coat: OPI GelColor Top Coat
How to DIY:
- Prep your nails: Clean and shape your nails into a stiletto shape.
- Base coat: Apply OPI GelColor Base Coat and cure.
- Pink gradient: Apply “Blush Pink” at the base of the nails and “Hot Pink” at the tips, blending them together to create a gradient effect. Cure each layer.
- 3D bubbles: Apply the 3D nail art bubbles to each nail and cure.
- Top coat: Finish with OPI GelColor Top Coat and cure.
FAQ
Q: What are the most popular fall nail colors this year? A: This year, the most popular fall nail colors include deep reds, burnt oranges, and earthy neutrals. Dark shades like burgundy and navy are also trending.
Q: How can I make my gel nails last longer? A: To make your gel nails last longer, ensure proper nail prep, apply thin layers, and cure each layer thoroughly. Avoid using your nails as tools to prevent chipping.
Q: What is the best way to remove gel polish at home? A: The best way to remove gel polish at home is by soaking a cotton ball in acetone, placing it on your nail, and wrapping it with aluminum foil. After 10-15 minutes, the polish should come off easily with a gentle push.
Q: Are fall nail colors suitable for short nails? A: Absolutely! Fall nail colors look great on all nail lengths. Opt for gel short almond or gel short square designs for a chic and modern look.
With these trendy nail ideas, you’ll be ready to embrace the beauty of autumn. From gradients to intricate swirls and floral patterns, there’s something for everyone to try this season. So grab your gel polishes and get creative!
Save Pin
