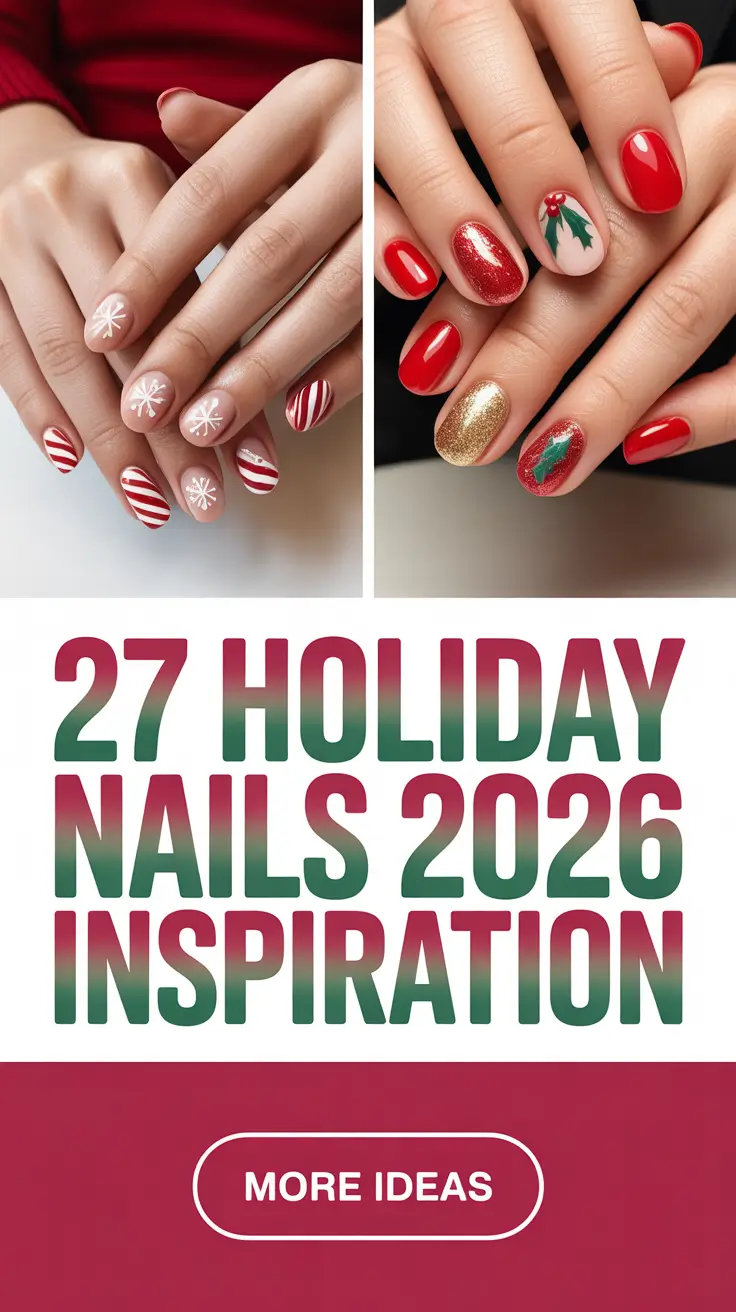
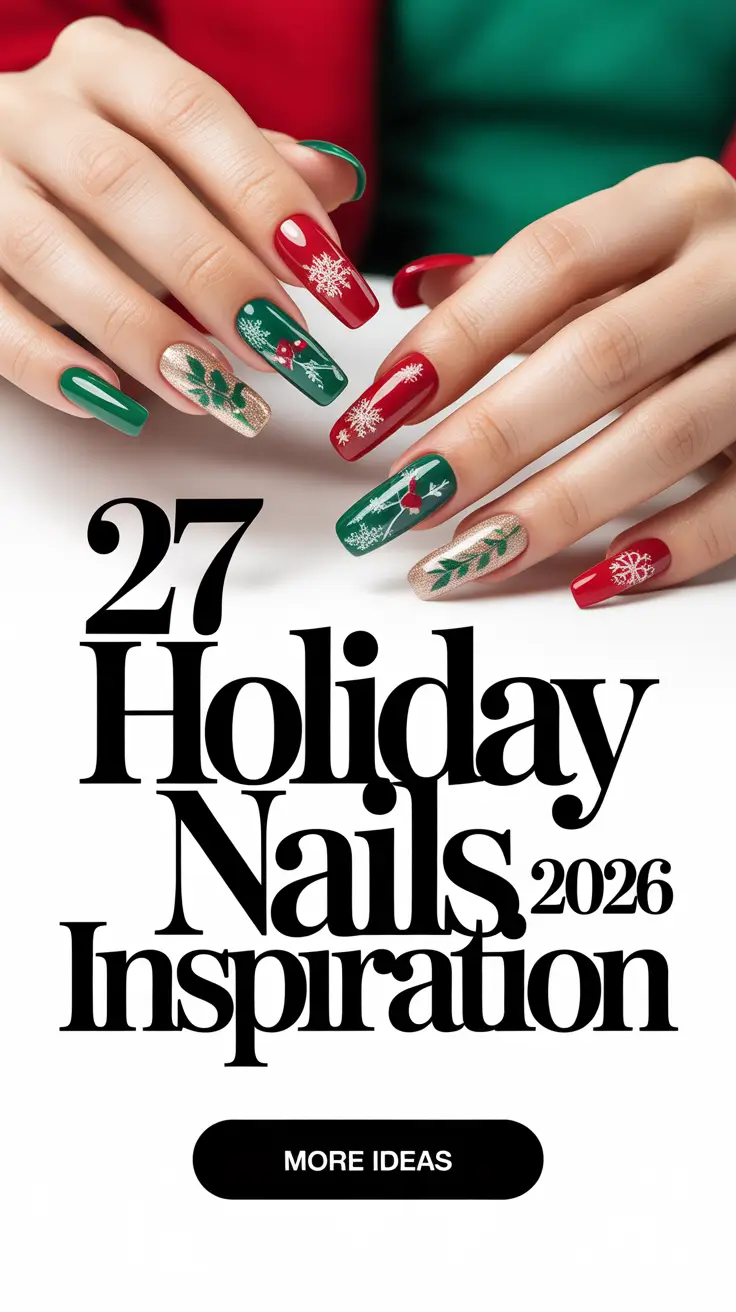
Holiday Nails Inspiration 2026 The Prettiest Simple and Festive Nail Ideas for Winter
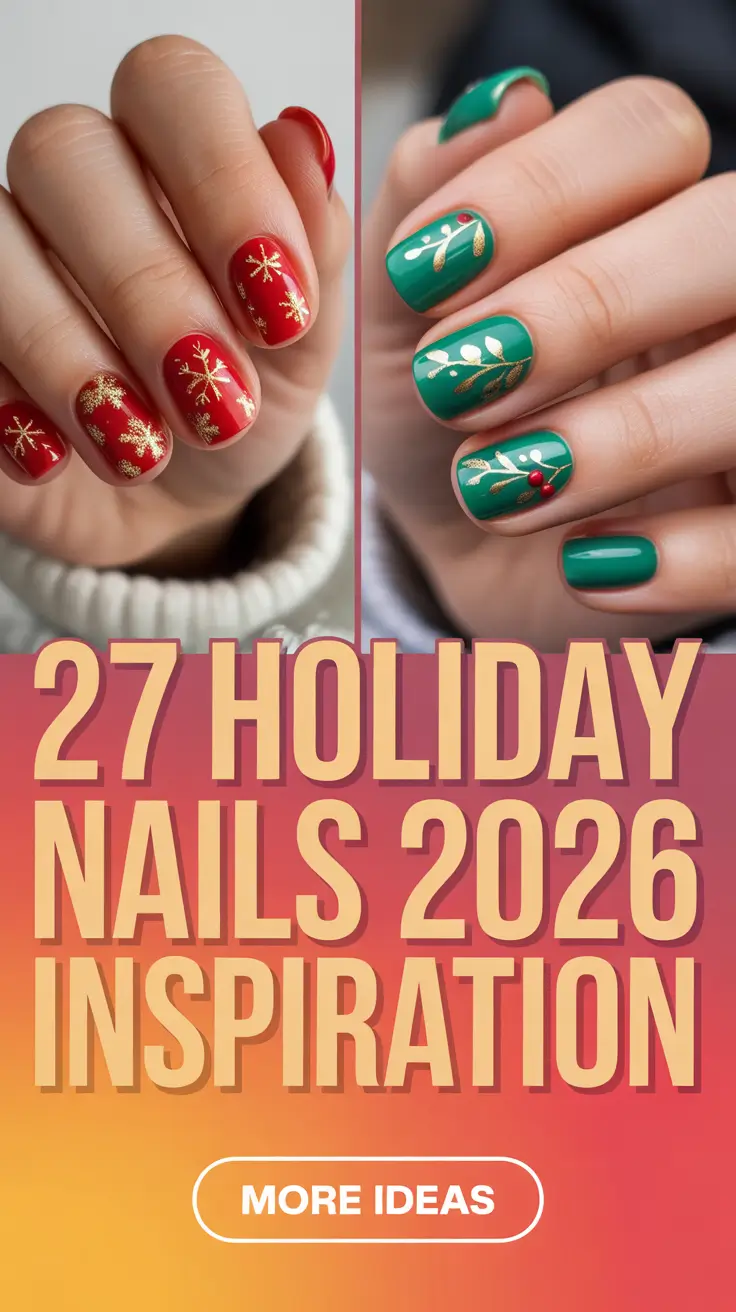
Holiday nails always sneak up on me. One minute I’m wearing clean neutrals, the next I’m craving sparkle, color, and something that feels a little celebratory without trying too hard. So what do holiday nails look like in 2026? Think refined, intentional, and emotionally warm. Designs that feel festive but wearable, playful but grown. Let’s talk through the looks that keep pulling me back this season – and why they work.
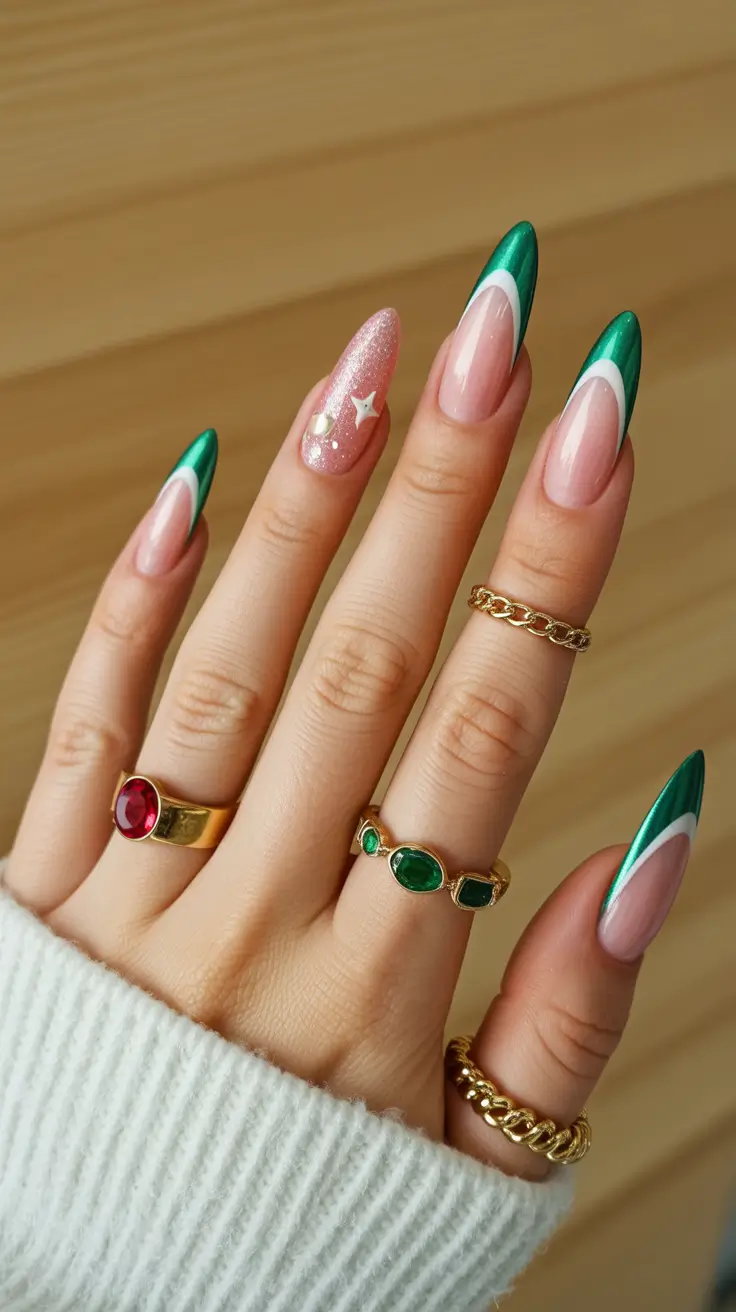
Dark Green and Gold Winter Story
There’s something timeless about deep green nails during the holidays, especially when gold details come into play. This manicure balances richness and restraint – almond-shaped nails in a dark green base paired with delicate gold stars and soft neutral accents. It feels wintery without screaming Christmas, which is exactly why I love it for December through January.
To recreate this, I’d reach for a forest-green gel polish like OPI Stay Off the Lawn, a creamy nude base, and thin gold foil or star decals. A fine liner brush is key for precision. Celebrity nail artists often say holiday designs feel more elevated when metallic accents are used sparingly, and I couldn’t agree more.
This is the kind of manicure I wear when I want my nails to feel styled even with a chunky sweater and no makeup. Quiet luxury, but festive.
Botanical Winter Whites and Soft Greens
This look leans into calm holiday energy. Milky white nails paired with hand-painted evergreen branches and muted green accents feel fresh and soothing. It reminds me of snowy mornings, fresh pine, and slow weekends in December.
A sheer white gel like Essie Marshmallow works beautifully here, combined with sage and pine-green art gels. I’d recommend dotting tools and a detail brush for the botanical elements. Patience matters more than perfection.
This style is ideal if you love holiday nails but want something subtle enough for everyday life. It’s gentle, elegant, and surprisingly versatile.
Festive Green Plaid with Snowflake Details
Plaid always feels right during the holidays, and in deep green tones it instantly reads winter. This manicure mixes glossy emerald nails with soft neutrals, plaid patterns, and minimal snowflake art. Cozy, but still polished.
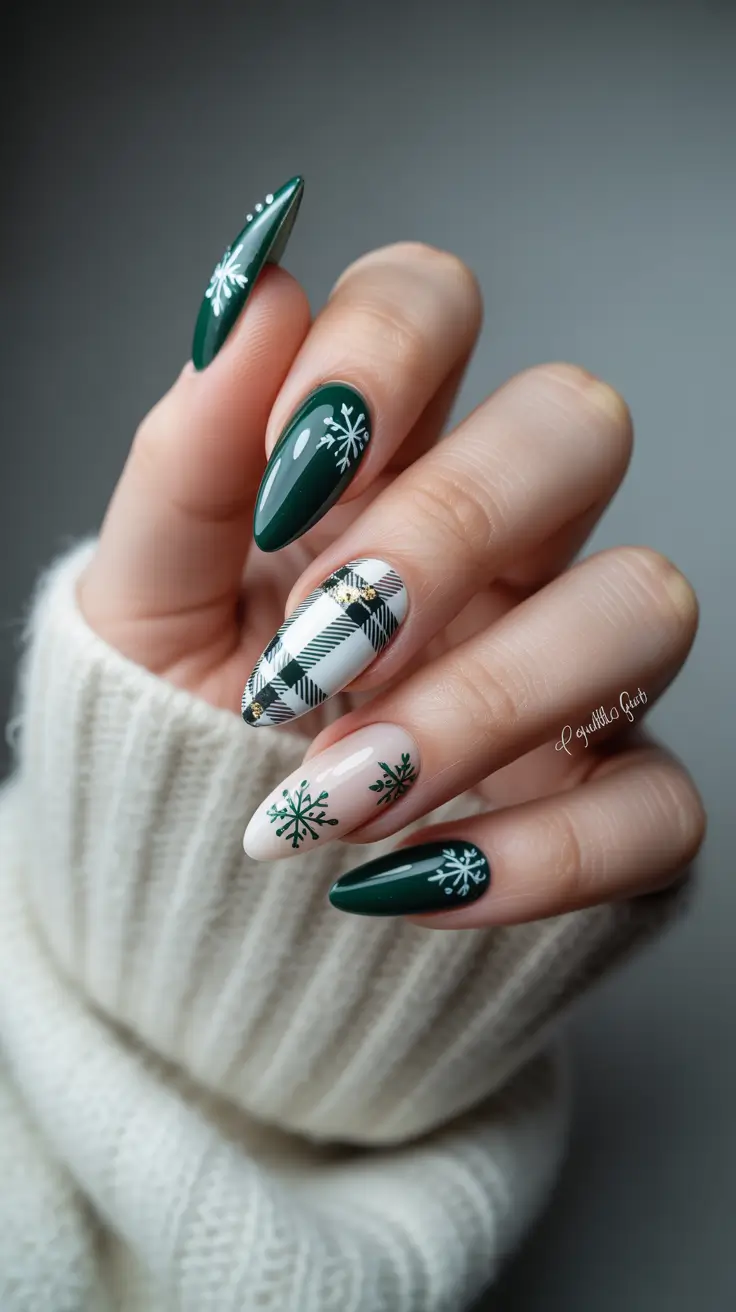
To get this look, I’d layer dark green gel, a creamy beige, and thin striping brushes for the plaid lines. Nail educators often suggest sealing detailed designs with an extra top coat to keep everything crisp longer.
This is my go-to when I want something playful that still feels grown-up. It pairs perfectly with knits, coats, and holiday gatherings.
Black Nails with Crystal Accents
Holiday nails don’t always need color to feel festive. Matte or satin black nails with crystal embellishments bring drama in the best way. Sharp shapes and evenly spaced stones make this design feel intentional rather than edgy.
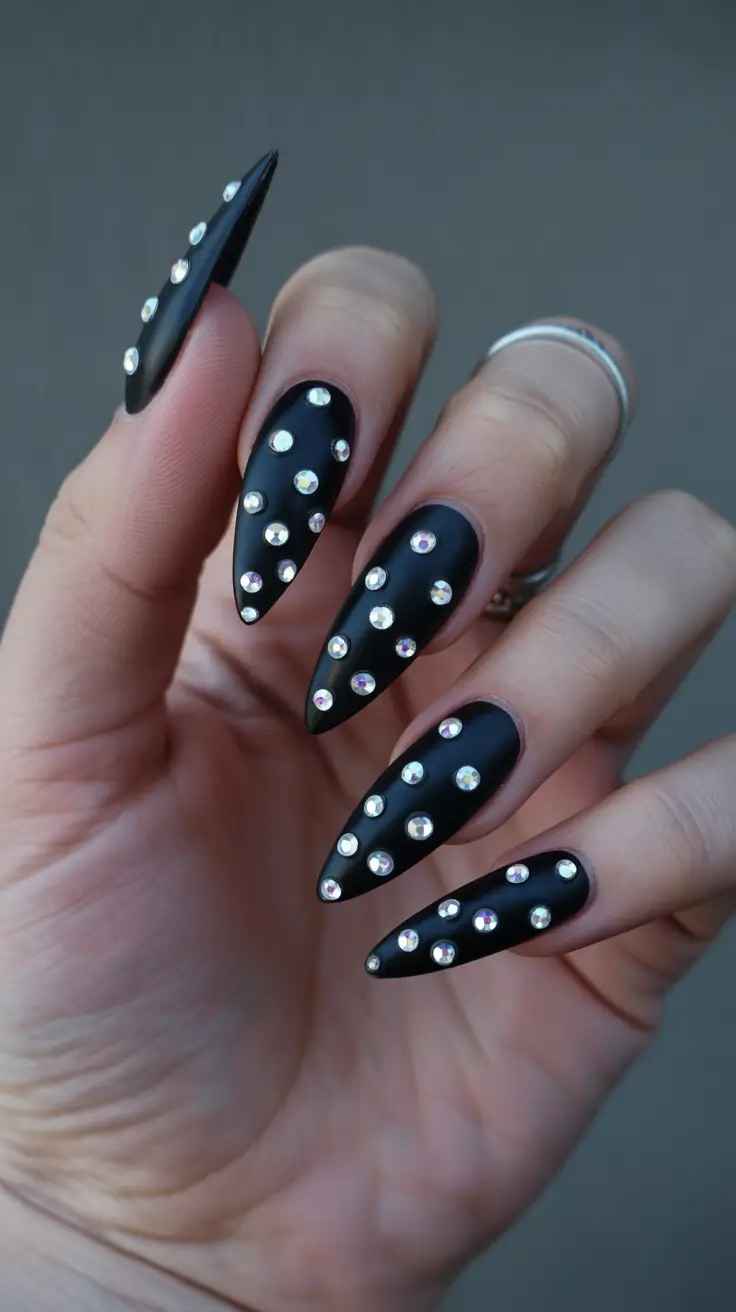
I’d use a jet-black gel like CND Black Pool and flat-back crystals secured with nail glue or builder gel. Many professional nail artists recommend placing stones before the final cure to ensure longevity.
This is a holiday party manicure. Bold, confident, and surprisingly chic with an all-black outfit or red lip.
Classic Red with Playful Holiday Art
Red nails are forever, but 2026 adds a twist with playful holiday motifs. Glossy red acrylics mixed with plaid patterns and sweet seasonal details feel joyful without being overdone.
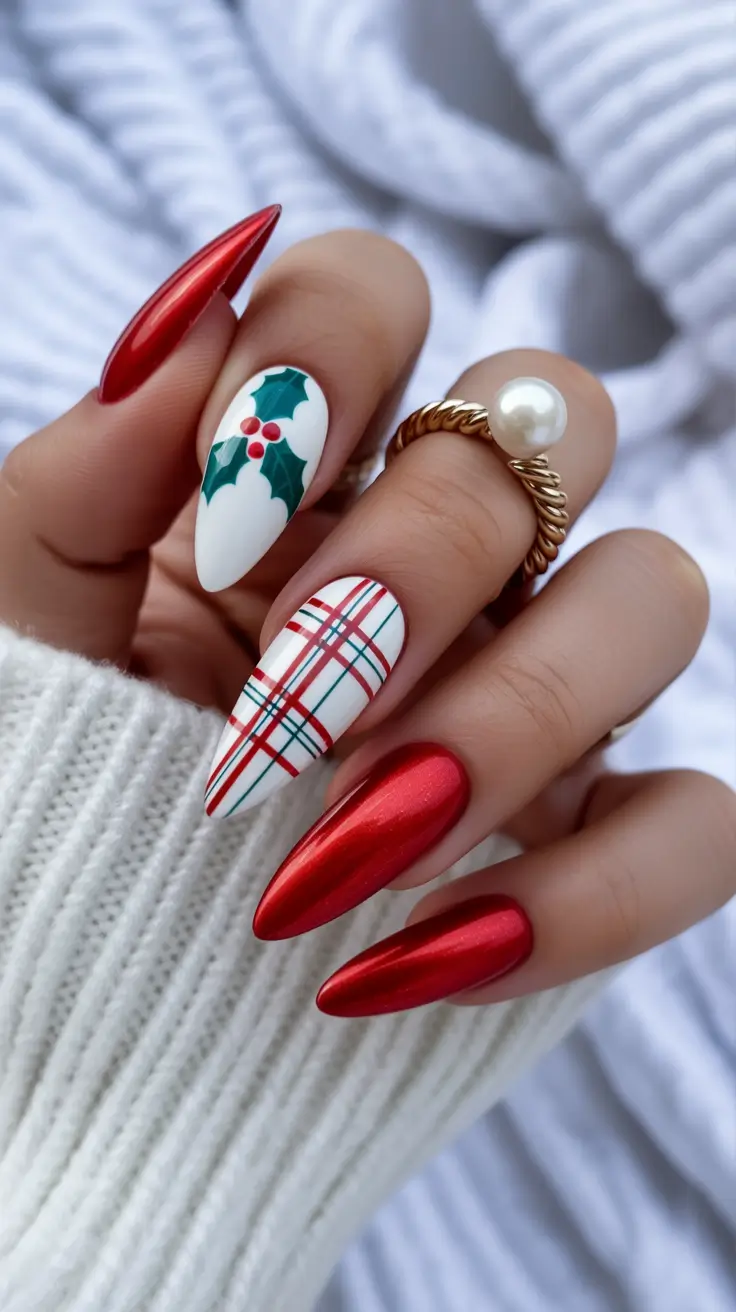
A true red like OPI Big Apple Red paired with white and green striping polish works beautifully here. I keep designs simple and let one or two accent nails do the talking.
This manicure always makes me smile. It’s festive, nostalgic, and perfect for embracing the spirit of the season without taking it too seriously.
Classic Red and Snowflake Elegance
This manicure leans into holiday tradition with glossy red nails balanced by soft nude accents, delicate white snowflakes, and a touch of champagne shimmer. The almond shape keeps everything elegant, while the contrast between bold red and airy white makes the design feel festive without being heavy.
I love this kind of look for winter events when you want something recognizable but still refined. It works just as well with a cozy sweater as it does with an evening dress.
Minimal Holly on Short Natural Nails
Short nails take center stage here, finished with a sheer nude base and tiny holly details in green and red. The design feels light, cute, and very wearable, especially for anyone who prefers subtle holiday nails over statement sets.
This is one of those manicures I recommend when you want festive energy without committing to bold colors. Simple art on a clean base always feels fresh.
Soft Pink Holiday Minimalism
Muted pink nails with tiny white accents prove that holiday nails do not need obvious symbols to feel seasonal. The glossy finish and almond shape give this manicure a calm, polished look that fits both winter and early spring.
I reach for styles like this when I want my nails to blend seamlessly into everyday outfits but still feel intentional and put together.
French Tips with Romantic Details
This set updates the classic French manicure with soft pink bases, crisp white tips, and raised accents like bows, pearls, and floral elements. It feels delicate, elegant, and slightly playful at the same time.

It is the kind of manicure that works beautifully for holiday dinners or winter celebrations where understated glamour matters more than sparkle.
Heart Accents with Modern Shine
Long nude nails are elevated with gold-lined heart shapes and iridescent details that catch the light softly. The design feels modern, artistic, and slightly unexpected for the holiday season.
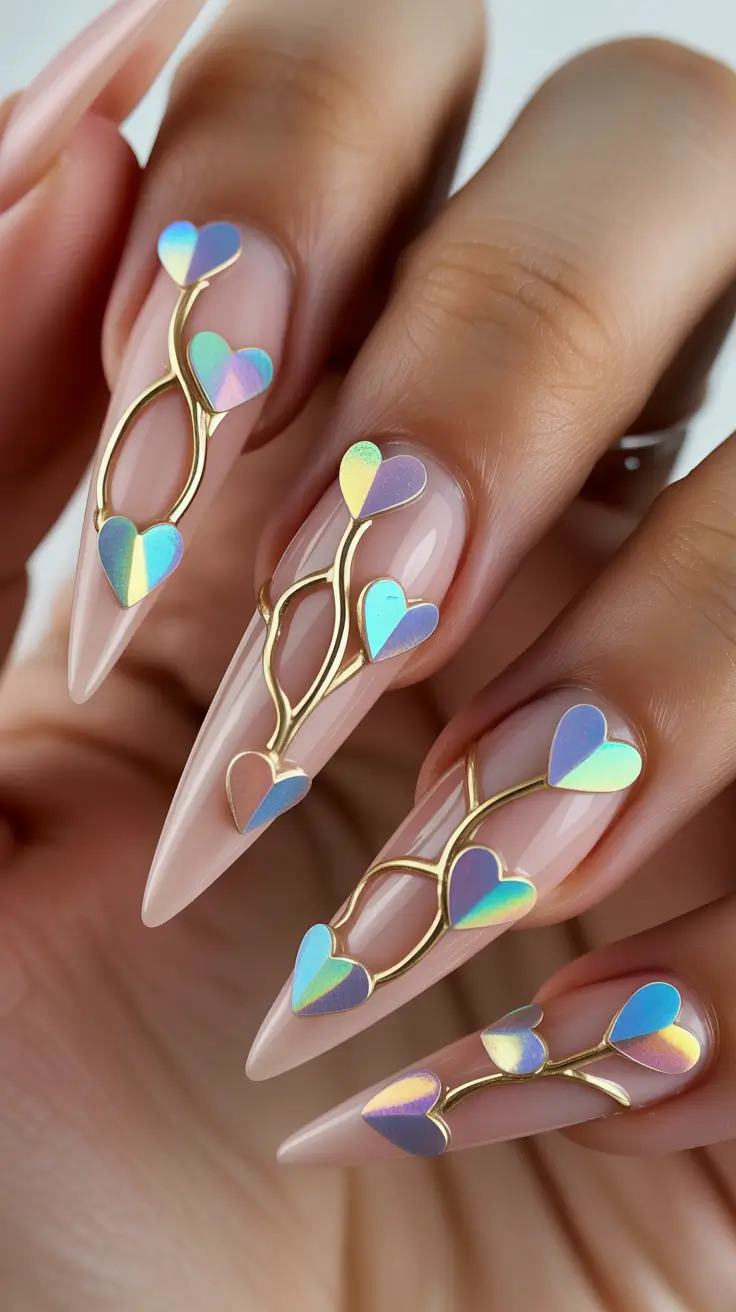
This is a great reminder that holiday nails in 2026 are about emotion and mood. A little romance, a little shine, and just enough detail to make you look twice.
Matte Black Studded Night Out
This matte black set is pure holiday after-dark energy – sharp almond tips, velvety finish, and scattered crystal studs that sparkle like city lights. The placement feels intentional, not random, which keeps it chic instead of costume-y.
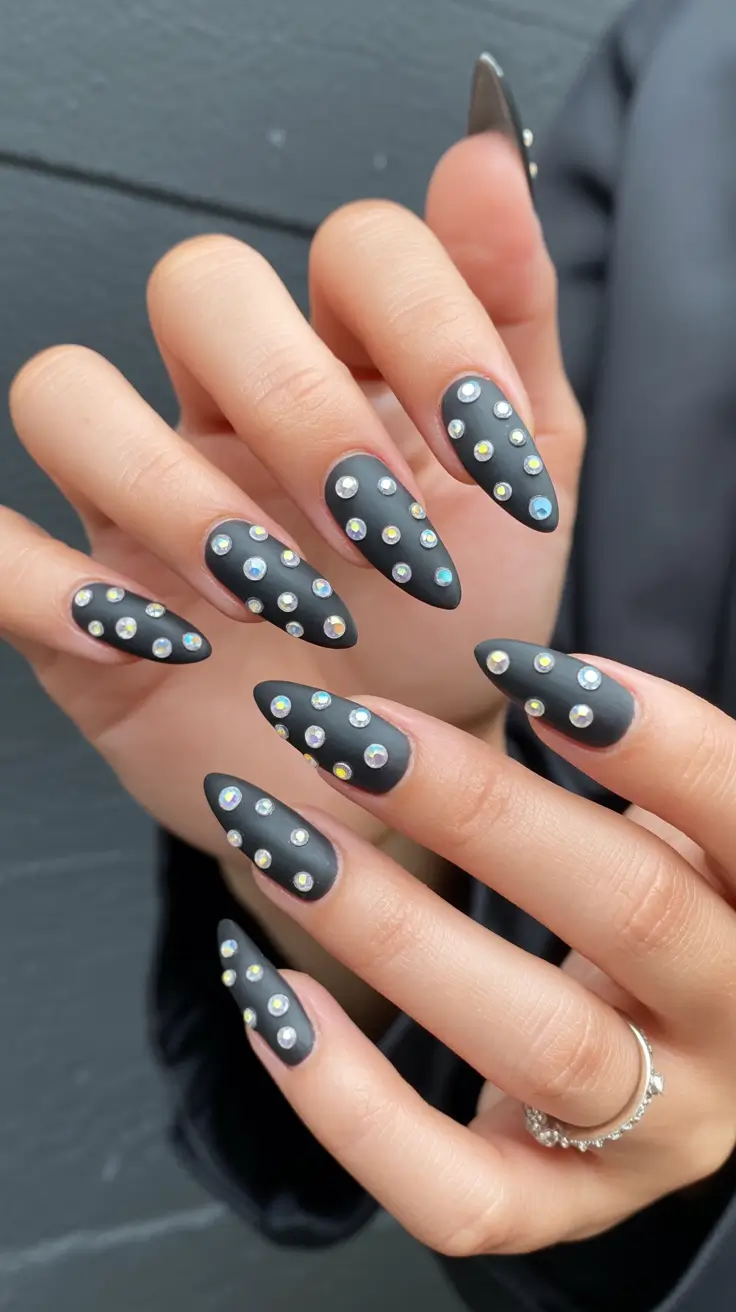
To recreate it, I’d use a matte top coat over a deep black gel like CND Black Pool, then secure flat-back crystals with builder gel and cure well. My tip – finish with a thin top coat only around the stones so the matte stays matte.
I wear this when I want my nails to look like accessories, especially with an all-black outfit and silver jewelry.
Black and Gold V French Glam
This design is the definition of classy drama – nude bases with sharp black V tips and a gold glitter seam that makes the shape look even more sculpted. It’s sleek, editorial, and very 2026.
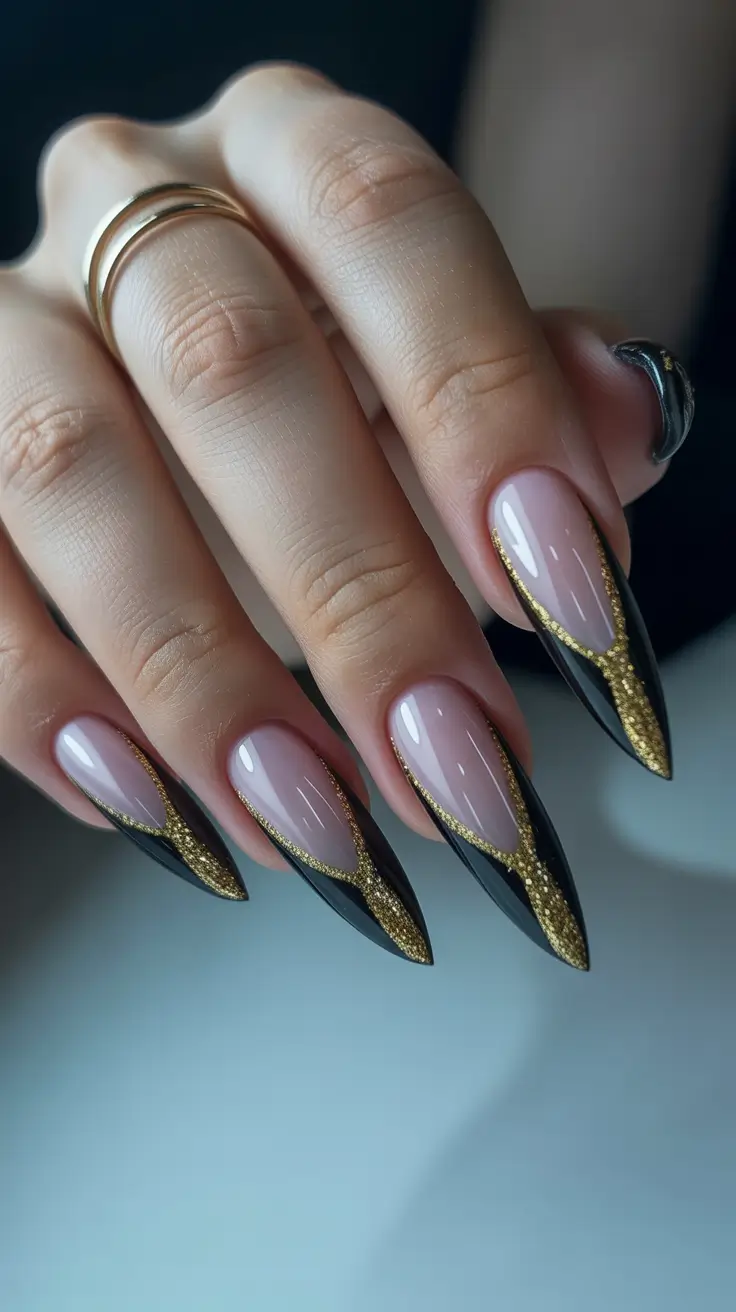
I’d go for a sheer nude like OPI Bubble Bath, a crisp black gel for the outline, and fine gold glitter liner for the center detail. Keep your brush almost flat and move slowly – sharp lines are everything here.
This is my pick for holiday dinners when I want something bold, but still elegant enough for a glass of champagne.
Black French with Soft Floral Touch
This manicure takes the classic French tip and makes it romantic – glossy black tips fading into a nude base, with tiny pastel flowers that soften the whole look. It feels feminine, modern, and surprisingly wearable.
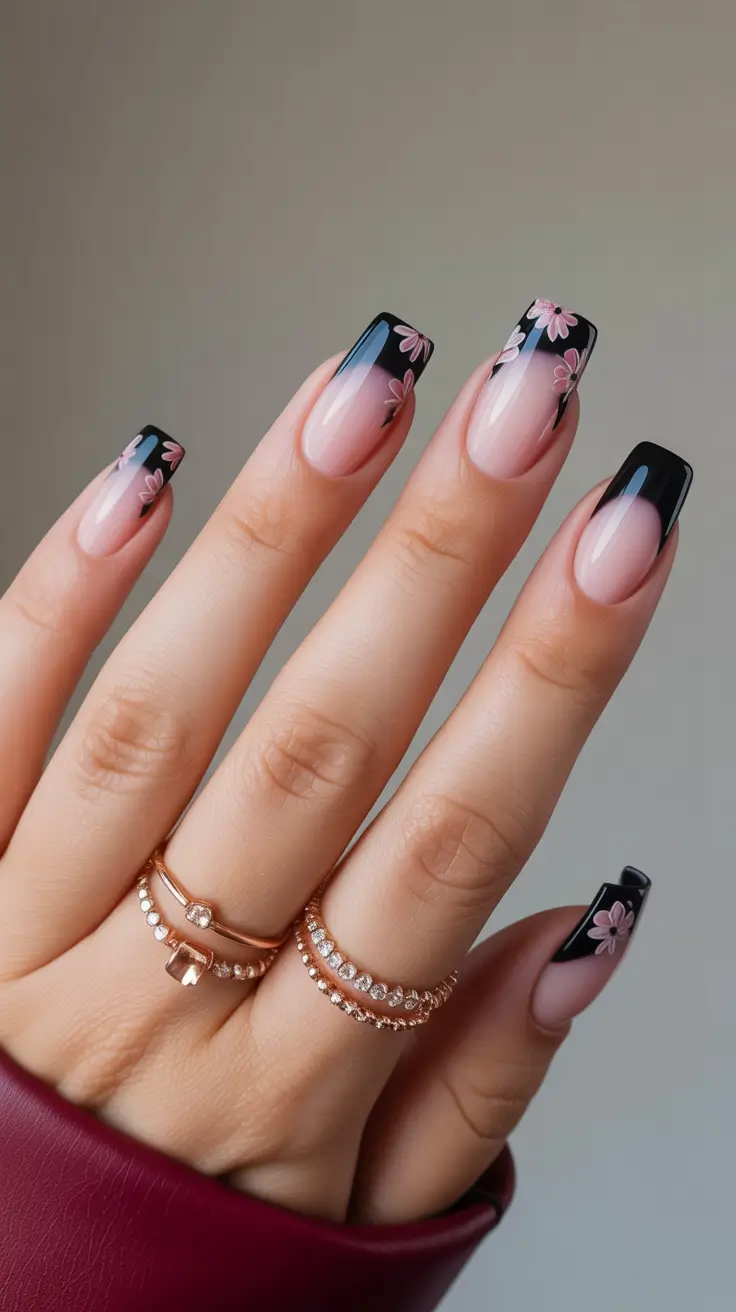
If you’re doing it at home, use a sponge for the subtle gradient and a dotting tool for petals. I love this style for holiday season because it pairs beautifully with both cozy knits and sleek party outfits.
It’s the kind of nail set that gets compliments in line at Starbucks – quietly impressive.
Red Chrome Trees and Graphic Holiday Art
This set is playful but still polished – deep red shimmer nails paired with nude accents featuring graphic Christmas tree silhouettes. The red looks rich and dimensional, while the tree art keeps it festive in a cool, minimal way.
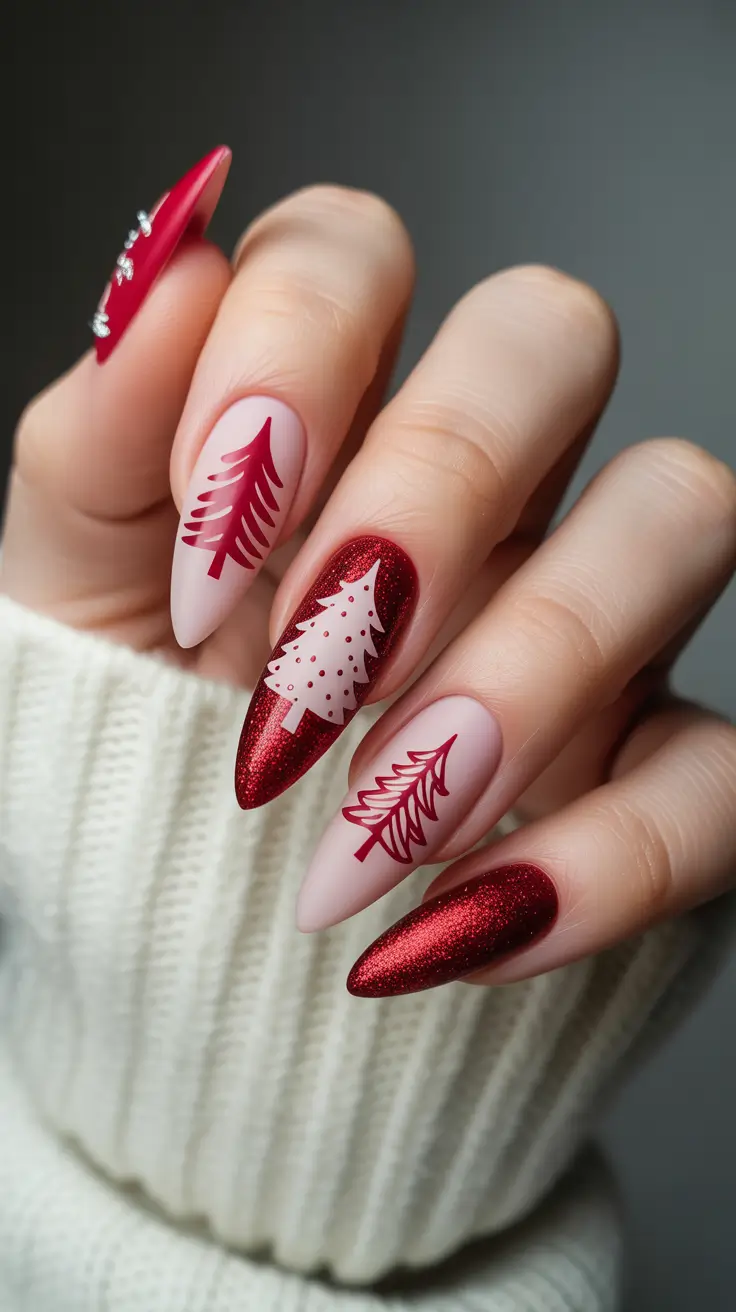
I’d use a red cat-eye or chrome powder over gel, then add tree designs with a fine brush or stamping plate for crisp edges. Quick tip – keep the art matte and the red glossy for contrast.
This is my favorite kind of holiday nail mood – cheerful, stylish, and not too literal.
Matte Red Snowflakes for Cozy Season
Matte red nails always feel like December, but the white snowflake accents make them extra special. The soft velvet finish looks modern, and the snowflake design feels clean and graphic instead of overly detailed.
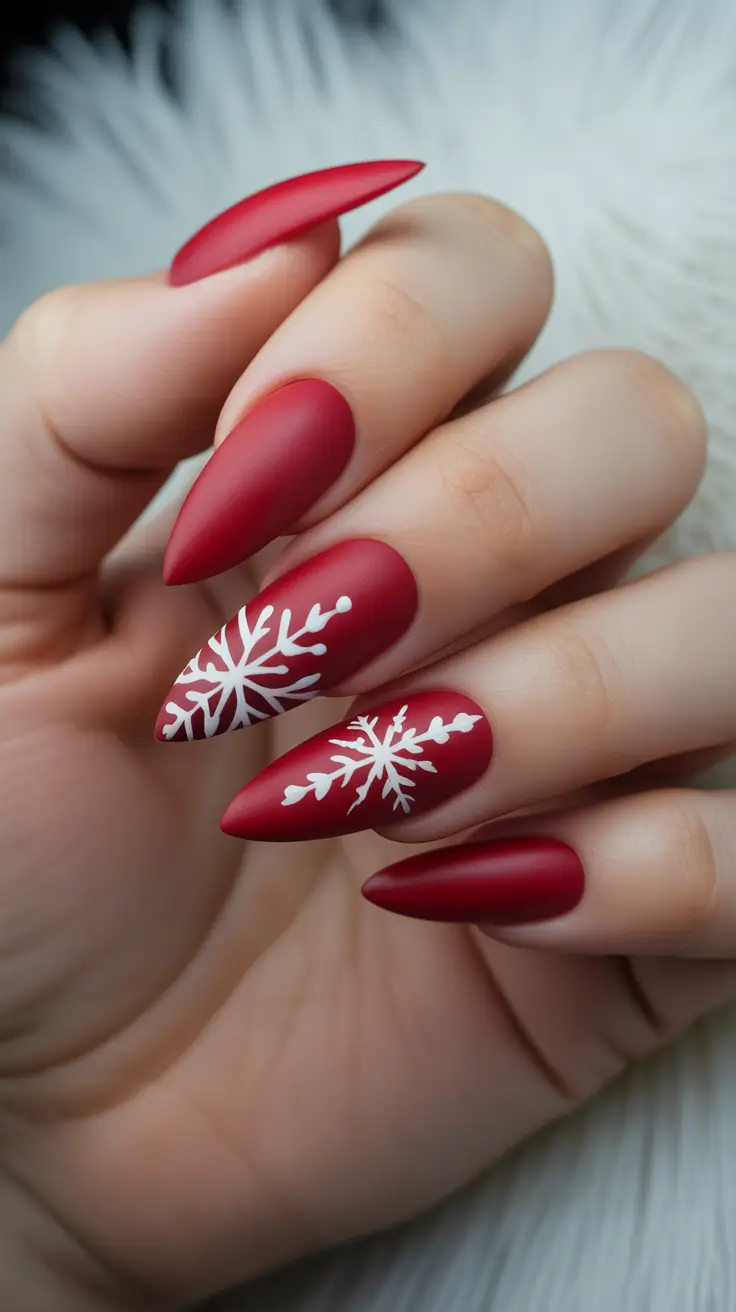
To get it right, I’d use a deep red gel like OPI Malaga Wine, matte top coat, and white art gel with a thin liner brush. Seal only the accent nails with a very light top coat layer so the snowflakes stay crisp.
If you want holiday nails that look good in every photo – this is the one.
Deep Red Winter Elegance With a Graphic Twist
There’s something timeless about a red manicure during the holidays, but this version feels updated. The almond shape, glossy wine-red polish, and that sharp geometric accent instantly elevate it. I love how the contrast between nude space and rich color makes the design feel modern rather than traditional.
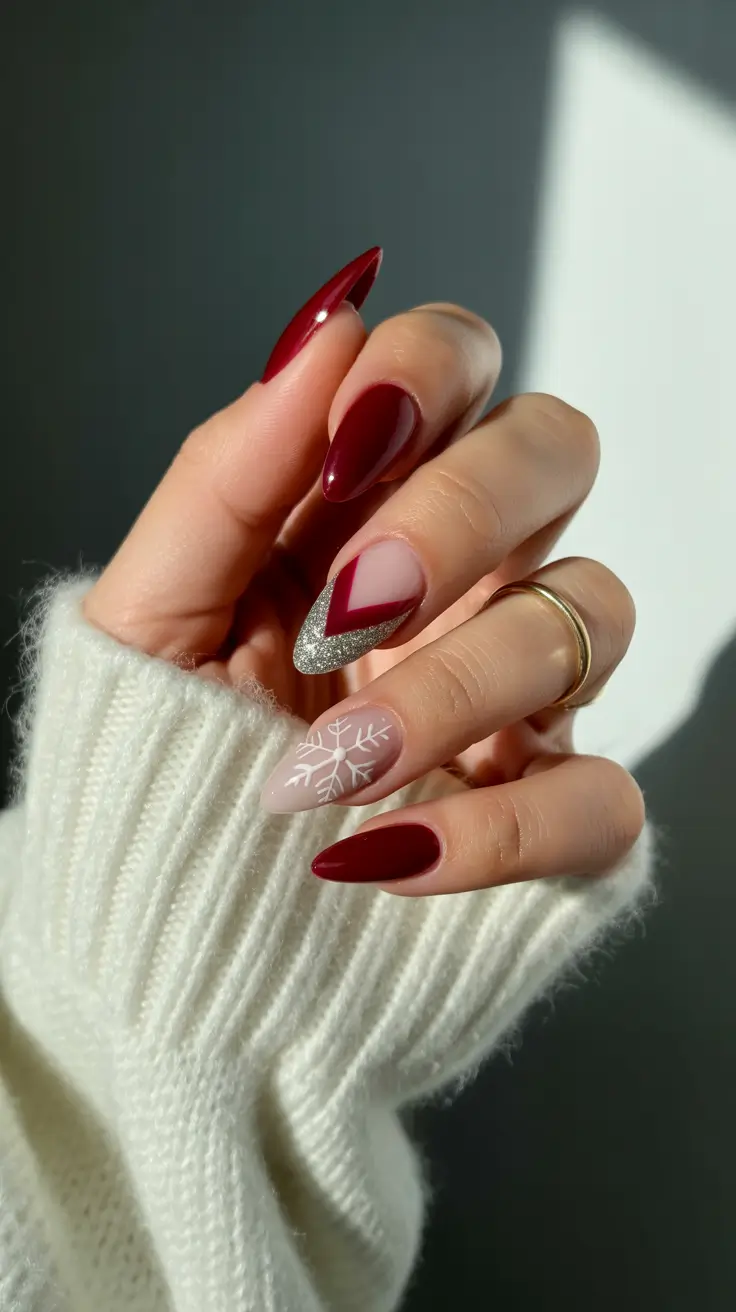
To recreate this look, I’d stick to a classic gel red like OPI Big Apple Red or Essie Bordeaux, plus a fine silver glitter liner. Clean lines matter here, so a thin nail art brush is essential.
This kind of manicure is my go-to when I want holiday vibes without committing to full-on sparkle. It feels classy, confident, and surprisingly versatile for winter outfits.
Festive Burgundy With Snowflake Art
Burgundy nails always feel like December to me, especially when paired with delicate white snowflake art. The elongated shape adds drama, while the matte finish keeps it refined instead of flashy.
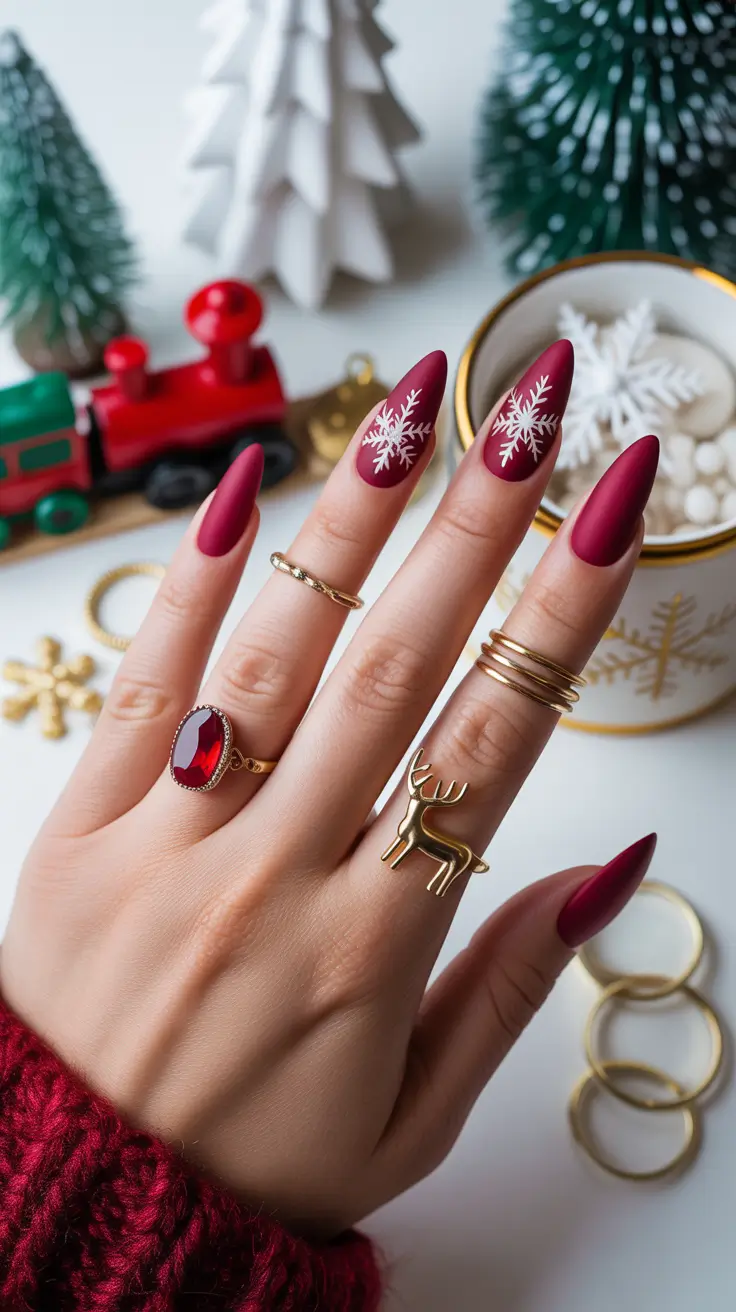
A deep red gel, white stamping polish, and a matte top coat are all you need. If you’re steady-handed, hand-painting the snowflakes gives a softer, more personal result.
I love this design for holiday dinners or winter trips. It’s festive, but still grown-up, and it photographs beautifully in natural light.
Green French Tips With a Playful Holiday Accent
Green is quietly becoming one of my favorite holiday nail colors. This updated French tip with a metallic green edge feels fresh, while the subtle accent nail adds just enough sparkle.
I’d use a sheer pink builder base, a chrome or metallic green gel for the tips, and a small star decal or charm for detail. Keep the base clean to let the color shine.
This is perfect if you want festive nails that still work after the holidays. It feels playful, not seasonal overload.
Soft Pink Winter Nails With Snowflake Details
Not all holiday nails need bold color. This soft pink base with fine white snowflakes and subtle shimmer feels cozy and elegant at the same time. It’s winter, but make it delicate.
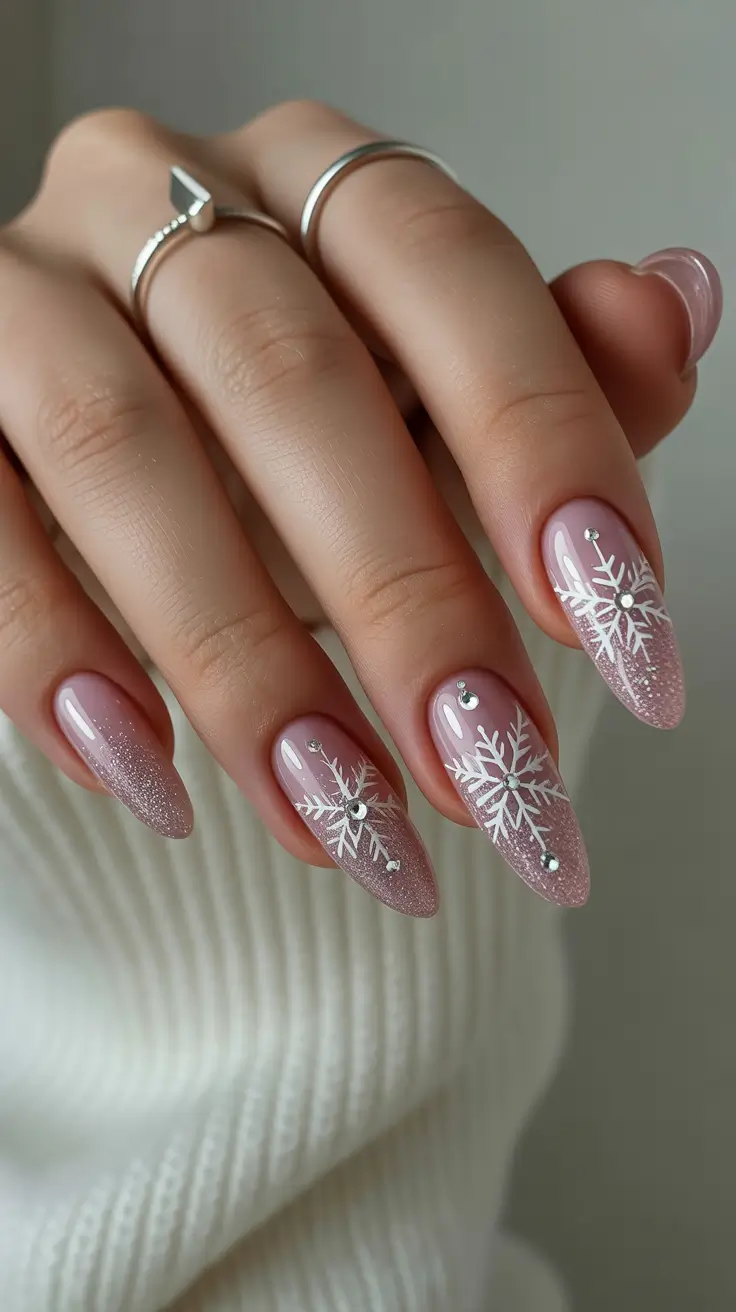
A milky pink gel, fine glitter, and rhinestone accents are enough to recreate this look. Celebrity nail artists often say less is more with winter designs, and I fully agree here.
I’d recommend this style if you love neutral outfits and want your nails to quietly complement everything you wear.
Minimal Holiday Nails With Subtle Art
This design proves that simple holiday nails can still feel special. Neutral tones, tiny hand-drawn details, and one soft glitter nail create balance without trying too hard.
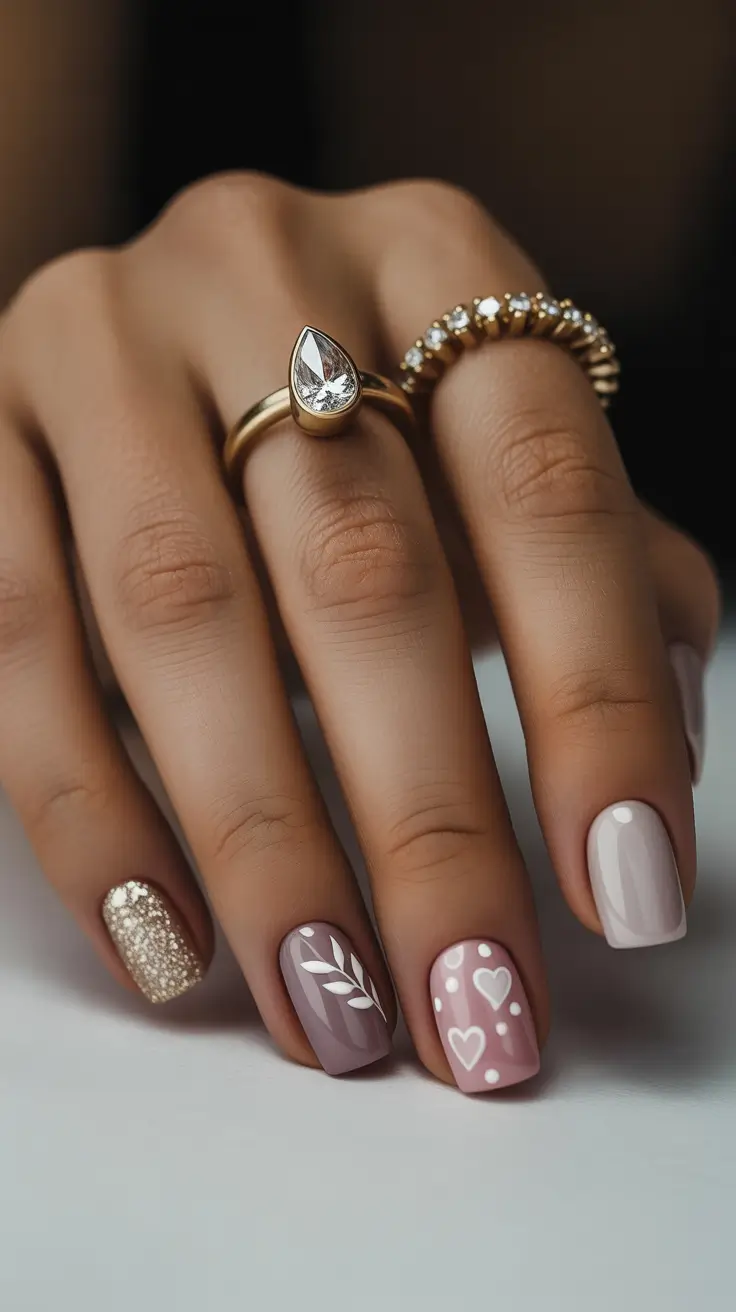
You’ll need nude and blush-toned gels, a gold glitter polish, and a fine liner brush. This is a great at-home option if you enjoy slow, careful nail art sessions.
Personally, I love this style for everyday winter life. It’s subtle, elegant, and feels very 2026 – intentional, calm, and quietly festive.
Soft Blush Snowflakes With a Jewelry Moment
This set is the definition of cozy and polished – a milky blush base with crisp white snowflakes, delicate winter branches, and a single heart-shaped confetti accent that feels like a tiny accessory. I love how the square-short shape keeps everything wearable, even with the extra details.
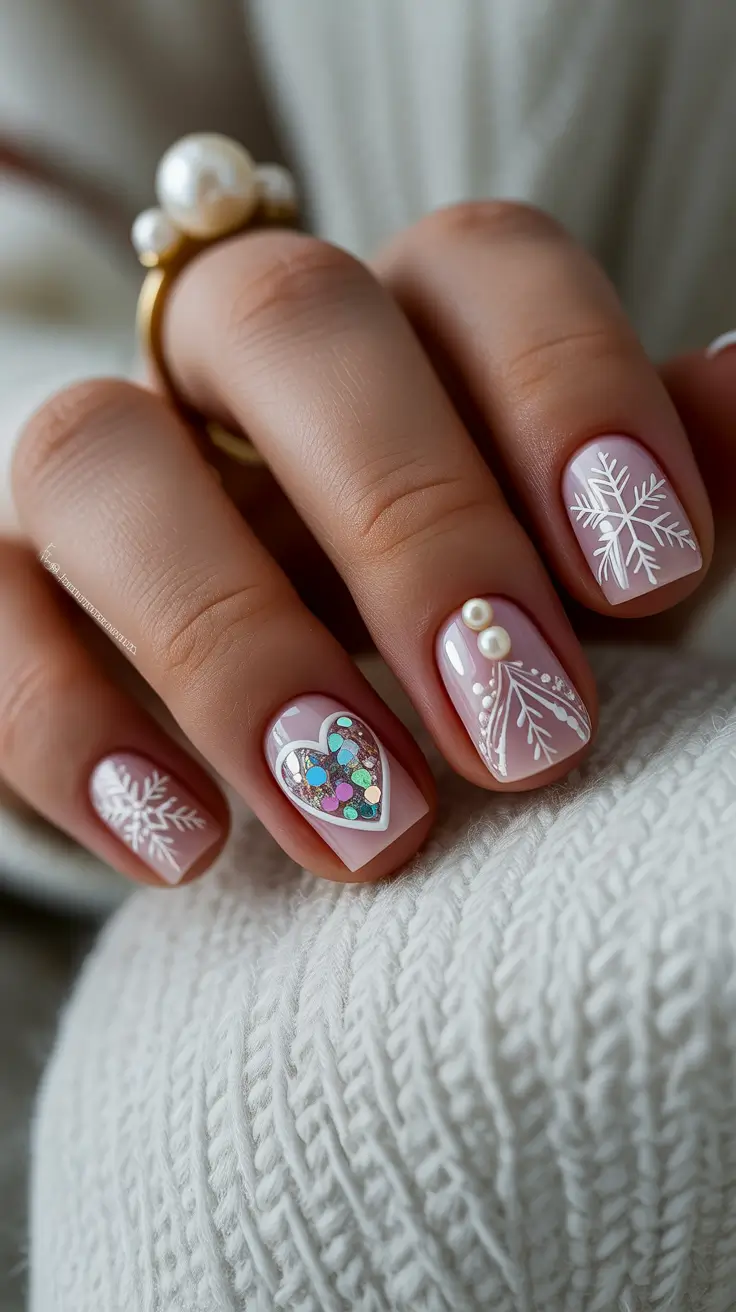
To get this look, I’d use OPI Bubble Bath or Essie Mademoiselle, a white art gel like Beetles Nail Art Gel, and a few pearl studs plus mixed confetti pieces. A thicker top coat helps seal the heart so it looks smooth, not bumpy.
If you’re doing it at home, paint your base, cure, then add snowflakes with a fine liner brush or decals. Finish by placing pearls into a dot of builder gel, cure again, and top coat – slow and steady wins here.
Classic White And Red Holiday Mix Nails
This manicure is perfect for anyone who wants festive without going full glitter bomb. I’m obsessed with the mix – a white knit-texture nail, a red snowflake moment, a soft translucent base with red leafy accents, plus a subtle gold-fleck nail to tie it all together.
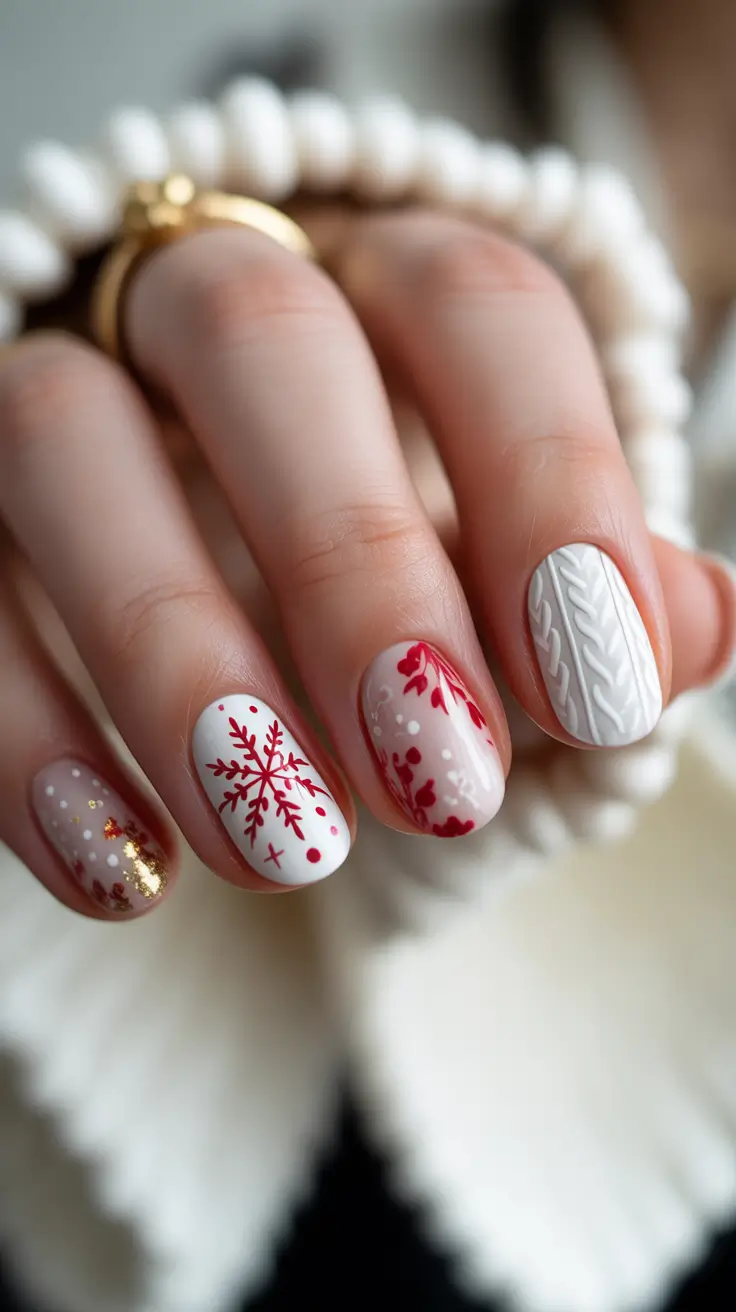
For polish, I’d grab Essie Blanc, OPI Big Apple Red, and a sheer pink like CND Romantique. The sweater texture can be done with a thick white gel or even a 3D art gel – it’s easier than it looks, just keep the lines raised and neat.
What I like most is how this still feels clean and modern. It works for holiday parties, but also looks totally normal holding a latte in January.
Minimal Evergreen Branch Tips On Short Square Nails
This one is so fresh – short square nails with a soft neutral base and tiny evergreen branches, finished with bright yellow berry dots. It feels like holiday decor, but minimalist, like you’re wearing a little winter postcard.
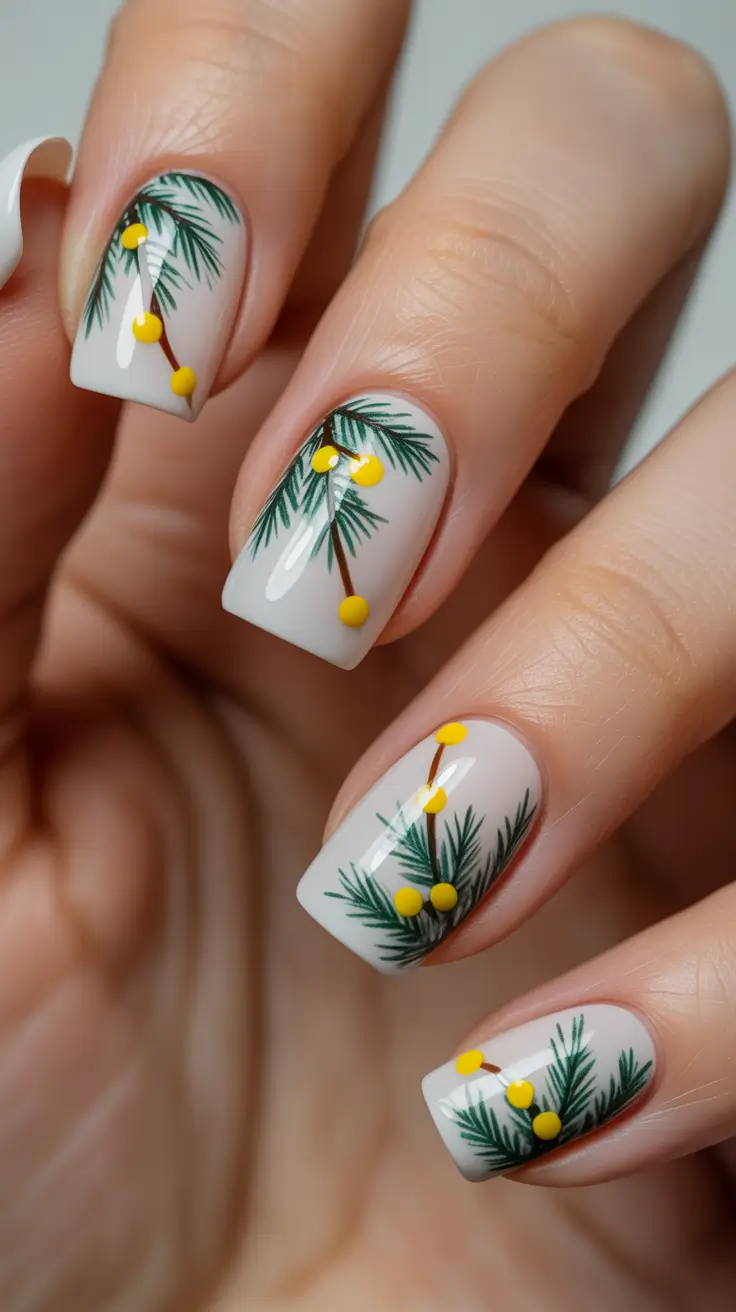
You can recreate it with a nude gel base, a deep green art gel, and a dotting tool for the berries. If you don’t have yellow gel, even acrylic paint works – just seal it well with top coat.
At home, I’d paint the branches first using a thin brush, cure, then add the berries with a dot tool. Keep the design slightly off-center on each nail so it looks organic, not stamped.
Mauve Gloss With Snowflakes And Ornament Detail
If Holiday Nails Inspiration 2026 had a signature color story, mauve would absolutely be in it. This glossy mauve base looks chic on every skin tone, and the snowflake plus ornament accent gives the manicure a festive feel without being too literal.
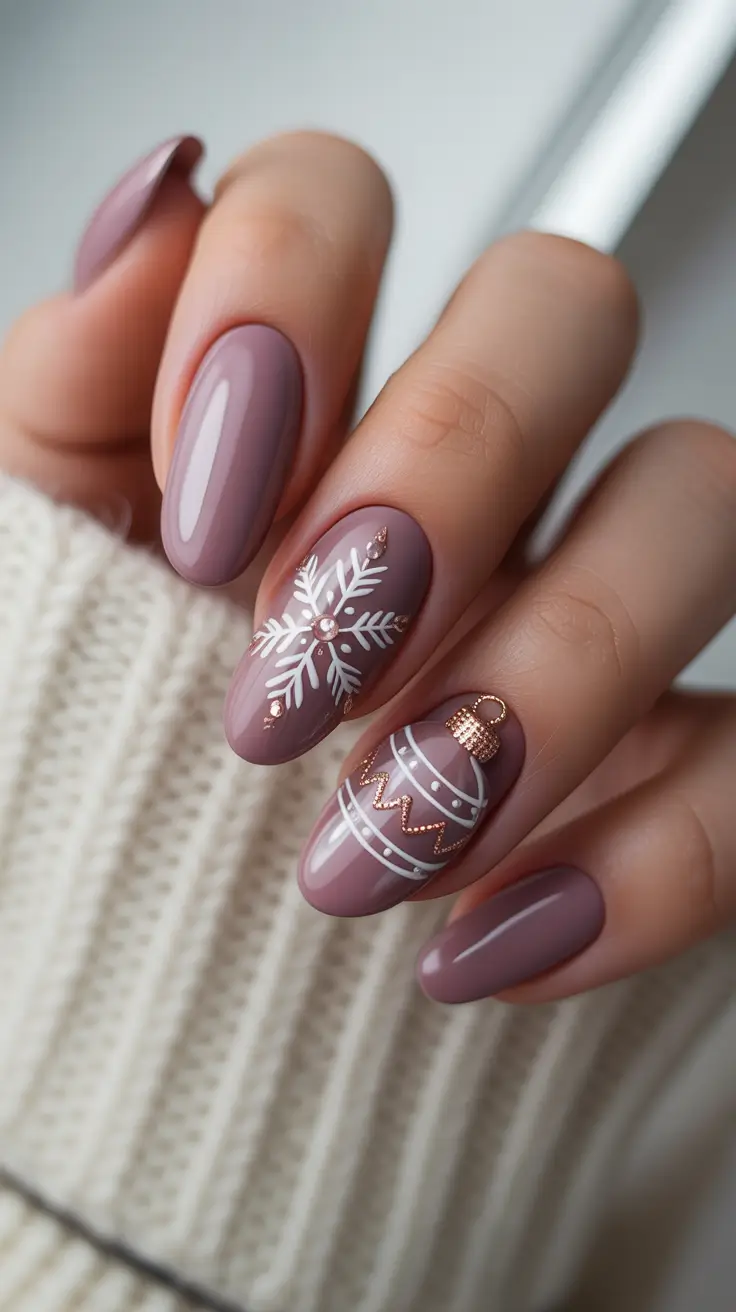
I’d use a dusty mauve gel like OPI You’re Such a Budapest or a similar builder shade, plus white liner gel for the snowflake and ornament lines. A tiny rose-gold charm or micro bead at the ornament top makes it look expensive instantly.
Honestly, this is the kind of manicure I’d choose for a holiday dinner where I want my nails to look elegant close-up, but still soft and wearable from far away.
Winter Blue Landscape Nails With Sparkle Accents
This design feels like a snowy weekend trip – airy blue-and-white gradients with pine silhouettes, paired with glittery nude accents. It’s winter art, but still clean and modern, especially with the almond shape keeping it sleek.

To do it yourself, you’ll need a milky nude base, a soft blue gel, a sponge for ombré, and a black or navy art gel for the trees. Add chunky glitter on the side nails to mimic fresh snow sparkle, then seal everything with a glossy top coat.
Pastel Confetti Sparkle With Snowflake Art
This manicure feels like holiday lights reflected in fresh snow – soft nude bases with a fine silver shimmer edge, playful pastel dots, and crisp white snowflake designs. The almond shape keeps it elegant, while the confetti effect makes it fun and slightly unexpected for Holiday Nails Inspiration 2026.
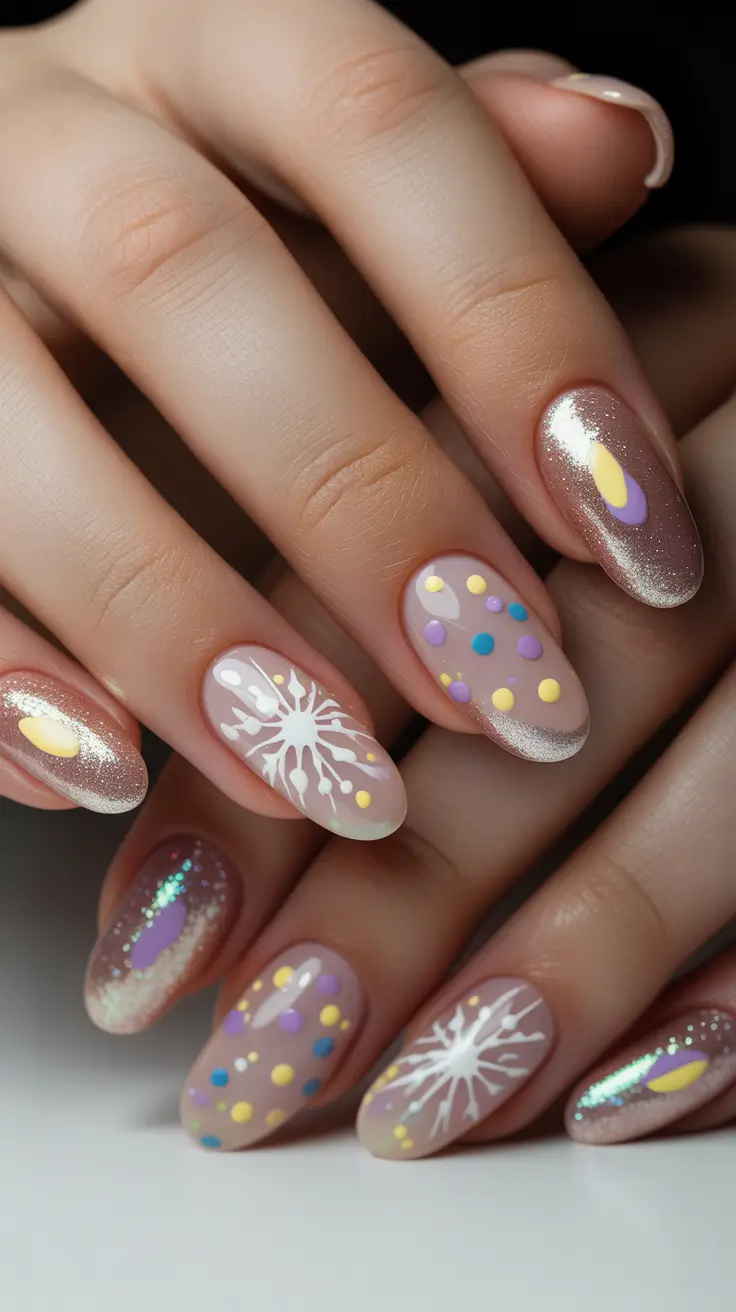
To recreate it, I’d use a sheer nude gel like CND Romantique, a fine silver glitter gel (Beetles or Kiara Sky), plus pastel dot gels in lilac, sky blue, and butter yellow. A white liner gel is key for sharp snowflakes, and a glossy top coat makes everything look glassy and smooth.
At home, I’d build the base first, add the glitter fade near the tips with a sponge, then dot the pastel confetti using a dotting tool. Snowflakes go on last with a thin brush, and the trick is not overworking them – clean strokes look more expensive.
Candy Cane Red Glam With Rhinestone Details
This is the classic holiday statement set, but with a very 2026 finish – glossy red chrome, candy cane stripes, a pink shimmer ombré accent, and rhinestones placed like jewelry. The mix of bold red and soft nude keeps it festive without feeling costume-y.
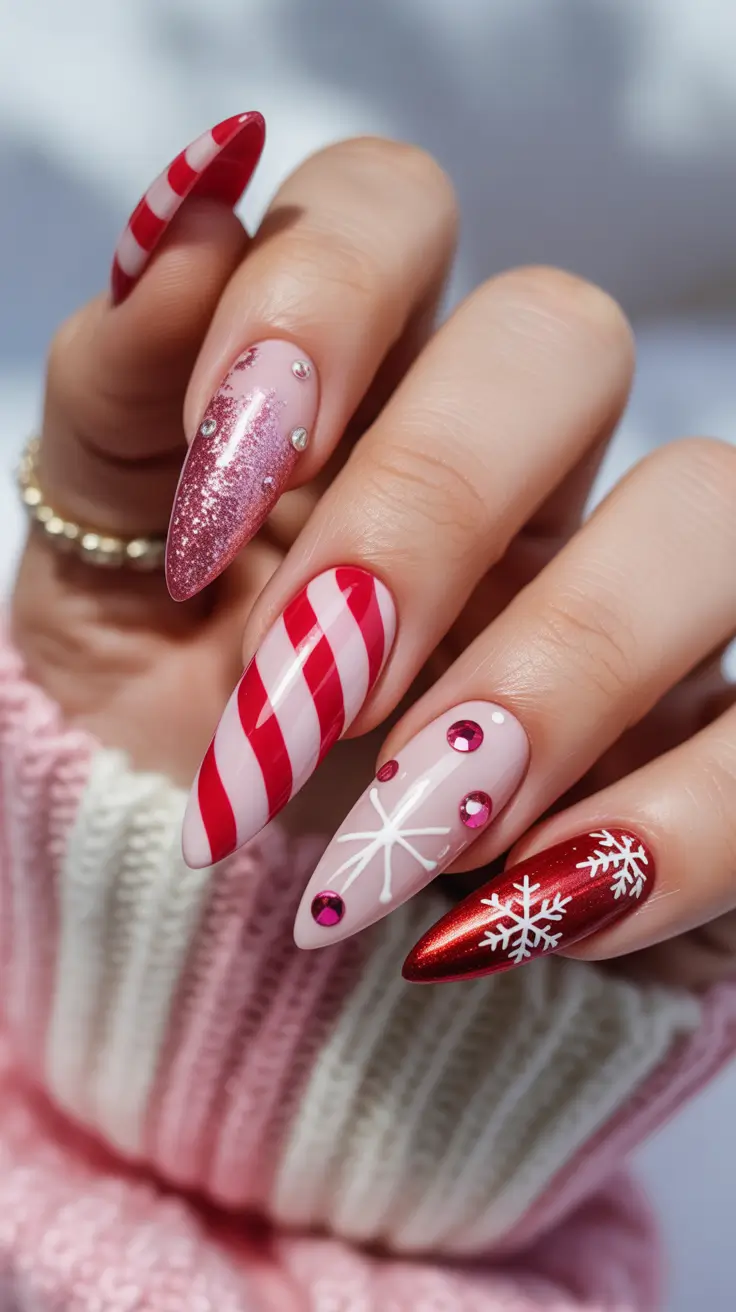
For products, I’d reach for OPI Big Apple Red in gel, a pearl-white gel for the stripes, and a fine pink glitter gel for the ombré nail. Use Swarovski-style flatback crystals or affordable Preciosa alternatives, plus a solid gem glue so they stay put through the season.
If you’re doing this at home, start with the red nails, then paint the candy cane stripes using a thin brush and cure between layers. Add rhinestones after top coat, seal around them carefully, and don’t flood them – that’s the secret to keeping the sparkle sharp.