The updos that survive summer aren’t just tight—they’re textured. Think messy buns with intentional flyaways, slicked roots meeting soft waves, and braids that look undone on purpose. These summer updo ideas for long hair 2026 mix architectural precision with that lived-in, humidity-proof vibe everyone’s actually wearing.
Vibrant Ombré Space Buns

Space buns work best on straight to slightly wavy hair with medium to thick density—the blunt ends grip without slipping. A ombre space buns tutorial sounds complicated until you realize it’s just two high ponytails twisted into circles. Maintenance is real: color refresh every 6-8 weeks to keep the gradient sharp, and trim blunt ends every 10-12 weeks so the twist doesn’t unravel halfway through your festival day. Flyaways will happen. Accept it, spray them down, move on.
Section the hair down the center from forehead to nape, then pull each side into a high ponytail at ear level—not directly at the crown. Twist each ponytail tightly, then wrap it around its own base like you’re coiling a rope. Secure with bobby pins that match your hair color so they disappear into the bun. Takes about 15 minutes your first time, 8 by attempt three. The ombré (usually peachy-pink fading to lavender or sunset orange) catches light best in late afternoon sun, which is why festival crowds go wild for this.
Minimalist Low Bun for Work

A sleek low bun tutorial long hair is the opposite of complicated. Straight hair works best here because sleekness is the whole point—any texture reads as undone, which defeats the purpose when you’re walking into a corner office with panoramic city views. Pull hair into a low ponytail at the nape, then twist it and wrap around itself. Two minutes, tops. Flyaways? Use a gel stick on the hairline, not spray—spray looks wet and weird under office lighting.
This bun holds through a full workday and survives humidity better than you’d expect because the tension is tight at the base where it matters. Color maintenance is low (every 6-8 weeks), and the style itself requires nothing but a quick redo after lunch if the front piece slides down. Oval, square, and diamond face shapes photograph best from the side in this style because the clean lines actually enhance your jawline instead of hiding it.
Twisted Balayage Updo

Wavy, thick hair with balayage color is made for this. Start with a side part deep enough to create an actual line—not a suggestion—then pull the thicker section into a low ponytail and twist it loosely (loose is critical; tight twists look costume-y). Wrap that twist around the base, then take a smaller section from the opposite side and do the exact same thing, pinning it so it crosses over the first twist. The balayage updo tutorial long hair works because highlights catch light as they weave through the twists, creating depth that a solid color can’t touch.
Balayage refresh every 10-12 weeks keeps the waterfall effect alive. The style itself lasts 6-8 hours on fresh hair, longer on day-two hair because the texture grips better. Takes 12 minutes once you understand the wrap-and-cross motion. If your hair is fine or straight, this reads as too loose and falls apart by hour four—skip it and go with the low bun instead.
Edgy Geometric High Bun

This is the statement bun. High crown placement (directly at the top of your head, not slightly back) and a super-tight base are non-negotiable. Straight, fine hair works best because you can see every clean line of the geometry, and that’s the whole appeal—sharp, deliberate, no softness. Gather hair into a high ponytail using a strong elastic, then twist tightly and fan the ends outward as you wrap around the base. The fanned-out spikes should look intentional, almost spiked. Pin every strand so nothing moves.
This bun looks glass-like under cool-toned, directional lighting (think minimalist tech firm lobbies or clean studio backgrounds). High maintenance color-wise (refresh every 6-8 weeks for solid shades, every 8-10 weeks if you want blunt ends to stay sharp), but the style itself takes 10 minutes once you commit to the tightness and accept that it’ll feel severe on your head. Oval, diamond, and square face shapes carry this best because the clean geometry frames them instead of softening them. This is sleek high bun tutorial long hair taken to its most intentional extreme.
Textured Copper Updo for Warm Undertones

A textured copper updo tutorial demands that warm apricot-to-burnt-orange tone—without it, the whole style falls flat. This works best on wavy or thick hair because the layers catch light differently at each depth, which is what makes copper sing. Blow-dry your hair upside down to build volume, then flip your head over and gather everything into a high ponytail. Twist the ponytail loosely, wrap it around its base twice, and secure with bobby pins angled in different directions so the texture reads as intentional rather than accidental. Pull out a few shorter pieces around your face and at your temples—they’ll showcase that copper color where it catches direct light.
Midnight Onyx Dramatic High Bun

The midnight onyx color here is non-negotiable—it’s what gives this style its edge. You’ll need thick hair or a texturizing product to make the voluminous messy bun long hair actually read as intentional. Spray the inside of your ponytail holder with dry texture spray before sliding your hair through, then twist the ponytail and wrap it around the base, leaving the ends loose and fanned out. Tease the wrapped section with a fine-tooth comb so it poofs out in all directions. This bun is supposed to look like you pulled it up in a rush, but every piece should be placed so light hits the shine.
Y2K Festival Space Buns with Razored Texture

For a true space buns tutorial long hair, you need either straight-to-wavy hair or a cut with razored layers that naturally piece apart—this is where texture does the heavy lifting. Divide your hair down the middle from your forehead to your nape, then split each half into three sections: one at the top of your head, one at your temple, and one lower. Twist each section loosely and wrap it into a tight bun, securing with small clips or bobby pins hidden inside. Pull the ends of each twisted section outward so they fan and catch the light. The higher you place these buns on your crown, the younger the energy; lower buns read more mature. On day two, the texture actually improves as oils settle and pieces relax slightly.
Cloud-Texture Low Bun with Wispy Face Framing

Start with day-two hair—it grips better. Pull everything into a low ponytail at the nape, then twist it loosely and wrap the tail around the base to form the bun. Now comes the magic: take small sections and gently pull them apart, working from the outside in. You’re creating deliberate texture, not smoothing it down. A pulled apart bun tutorial long hair works best on fine to medium density hair because the bluntness of the cut gives the illusion of fullness without needing tons of volume. Redo the front pieces after lunch if they’ve deflated—two minutes, tops.
The whole thing takes 8 minutes once you’ve done it twice. Fine, straight hair holds this better than thick waves, since waves add their own bulk and can read as messy rather than intentional. Expect it to last a full day in regular humidity; add dry shampoo if you’re heading somewhere sweaty.
Bohemian Textured Updo with Loose Face Framing

A curly hair crown braid tutorial is a weekend project, honestly. Start by sectioning damp curls into two halves down the middle, then dutch-braid each side from temple back, picking up hair as you go—the braid sits in the crown area like a halo. Secure both braids at the nape with small clips. Once dry, gently pull sections of the braid apart to add dimension, then gather the loose curls at the back into a soft knot and pin it. This archetype lives on natural curls and coily hair; it’s a test of patience, not technique. The intricacy of the crown placement and the definition of your natural curls is what makes this work, especially when photographed from a side-back angle with diffused light.
Textured Copper Updo for Warm Undertones

Warm undertones—think apricot crush or copper shades—demand a braid strategy that plays with the color shift as you move. Section hair into three parts: two sides and a center back. Create a dutch braid down each side, pulling slightly tighter than you normally would so the braid sits defined and clean against the head. Bring both braids to the center back and secure them low with a textured elastic. Leave the ends loose and undone; don’t finalize the bun. Tuck and pin strands as needed through the day for a refined but never-rigid look.
The dutch braid bun tutorial long hair suits wavy and textured hair especially well, since the braid definition reads against natural movement rather than fighting it. Layered hair helps the bun taper smoothly at the ends without looking blunt. Color refresh every 4-5 weeks keeps the warm tone from shifting too far into bronze.
Minimalist Low Bun for Work

A sculptural claw clip updo long hair is the anti-fussy move: no elastics, no bobby pins, no time investment. Smooth hair back into a low ponytail—literally just hold it—then twist it once and clamp it with an oversized claw clip positioned so the clip sits fully inside the gathered hair. The ‘fan’ shape created by the clip’s geometry does the work for you. On straight or fine wavy hair, this reads polished and intentional, not lazy. Takes 90 seconds. The clip itself has to be substantial—a thin clip won’t grip enough for an 8-hour workday.
This minimal approach works on oval, heart, and diamond face shapes. Skip it if your hair is thick or coily; the clip won’t have enough grip tension to keep the style locked all day. Humidity doesn’t touch this, since there’s nothing to relax or fall.
Y2K Festival Space Buns with Razored Texture

Slick the entire head back with a gel or lightweight smoothing cream—wet-look is mandatory here. Divide hair into two sections (left and right) using a center part from crown to nape. Twist each section tightly as you move back toward the crown, then wrap it around itself to form a compact bun at the top of the head on each side. Secure with bobby pins hidden inside. Now, take a thin comb and backcomb the outer surface of each bun to create the spiky, separated texture. This is where razored ends shine: they already want to stand apart, so the backcombing amplifies that without looking matted.
The y2k spiky bun tutorial demands straight or relaxed hair with a sharp, separation-friendly cut. Thick curly hair won’t hold the spiky definition no matter how hard you try. The high-gloss finish means this reads futuristic and bold—fine for a festival or night out, less so for an office. Expect the style to last 6-7 hours before the gel softens.
Bohemian Textured Updo with Loose Face Framing

This works best on wavy, curly, or thick hair that actually holds texture without fighting you. A boho braided crown long hair style starts with two Dutch braids from your temples, crossing them at the back of your head, then tucking the ends into a low, deliberately undone bun. Messy is the point here. Grab a texturizing spray beforehand—it grips better than you’d expect—and don’t worry if pieces fall out by hour four. That’s literally the look.
Braided Crown Ponytail for Garden Weddings

Start with a center part. Create two Dutch braids on either side of your head, pulling them toward the back and pinning them horizontally to form a halo, then gather the remaining length into a low ponytail underneath. The braids sit like a crown above the ponytail—romantic, structured, and harder to mess up than it looks. Fine hair struggles here; thick or wavy hair is your friend. The braided crown ponytail tutorial holds for 5-7 hours in humidity before the front pieces start sliding, which is why day-of application matters more than prep.
Platinum Blonde Pin-Up Rolls for Retro Glamour

This is 1950s hair—the kind that requires actual skill or multiple attempts. Section your hair into four vertical panels, starting at the front. Roll each section tightly away from the face, securing with setting pins as you work, then pin-curl the back section. Sleep in the pins or use a heat-set method if you’re in a hurry. The result? Sculpted, shiny waves that scream platinum blonde pin up hair. It’s high-maintenance, high-drama, and demands straight or nearly-straight hair to look period-correct. Skip this if your hair texture defaults to wavy—the rolls won’t hold their shape.
Architectural Half-Updo with Fanned Detail

Straighten your hair completely. Take a one-inch section from each temple and twist it back to the crown, pinning both twists parallel to each other. Fan out the remaining length below—use a fine-tooth comb to tease gently at the crown, then smooth the surface with a smoothing serum so the layers separate cleanly instead of clumping. The sculptural half-updo long hair works only on straight to slightly wavy hair with medium density that actually responds to styling products without looking wet. It’s architectural, precise, and falls apart if humidity hits before you’ve set it with a lightweight hairspray.
Twisted Crown Updo with Soft Face Framing

The twisted crown updo tutorial works best on day-two hair—texture grips better than fresh waves. Start by creating a deep side part and pulling your hair into a low ponytail at the nape. Divide the ponytail into two sections, then twist each one loosely around the base of the ponytail, pinning as you go. Pull a few delicate face-framing pieces loose around your temples and ears for that undone, romantic feel you see at garden weddings and backyard celebrations.
This style holds for about 6 hours in humidity, maybe longer if you’ve slept in your hair the night before. The layered cut works beautifully on fine to medium density, wavy or naturally textured hair—layers give the twisted sections movement instead of looking flat and matted against your head. If your twists feel too slippery, run a light dry texture spray through your mid-lengths and ends before you start. Skip this if your hair is shorter than shoulder-length; the twist won’t have enough hair to grip and wrap around itself cleanly.
Minimalist Deep-Side Bun for Work

A sleek low bun tutorial long hair starts with a sharp, deep side part—move that part line at least two inches from center. This creates the architectural separation that reads as intentional and polished in boardroom lighting. Brush your hair straight back into a low ponytail positioned behind one ear, then wrap a thin section around the base and pin. The bun should sit at the nape of your neck, not higher, which keeps it modern instead of dated.
Straight, fine hair holds this best because texture can disrupt the mirror-like surface you’re after. Smooth everything with a paddle brush and a light finishing spray that doesn’t flake or leave residue. If pieces fall by mid-afternoon, bobby pins tucked underneath (never visible from the front) save the look. This isn’t the style for naturally wavy or textured hair—the humidity will betray the sleekness, and you’ll spend all day re-smoothing sections that refuse to stay flat.
Soft Romantic French Twist with Tendrils

Take your time with this one. Gather hair into a low ponytail and divide it in half lengthwise, then twist each half loosely and wrap them around each other to create a spiral effect. Tuck the entire bundle into a low, loose roll at the nape and secure with pins hidden inside the twist itself. Pull 3 to 4 face-framing pieces from around your temples and let them fall naturally—these tendrils matter more than you think for the overall softness. The voluminous french twist long hair looks best on wavy, thick hair with medium density because the natural texture creates volume without you forcing it.
This is an advanced style, not because of difficulty but because it requires patience with flyaways and a willingness to let the structure look slightly undone. Golden hour lighting in a garden or dim bistro setting hides any imperfections beautifully, which is why it photographs so well at evening celebrations. If your twist feels too tight or structured, you’ve started too high—move your base ponytail lower and looser. Skip this if you’re in a rush; it takes 12 to 15 minutes the first time, though you’ll shave that down with practice.
Sultry Low Chignon for Evening

This is where dark, rich hair colors (think cherry cola or deep mahogany) absolutely shine under moody lighting. Create a sleek low chignon tutorial by smoothing your hair into a low ponytail at the nape, then twist the entire ponytail and coil it into a loose spiral knot. Pin the knot at the base so it sits flush against your neck—no height, just density and shape. The chignon requires a high-maintenance color that refreshes every four to five weeks to keep that depth, which matters more than the actual styling technique here.
Straight or wavy hair works equally well, as long as you use a smoothing product that keeps the finished surface looking glossy and intentional. This isn’t a DIY-friendly afternoon style—the maintenance level assumes you’re investing in professional touch-ups and trims every ten to twelve weeks to keep ends blunt and healthy. Dark hair without that high-gloss finish reads flat under speakeasy lighting, so shine and color depth are non-negotiable parts of pulling this off. Wear it with minimal jewelry and a classic silhouette; the simplicity of your outfit matters because the chignon already commands attention.
Athletic Braided High Bun for Texture
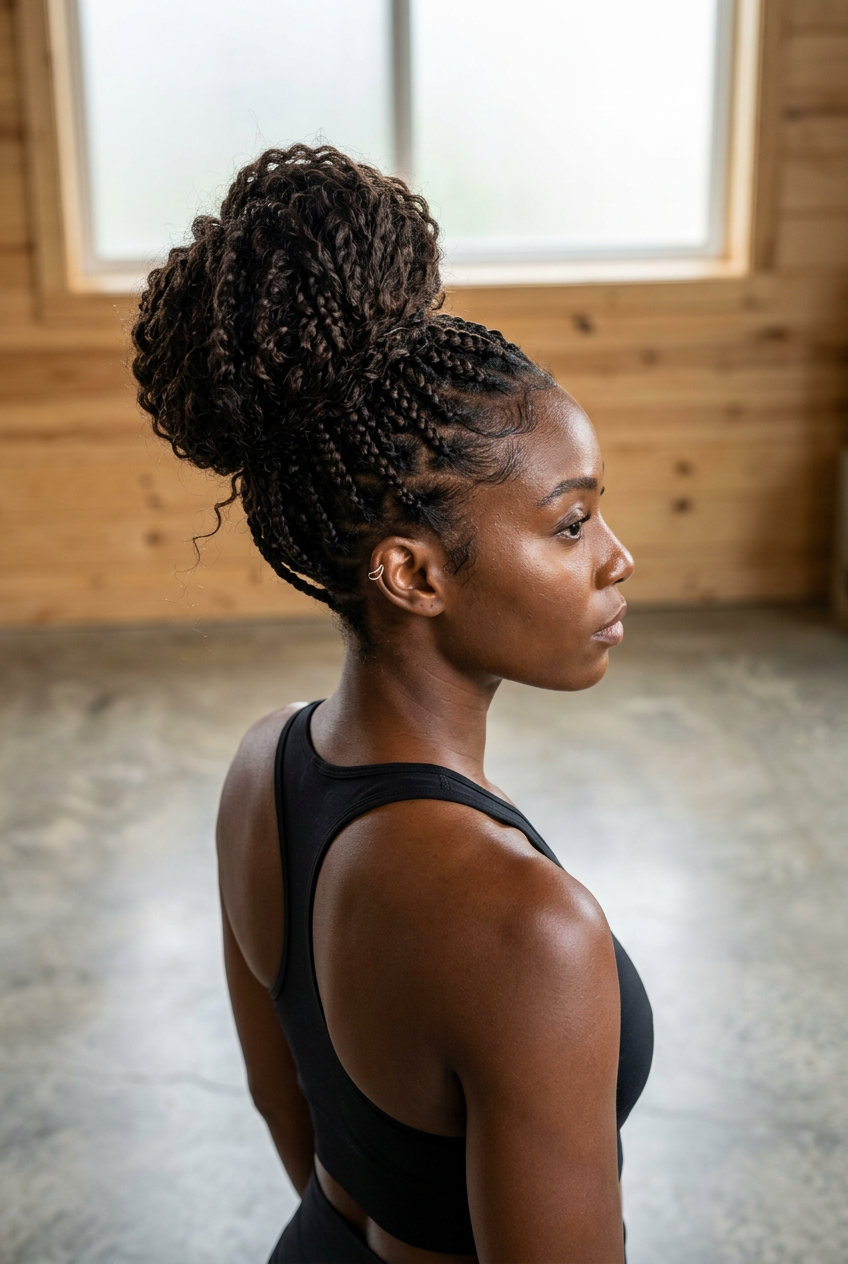
The braided high bun for curly hair thrives on naturally curly to coily hair with medium to thick density—your texture is the entire point here. Start by creating a high pony at the crown, then divide it into three sections and braid each one loosely. Wrap all three braids around the base of the pony and pin the bundle tight against your scalp so it stays elevated and sculptural throughout the day. Leave the edges sleek by smoothing your hairline with a light gel, which creates visual contrast against the textured volume on top.
This style holds through sweat and humidity because braids grip natural texture in ways that twists or rolls simply don’t. Refresh your hair daily with leave-in conditioner spritzed into the braids, then recoil your bun each morning—the style itself stays intact, but the braids need hydration to maintain definition. Wash your hair every one to two weeks to prevent buildup in the braids and keep your scalp clean. This is confidence hair, the kind you wear when you want movement and texture to be visible and intentional instead of hidden away.
Ruffled Cloud Bun with Loose Curls

A romantic summer updo thrives on wavy, fine-to-medium hair that holds texture without weights. Curl your lengths loosely with a large-barrel tool or by sleeping in braids, then gather into a low ponytail at the nape. Instead of twisting, gently loop sections of the ponytail around the base, leaving pieces deliberately loose and undone—this creates that ruffled, cloud-like shape. Pin with bobby pins as you go, then pull a few face-framing curls free. The copper undertones catch light beautifully in overcast daylight, and the soft texture reads as romantic without feeling stiff or overwrought.
Side-Swept Hollywood Waves Updo

Straight, wavy, or curly hair works for this structured look, though you’ll need 15–20 minutes to set the waves properly. Use a large hot tool or velcro rollers to create deep, defined waves throughout, then pin everything to one side with bobby pins hidden beneath the waves themselves. The key is tension—this isn’t loose or romantic, it’s controlled and sculpted. Brush gently between sections to create sweep without erasing the wave definition. A light hairspray keeps the style locked through a 6–8 hour event without flaking or stiffness. The vintage Hollywood curls tutorial approach means the bun itself is almost invisible; the waves are the entire statement.
Messy Top Knot with Undone Pieces

The messy top knot long hair tutorial is genuinely a 5-minute style. Flip your head down, gather everything into a high ponytail, twist it loosely, and wrap it around the base. Don’t fuss—the imperfection is the entire point here. Pull out a few face-framing pieces and roughen the knot with your fingers so it looks slightly disheveled. This works on wavy, curly, thick, or medium-texture hair because texture is what makes the messiness readable. On straight hair, mist with a sea salt spray first to add grip. No tools needed beyond a hair elastic, and you can redo the front pieces at lunch in under two minutes if they slip.
Sculptural Claw Clip Updo with Twisted Face Framing

Straight-to-wavy, fine-to-medium hair responds best to the architectural claw clip updo long hair technique because point-cutting ensures a soft, buildable shape that a clip can actually hold without sliding. Tease gently at the crown for grip, then gather the majority into a high-ish section and clamp with a tortoiseshell or matte metal clip. Twist two thin sections from the front and pin them in an X pattern across the back for visual interest. The clip creates a fan-like silhouette when you catch it in the right light—this is what makes it trendy rather than ordinary. Takes eight minutes, and the twisted pieces add definition that keeps it from reading as lazy, even though the grip work is minimal.
Still Deciding? Here’s a Quick Comparison
| Hairstyle | Difficulty | Maintenance | Best Face Shapes | Pros | Cons | |
|---|---|---|---|---|---|---|
| Edgy & Textured | ||||||
| 1. Ombré Festival Space Buns | Moderate | High — every 6-8 weeks | round, square, heart | Suits most face shapesWorks on multiple texturesLayers add movement | Frequent salon visits needed |
| 5. The Cyber-Sleek Spiky Bun | Moderate | High — every 8-10 weeks | oval, diamond, square | Suits most face shapesWorks on multiple texturesLayers add movement | Frequent salon visits needed |
| 8. Textured Apricot Crush Updo | Moderate | High — every 4-6 weeks | All face shapes | Suits most face shapesWorks on multiple texturesLayers add movement | Frequent salon visits needed |
| 11. The Festival Cosmic Buns | Easy | High — every 4-5 weeks | heart, diamond, oval | Easy to style at homeSuits most face shapesWorks on multiple textures | Frequent salon visits needed |
| 12. The Soft-Focus Chignon | Moderate | Medium — every 6-8 weeks | oval, heart, diamond | Suits most face shapesWorks on multiple texturesSubtle sun-kissed effect | Not ideal for very curly hair |
| 16. The Y2K High Gloss Spiky Bun | Moderate | Medium — every 10-12 weeks | oval, heart, diamond | Suits most face shapesLayers add movement | Not ideal for very curly hair |
| Classic & Clean | ||||||
| 3. The Executive Low Bun | Easy | Low — every 6-8 weeks | oval, square, diamond | Low maintenanceEasy to style at homeSuits most face shapes | Not ideal for very curly hair |
| 9. The Midnight Onyx Messy Cloud Bun | Easy | Low — every 8 weeks | all | Low maintenanceEasy to style at homeWorks on multiple textures | Not ideal for fine hair |
| 14. The Dutch Woven Crown | Moderate | Medium — every 4-5 weeks | oval, round, heart | Suits most face shapesWorks on multiple texturesLayers add movement | Not ideal for very curly hair |
| 15. The Modern Minimalist Fan Updo | Easy | Low — every 10-12 weeks | oval, heart, diamond | Low maintenanceEasy to style at homeSuits most face shapes | Not ideal for very curly hair |
| 17. The Sun-Kissed Braided Crown | Moderate | Low — every 12-16 weeks | All face shapes | Low maintenanceSuits most face shapesWorks on multiple textures | Not ideal for fine hair |
| 20. The Platinum Pin-Up Scroll | Moderate | High — every 4-6 weeks | heart, diamond, oval | Suits most face shapesWorks on multiple texturesLayers add movement | Frequent salon visits needed |
| 21. The Architect’s Half-Up Fan | Moderate | Medium — trim every 5-6 weeks | oval, heart, diamond | Suits most face shapesWorks on multiple texturesLayers add movement | Not ideal for very curly hair |
| 23. The Power Sleek Low Bun | Moderate | Medium — every 10-12 weeks | oval, sharp_jawlines | Layers add movementFlattering face-framing5-minute styling | Not ideal for very curly hair |
| 24. The Parisian Volume Twist | Moderate | Medium — every 10-12 weeks | oval, heart, diamond | Suits most face shapesWorks on multiple texturesLayers add movement | Not ideal for very curly hair |
| 25. The Cherry Cola Chignon | Moderate | High — every 4-5 weeks | oval, square, diamond | Suits most face shapesWorks on multiple texturesLayers add movement | Frequent salon visits needed |
| 26. The Afro-Centric Braided Cloud Bun | Moderate | Medium — every 1-2 weeks | oval, round, heart | Suits most face shapesWorks on multiple texturesLayers add movement | Not ideal for fine hair |
| 29. The Vintage Hollywood Sweep | Moderate | Medium — every 8-10 weeks | square, long, oval | Suits most face shapesWorks on multiple texturesSubtle sun-kissed effect | Not ideal for fine hair |
| 30. The Effortless Summer Top Knot | Easy | Low — every 12-16 weeks | All face shapes | Low maintenanceEasy to style at homeSuits most face shapes | Not ideal for fine hair |
| 31. The Sculpted Claw Clip Updo | Moderate | Medium — every 10-12 weeks | oval, heart, diamond | Suits most face shapesWorks on multiple texturesLayers add movement | Not ideal for very curly hair |
| Soft & Romantic | ||||||
| 4. The Balayage Waterfall Twist | Moderate | Medium — every 10-12 weeks | oval, heart, diamond | Suits most face shapesWorks on multiple texturesLayers add movement | Not ideal for very curly hair |
| 13. Curly Brunette Crown Braid | Moderate | Medium — every 12-16 weeks | square, long, round | Suits most face shapesWorks on multiple texturesLayers add movement | Not ideal for fine hair |
| 19. The Fairytale Braided Crown Ponytail | Moderate | High — every 8-10 weeks | round, long, square | Suits most face shapesWorks on multiple texturesLayers add movement | Frequent salon visits needed |
| 22. The Ethereal Twisted Halo | Moderate | Medium — every 8-10 weeks | round, heart, oval | Suits most face shapesWorks on multiple texturesLayers add movement | Not ideal for very curly hair |
| 28. The Romantic Ruffled Updo | Moderate | Medium — every 4-6 weeks | round, long, oval | Suits most face shapesLayers add movementFlattering face-framing | Not ideal for very curly hair |
Frequently Asked Questions
How can I make my updo last all day in summer humidity?
Start with texture: texturizing spray before twisting gives grip that smooth hair can’t match. The Executive Low Bun and Cyber-Sleek Spiky Bun rely on strong-hold hairspray and a wax stick to lock down flyaways. For the Balayage Waterfall Twist , spray first, then twist—the product creates friction that keeps sections from sliding out.
What’s the easiest summer updo for long hair if I’m a beginner?
The Executive Low Bun takes 15 minutes and requires only an elastic and a wax stick for slicking. If you can gather hair and twist it into a coil, you’re done. The Ombré Festival Space Buns look fun but demand precision sectioning and even coiling on both sides—save that for when you’ve practiced once.
Can I achieve these sleek updos on wavy or fine hair?
The Executive Low Bun and Cyber-Sleek Spiky Bun work best on straight or relaxed hair for that polished finish. Fine hair benefits from texturizing spray before styling—it adds grip without weight. For styles like the Buttercream Twisted Crown , texturizing products help fine hair hold the twists longer.
What products do I actually need for these updos?
Strong-hold hairspray, texturizing spray, bobby pins, and a styling wax stick cover nearly every style in this list. Add a lightweight leave-in conditioner to combat summer frizz, and dry shampoo for texture on non-wash days. Heat protectant with UV filters is optional but smart if you’re spending hours in direct sun.
Final Thoughts
The truth about summer updo ideas for long hair 2026: they all work better on day-two hair, and half the battle is accepting that “undone” is the entire aesthetic. If your twisted crown or spiky bun survives humidity and a full day of existing, you’ve already won.