
Winter is the perfect excuse to make short nails feel anything but ordinary. Deep wine shades, creamy neutrals, icy shimmer, tiny snowflakes, and even a little animal print can completely change the mood of a manicure. But which designs actually feel polished rather than overly festive? And how can I make short nails look elegant, interesting, and unmistakably winter-ready?
I tend to save dozens of manicure ideas during the colder months, only to return to the same question: would I actually wear this for more than one evening? These five designs pass that test in very different ways. Some are understated, some have a little sparkle, and one definitely brings the drama. Here is how I would wear each one.
Winter Cow Print with a Touch of Gold
I love a manicure that looks playful at first glance but still has enough restraint to feel sophisticated. This short rounded design combines a warm creamy base with irregular black and brown cow-print patches, then adds tiny touches of metallic gold. The pattern is intentionally uneven, which keeps it from looking too graphic or overly perfect. On short nails, that matters – the smaller canvas makes organic shapes feel especially balanced.
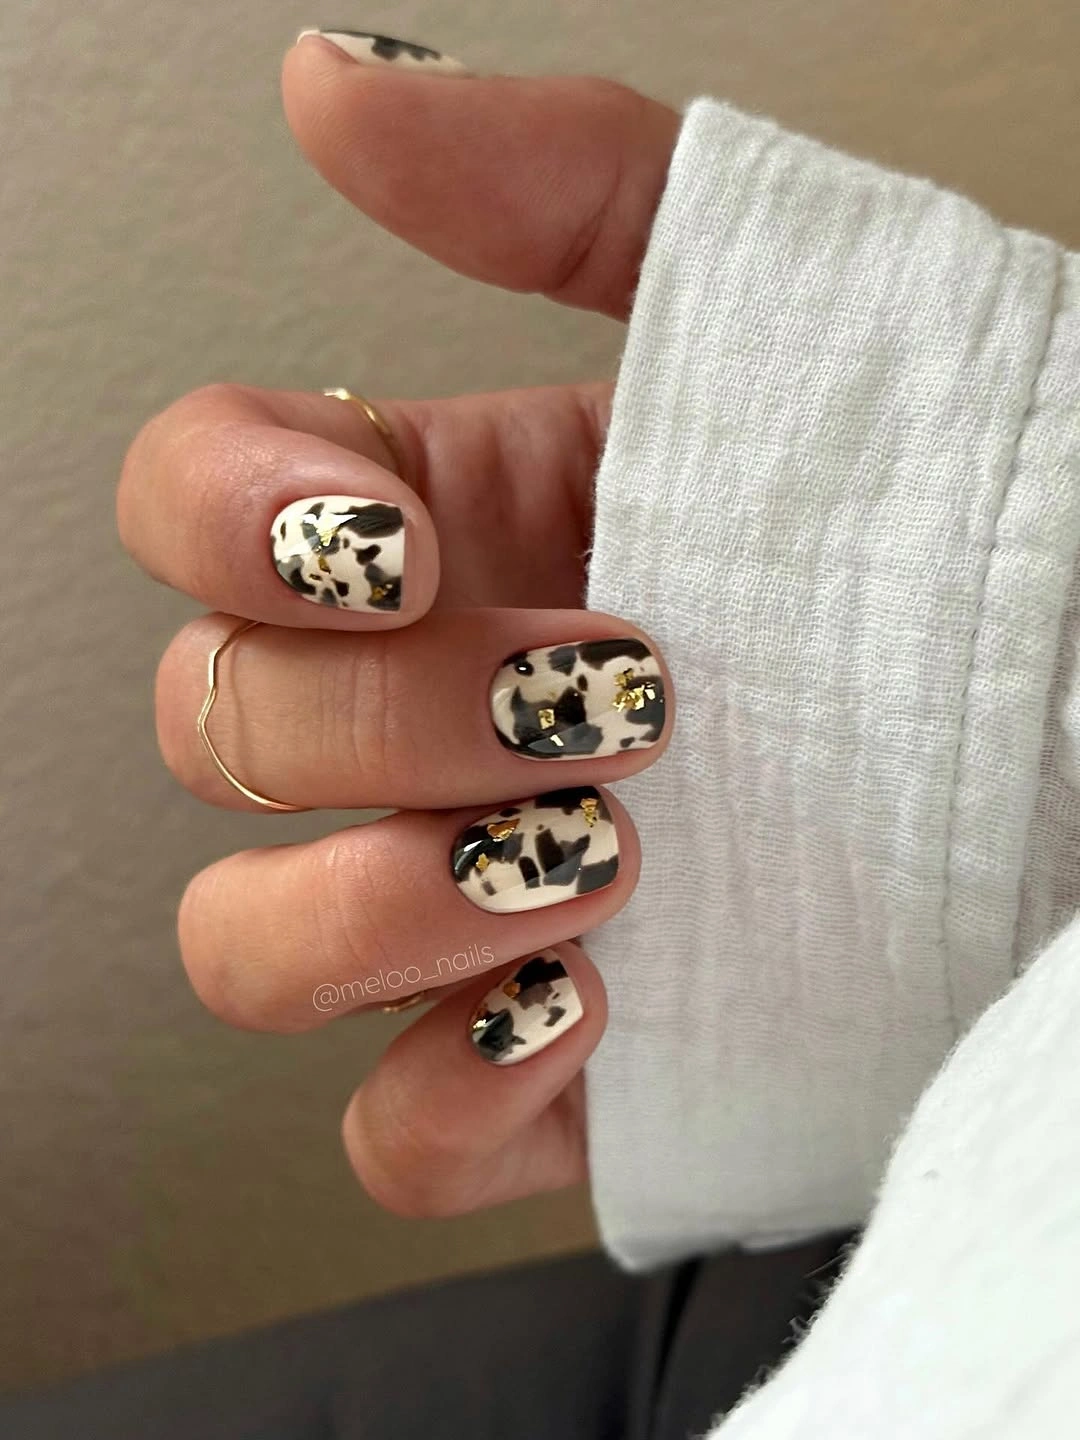
For a similar manicure, I would start with a creamy off-white gel polish, such as a soft ivory from OPI or Gelish, rather than a stark white. I would add a chocolate-brown and black gel for the irregular patches and use a fine liner brush for the smaller details. A tiny amount of gold foil or gold metallic gel gives the design its jewelry-like finish. I would keep the top coat very glossy because that contrast makes the neutral colors look richer.
At home, I would shape the nails into a soft squoval or short rounded shape first, then apply the ivory base in two thin layers. Once it is cured, I would create loose brown and black patches with a fine brush, deliberately varying their size and direction. The gold should be used sparingly – just a few fragments are enough. After curing the artwork, I would seal everything with a glossy top coat, making sure the free edge is covered.
This is the kind of winter manicure I would choose when I want something more interesting than a solid neutral but still need it to work with everyday clothes. Cream sweaters, camel coats, denim, black boots – it all makes sense. And because the print is broken up rather than covering every nail with identical spots, the result feels more fashion-editorial than novelty. A little cow print in January? Honestly, why not?
Deep Burgundy Short Nails for a Rich Winter Mood
There is something about deep burgundy on short nails that instantly makes a manicure feel expensive. I especially like the combination of a compact rounded shape and an almost-black wine color. The finish is completely glossy, so the shade shifts subtly between red, plum, and brown depending on the light. There are no embellishments here, and that simplicity is exactly what gives the manicure its impact.
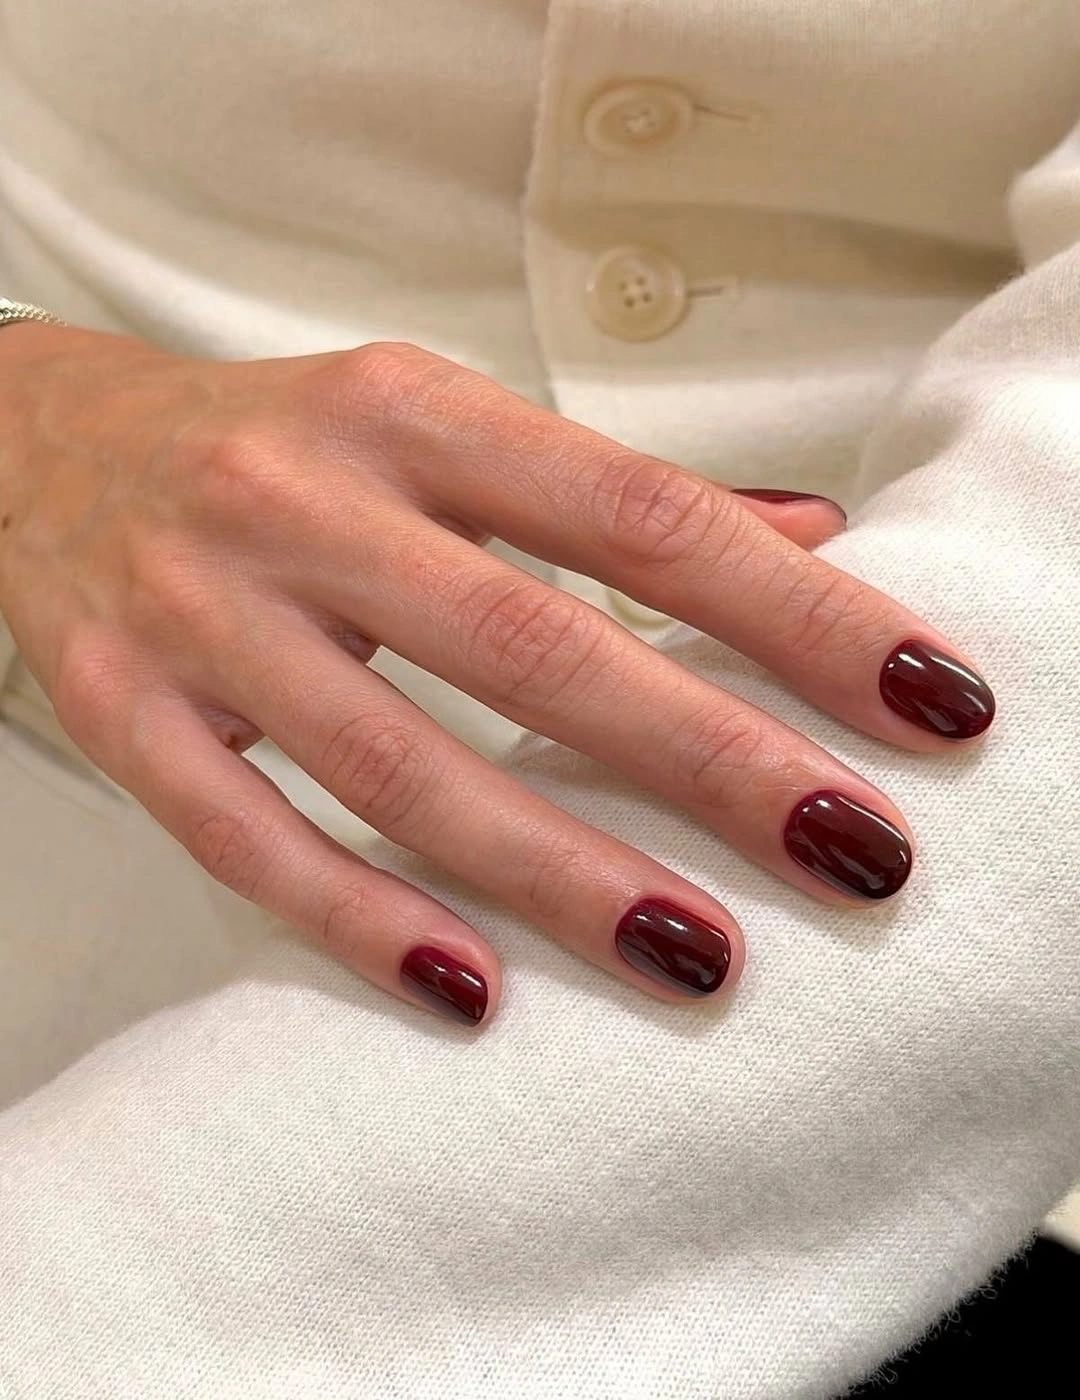
For the color, I would reach for a classic burgundy or black-cherry gel from CND Shellac, OPI GelColor, or Gelish. I prefer a shade with a slight wine undertone rather than a bright cherry red because it feels more seasonal. The rest is wonderfully simple: base coat, two thin layers of color, and a high-shine top coat. A good cuticle oil is also worth having nearby, because dark polish draws attention to the skin around the nails.
I would keep the application clean and controlled. After preparing the nails and pushing back the cuticles gently, I would apply the base and cure it according to the product instructions. Two thin coats of burgundy usually give me much more even coverage than one thick layer. I would finish with a glossy top coat and carefully cap the free edge. If I accidentally flood the cuticle area, I would clean it before curing rather than trying to fix the shape afterward.
This is my winter fallback when I want to feel instantly put together without thinking too hard about nail art. It works for a holiday dinner, an office week, a date night, or absolutely nothing special at all. That is the beauty of a shade like this – it creates the mood for you. Add a cream knit and gold jewelry, and suddenly even a very simple manicure feels intentional.
Milky White Nails with a Delicate Gold Accent
For anyone who likes quiet luxury but still wants a little detail, this milky white manicure is right in the sweet spot. The nails are short and softly squared, with a translucent creamy-white base that allows a hint of natural nail to show through. The most beautiful detail is the fine gold decoration placed close to the cuticle, almost like a delicate metallic frame. It gives the manicure a subtle festive feeling without turning it into holiday nail art.
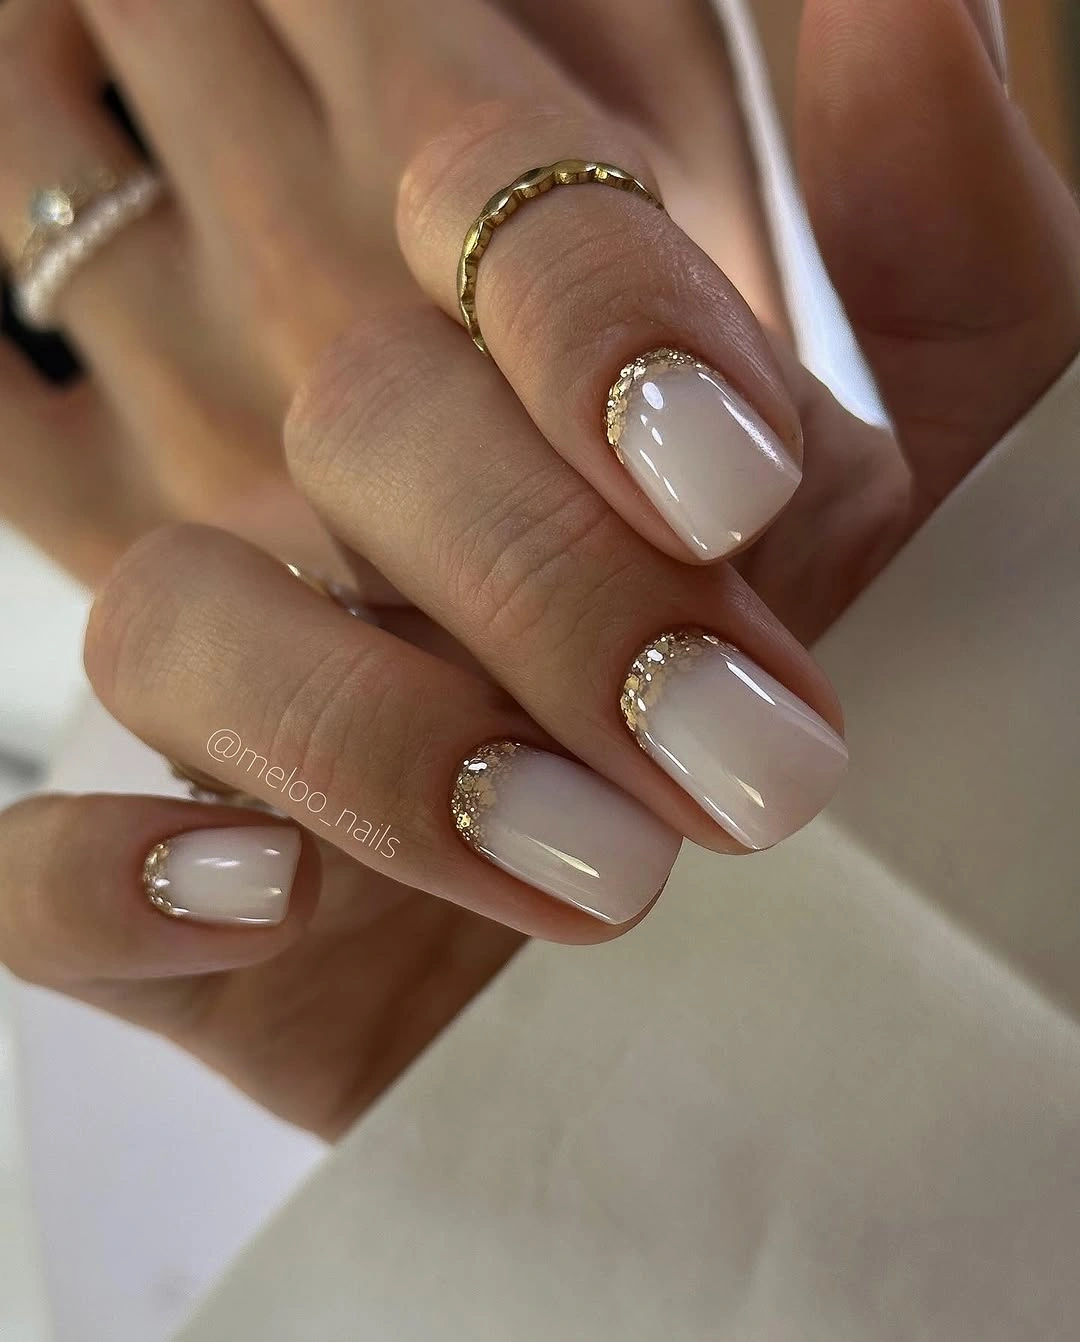
I would use a sheer milky gel such as a soft white from OPI, Gelish, or The GelBottle, choosing a formula that can be layered without becoming completely opaque. For the gold detail, I would use fine gold glitter gel, metallic gel paint, or very small gold glitter particles. A glossy top coat is essential here because it gives the milky base that smooth, glassy quality. I would also keep the gold delicate – chunky glitter would change the entire character of the manicure.
To recreate it, I would begin with a carefully shaped short square or squoval nail and apply one thin layer of milky polish. Depending on the coverage, I might add a second sheer layer. After curing, I would use a tiny detail brush to trace the gold accent near the cuticle, working slowly rather than trying to create one perfect stroke. Once the gold is cured, I would apply a smooth layer of top coat over the entire nail. The trick is restraint.
I find this style especially lovely in the middle of winter, when everything outside can feel a little gray and heavy. The milky base brightens the hands, while the gold catches the light when I move my fingers. It would look beautiful with an ivory sweater, a tailored winter coat, or even a simple black outfit. If full-on glitter is not your thing, this is the softer way to get that festive sparkle.
Ruby Red Snowflake Nails with Winter Sparkle
This manicure turns short nails into a tiny winter postcard, but it does so without relying on excessive decoration. The dominant shade is a rich ruby red with a fine shimmer running through it, while one accent nail features a delicate white snowflake. A few nails also have a lighter reflective detail that creates the impression of a glossy ribbon across the red base. The rounded short shape keeps all that sparkle feeling neat rather than overwhelming.
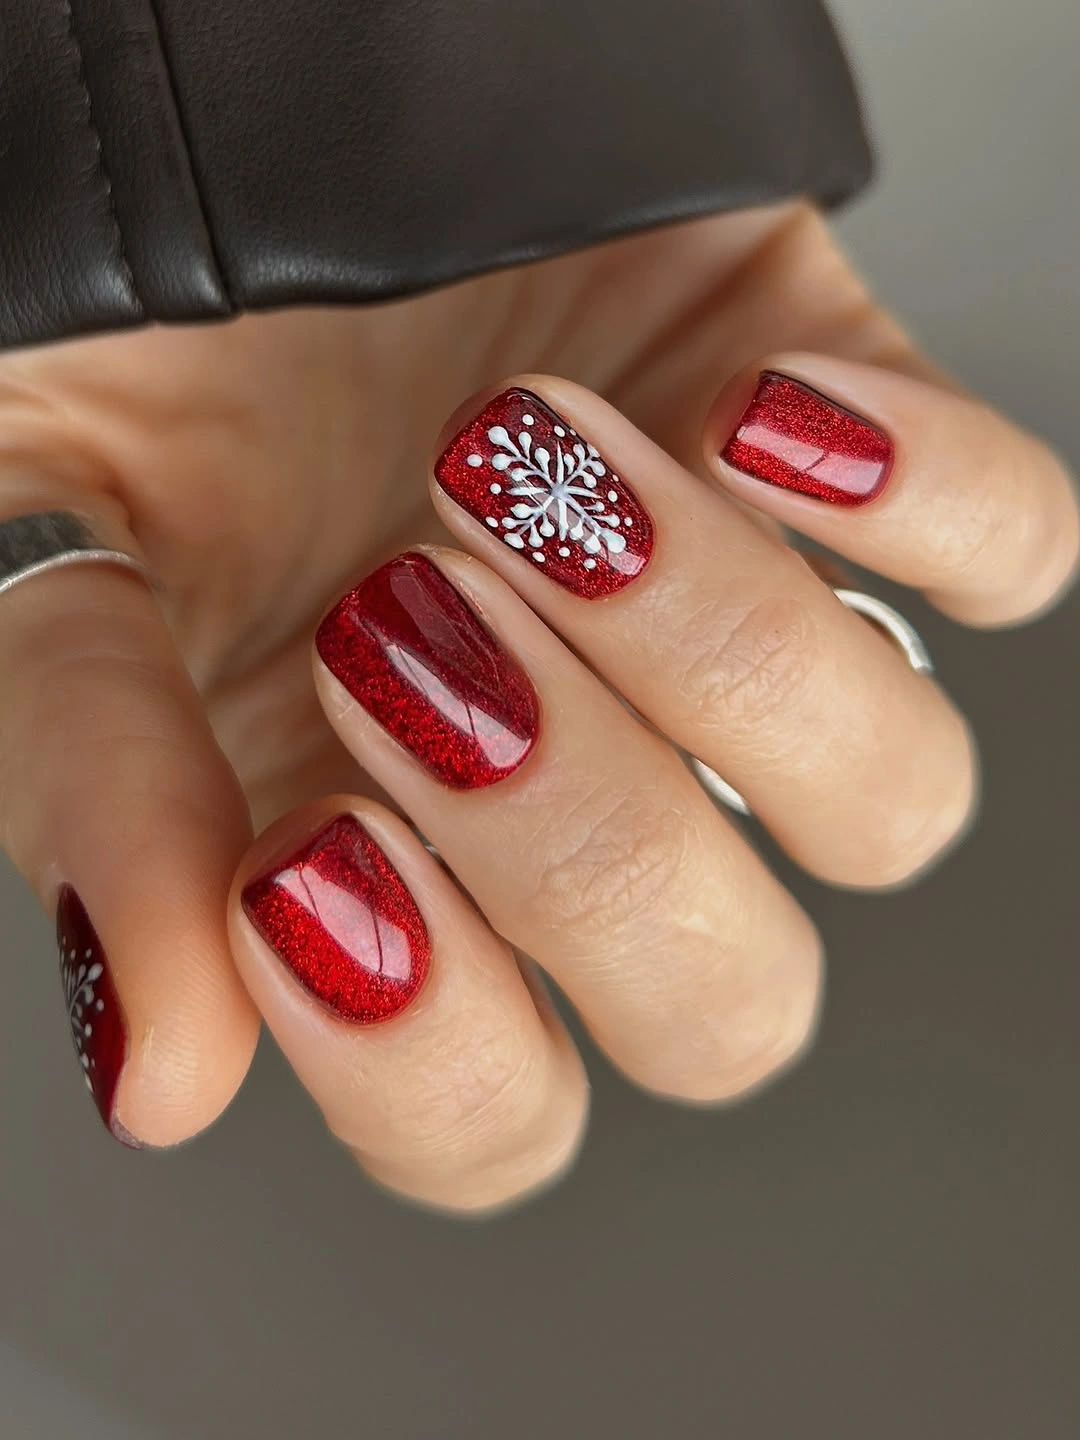
For this version, I would choose a red glitter gel from OPI GelColor, CND Shellac, or Gelish and pair it with a crisp white gel paint for the snowflake. A fine nail-art brush is important for the thin branches, while a dotting tool makes the tiny surrounding snow points much easier. If I wanted the reflective stripe effect, I would use a sheer glossy gel or a slightly lighter red detail. The finished manicure needs a glossy top coat to bring out the sparkle.
I would apply the red base in two thin coats and cure each layer properly. For the snowflake, I would first draw a simple central line and then add shorter branches rather than attempting a complicated design all at once. Tiny white dots around the motif make it look softer and more dimensional. I would keep the snowflake on one or two accent nails so the manicure retains some visual breathing room.
I would save this one for the part of winter when I actually want my nails to participate in the season. It feels festive enough for December but still works for a snowy January weekend. I also like that the design does not require long nails – the short shape gives the red polish a charming, almost vintage quality. Add a red lip if you want to lean into it, or let the manicure be the only dramatic detail.
Glossy Black Short Nails with a Minimal Metallic Detail
Sometimes winter calls for the opposite of soft and snowy. These short black nails are sleek, glossy, and unapologetically dark, with a rounded-square shape that makes the color look especially clean. Most of the nails are completely solid, while a tiny metallic accent appears on one nail near the upper edge. It is barely there, but that little detail keeps the manicure from feeling too flat.
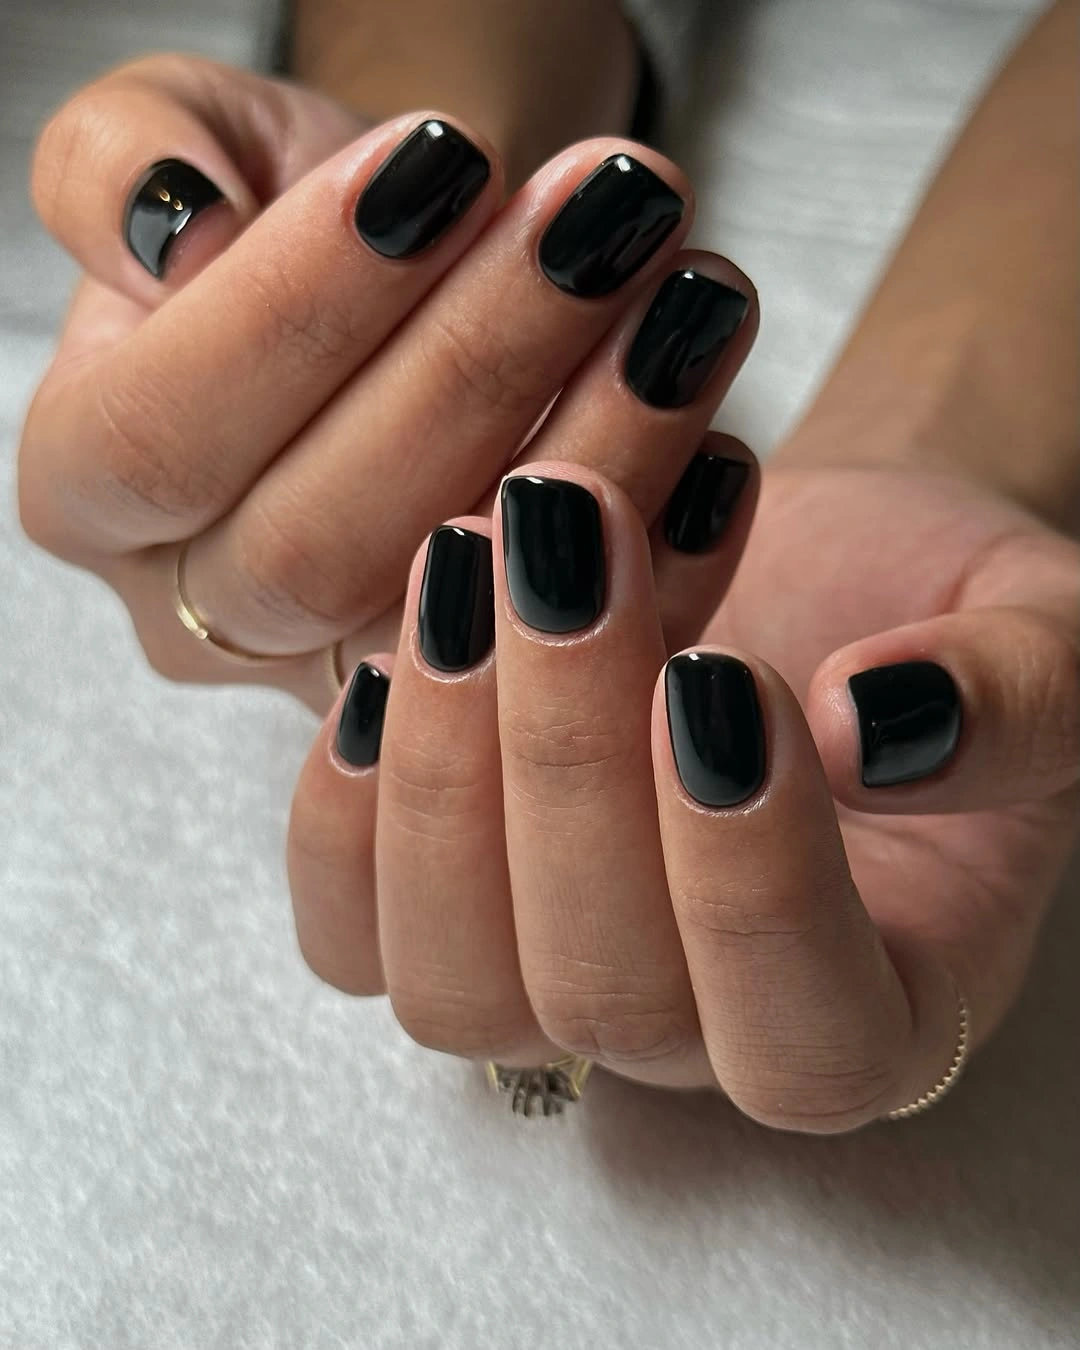
I would use a dense black gel polish from CND Shellac, OPI GelColor, or Gelish, preferably one that reaches full opacity in two thin coats. For the accent, a tiny gold metallic gel or a couple of miniature gold studs would work beautifully. I would not add glitter to every nail – the appeal here is the contrast between almost completely plain black nails and one tiny flash of metal.
The preparation matters more with black polish because every uneven edge becomes obvious. I would shape the nails evenly, clean the cuticle area carefully, and apply a thin base coat. Two controlled layers of black give the richest result, followed by a glossy top coat. For the metallic detail, I would place it before the final top coat and make sure there are no raised edges that could catch on clothing or hair.
Sheer Nude Nails with Ruby Snowflakes
I would choose this delicate nude manicure when I want winter nail art without the usual heavy white-and-blue palette. The short rounded nails have a soft pink-beige base, while deep red snowflake-like motifs sit neatly toward the center. Tiny reflective red accents catch the light and give the design a subtle festive glow without making it feel overly seasonal.
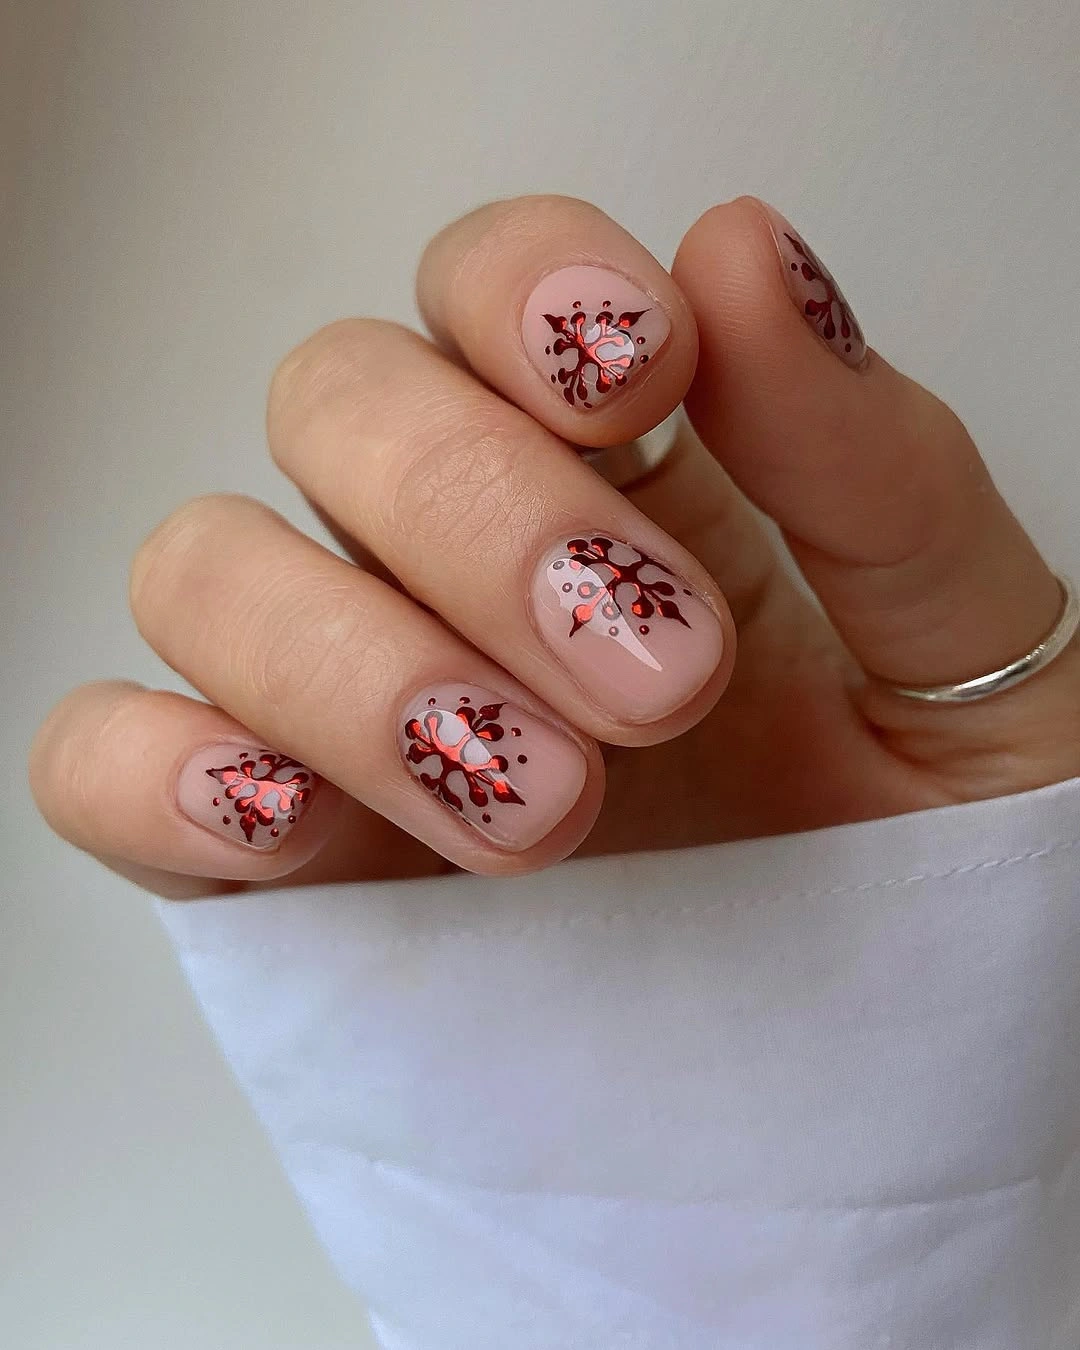
For the base, I would use a sheer nude or blush gel such as OPI GelColor Bubble Bath or a similar translucent pink. A deep burgundy-red gel, fine nail-art brush, and a few tiny red metallic flakes create the decoration. I like a glossy top coat here because it makes the reflective details look almost like little pieces of winter jewelry.
I would apply two very thin layers of the nude shade, curing each one before adding the artwork. Then I would draw loose snowflake shapes with the burgundy gel, adding small dots and metallic fragments around them. I would finish with a smooth top coat and pay extra attention to the free edge.
This is one of my favorite ways to make short nails feel festive while keeping them wearable after the holidays. The nude background keeps everything soft, while the red gives just enough contrast. It would look especially pretty with a cream sweater and a deep red scarf.
Smoky Silver Chrome for Cozy Winter Days
This manicure takes winter nails in a cooler, moodier direction. The short rounded nails combine charcoal, silver, and smoky gray in a marbled metallic finish. The irregular strokes create movement across each nail, almost like frosted glass or brushed metal, while the dark base keeps the overall effect sophisticated rather than sparkly.
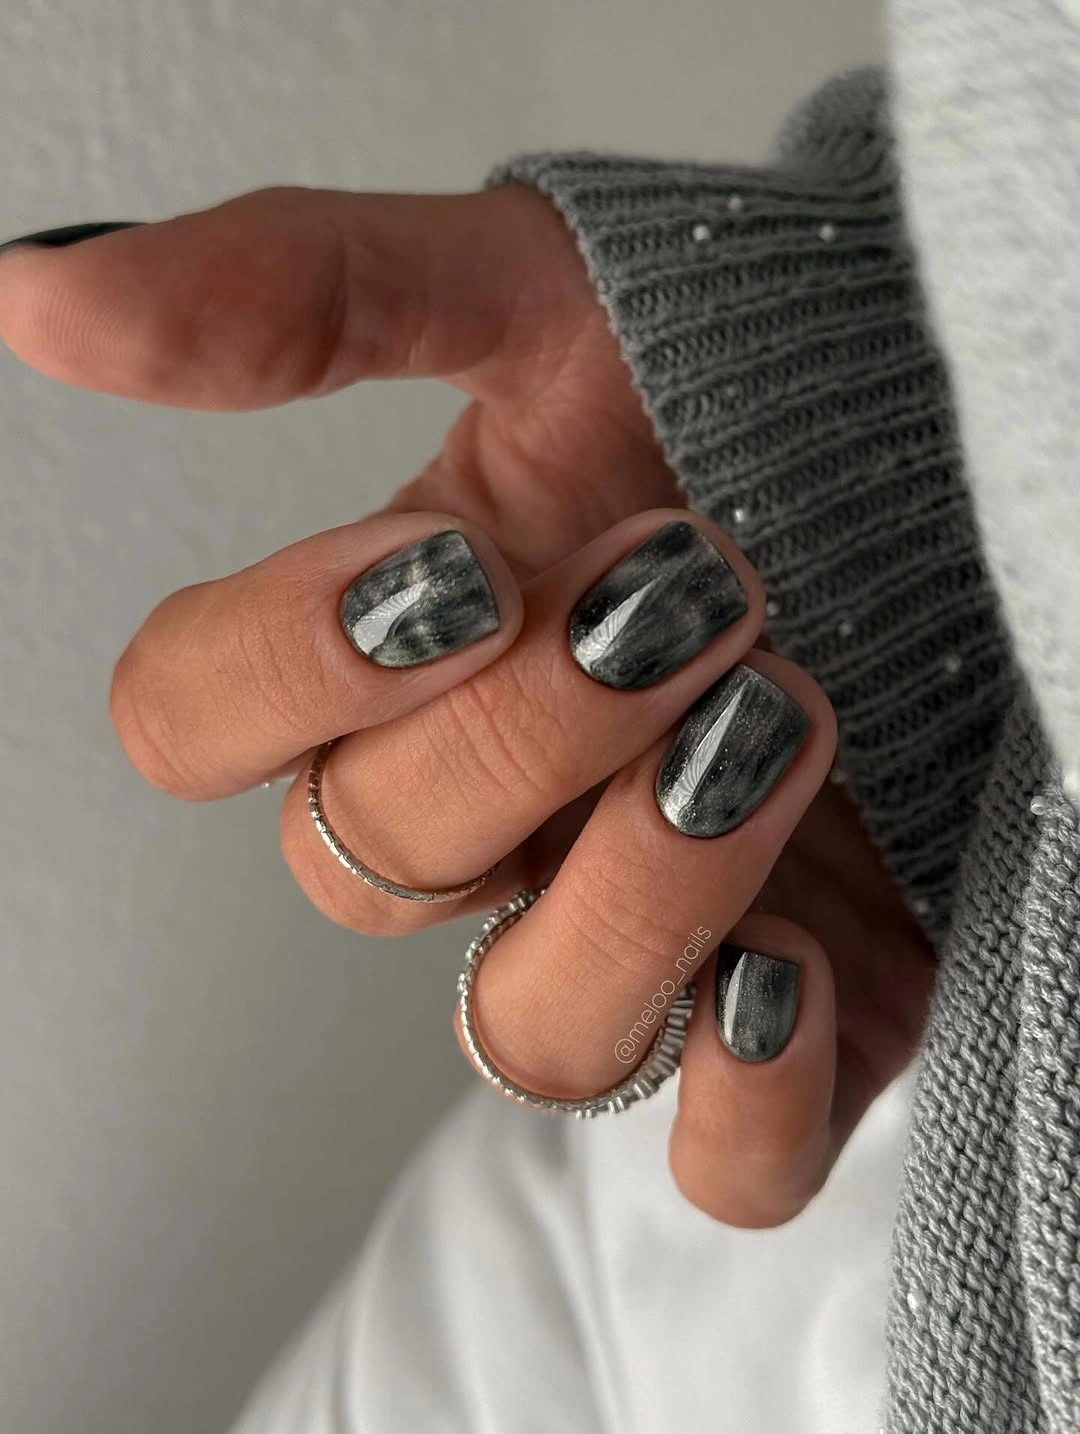
I would reach for a charcoal gel, metallic silver polish, and a sheer gray or black gel for the layered effect. A small detail brush or soft nail-art brush is enough to create the irregular metallic strokes. A glossy top coat will emphasize the chrome-like reflections and make the surface look smooth.
After applying the charcoal base, I would add uneven silver strokes while the layers are still thin, blending some areas with translucent gray. I would avoid making every nail identical – the slightly different patterns are what make this design interesting. Once cured, a glossy top coat brings the whole manicure together.
I would wear this with chunky knits, gray wool coats, and silver jewelry. It has that quiet winter-night feeling I always come back to when classic red starts to feel too predictable. Short nails also make the metallic finish much easier to wear every day.
Soft Sage Green for a Frosted Winter Look
Soft sage green feels unexpectedly beautiful in winter, especially in this clean short manicure. The nails are rounded and kept at a practical length, while the muted green-gray shade has a creamy, almost frosted quality. There is no elaborate nail art here, and that simplicity lets the unusual color do all the work.
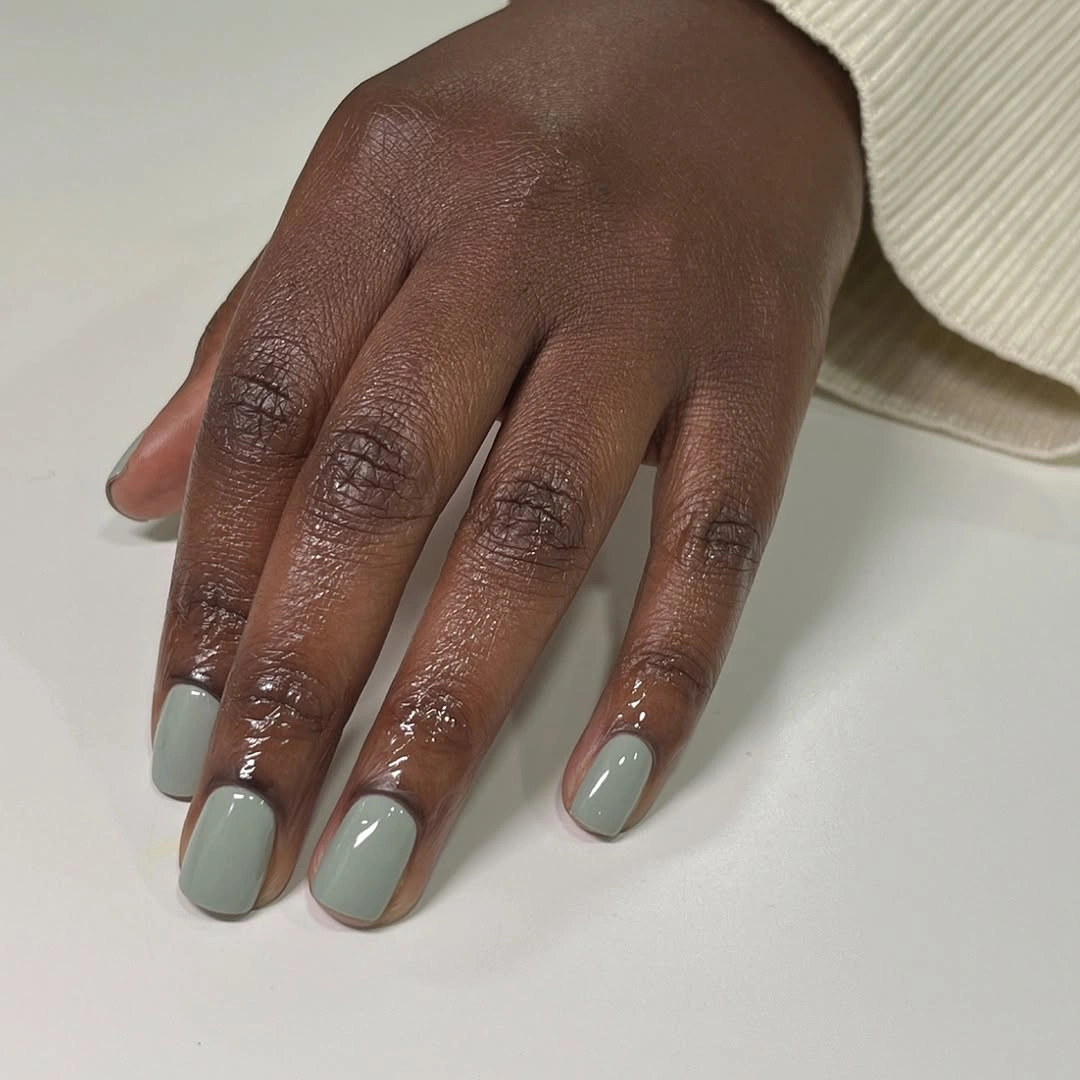
I would choose a muted sage or eucalyptus gel, preferably with a creamy rather than neon finish. OPI, CND Shellac, and Gelish all have soft green families that can be adapted to this look. I would keep the supplies minimal – base coat, sage polish, glossy top coat, and cuticle oil.
The manicure itself is wonderfully straightforward. I would shape the nails evenly, apply a thin base layer, then build the sage color with two controlled coats. After curing, I would seal everything with a glossy top coat and finish with cuticle oil once the manicure is complete.
I like this shade when I want winter nails that do not scream holiday. It feels fresh against cream, gray, and oatmeal clothing and works particularly well for those long stretches of January when the festive decorations are already gone. Sometimes a quiet color is exactly what I need.
Chocolate Brown Glitter with a Golden Accent
Rich brown becomes surprisingly glamorous when it is covered in fine shimmer. These short rounded nails have a deep chocolate-brown base filled with delicate glitter, while a tiny gold accent near the center of each nail adds a refined flash. The combination reminds me of dark chocolate dusted with a little gold – warm, elegant, and very winter-friendly.
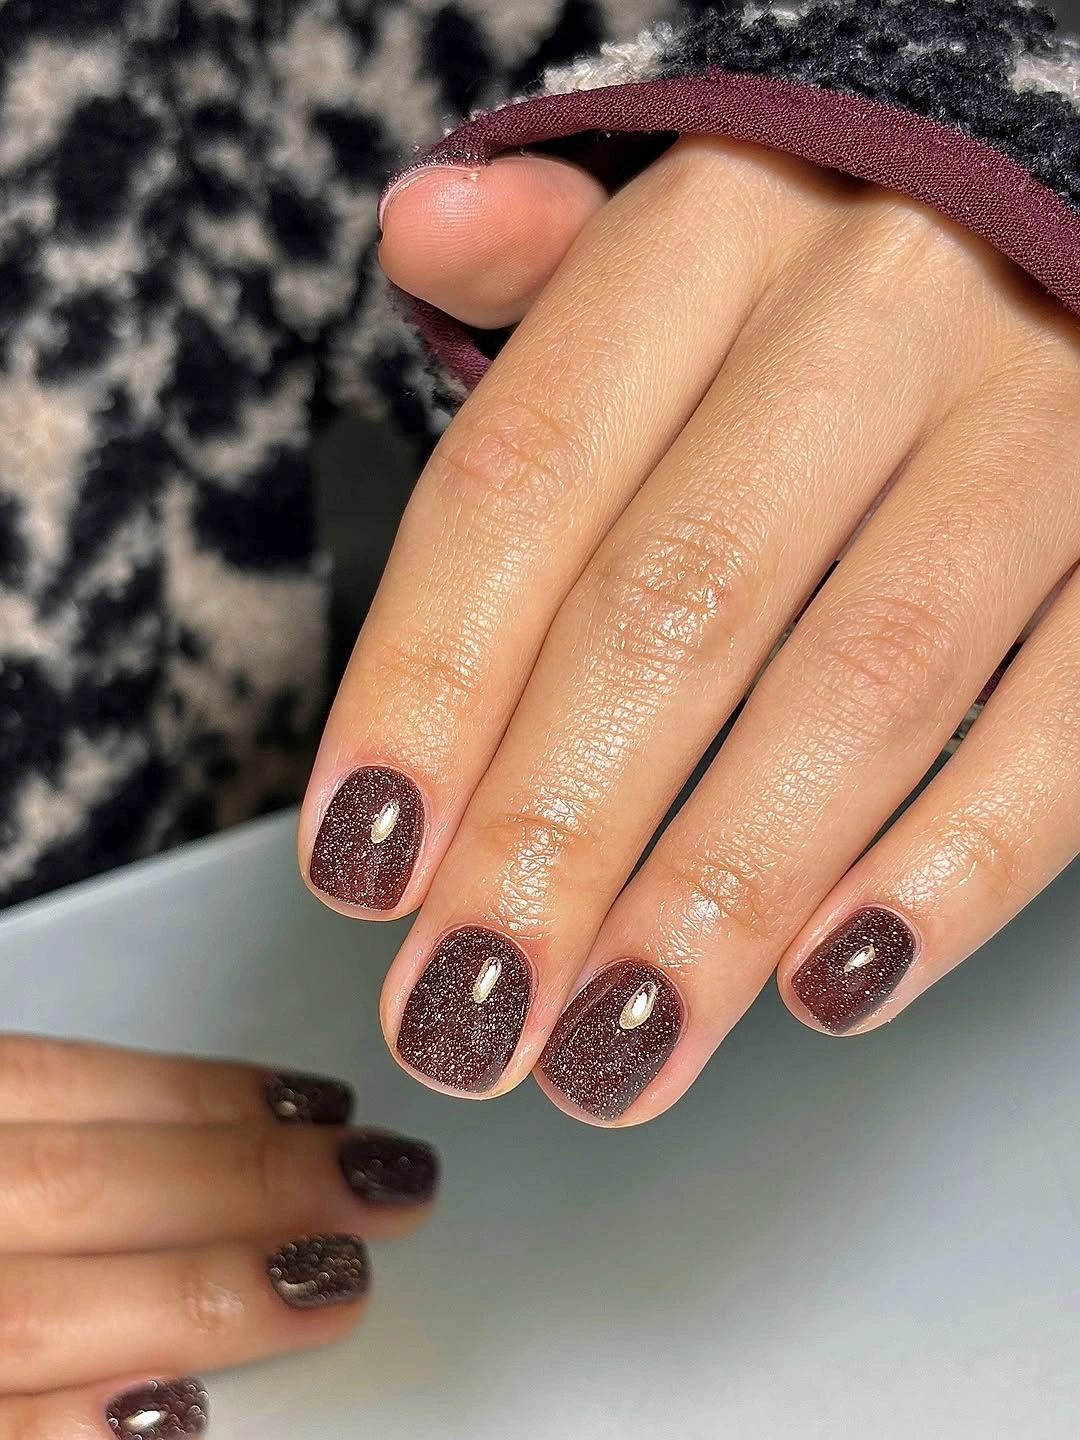
I would use a chocolate or espresso gel with fine shimmer, plus a small amount of gold metallic gel or gold foil. OPI GelColor, CND Shellac, and Gelish are good starting points for finding deep brown shades. A glossy top coat keeps the glitter looking dimensional instead of flat.
I would apply the brown in two thin layers, curing between them, and add the gold accent with a very fine brush or tiny piece of foil. I would keep the gold centered and minimal so it does not compete with the shimmer. One final glossy layer gives the manicure that smooth, polished finish.
This is the kind of manicure I would choose for a winter dinner or a dressed-up evening when I want something darker than burgundy. The brown feels softer than black but just as sophisticated. Add gold jewelry and a camel coat, and the whole look practically styles itself.
Icy Blue Snowflakes with a Soft French Finish
This manicure feels like winter morning light. The short-to-medium oval nails alternate between sheer blush, icy blue, and delicate white French details, while tiny silver snowflakes add a frosty accent. The cool palette is softened by the pinkish nude base, so the overall effect stays elegant rather than looking like traditional holiday nail art.
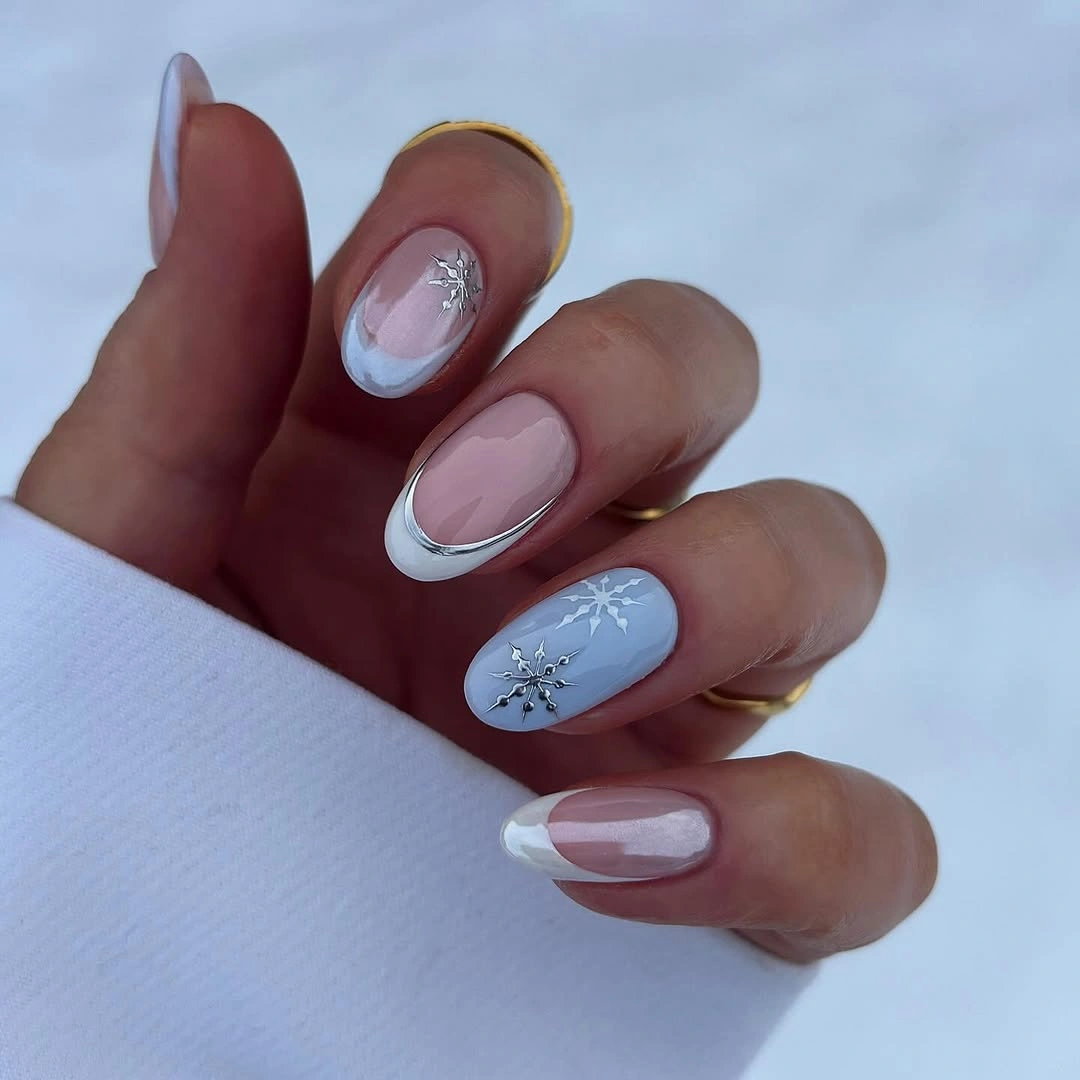
For the base, I would use a sheer pink nude gel with an icy blue polish for the accent nails. White gel paint, silver metallic gel, and a fine liner brush are enough for the snowflakes and delicate borders. A glossy top coat is essential because the design depends on crisp, reflective details.
I would start with the sheer nude base, then add the soft blue sections and white French accents. Once cured, I would draw tiny snowflakes using thin intersecting lines and add small silver details where needed. I would keep the artwork delicate and leave plenty of negative space so the short nails do not look crowded.
I especially like this idea for the heart of winter, when I want something lighter than burgundy or chocolate. The combination of icy blue, soft pink, white, and silver feels fresh against winter whites and cool gray knits. It is festive, but in a very understated way – almost like frost caught on the fingertips.
Glossy Cherry Red with Graphic White Details
I love how this short manicure takes classic winter red and gives it a modern little twist. The nails are rounded and coated in a rich cherry-red gel, while crisp white geometric accents sit near the lower portion of several nails. The contrast is bold but wonderfully clean, making the design feel festive without relying on snowflakes or glitter.
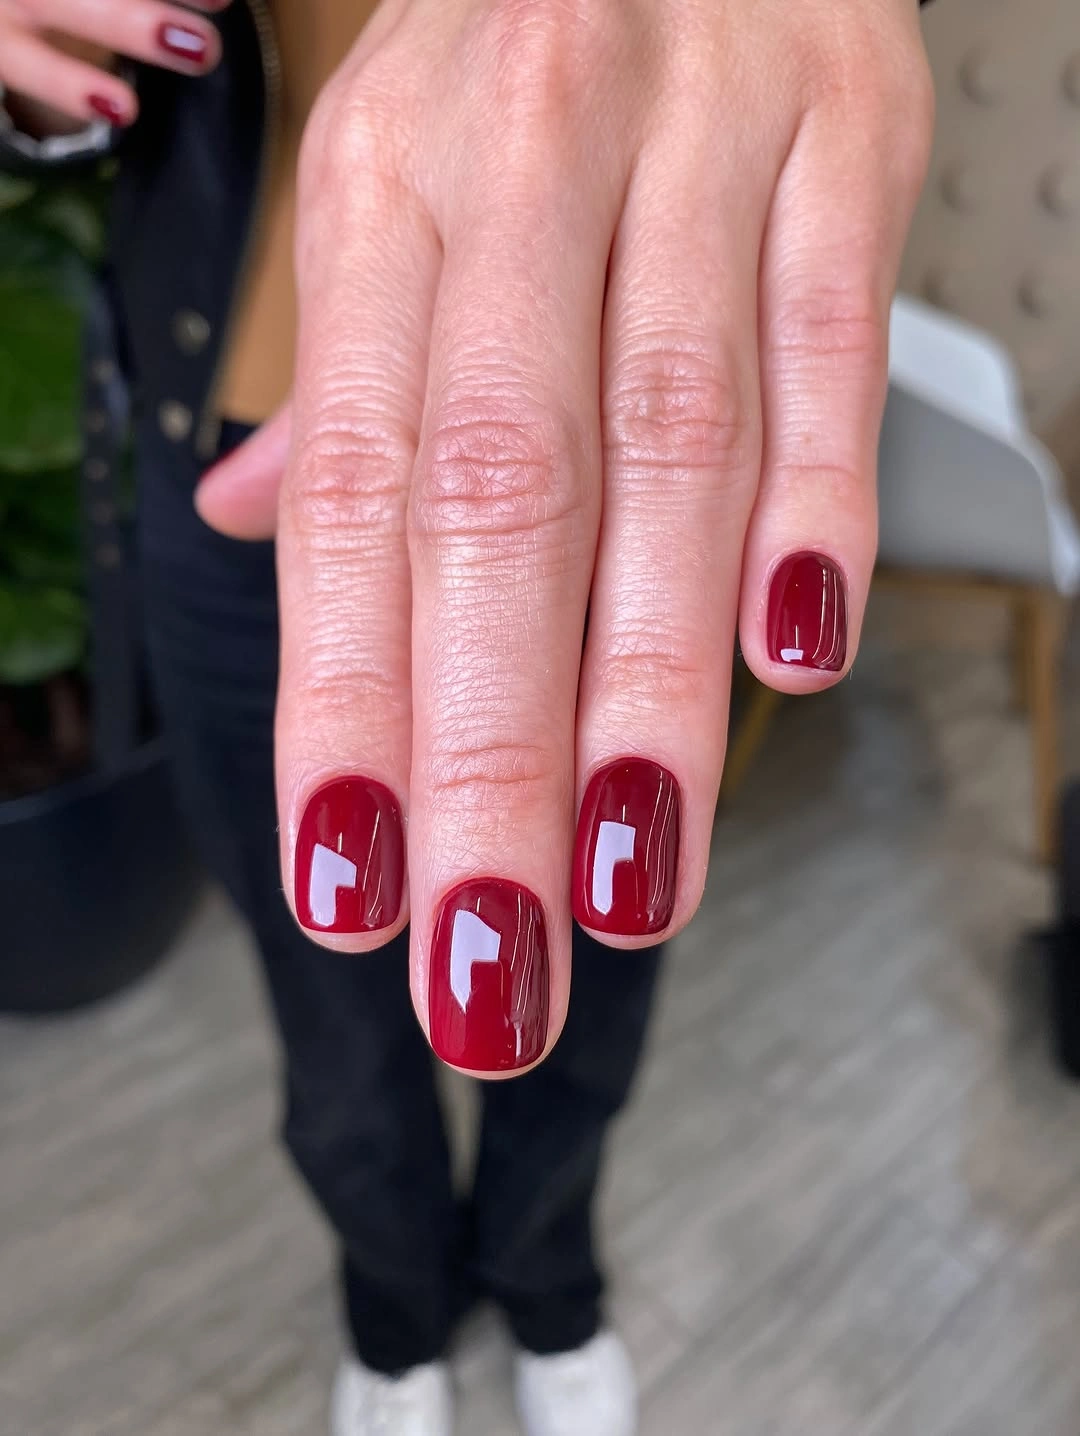
For the look, I would use a glossy cherry-red gel, an opaque white gel paint, a fine detail brush, and a high-shine top coat. OPI GelColor or CND Shellac both offer plenty of deep red shades that would work beautifully. The white needs to be highly pigmented so the graphic shapes stay sharp against the red.
I would apply two thin coats of red, cure them, and then carefully add the white geometric shapes with a fine brush. I would keep the edges crisp and slightly vary the placement from nail to nail. After curing the artwork, I would seal everything with glossy top coat.
I would wear this when I want something cheerful but not overly decorative. The red works beautifully with winter knits, black coats, and even a simple white shirt. It is proof that short nails can make a statement without needing complicated artwork.
Deep Espresso Nails for a Moody Winter Look
Deep espresso brown is one of those colors I keep coming back to once temperatures drop. On these short rounded nails, the shade looks almost black in some lighting, but its warm brown undertone keeps it softer. The extremely glossy finish gives the manicure a polished, almost lacquered appearance.
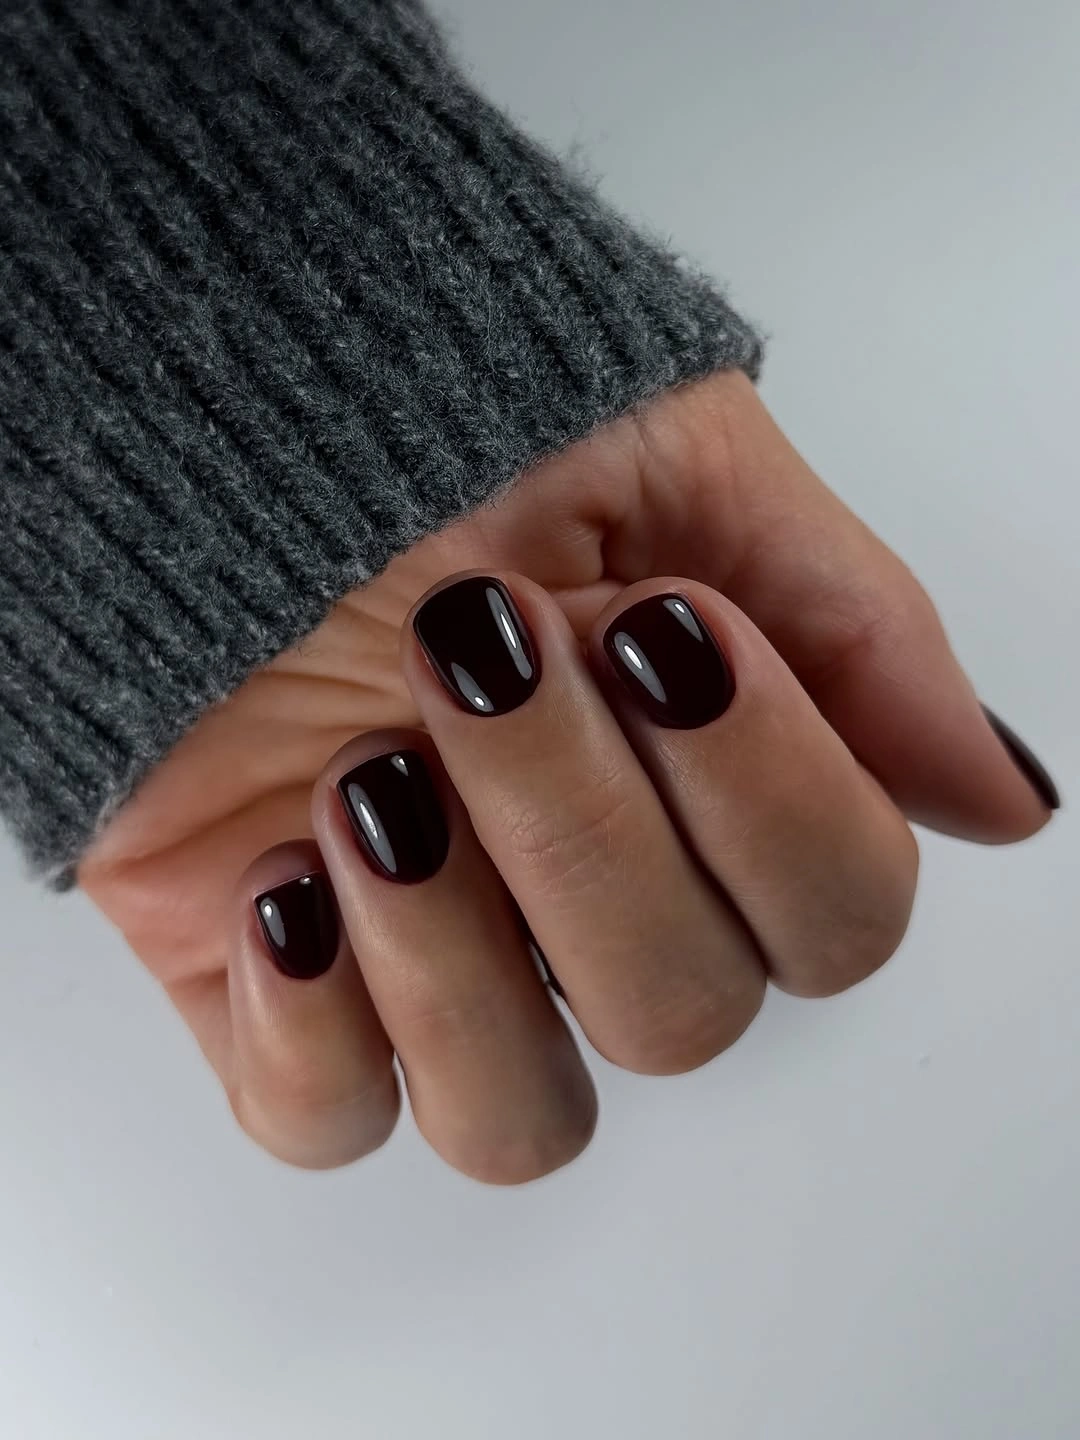
I would choose a very dark chocolate or espresso gel polish with a high-gloss top coat. Shades from OPI, Essie Gel Couture, or CND can easily create this effect. I would also keep a cuticle oil nearby because dark polish looks especially elegant when the surrounding skin is neat and moisturized.
The application is simple enough for a minimalist manicure. I would shape the nails into a soft rounded-square form, apply a thin base coat, and follow with two thin coats of espresso polish. After curing each layer as required, I would finish with a generous but controlled layer of glossy top coat.
For me, this is the perfect winter alternative to black. It has the same drama but feels warmer and a little more relaxed. Pair it with charcoal knitwear, brown leather, or a gray coat and suddenly the whole outfit feels very intentional.
Pink Winter Glam with Silver Leaf Details
This design brings a softer kind of holiday glamour to short nails. The base is a sheer pink nude, while sweeping silver and deep berry details create an elegant leaf-like pattern across each nail. Fine silver glitter traces parts of the artwork, adding sparkle without covering the entire manicure.
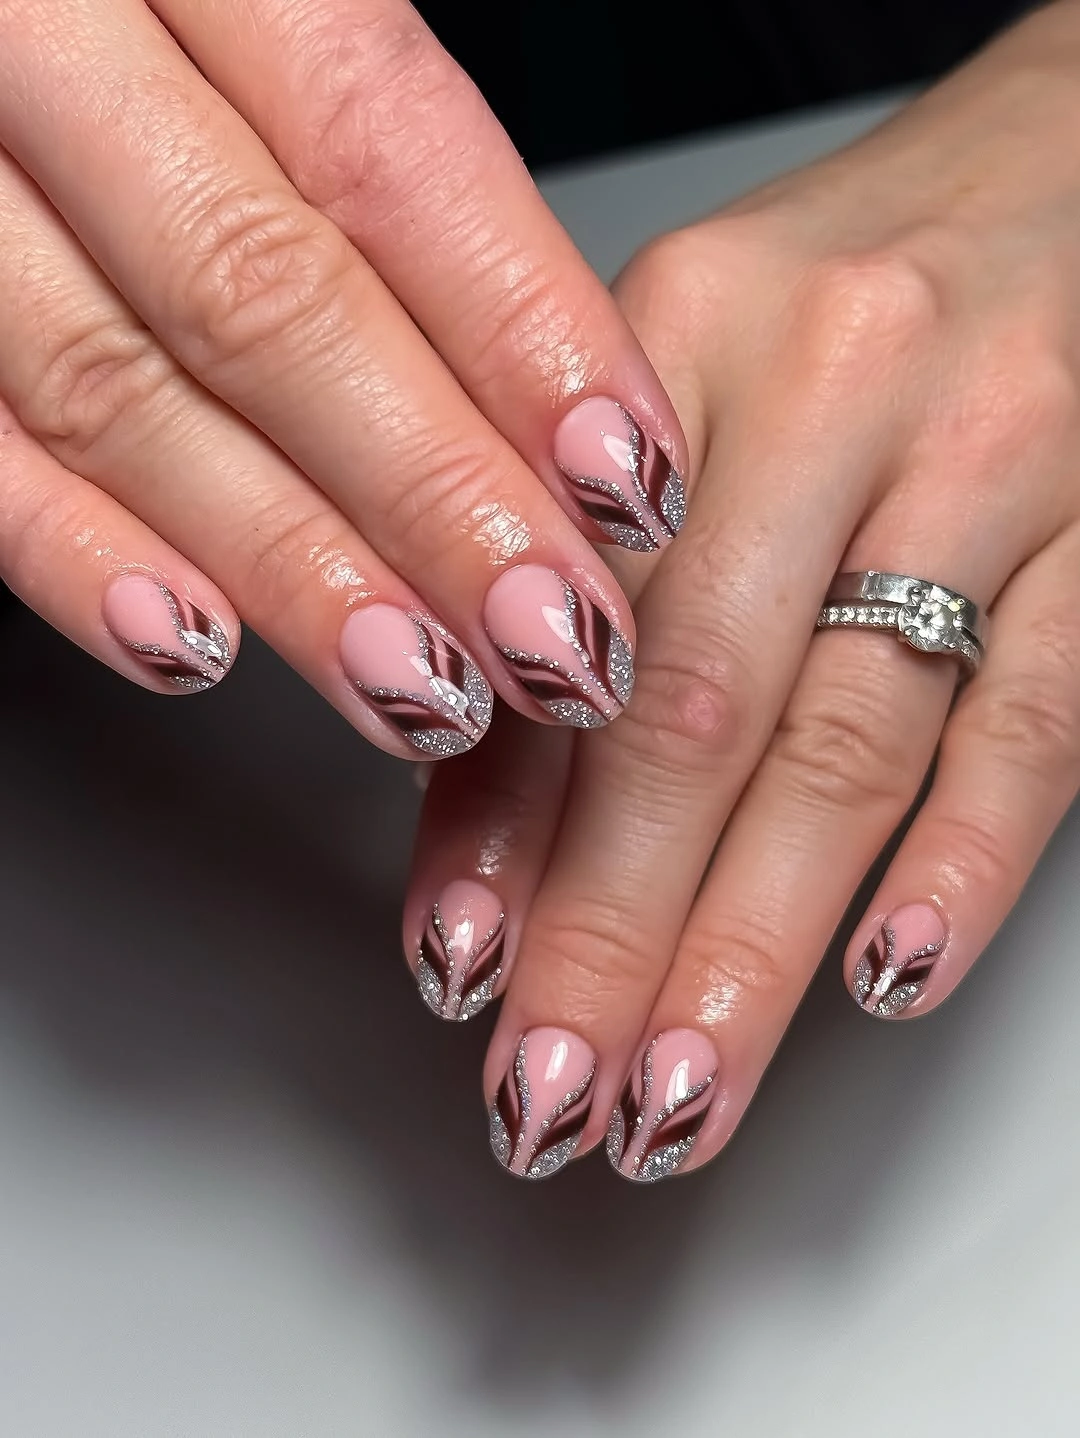
I would use a translucent blush gel, a deep burgundy or plum gel, silver glitter gel, and a fine liner brush. A few tiny silver particles can add dimension, but I would avoid chunky glitter because the design already has plenty of movement. A glossy top coat keeps the pink base looking fresh.
I would begin with the sheer pink base and then build the curved berry shapes from the lower corners upward. Next, I would outline selected sections with silver and add a small amount of glitter along the edges. The key is keeping the strokes delicate so the short nail surface still has breathing room.
This is the manicure I would save for a winter celebration when classic red feels a little too predictable. It has sparkle, romance, and just enough drama to catch the light. I especially like it with silver jewelry and soft pink or burgundy clothing.
Classic Tortoiseshell for a Cozy Winter Mood
Tortoiseshell has a warmth that feels made for winter. These short rounded nails mix translucent caramel, amber, and deep brown patches beneath a glossy finish, creating the look of polished tortoiseshell. The irregular pattern makes every nail slightly different, which is part of its charm.
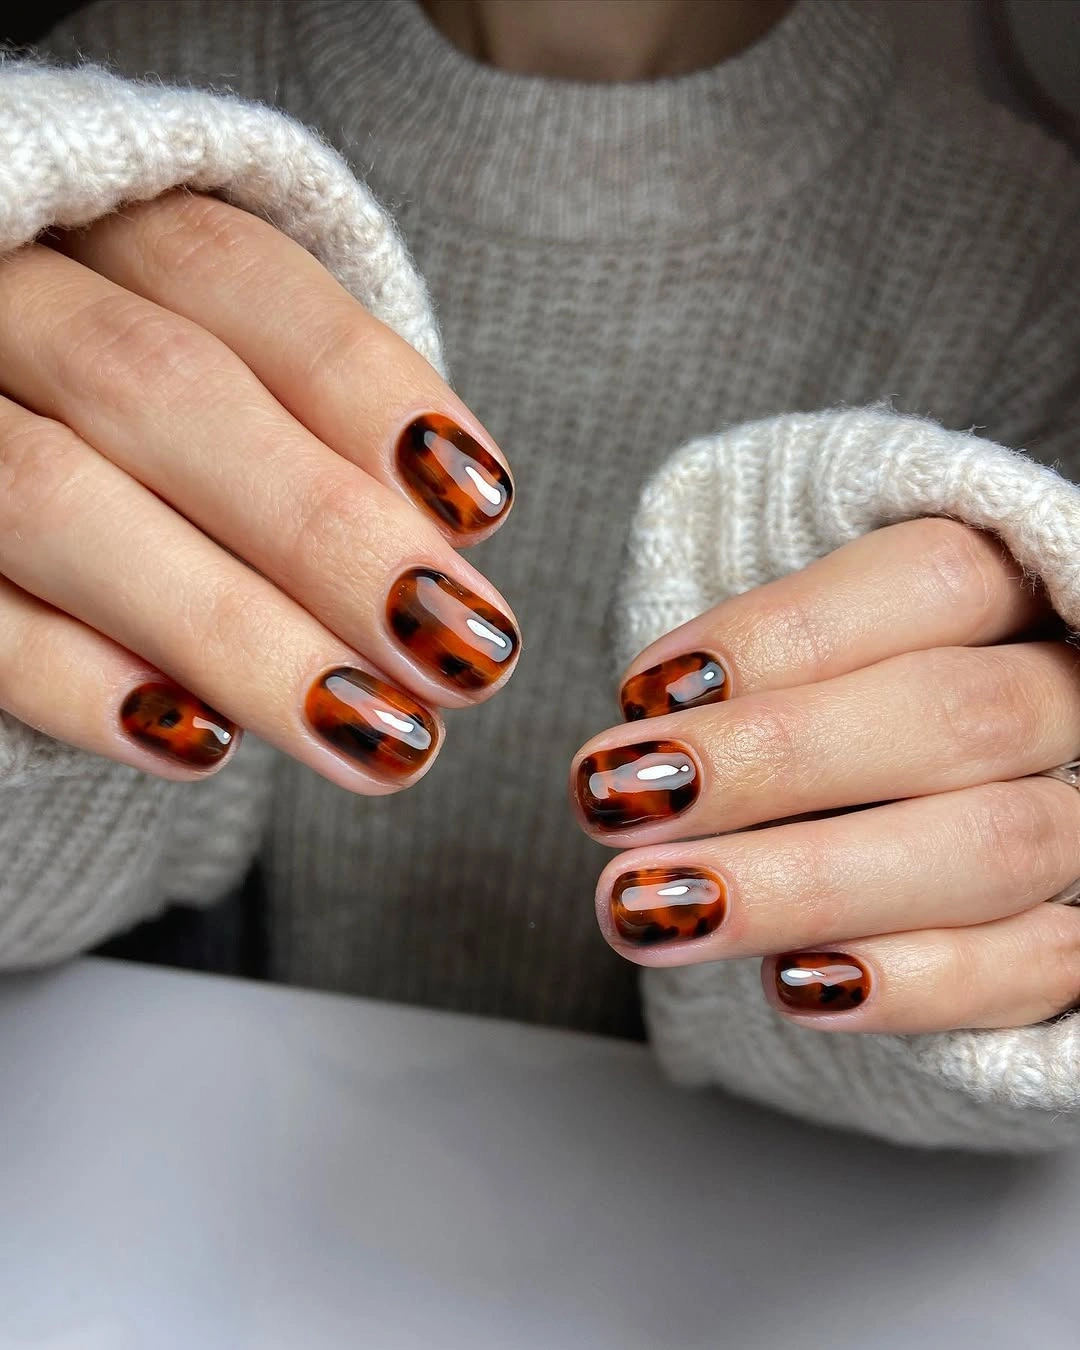
I would use a translucent caramel base, amber gel, dark chocolate brown, and a clear builder or jelly-style gel to create the layered effect. A fine brush or small sponge can help soften the edges between colors. The final ingredient is a glossy top coat, which makes the warm shades look almost glass-covered.
I would apply the translucent base first, then place irregular brown and amber patches while keeping their edges soft. I would layer the colors rather than trying to make every spot perfectly defined. Once cured, a glossy top coat brings out the depth and makes the manicure look much more dimensional.
I think tortoiseshell works particularly well when winter clothes become all about texture. Wool sweaters, cream scarves, camel coats, and brown leather accessories all pick up something from these warm tones. It feels trendy, but not tied to one particular holiday.
Silver Metallic Nails for an Icy Finish
Nothing says winter quite as quickly as a reflective silver manicure. These short rounded nails are completely covered in fine metallic silver, creating a smooth chrome-like effect without additional artwork. The finish is bright but clean, so the short shape keeps it sophisticated rather than excessive.
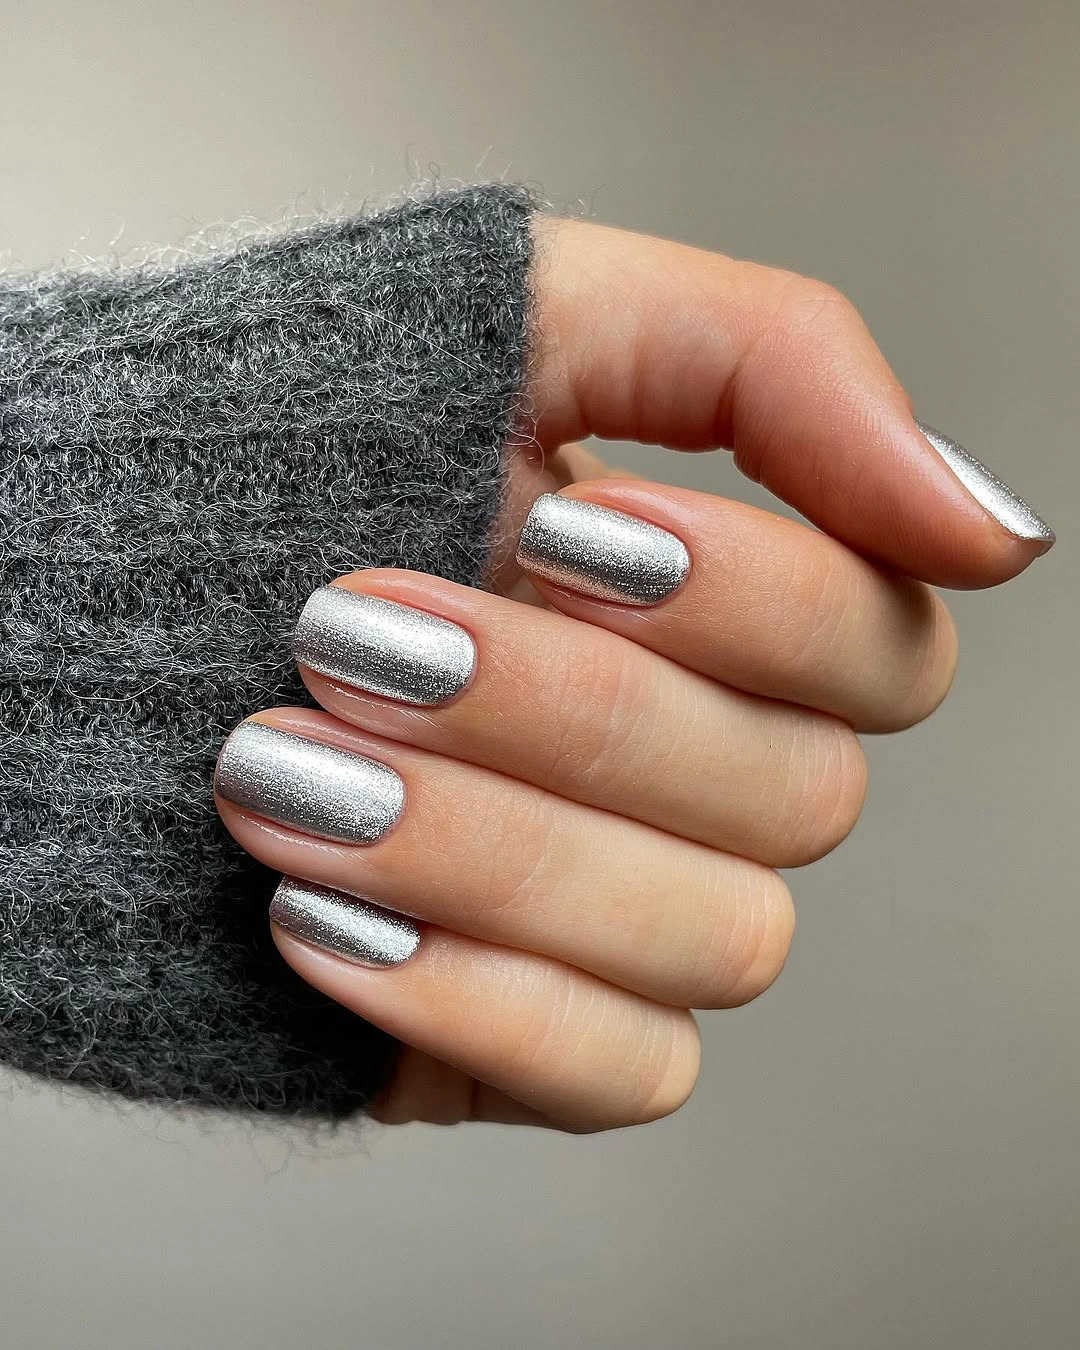
I would use a silver chrome powder over a suitable gel base, or choose a highly reflective silver gel polish for an easier version. A no-wipe top coat is useful when working with chrome powder, while a regular glossy top coat works beautifully with metallic polish. The smoother the nail surface, the more even the reflection will look.
I would prepare and shape the nails carefully, apply the chosen base color, and cure it completely. For chrome, I would rub a small amount of powder over the cured no-wipe surface until the finish becomes evenly reflective, then seal it with top coat. With metallic polish, two thin layers are usually enough.
I would choose this when I want my winter manicure to feel instantly polished with almost no nail art. Silver catches the light beautifully against chunky gray knitwear and dark coats, and the short length keeps the look practical. Sometimes all I need is a little frost on my fingertips.
Playful Winter Mix with Icy Blue Accents
I would choose this manicure when one color simply is not enough. The short nails combine sheer nude, icy blue, deep burgundy, black, and tiny metallic details, creating a playful mix of stars, dots, curved shapes, and jewel-like accents. Despite all the different elements, the short rounded shape keeps everything compact and wearable.
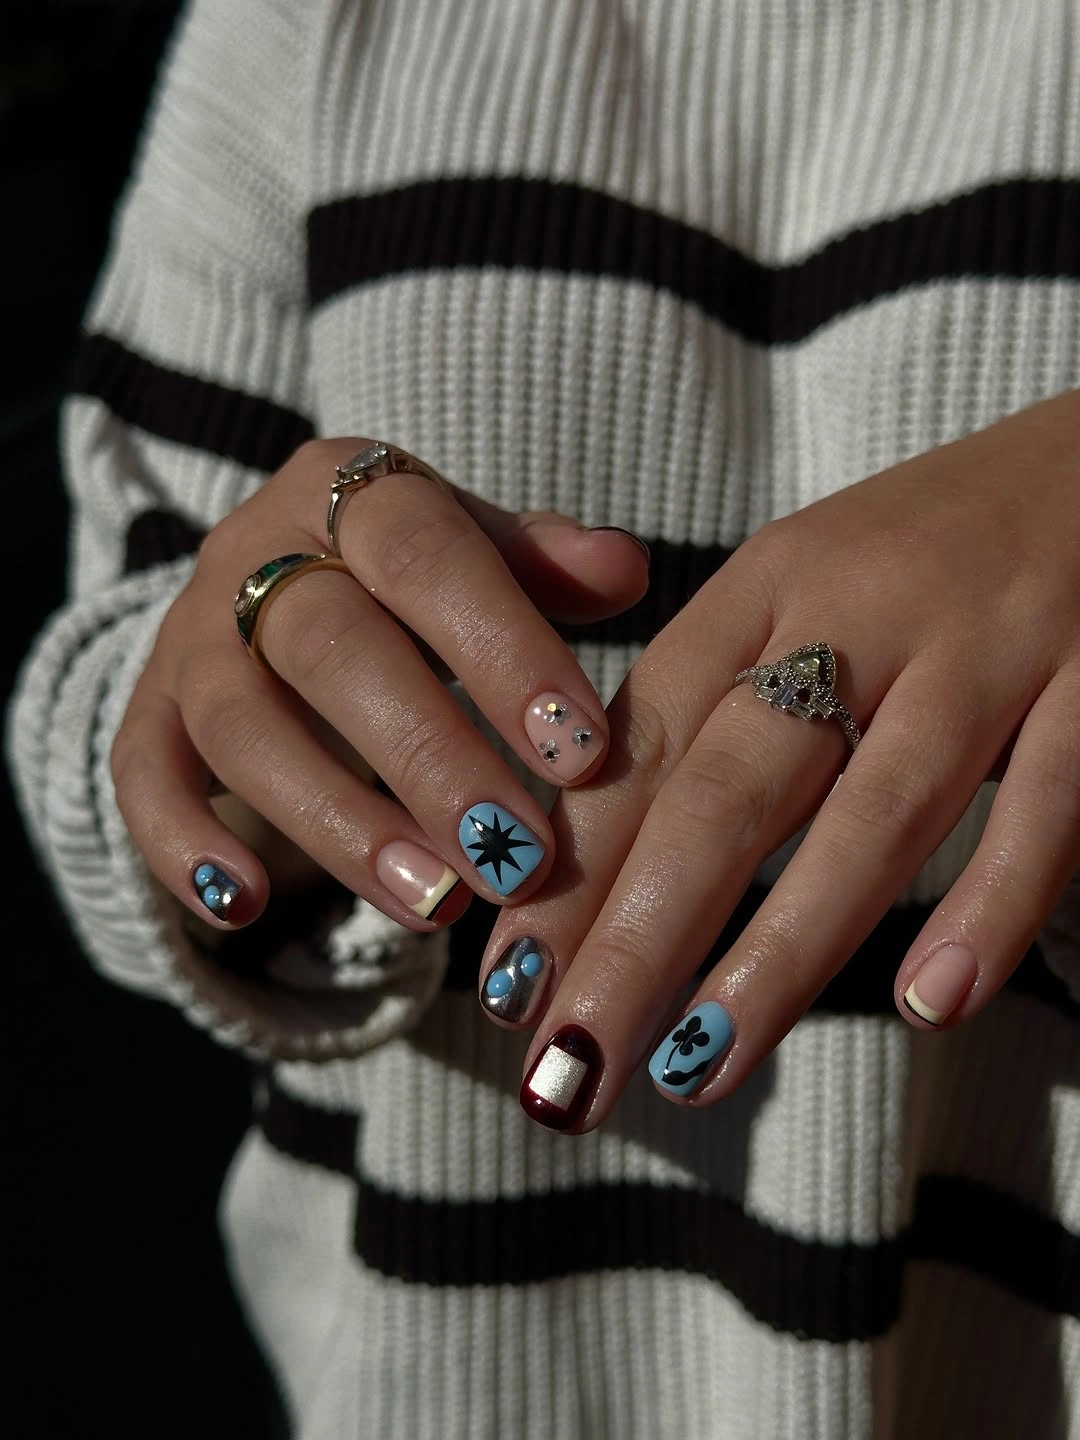
I would use a sheer nude base with muted sky-blue, burgundy, black, and silver or gold accents. Small rhinestones, metallic foil, and a fine nail-art brush would recreate the tiny decorative details. A glossy top coat is enough to pull the mixed design together.
I would keep the nude nails mostly simple, then give each accent nail its own small motif. A blue base can carry a dark star or floral shape, while burgundy works beautifully with metallic foil. I would cure each layer carefully and finish with one smooth glossy coat.
This is the manicure I would save for a winter weekend when I want my nails to feel creative rather than perfectly coordinated. The mix has a little retro charm, a little holiday sparkle, and plenty of personality. With a striped sweater, it feels especially fun.
Sheer Nude Nails with Fine Winter Sparkle
Sometimes the prettiest winter manicure barely announces itself. These short rounded nails use a translucent pinky-nude base scattered with extremely fine silver glitter. The effect is soft and luminous rather than glitter-heavy, almost like tiny ice crystals suspended inside a glossy finish.
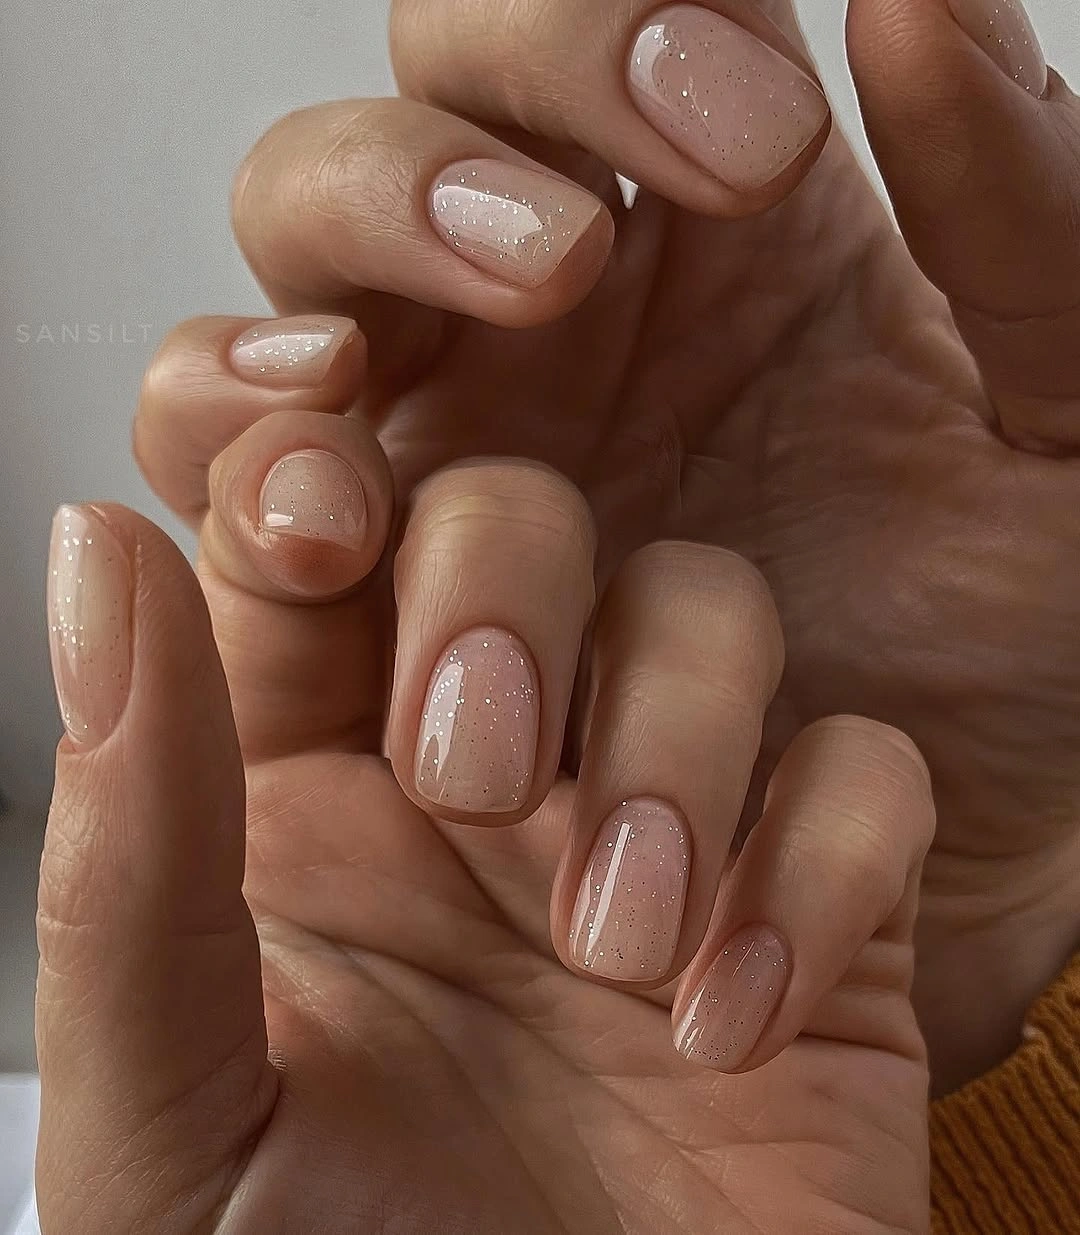
I would choose a sheer blush or beige gel with micro silver shimmer, plus a glossy top coat. A jelly-style nude works particularly well because it allows the tiny reflective particles to remain visible without making the manicure opaque. The beauty here is in keeping the materials minimal.
I would apply one sheer layer first, followed by another thin coat if I want slightly more coverage. The glitter should remain fine and evenly distributed, rather than concentrated in one area. After curing, I would add a glossy top coat for that smooth, glass-like finish.
I love this version for the quieter side of winter. It works with everything from a chunky oatmeal sweater to a tailored black coat, and the sparkle only appears when the light catches it. If I wanted an elegant manicure that could carry me through the entire season, this would be an easy choice.