
The weather gets cooler, the light turns softer, and suddenly I want my manicure to feel a little more polished too. But which colors actually flatter fair skin in fall? From smoky neutrals and icy chrome to rich black floral art, these chic fall nails for fair skin tone make the seasonal switch feel fresh, elegant, and easy to wear.
Warm Mocha And Olive Almond Nails
I love how easily warm fall shades can make fair skin look softer and more luminous, and this almond manicure gets that balance exactly right. The palette moves through creamy ivory, translucent nude, toasted brown, and muted olive, while delicate white botanical lines keep the darker tones from feeling heavy. Small gold studs add just enough sparkle. For me, this is one of those chic fall nails for fair skin tone ideas that feels polished with a camel coat, a chunky cream sweater, or even a simple brown blazer.
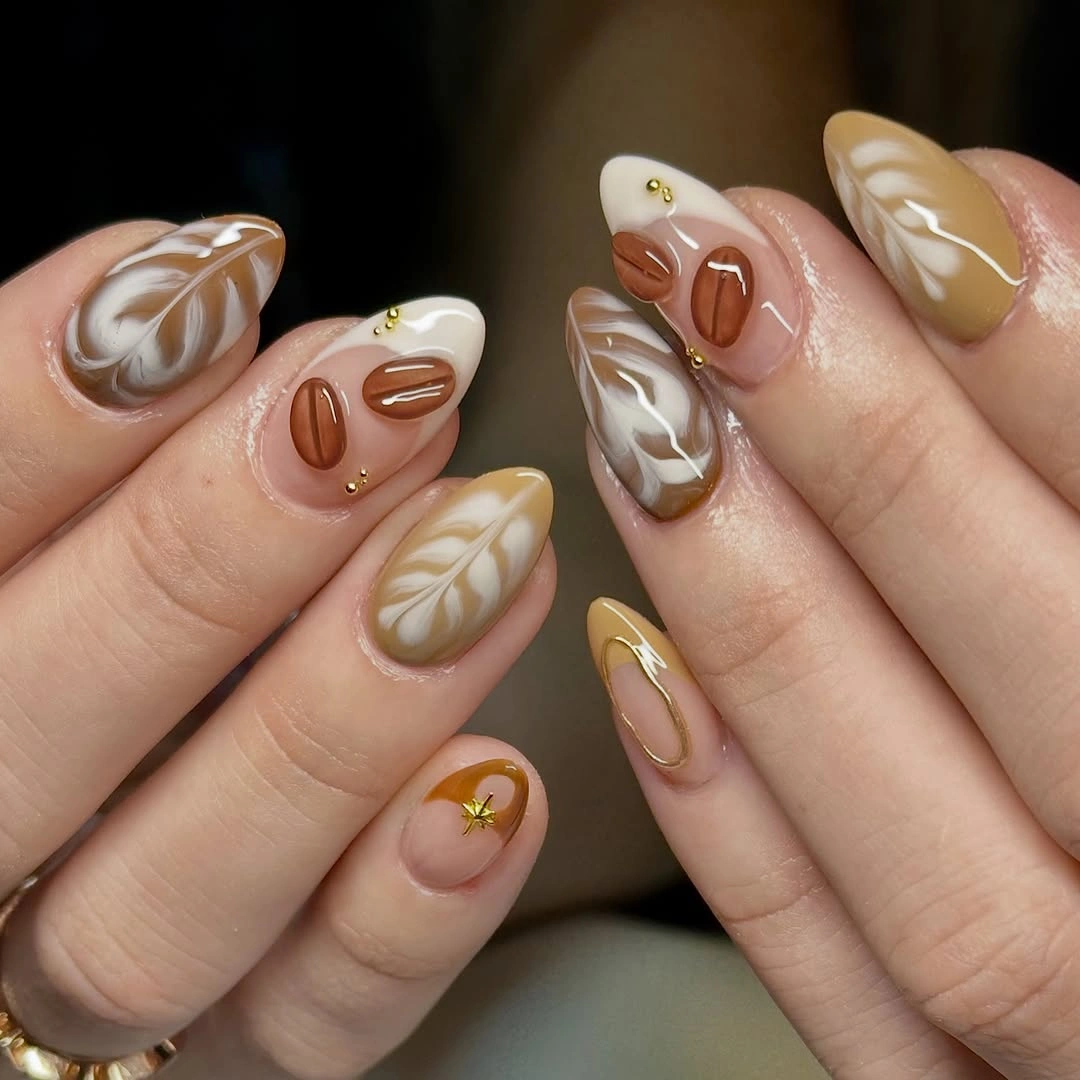
To recreate the color story, I would reach for a sheer pinky-nude base, creamy ivory polish, a warm cinnamon brown, and a muted olive or khaki shade. OPI Put It In Neutral works beautifully as a soft base, while shades similar to Essie Clothing Optional can give that earthy brown effect. For the tiny accents, I would use white gel paint, a fine liner brush, and miniature gold studs. A glossy top coat is essential because it pulls all those different finishes together.
I would start by shaping the nails into a soft almond and applying a thin nude base. Then I would build the brown and olive sections separately, curing each layer if I were working with gel. The white botanical details need a very fine brush and a light hand – I prefer making several delicate strokes rather than trying to create one perfect line. A dot of nail glue or builder gel can hold the gold accents securely before the final top coat goes on.
Sheer Pink With Silver Micro French Details
Sometimes the best fall manicure is the quiet one. Here, short square nails are coated in a translucent blush pink that lets the natural nail show through, then finished with ultra-thin silver lines tracing the tips and sides. I find this approach especially flattering on fair skin because the soft pink blends into the complexion instead of creating a harsh contrast. The result is clean, delicate, and incredibly easy to wear with everything from a knit sweater to a tailored gray coat.
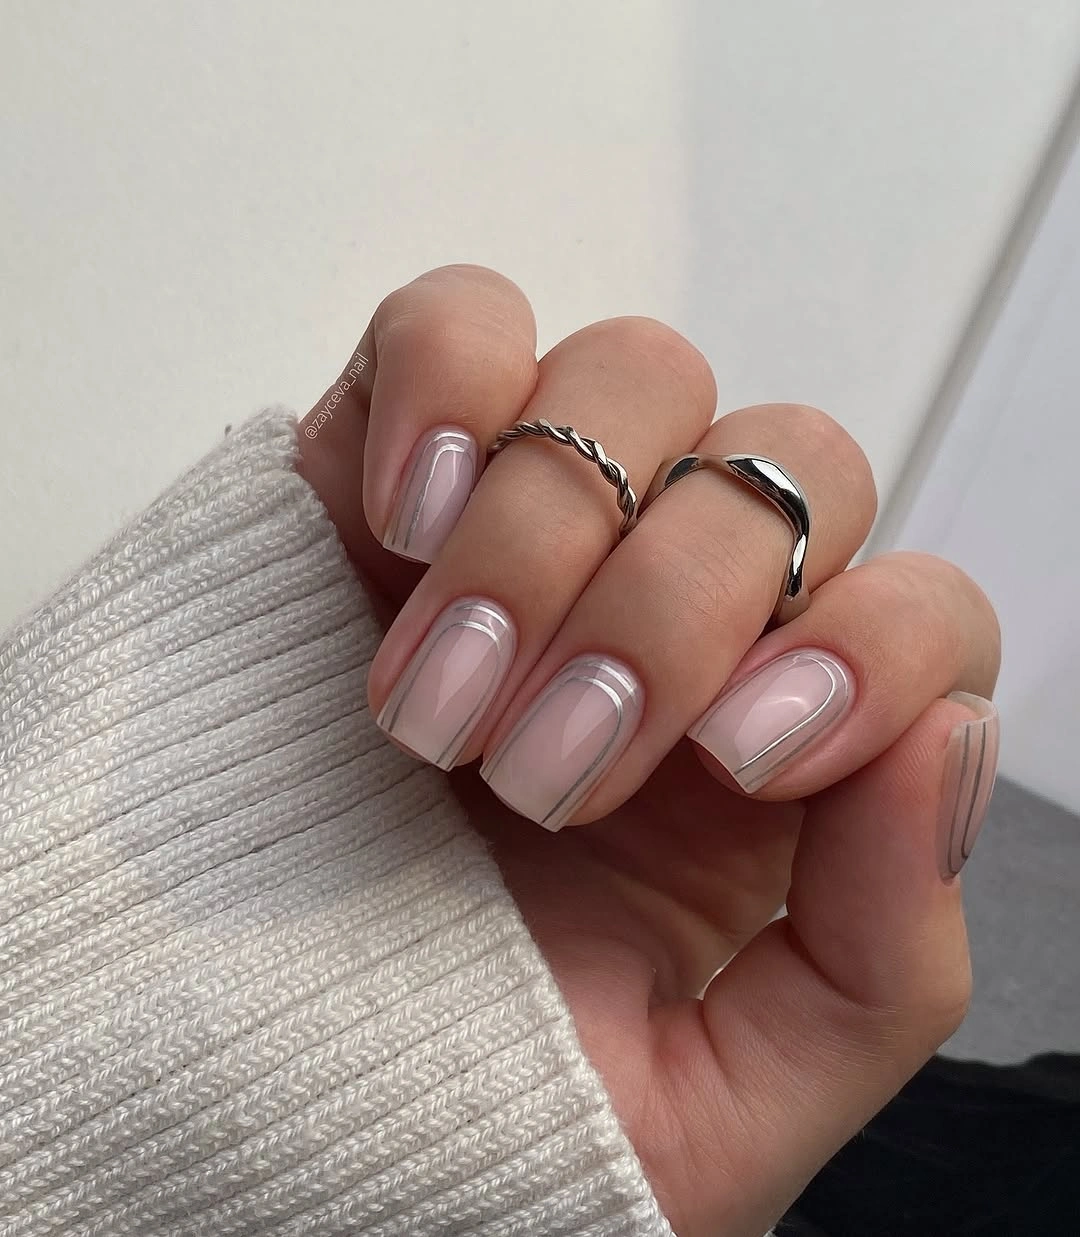
For this look, I would use a sheer milky pink polish, a metallic silver striping gel, and a high-shine top coat. Essie Mademoiselle is a good starting point if I want that barely-there pink effect, although any translucent rosy nude can work. I would also keep a very fine liner brush nearby because the silver detailing needs to stay narrow and controlled.
After shaping the nails into a neat short square, I would apply one or two sheer layers rather than a completely opaque color. Once the base is smooth, I would trace the silver around the free edge and add the slim vertical accents along the sides. The trick is restraint – I would rather have a slightly imperfect delicate line than one that is too thick and takes over the nail.
Burgundy Floral Stiletto Nail Art
Deep burgundy is practically made for autumn, but I love seeing it used with a little more imagination than a simple solid manicure. The combination here pairs rich wine-colored short nails with elongated transparent stiletto extensions decorated with burgundy floral shapes, fine black stems, tiny dots, and touches of gold. Against fair skin, that contrast makes the manicure feel dramatic without relying on a huge amount of color.
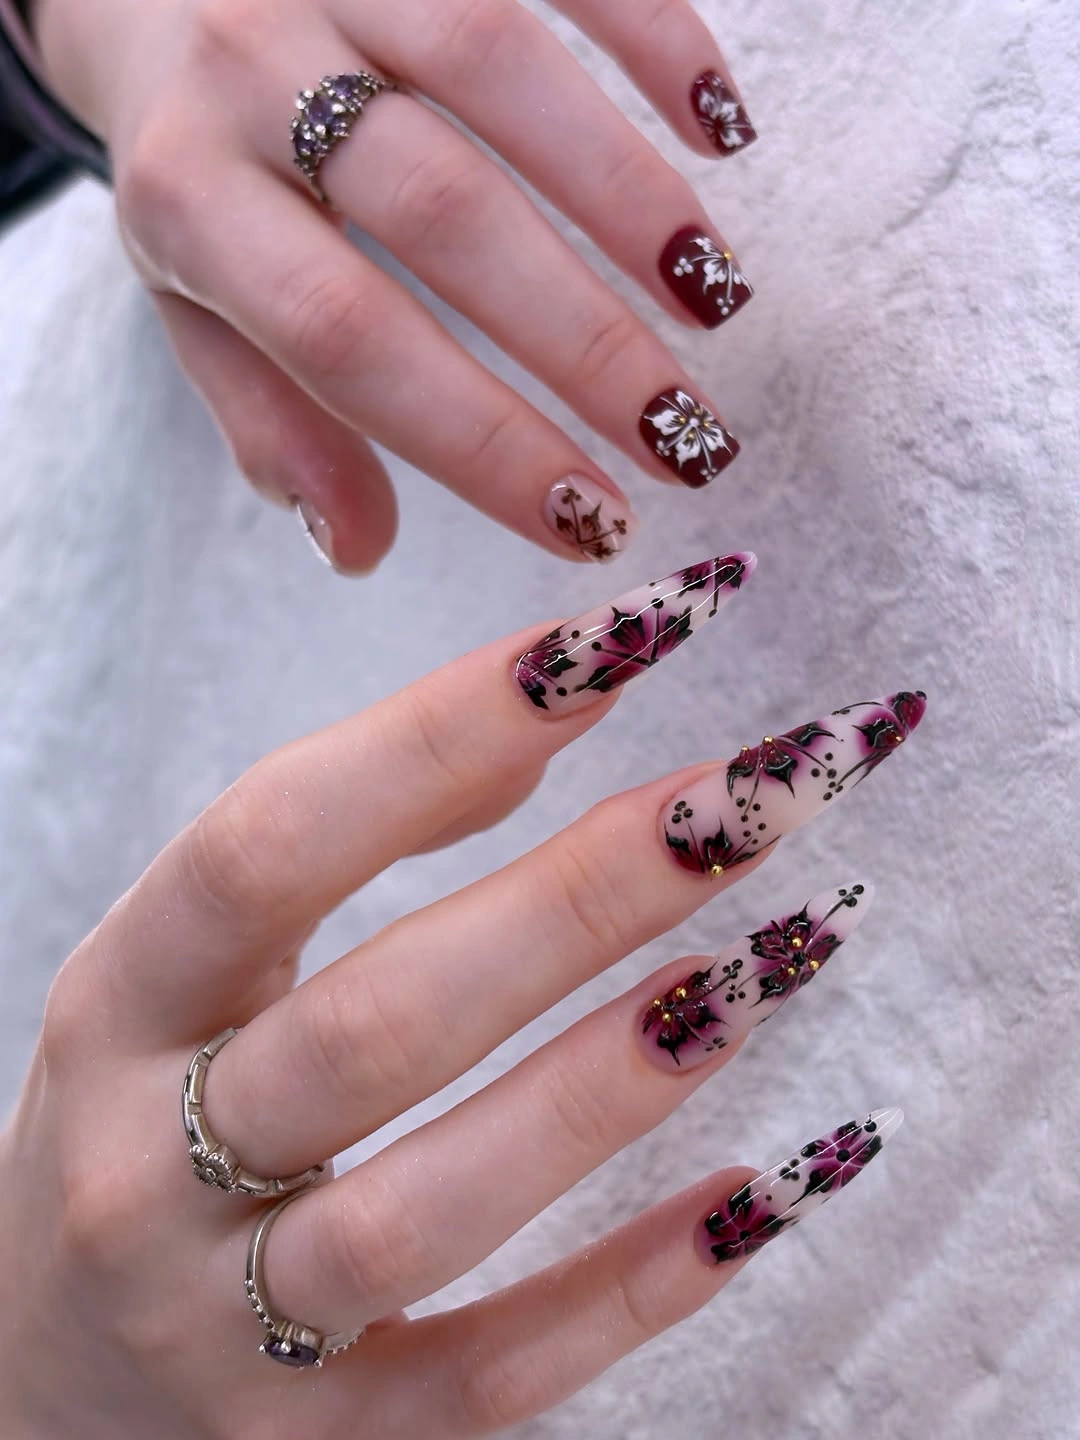
I would use a sheer nude builder base, a deep burgundy gel such as OPI Malaga Wine, black detailing gel, white floral paint, and a small amount of gold foil or metallic gel. A long sculpted extension is also important because the transparent sections need enough space for the artwork to breathe. For the flowers, I would choose a very fine nail-art brush rather than a dotting tool alone.
I would build the extensions first, then apply the sheer nude layer and cure it thoroughly. From there, I would place the burgundy floral shapes in different positions so the design feels organic rather than mirrored. Thin black stems, tiny dots, and restrained gold details finish the look. I would seal everything with a glossy top coat, paying extra attention to the free edge of the long extensions.
Would I wear this to a quiet weekend brunch? Maybe not. Would I wear it with a black dress, burgundy lipstick, and a long wool coat? Absolutely. This is fall nail art with a little attitude, and I think that makes it particularly fun for anyone who wants her manicure to become part of the outfit rather than simply an accessory.
Pink French Tips With Playful Black Dots
A French manicure does not have to be predictable, and this version proves it. The long square nails start with a glossy pale pink base before switching to creamy ivory French tips covered in irregular black dots. I love the contrast against fair skin because the pink keeps the manicure soft while the black-and-cream detailing gives it a graphic edge. It feels playful, polished, and slightly retro at the same time.
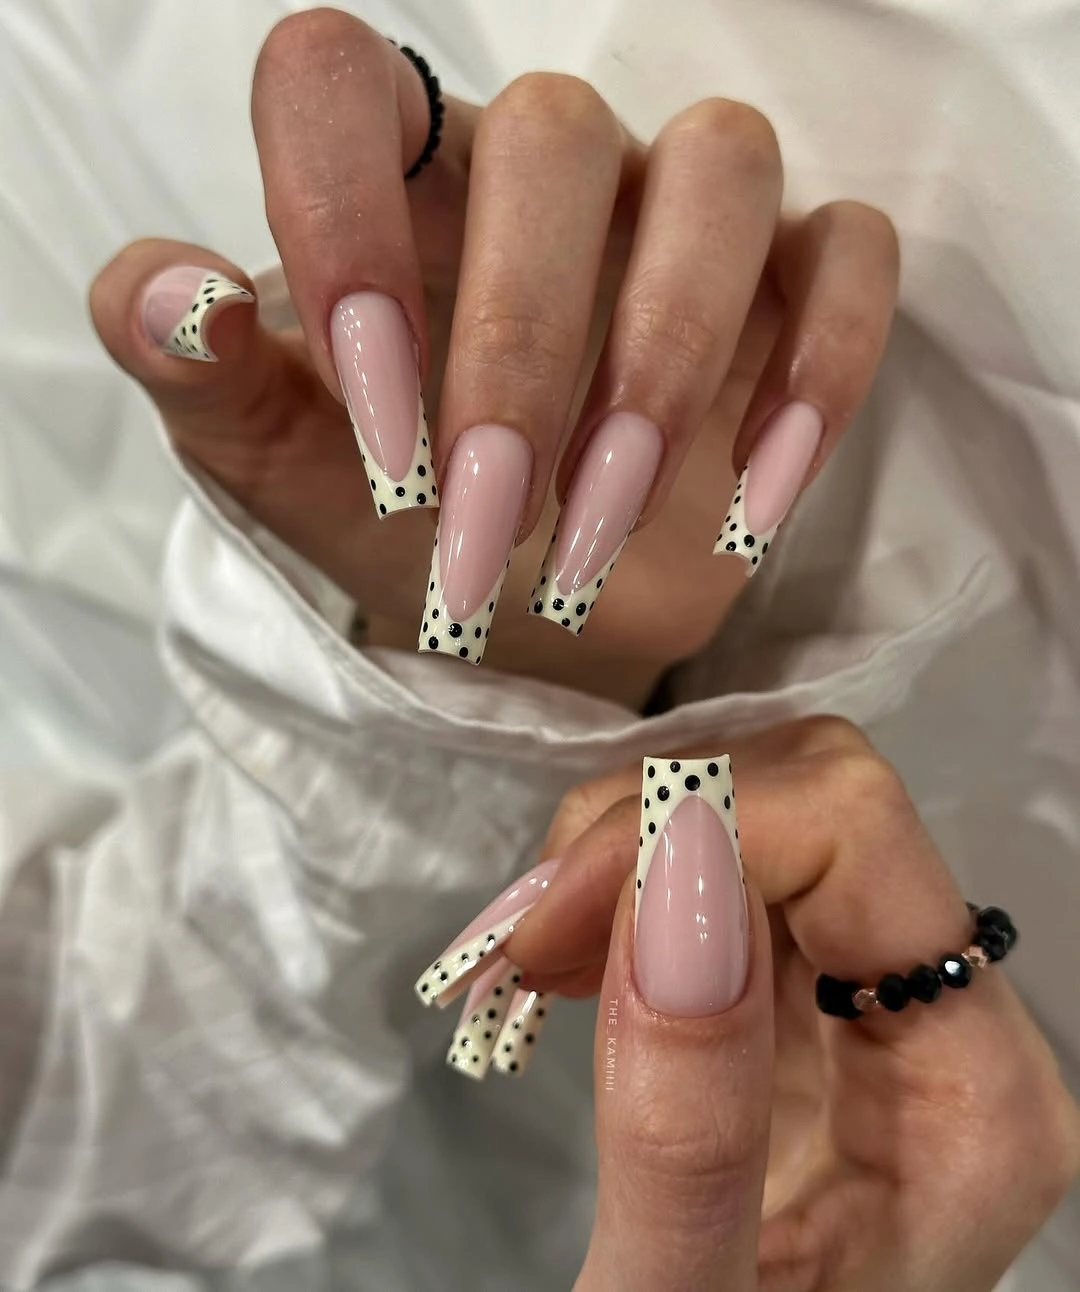
For the base, I would choose a translucent ballet-slipper pink and pair it with a warm creamy white for the tips. A true black gel polish is all I would need for the dots, plus a dotting tool in two different sizes. Gelish Simple Sheer works as a delicate pink inspiration, while a creamy shade similar to OPI Funny Bunny can create a softer tip than stark white.
I would shape the extensions into a crisp square and apply the pink base in thin, even layers. Next comes the cream French tip – I would use a French-tip guide if I wanted perfectly symmetrical lines, although freehand can look more relaxed. Once the tip is cured, I would scatter black dots in different sizes instead of placing them in a rigid pattern. That tiny difference makes the design feel much more modern.
Smoky Gray With Silver Curved Details
Cool gray can look incredibly elegant on fair skin when it has enough dimension, and this stiletto manicure takes that idea somewhere more sophisticated. The soft gray base has a translucent quality, while sweeping silver lines curve across the nails like delicate ribbons. Sparkling silver at the cuticle adds another layer of light, creating a manicure that feels almost metallic without becoming completely chrome.
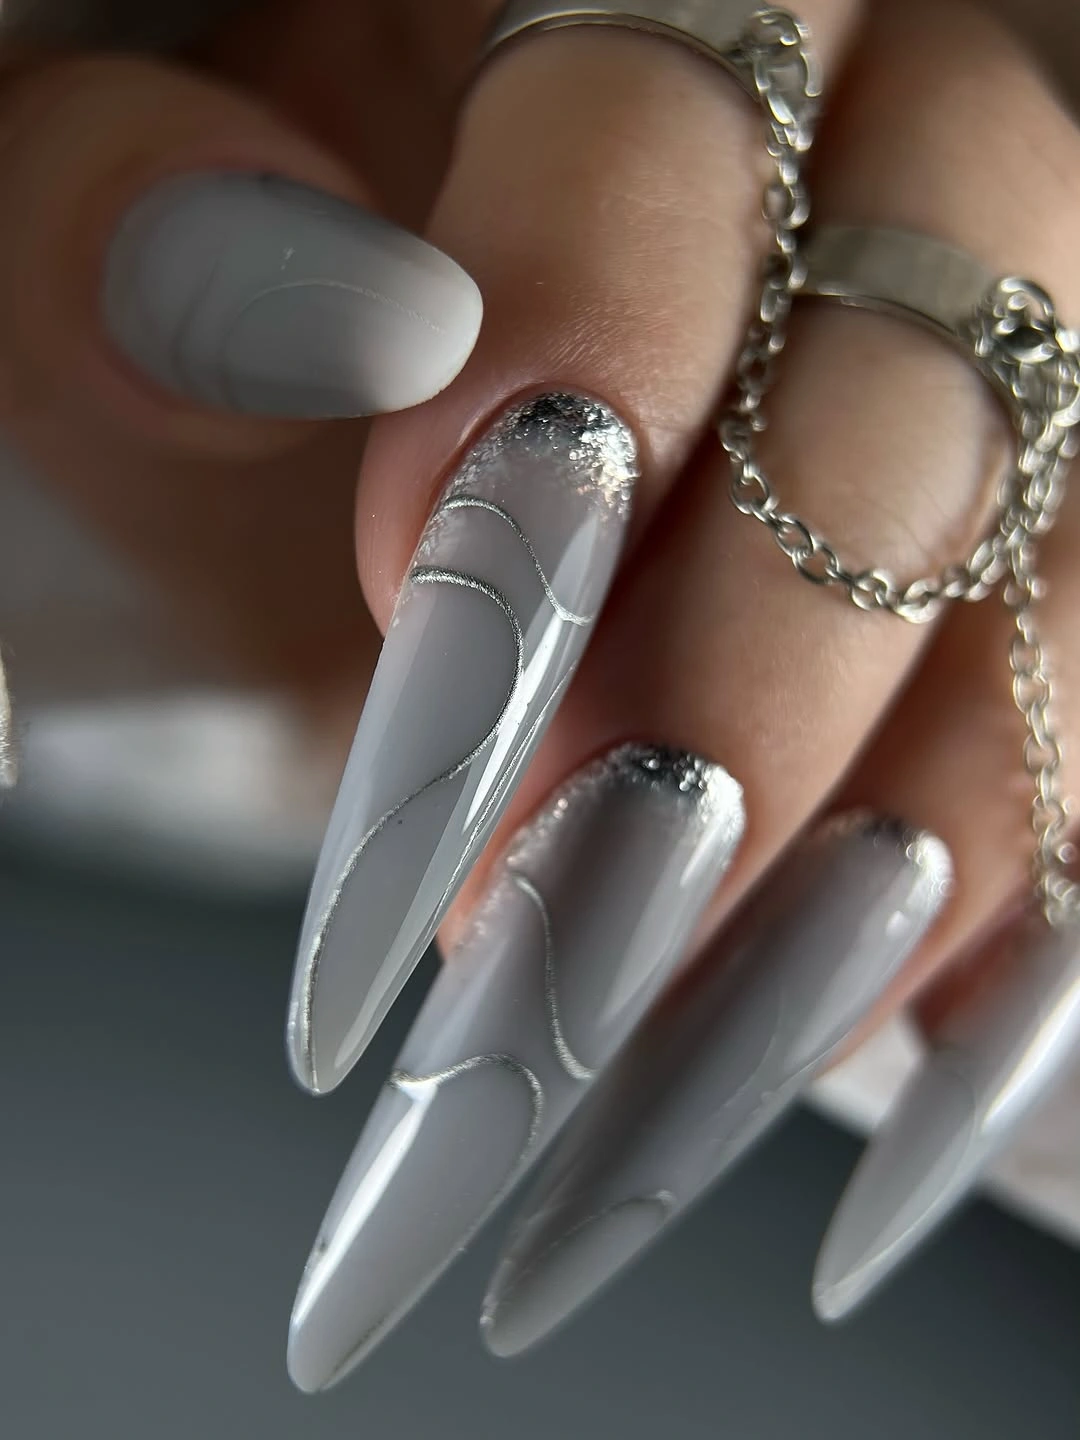
I would start with a cool gray gel polish, a sheer milky base, and a fine silver metallic gel for the curved artwork. Something like OPI Suzi Talks With Her Hands can inspire the gray family, while a silver chrome powder can intensify the reflective sections. For the sparkling cuticle effect, I would use fine silver glitter or chrome pigment rather than chunky glitter, which keeps the finish refined.
The elongated stiletto shape needs to be filed carefully so both sides remain balanced. I would apply the gray base first, then map the curved silver lines with a fine liner brush before curing. If the lines need correcting, I would clean the edges before curing rather than trying to fix them afterward. A glossy top coat brings out the depth of the gray and makes those silver curves catch the light beautifully.
White Lace And Crystal Glamour
I would choose this manicure when I want my fall nails to feel elegant and a little extravagant. The long coffin extensions combine a soft white base with raised lace-like patterns, delicate geometric details, and scattered silver crystals. On fair skin, the monochromatic palette looks especially clean and luminous, while the sparkle keeps the design from feeling too bridal.
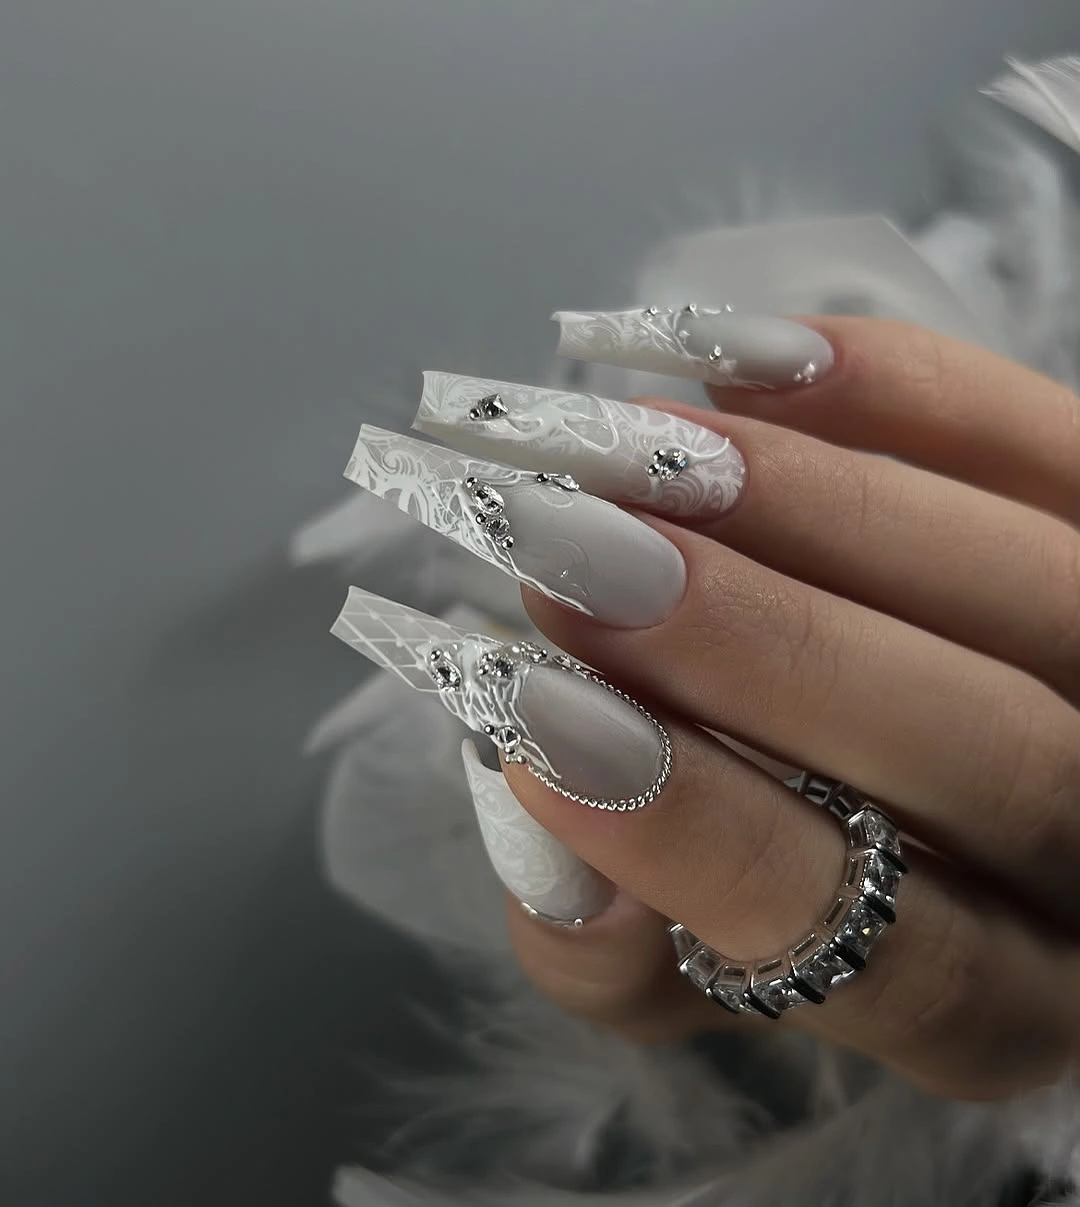
I would use a milky white builder gel, white 3D gel or raised nail-art gel, silver rhinestones, tiny metallic beads, and a glossy top coat. The relief details are the real star here, so I would keep the base smooth and slightly translucent rather than using a heavy opaque white.
I would shape the extensions into a long coffin silhouette, apply the milky base, and cure it before adding the raised lace patterns. Then I would place the crystals and silver accents while the adhesive gel is still workable. A final layer of top coat around, rather than directly over, the larger embellishments helps preserve their shine.
For me, this is a beautiful choice for a fall wedding, holiday dinner, or any evening when a simple sweater needs something extra. The white and silver combination feels crisp against fair skin, almost like winter arriving early.
Soft Pink Floral Short Nails
Short nails can still have plenty of personality, and I love the softness of this design. A pale pink base covers the rounded-square nails, while translucent white flowers bloom across the surface with a subtle shimmer. Tiny iridescent gems sit near the floral details, adding flashes of blue, pink, and violet without overwhelming the delicate nail art.
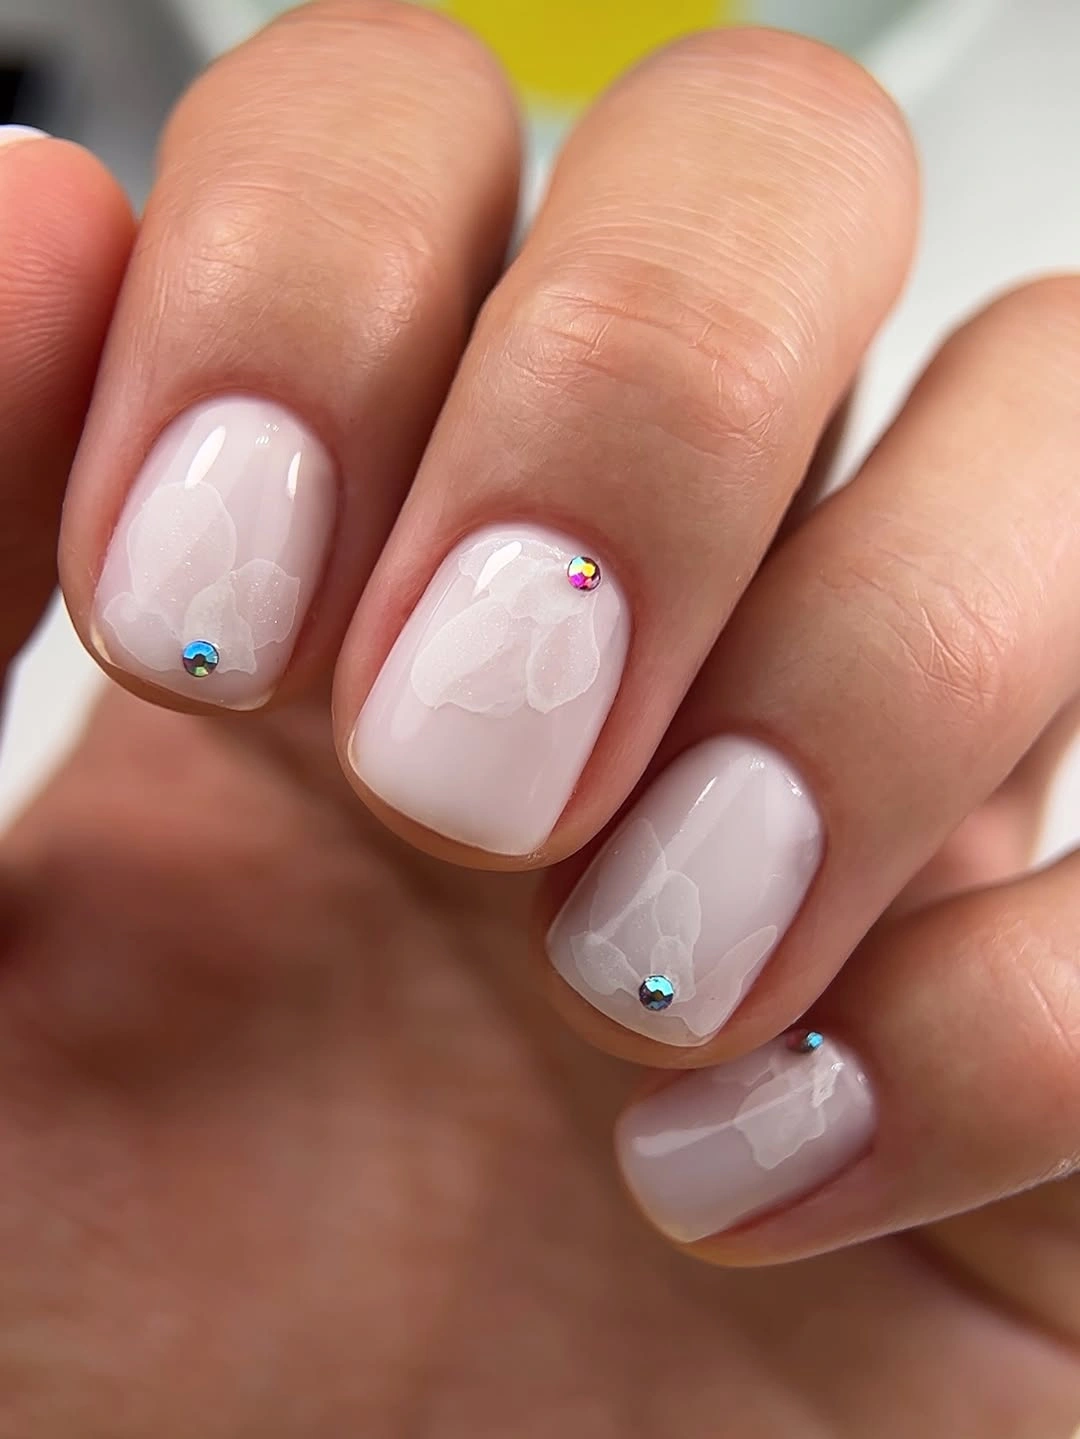
For this look, I would reach for a sheer blush polish, white gel paint, a fine detail brush, and a few tiny iridescent rhinestones. A shade like OPI Bubble Bath would give me the soft color for fair skin I want, especially when paired with a glossy finish.
I would apply two thin layers of pink, then build the flowers with overlapping white petals. Once cured, I would secure one small crystal near each floral cluster and finish with top coat. Keeping the flowers slightly translucent makes the manicure look airy rather than overly decorated.
This is easily one of my favorite short fall nails ideas because it feels feminine without being fussy. I can see it working beautifully with cream knits, soft gray layers, and delicate gold jewelry.
Powder Blue And White French Tips
Fall does not mean I have to abandon cool pastels. These long square extensions pair a glossy powder-blue base with crisp white French tips, creating a surprisingly fresh contrast. Against fair skin, the icy blue looks delicate and bright, while the white tips make the long shape feel especially polished.
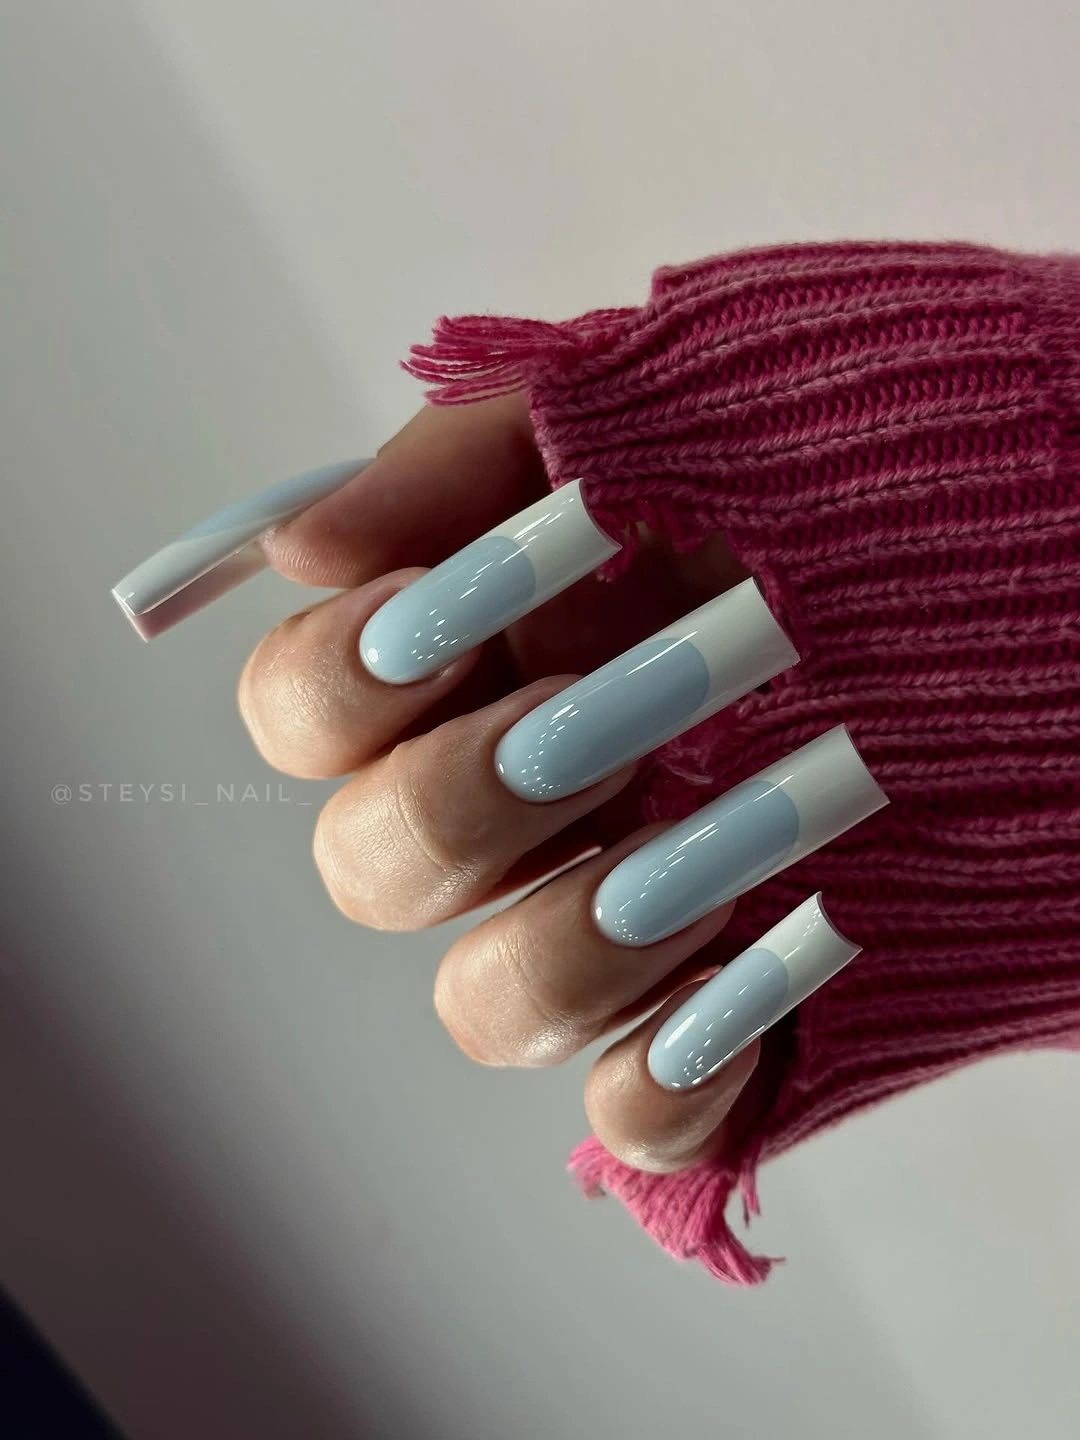
I would use a pale blue gel polish, a clean white for the tips, and a high-shine top coat. The blue should stay soft rather than leaning turquoise because that keeps the color for fair skin elegant and wearable during the cooler months.
After creating the square extensions, I would apply the blue base evenly and cure it. Then I would paint the white tips with a steady liner brush, keeping the French line fairly straight to complement the squared shape. A glossy top coat finishes the manicure with that glass-like shine.
I like this unexpected fall option with a chunky berry-colored sweater, exactly as the styling suggests. It feels cool, clean, and slightly nostalgic – proof that chic fall nails do not always need brown, burgundy, or orange.
Milky Nude With Bright Orange Tips
Here is where fall gets playful. The nails have a soft milky nude base with vivid orange French tips, and that sharp color contrast immediately gives the manicure more energy. On fair skin, the warm orange stands out beautifully without covering the entire nail, making it a clever way to wear a bold fall nail color in a more refined format.
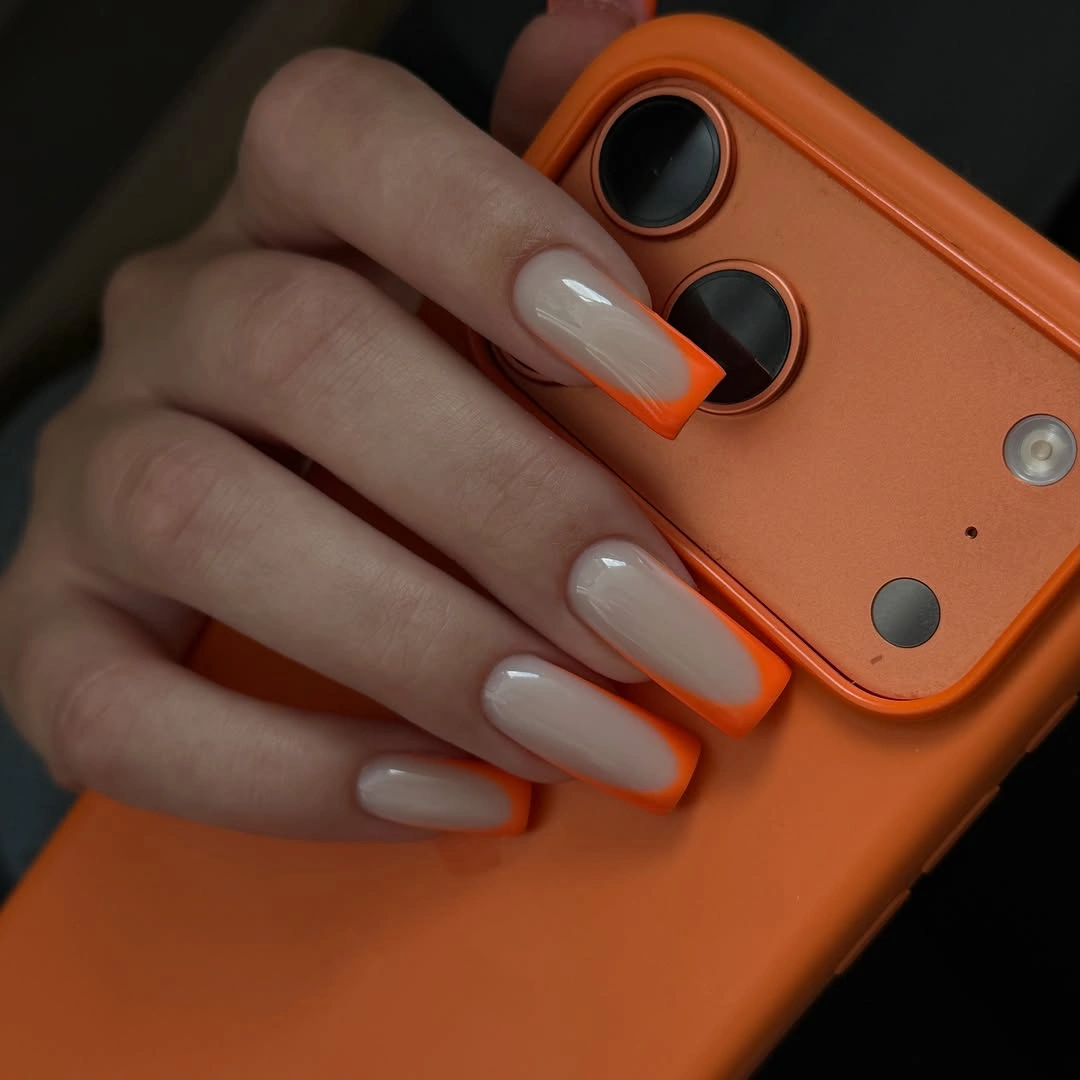
I would use a translucent nude or milky pink base, a saturated orange gel, and a glossy top coat. OPI Funny Bunny layered with a sheer nude can create the soft background, while a bright pumpkin-orange shade gives the tips that unmistakable autumn spark.
I would shape the nails into a long tapered square, smooth the base, and carefully paint the orange tips with a thin liner brush. Two slim coats of orange give better saturation than one thick layer. I would finish with a glassy top coat to make the color look almost lacquered.
This is the manicure I would pick when neutral fall outfits start feeling a little too predictable. It looks especially fun with an orange handbag, warm-toned knitwear, or even a simple black outfit where the tips become the whole point.
Classic Red Fall Polish
Sometimes I want absolutely no nail art at all, just a perfect red. This rich, glossy manicure uses a clean medium-length square shape and a saturated classic red that looks instantly sophisticated against fair skin. There are no embellishments to distract from the color, which is exactly why it feels so timeless.
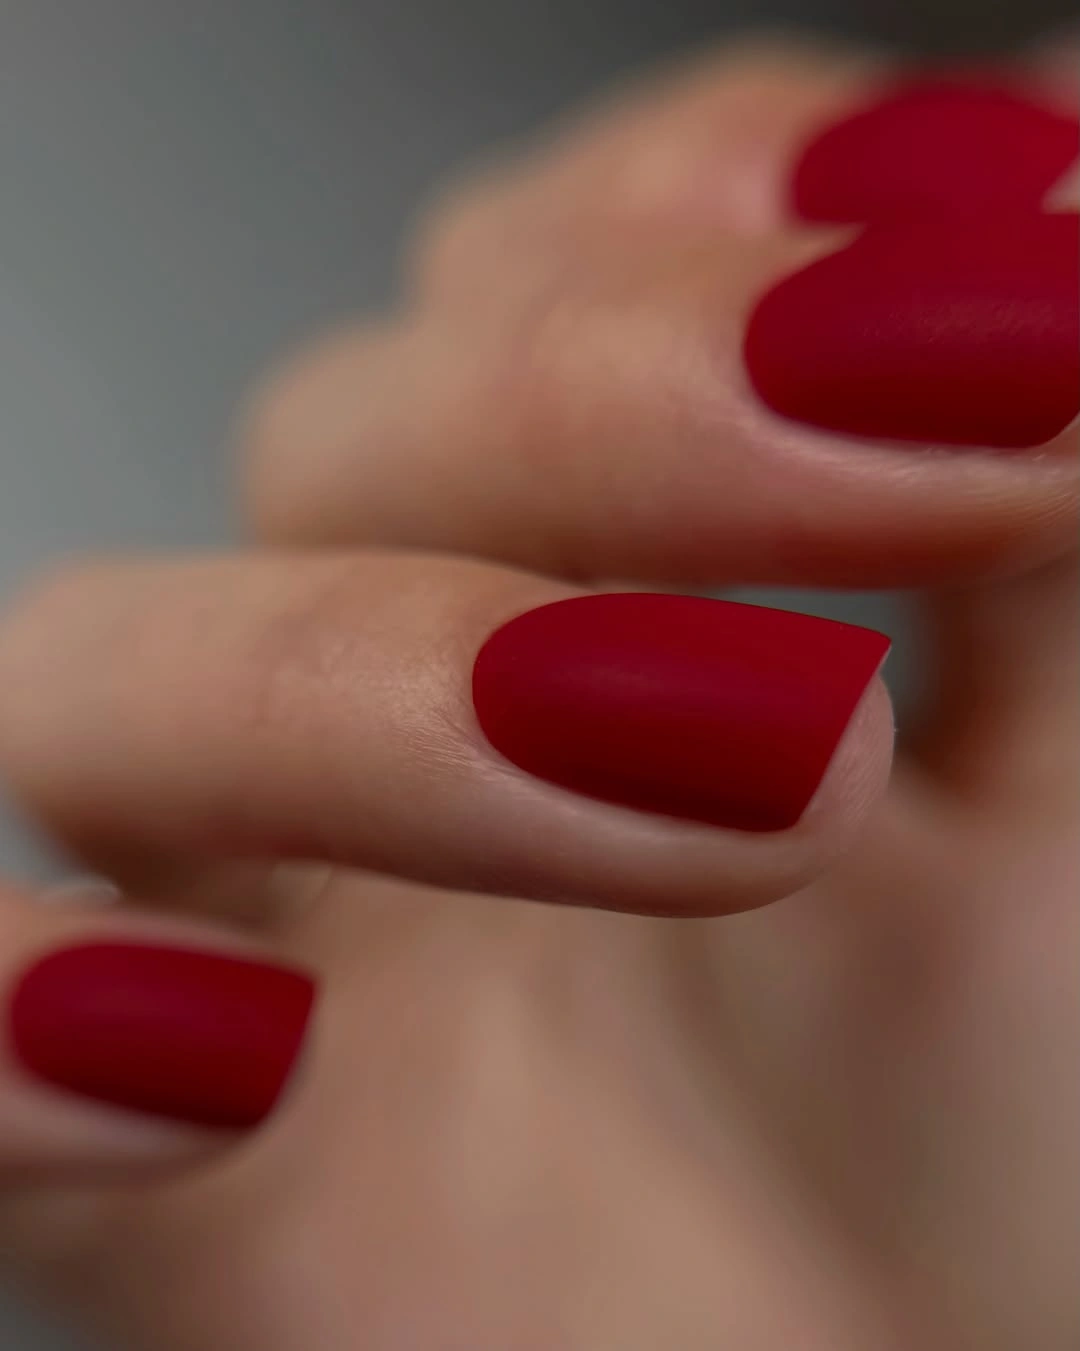
I would choose a true cool or neutral red rather than an orange-red if I wanted this exact elegant effect. A shade like OPI Big Apple Red gives that polished finish, while a ridge-filling base coat can help the color look exceptionally smooth on natural nails.
I would keep the nails neatly shaped, apply a thin base coat, and follow with two even layers of red polish. I always let each layer settle before adding the next because red shows every little bump. A high-gloss top coat is the final step that makes the manicure look salon-finished.
For me, classic red is the ultimate best fall nail color for fair skin when I want something dependable. Add a camel coat, dark denim, or a red lip, and suddenly the simplest manicure in the world feels incredibly chic.
Smoky Dalmatian Nails With a Fall Edge
I have always liked a manicure that looks playful at first glance but still feels polished enough for an everyday fall wardrobe. This smoky gray design does exactly that. The base has a cool, almost misty charcoal-to-silver effect that sits beautifully against fair skin, while the tiny black spots and soft heart-like shapes give the nails a dalmatian-inspired finish. The long sculpted shape adds drama, but the muted palette keeps it from feeling too loud. For me, this is one of those chic fall nails for fair skin tone ideas that works especially well when the weather turns crisp and black coats, gray knits, and silver jewelry start coming back into rotation.
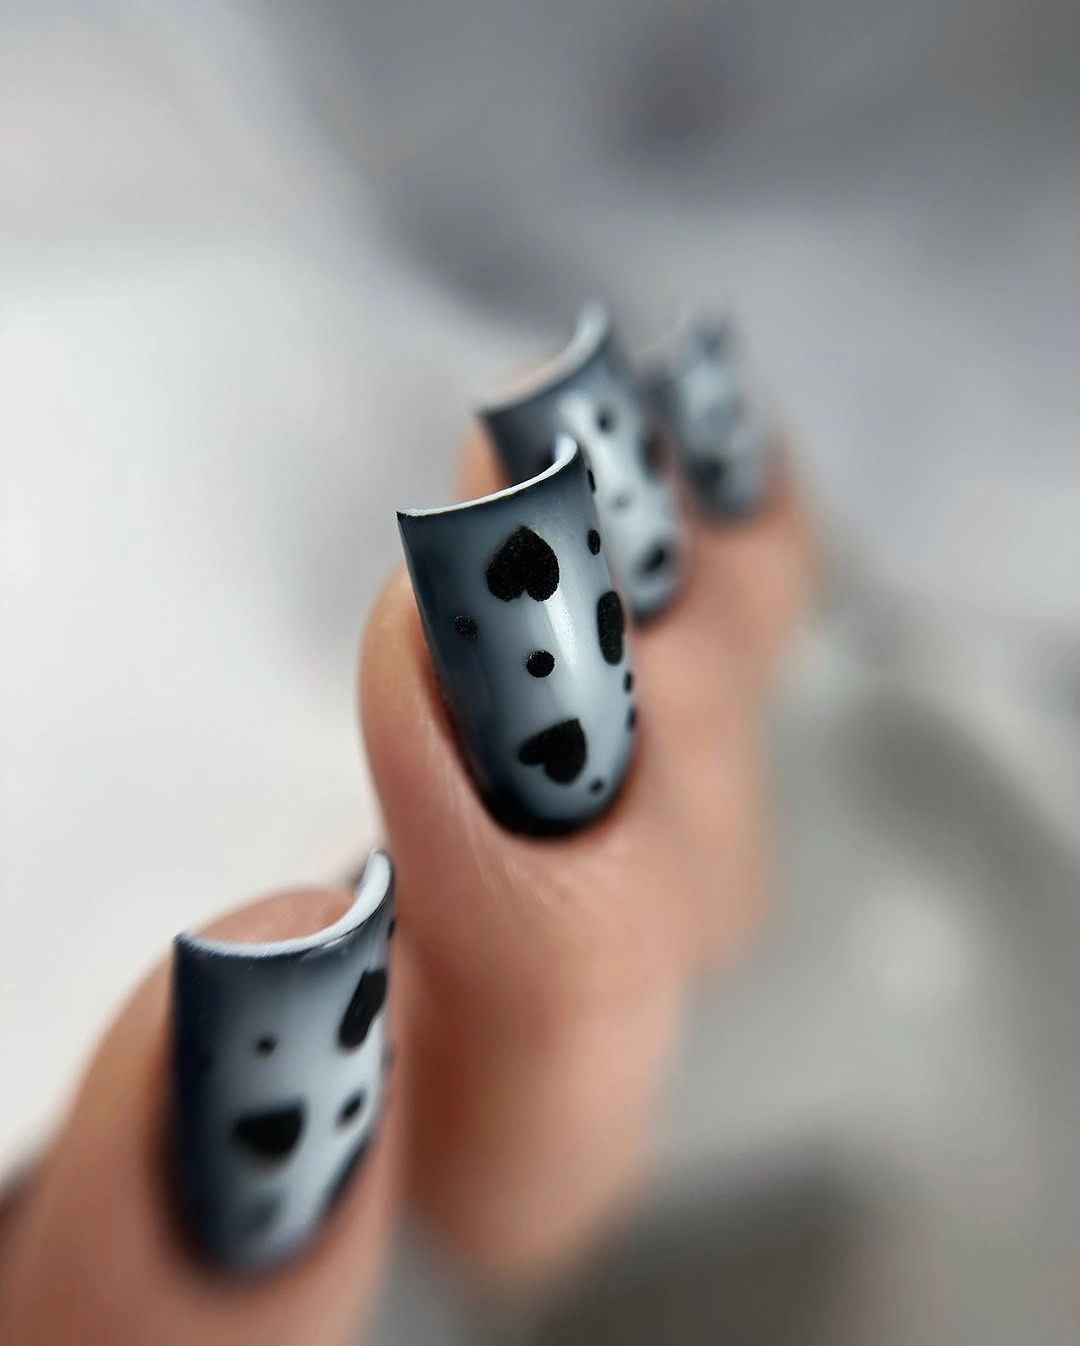
To recreate the look, I would start with a cool gray gel polish rather than a warm beige, because the cooler undertone makes very fair skin look clean and luminous. A shade such as OPI Suzi Talks With Her Hands or a comparable soft slate gray would give the right starting point, while a true black art gel can create the spots. I would also keep a high-shine top coat nearby – the glossy finish is important because it makes the gray base look almost metallic without actually requiring chrome powder.
At home, I would shape the nails into a long almond or soft stiletto, then apply the gray base in two thin layers. Once cured, I would use a fine nail-art brush or dotting tool to place irregular black dots, deliberately varying their sizes. The charm is in the imperfect spacing, so I would resist the temptation to make every mark symmetrical. A final glossy top coat pulls everything together and gives those little black details that wet, inky quality.
Silver Mist Chrome for a Cool Fall Glow
Sometimes I want my nails to look expensive without being covered in decoration, and this silvery manicure is exactly that mood. The nails are elongated into a sharp almond shape, with a translucent gray-white base that gives the manicure an almost frosted appearance. A narrow silver line runs vertically through each nail, creating a sleek architectural detail rather than a traditional glitter accent. On fair skin, the cool gray and reflective silver create a soft monochromatic effect that feels particularly elegant once fall light starts becoming less golden and more muted.
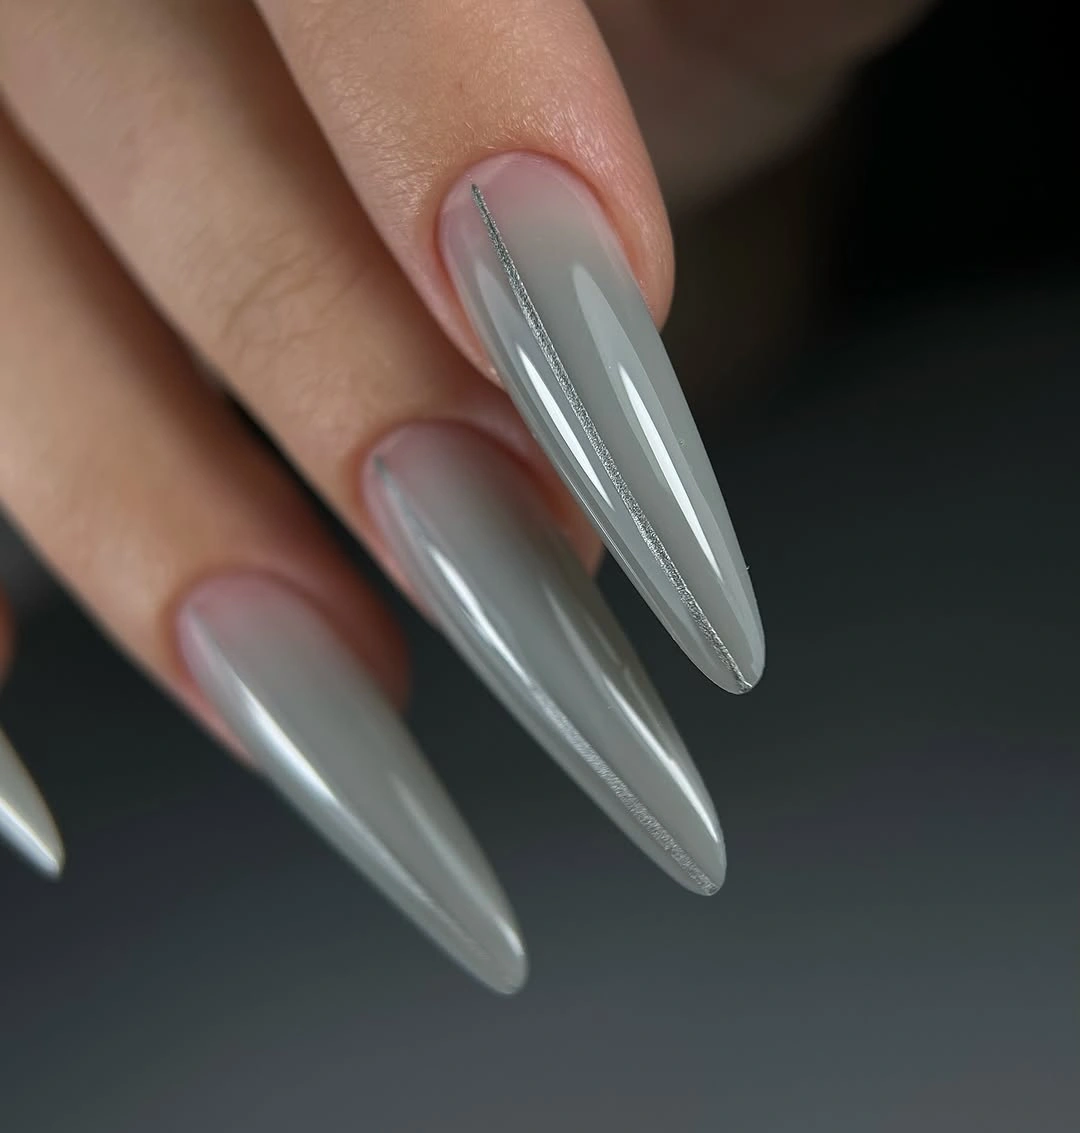
For this kind of design, I would reach for a sheer milky gray gel, a fine silver liner gel, and a glossy no-wipe top coat. If I wanted more reflection, I could add a very fine silver chrome powder over the appropriate layer, but I would keep it delicate. The point is not to turn the nails into mirrors. It is that subtle metallic flash when the hand moves – that is where the magic lives.
I would begin by giving the nails a consistent almond shape, because the elongated silhouette makes the vertical detailing look much cleaner. After the translucent base is cured, I would draw one extremely thin silver line from near the cuticle toward the tip. I would not worry if the line is not mathematically perfect; a slightly organic line can actually look more modern. After curing, I would seal everything with top coat and cap the free edge carefully.
This is probably my favorite kind of fall manicure for someone who lives in neutrals. Think oatmeal knitwear, black trousers, gray tailoring, maybe a silver watch peeking out from a sleeve. Nothing is shouting for attention, yet the nails still have a point of view. And if I had a dinner reservation after work? Even better. The chrome catches candlelight beautifully.
Red Folk Art on a Soft Nude Base
Fall is the season when I start craving deeper reds, but I do not always want a solid burgundy manicure. This design gives that classic autumn color a much more artistic treatment. The nails use a soft milky nude base with elongated almond tips, then layer delicate red botanical motifs, tiny flowers, black flourishes, hearts, and graphic folk-inspired details across the surface. The combination of red, black, and creamy white feels wonderfully seasonal without becoming overly literal. On fair skin, the pale base keeps the manicure fresh while the richer artwork adds warmth and contrast.
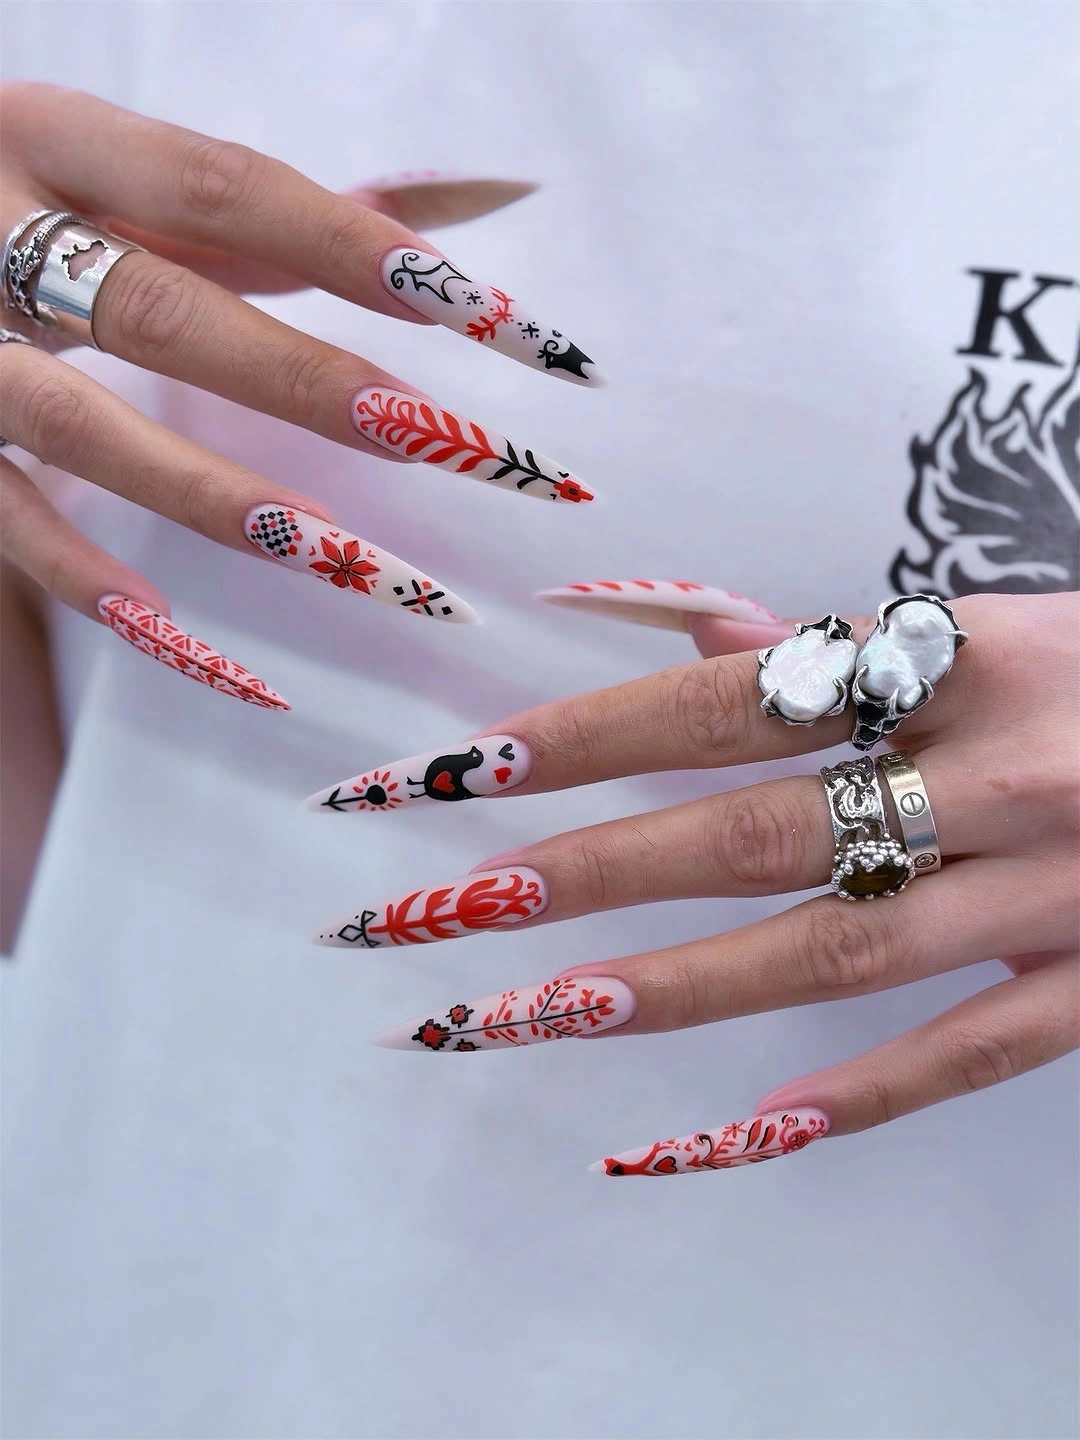
I would use a sheer milky-white or pale pink gel as the background, followed by a true brick red, muted scarlet, and black nail-art gel. A tiny detailing brush is essential here, especially for the fine stems and curved lines. I might also use a dotting tool for the small flowers and decorative points. The colors do not need to match one particular polish collection – what matters is choosing a red with enough depth to stand out against the light base without looking neon.
I would keep the background very sheer and let it cure completely before beginning the artwork. Then I would work nail by nail, alternating botanical stems with flowers and small graphic motifs so the design feels collected rather than copied. For anyone doing this at home, I would start with the larger red shapes and add the black details last. That little change makes the process much less intimidating. Finish with a generous layer of glossy top coat to smooth the artwork and protect the finer lines.
Minimal Botanical Leaves in Black and White
There is something quietly beautiful about botanical nail art when it is stripped down to almost nothing. Here, a clean white base creates the canvas, while each short square nail carries a single dark botanical shape with a thin stem and soft gray shading. The result feels graphic but surprisingly delicate. I especially like this approach for fair skin because the crisp white background creates definition around the fingertips, while the charcoal-gray details keep the contrast sophisticated rather than harsh.
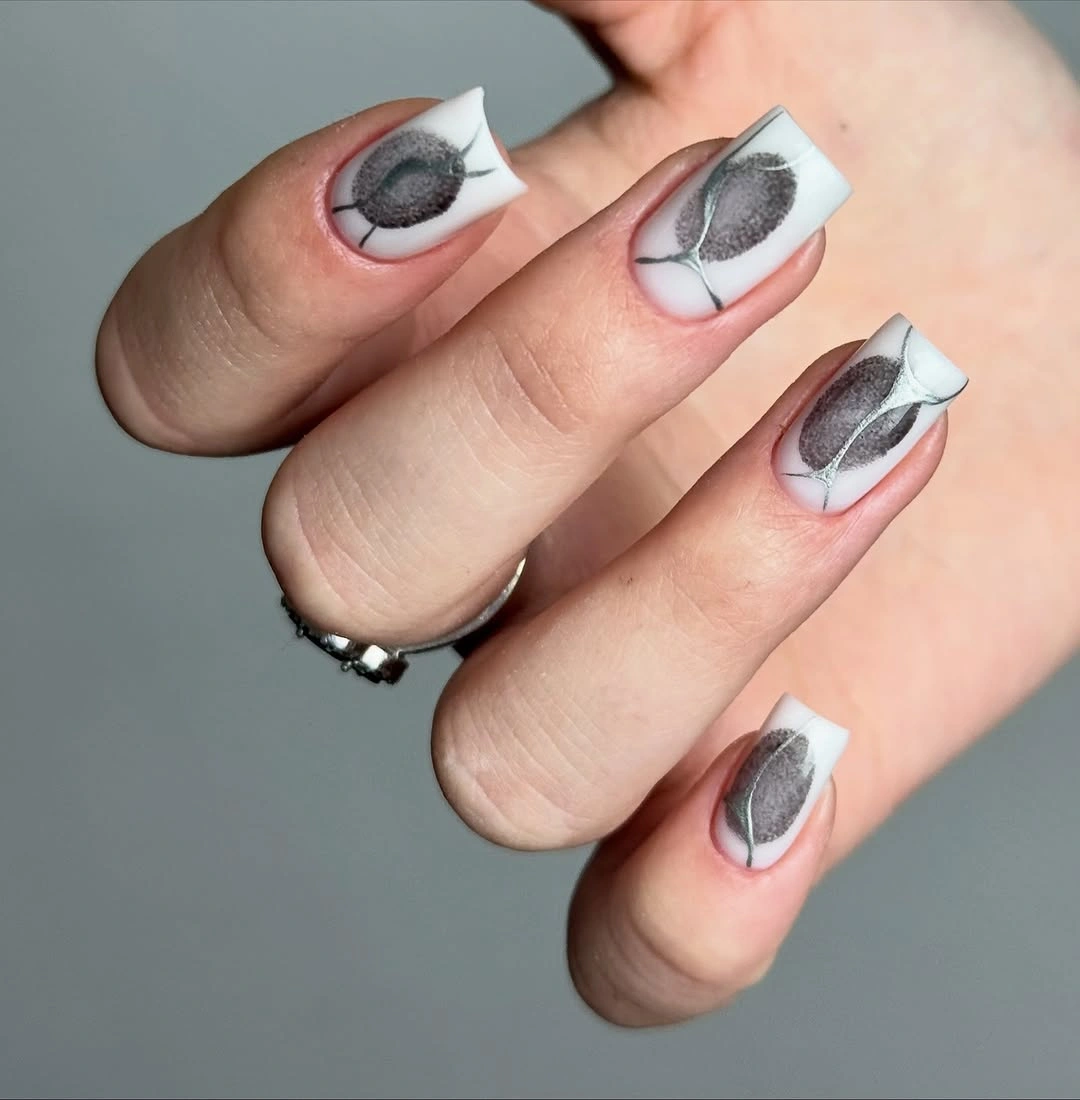
The material list is refreshingly short. I would choose an opaque soft white gel, a charcoal or black art gel, a very fine liner brush, and a sheer gray polish or diluted black gel for the soft interior shading. A glossy finish would preserve the crisp quality, although a satin top coat could make the design feel even more editorial. The beauty of this manicure is that it does not require a cabinet full of colors.
For the cleanest result, I would shape the nails into a short square or squoval and apply two thin coats of white. Once cured, I would sketch the stem first, then add the leaf shape and build the gray shading gradually. I would keep each motif slightly different rather than trying to duplicate one exact leaf across every nail. After curing the artwork, I would seal it carefully, making sure the free edge is covered.
Sheer Nude Nails With Tiny Black Dots
A nude manicure can be anything but boring when the proportions are right. This version starts with a translucent pink-beige base that allows the natural nail to remain visible, then adds tiny black dots in an irregular pattern across long square-shaped extensions. The result is minimal, graphic, and incredibly easy to style. For fair skin, I would look for a nude with a neutral or slightly pink undertone so the nail does not disappear into the skin. The scattered black dots then create just enough contrast to make the manicure noticeable.
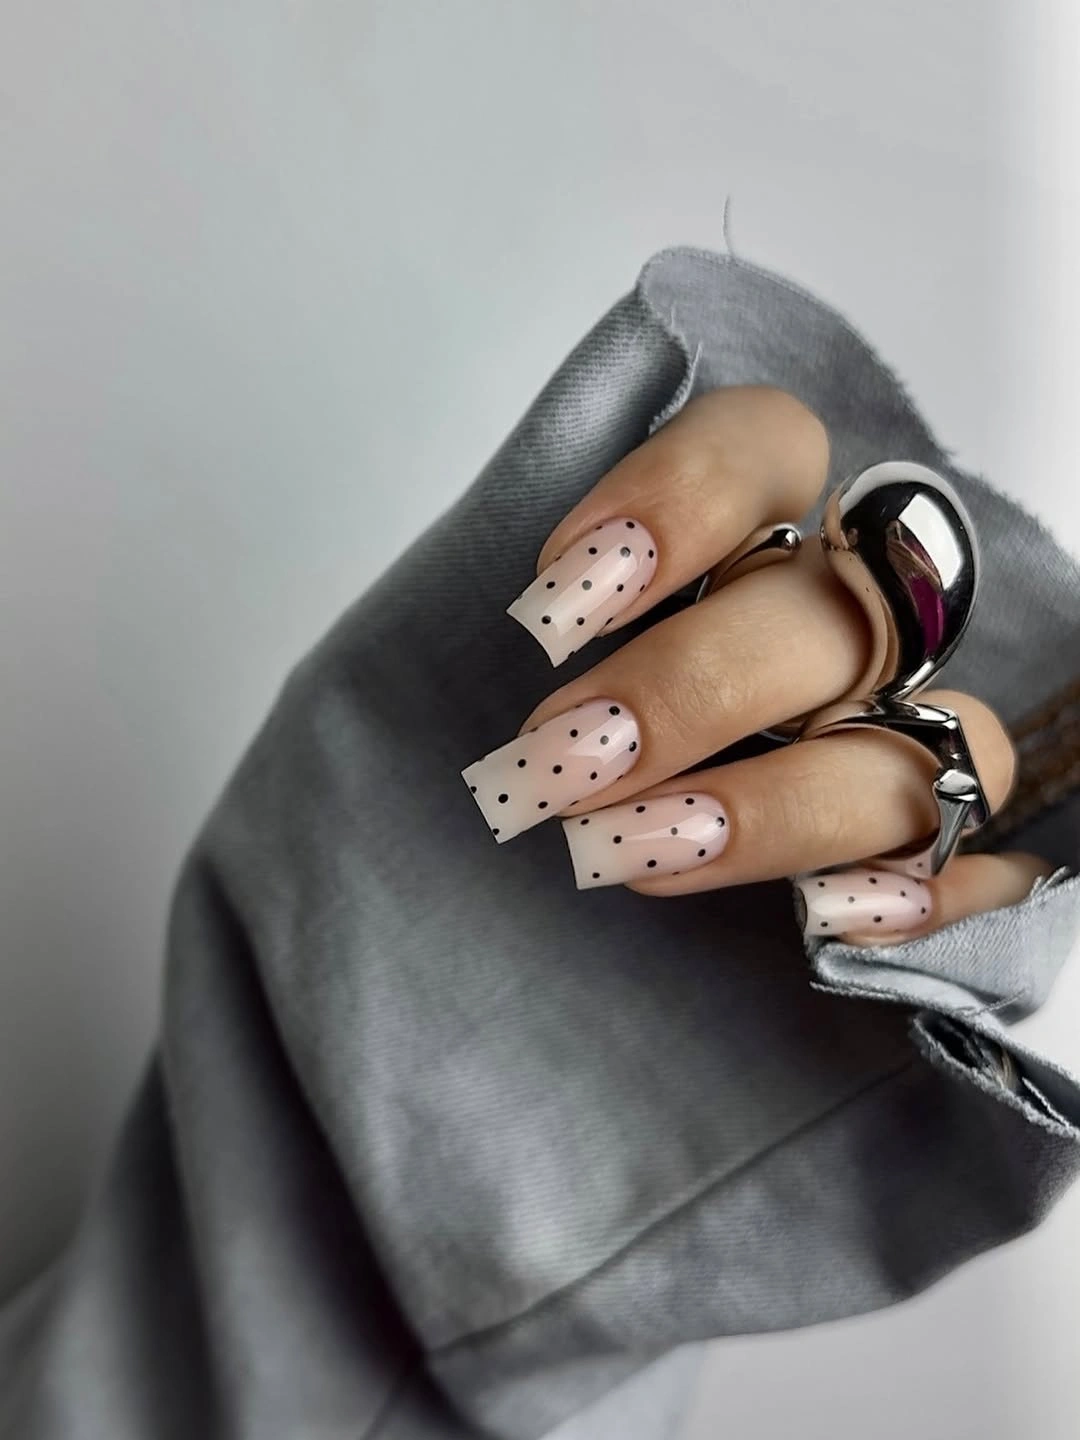
I would use a translucent nude gel, preferably something close to a natural pink-beige, plus a highly pigmented black gel for the dots. A small dotting tool is the easiest option, although the rounded end of a fine nail-art brush can work too. I would finish with a high-gloss top coat because the contrast between the glassy nude base and the tiny black marks is what gives the design its polished look.
Black Floral Nails With a Romantic Fall Mood
I love how a black base can make delicate flowers feel completely different. These medium-length square nails use glossy black polish as a dramatic backdrop for tiny red, pink, white, yellow, and mint-green flowers. The contrast is striking on fair skin, while the floral details keep the manicure soft rather than severe. For fall, this is such an easy way to bring a little garden romance into a darker wardrobe.
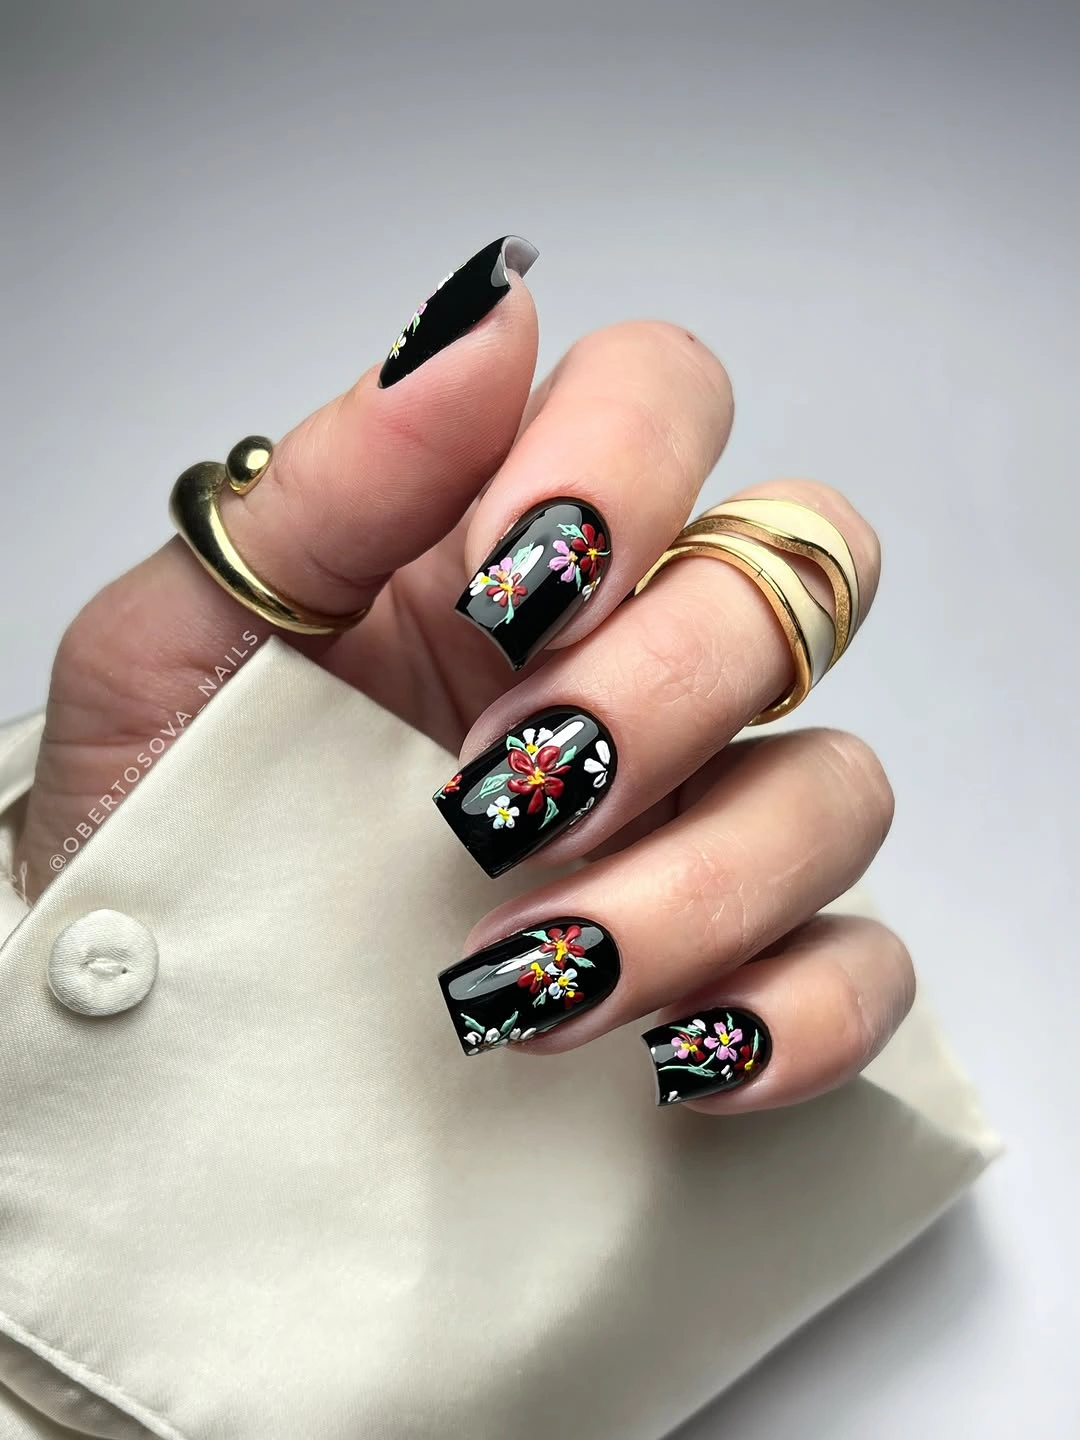
I would use a highly pigmented black gel, several fine-art colors, and a very thin liner brush. A glossy top coat is essential here because the shine makes the black background look richer and helps the colorful flowers pop. I would keep the floral palette slightly muted for fall rather than choosing very bright summer shades.
At home, I would apply two thin coats of black and cure each one before adding the flowers. I would build each blossom from small petals, then add tiny yellow centers and fine green stems. There is no need for every nail to match perfectly – a little variation makes the manicure feel hand-painted and personal.
This is the kind of design I would save for October when I am wearing black coats, burgundy sweaters, and gold jewelry on repeat. The flowers add just enough softness to make the dark manicure feel special.
Marble Eyes and Dramatic Almond Extensions
This manicure takes fall nail art into a much moodier direction. Long almond extensions are covered in a creamy ivory base with smoky gray marble veining, while several nails feature stylized black eye motifs. The combination feels mysterious, artistic, and slightly gothic without relying on an overly dark color palette. Against fair skin, the milky base keeps the long shape looking elegant.
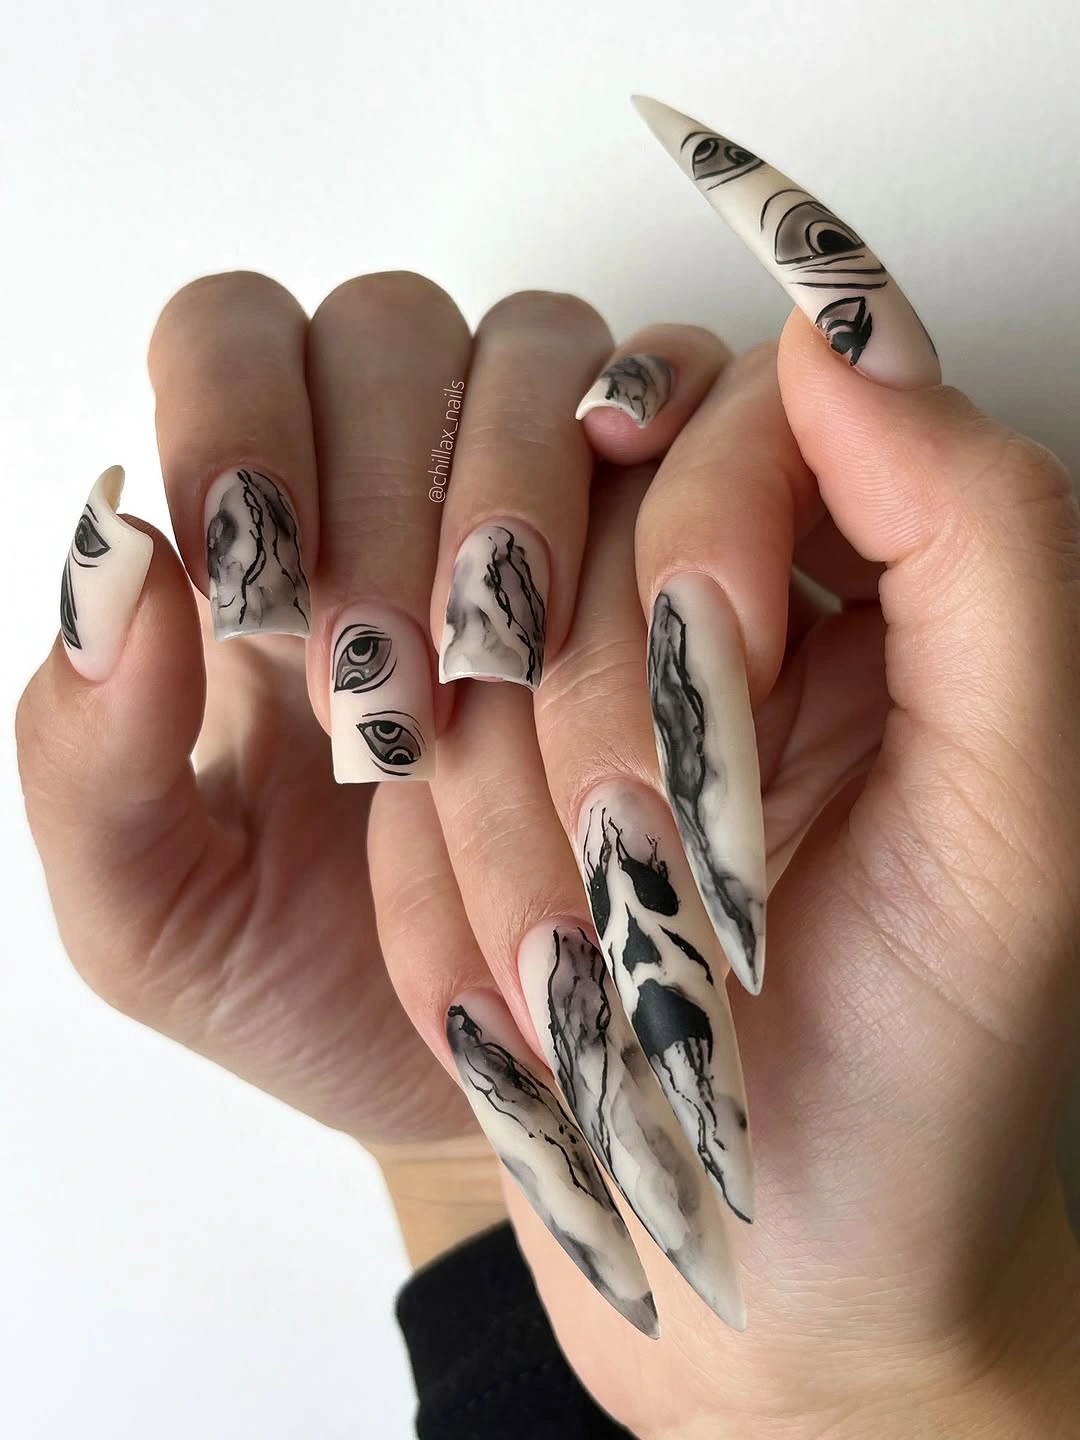
I would reach for an ivory gel, translucent gray, black art gel, and a fine liner brush. A blooming gel can help create softer marble movement, while a detail brush is better for the precise eye designs. A glossy finish would emphasize the depth of the marble, although satin could make the look even more dramatic.
I would first create the almond extensions and smooth the surface carefully. After applying the ivory base, I would add diluted gray lines and gently blur some of them before curing. The eyes come last, using thin curved strokes and small areas of black shading. I would keep the artwork concentrated on selected nails so the manicure does not become visually overwhelming.
Personally, I see this as a perfect late-fall design. It has that mysterious November energy – dark lipstick, oversized tailoring, and a little bit of attitude. If ordinary marble feels too familiar, the eye details give it a completely new personality.
Crystal White Nails With Silver and Gold Sparkle
For anyone who thinks fair skin cannot handle a white manicure, this is the look I would show them. Long pointed nails combine a milky white base with transparent glitter sections, silver particles, rhinestones, and tiny touches of gold. The result is glamorous without relying on a single strong color. It feels almost like frost caught under glass, which makes it especially beautiful as fall moves toward the holiday season.
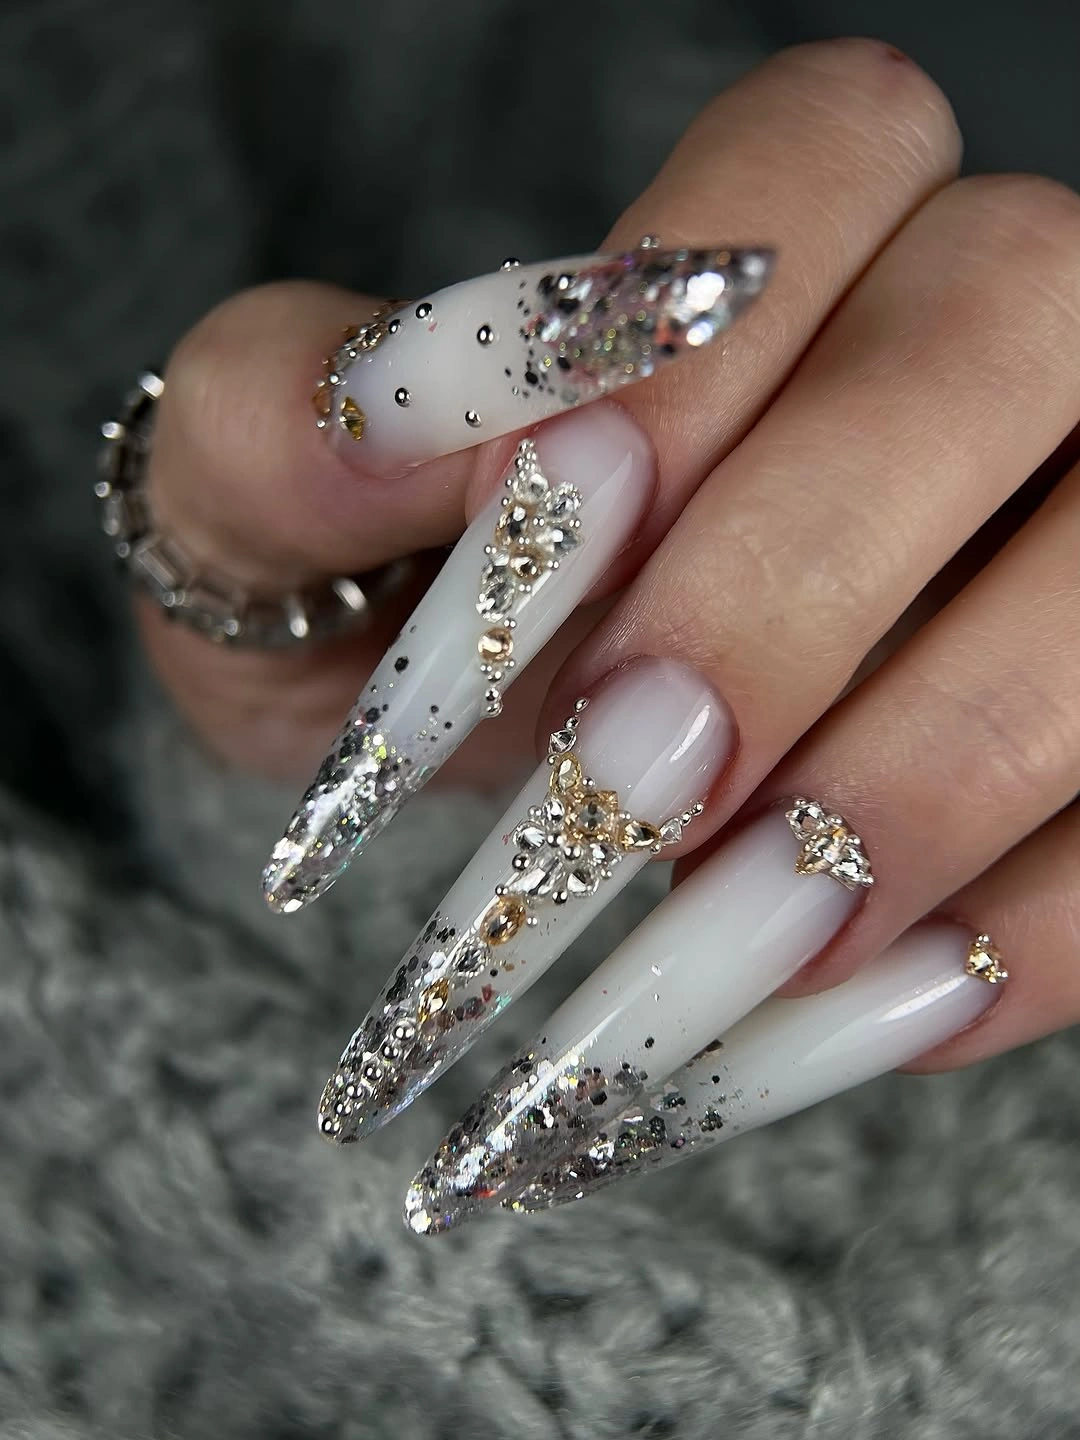
For this design, I would use a sheer white or milky gel, silver glitter, fine reflective flakes, crystal rhinestones, and a small amount of gold metallic decoration. Nail glue or a suitable gem gel is useful for securing larger embellishments. I would finish with top coat around the decorations rather than flooding over substantial stones.
I would build the white base first, then create irregular glitter sections toward the tips and sides. After curing, I would place rhinestones in small clusters and add a few metallic accents for warmth. The trick is restraint – the sparkle should look layered, not randomly scattered.
I would choose this manicure for a fall wedding, a party, or simply that first evening when the season starts feeling festive. It is definitely not quiet, but on fair skin the white-on-white effect keeps it surprisingly sophisticated.
Soft Blue and Chrome for a Cool Fall Palette
Not every fall manicure needs brown, burgundy, or pumpkin orange. I actually love a cool palette when the weather turns crisp, and this design makes a strong case for icy blue. Short-to-medium oval nails mix powder blue, translucent pink, pearly white, silver chrome, and delicate raised details. The colors are soft enough for fair skin but still have plenty of dimension.
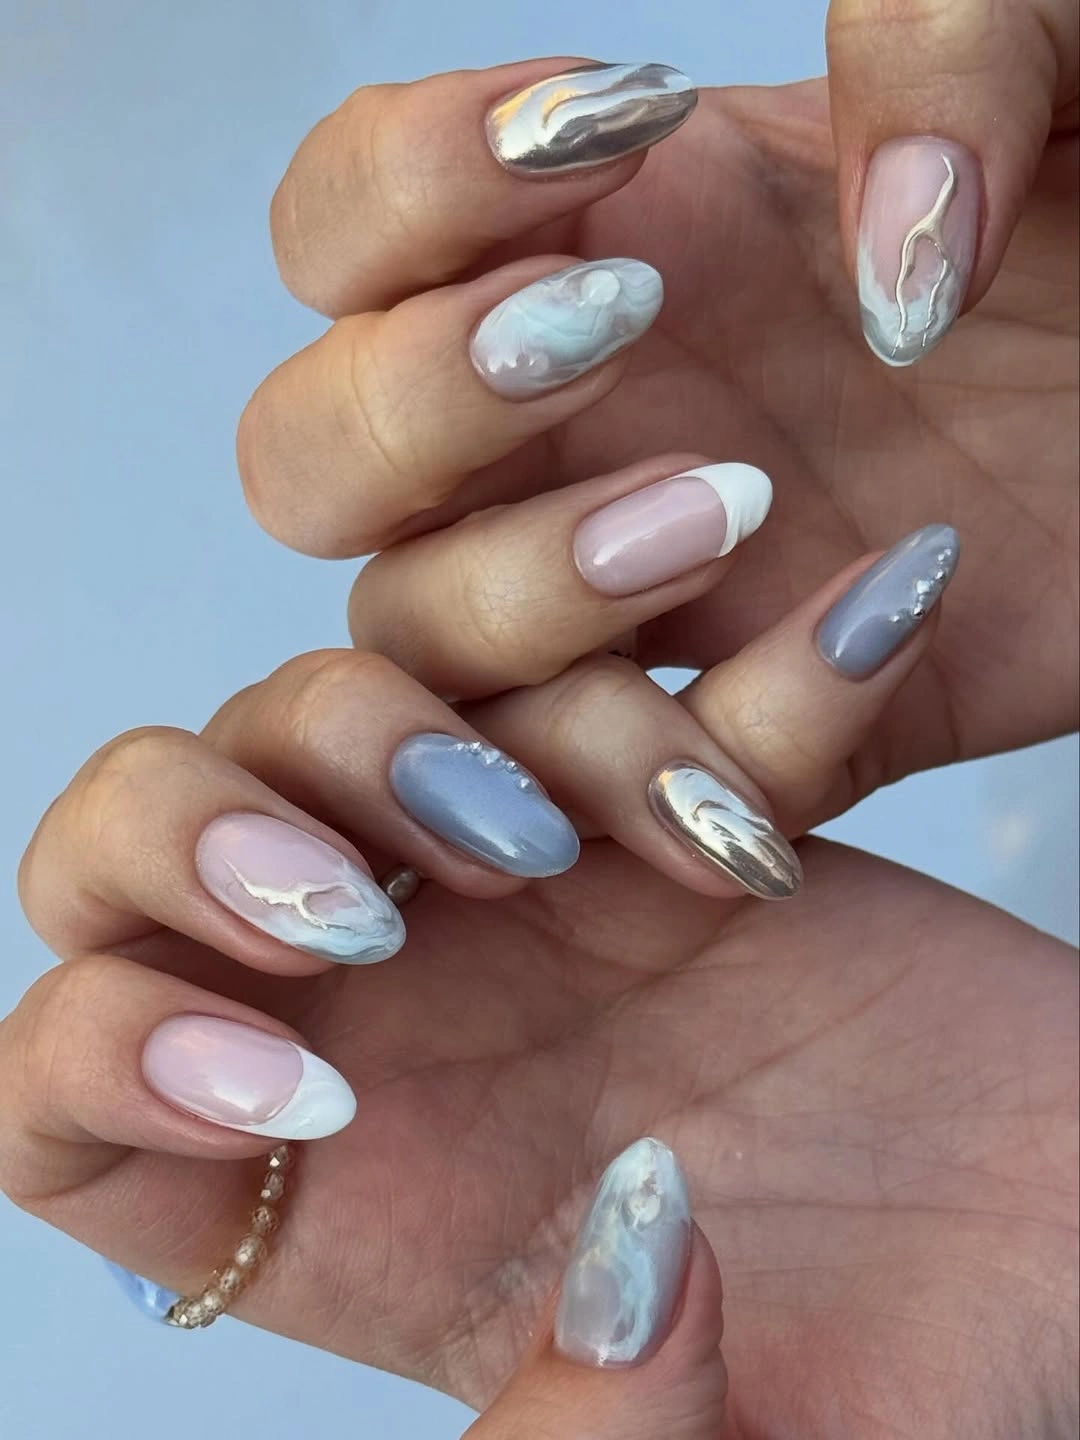
I would use a pale blue gel, sheer pink nude, milky white, silver chrome powder, and a glossy top coat. A small amount of silver embellishment can be added to one or two nails, while a raised gel detail creates the sculptural effect. Keeping the colors within the same cool family is what makes the manicure look cohesive.
I would alternate the base shades rather than applying one color to every nail. French-style white tips can go over the pink base, while chrome can be concentrated on accent nails. I would finish with a high-shine top coat and keep the embellishments delicate so the shorter shape remains practical.
This is my choice when I want fall nails that feel fresh rather than traditional. The icy blue works beautifully with gray cashmere, denim, silver jewelry, and soft white layers. A little unexpected? Exactly.