
October is when I start wanting my manicure to look a little moodier, richer, and more intentional. But does an October manicure have to mean pumpkins, ghosts, and orange polish? Not at all. This season, I would rather play with chocolate brown, smoky plum, milky pink, icy blue, and tiny black details – shades that feel autumnal without turning every fingertip into a Halloween costume. Which chic October nails design 2026 would I actually save for my next appointment? These five are the ones that caught my eye.
Dark Chocolate Waves for a Chic October Halloween Manicure
I love how this short square manicure takes a dark chocolate base and makes it feel almost graphic. The nails are kept short with softly rounded square edges, which makes the deep brown polish much easier to wear every day. Glossy white and muted gray lines curve across several nails in loose, abstract waves, while a few tiny reflective dots add just enough sparkle. One pale milky-white nail breaks up the dark palette, and that contrast is exactly what keeps the manicure from feeling heavy. To me, it has a subtle Halloween mood without relying on obvious seasonal symbols.
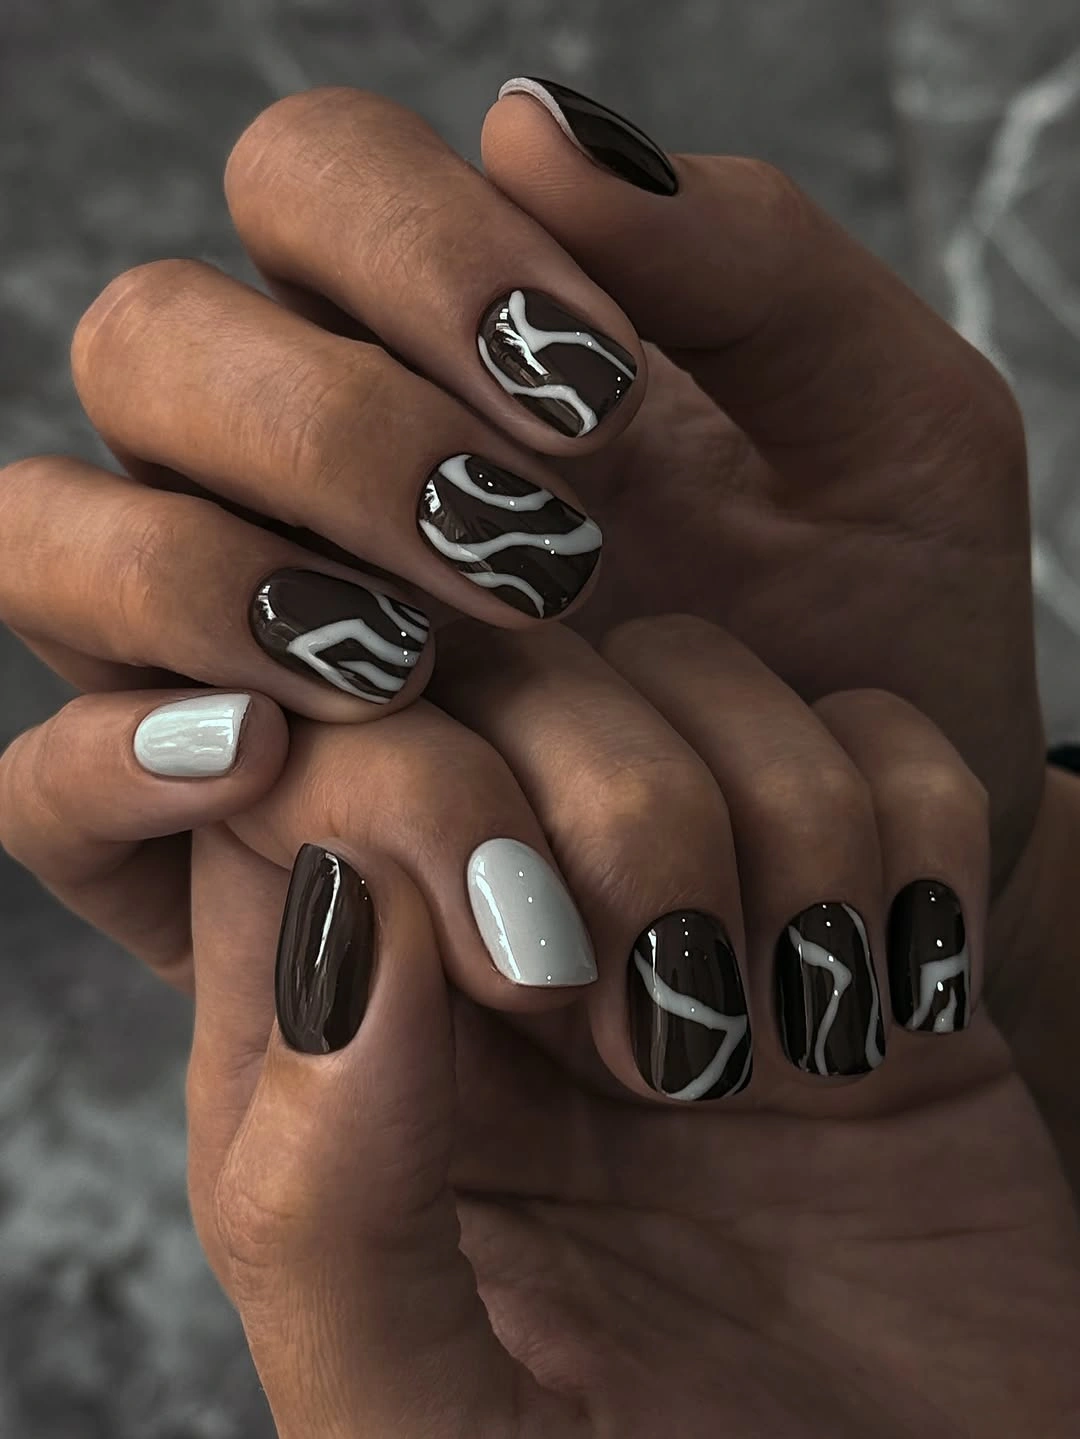
For this look, I would start with a dark chocolate gel such as OPI GelColor Chocolate Moose or a similar espresso-brown shade. I would pair it with a crisp white gel for the abstract lines, a soft gray or sheer silver for dimension, and a milky white polish for the accent nail. A very fine nail-art brush is important here because the appeal comes from those fluid, imperfect-looking curves rather than perfectly geometric stripes. I would also keep a glossy top coat nearby because the shine makes the brown look deeper and gives the white details that polished finish.
At home, I would shape the nails first and make sure every edge is smooth before applying the base coat. After two thin layers of chocolate brown, I would cure each layer and then use a fine brush to draw irregular white and gray curves, deliberately varying their thickness. I would add the tiny dots last, then seal everything with a high-shine top coat. The trick is not to overthink the lines – if every curve is identical, you lose the effortless feel that makes this easy Halloween nail idea so chic.
This is probably the design I would choose when I want my manicure to whisper October rather than shout it. I can already see it with a black blazer, brown leather bag, or oversized knit sweater. And because the nails are short, I would not hesitate to wear this one through the entire fall instead of limiting it to Halloween week.
Icy Blue Almond Nails With Silver Curved Details
I would not normally put pale blue at the top of my October manicure list, but this combination makes a surprisingly strong case for it. The long almond-shaped nails have a soft baby-blue base that looks almost frosted, while silver metallic lines sweep around the nails in loose, asymmetric curves. The design feels clean from a distance and more intricate when you look closely. I especially like the contrast between the cool blue color and the reflective silver because it gives the manicure a crisp, almost glassy quality without covering the nails in glitter.
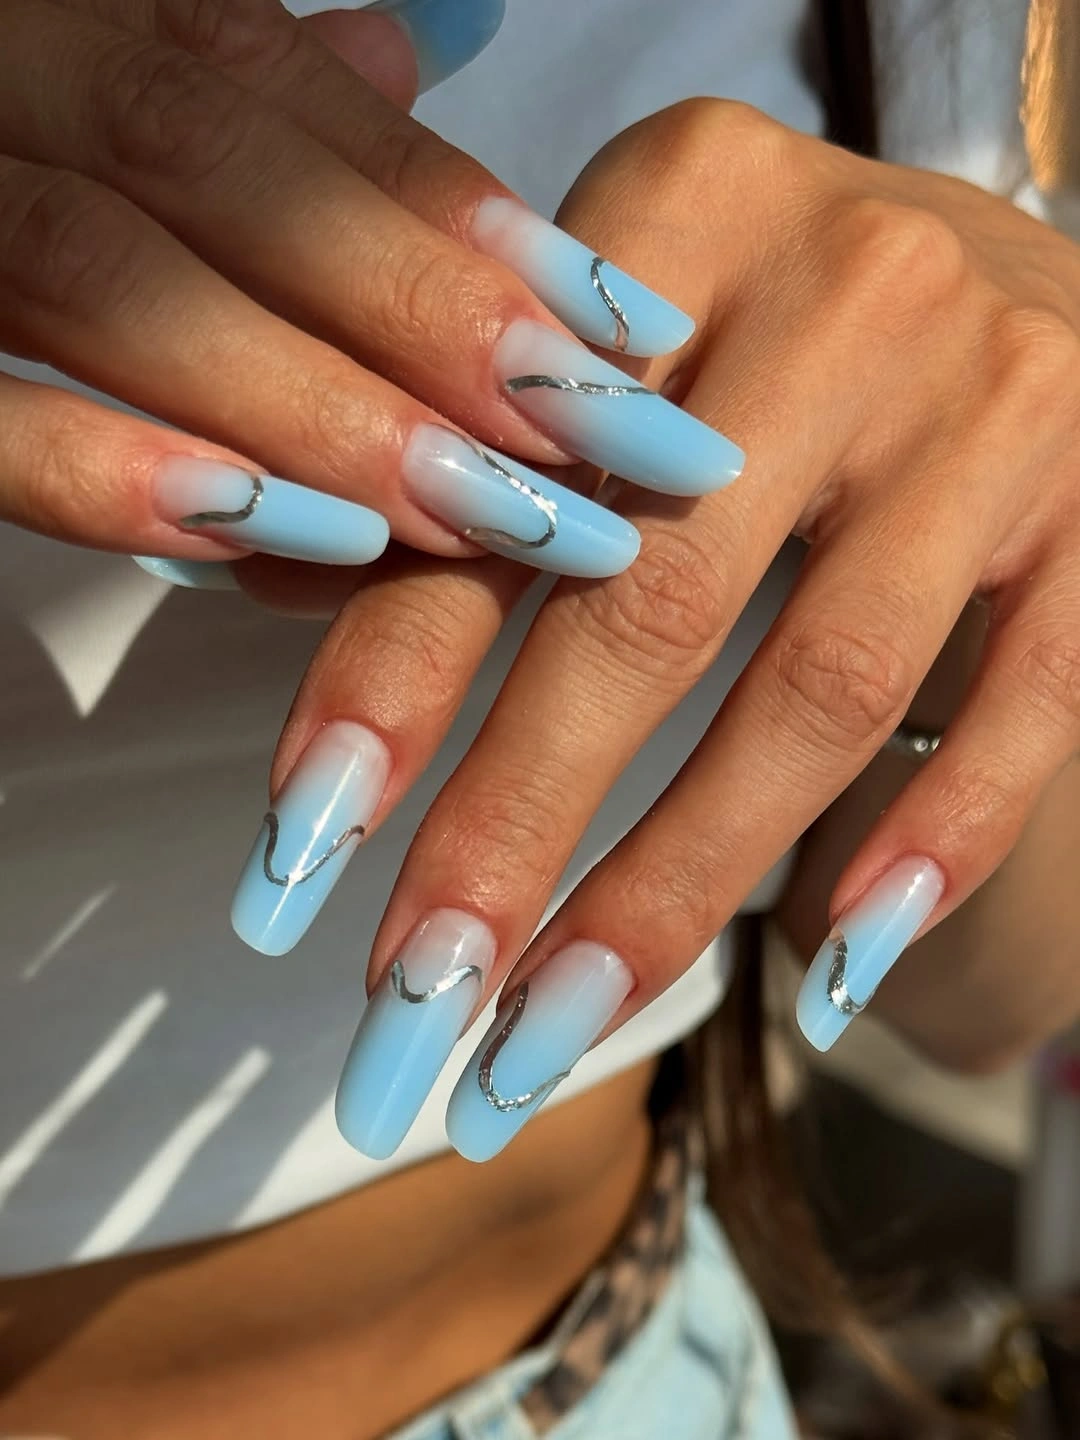
I would recreate this with a pastel blue gel polish, preferably one with a slightly milky rather than neon finish. For the metallic accents, a silver striping gel or highly pigmented silver nail-art polish would work best. I would also use a thin liner brush, because the silver details need to stay delicate and follow the almond shape instead of looking like thick bands. A glossy top coat finishes the look beautifully and helps the blue appear smoother and more dimensional.
My approach would be to create the almond shape first, then apply the blue base in two thin layers. Once it is completely cured, I would draw the silver curves starting near the sidewalls and letting them gently travel toward the center or tip. I would not try to make every nail identical. Slight variations actually make the set look more modern and handmade. After curing the metallic details, I would apply top coat carefully so the lines remain crisp.
For me, this is the wildcard of the group. It feels more transitional than traditionally autumnal, which is precisely why I like it for early October when the weather cannot decide what season it wants to be. If pumpkins and burnt orange are not really your thing, this is a pretty way to get that fresh Pinterest-worthy manicure feeling while still looking polished and grown-up.
Plum Ribbed Nails for a Cozy Fall Short Manicure
Deep plum is one of those colors I reach for as soon as the air starts feeling cooler. Here, the shade is rich and slightly smoky, somewhere between burgundy, aubergine, and dark chocolate, and the short rounded nails make it feel especially wearable. What gives the manicure its personality is the raised ribbed texture running vertically across each nail. The ridges catch the light in narrow lines, creating a velvet-like effect that changes as the hands move. It is simple, but definitely not plain.
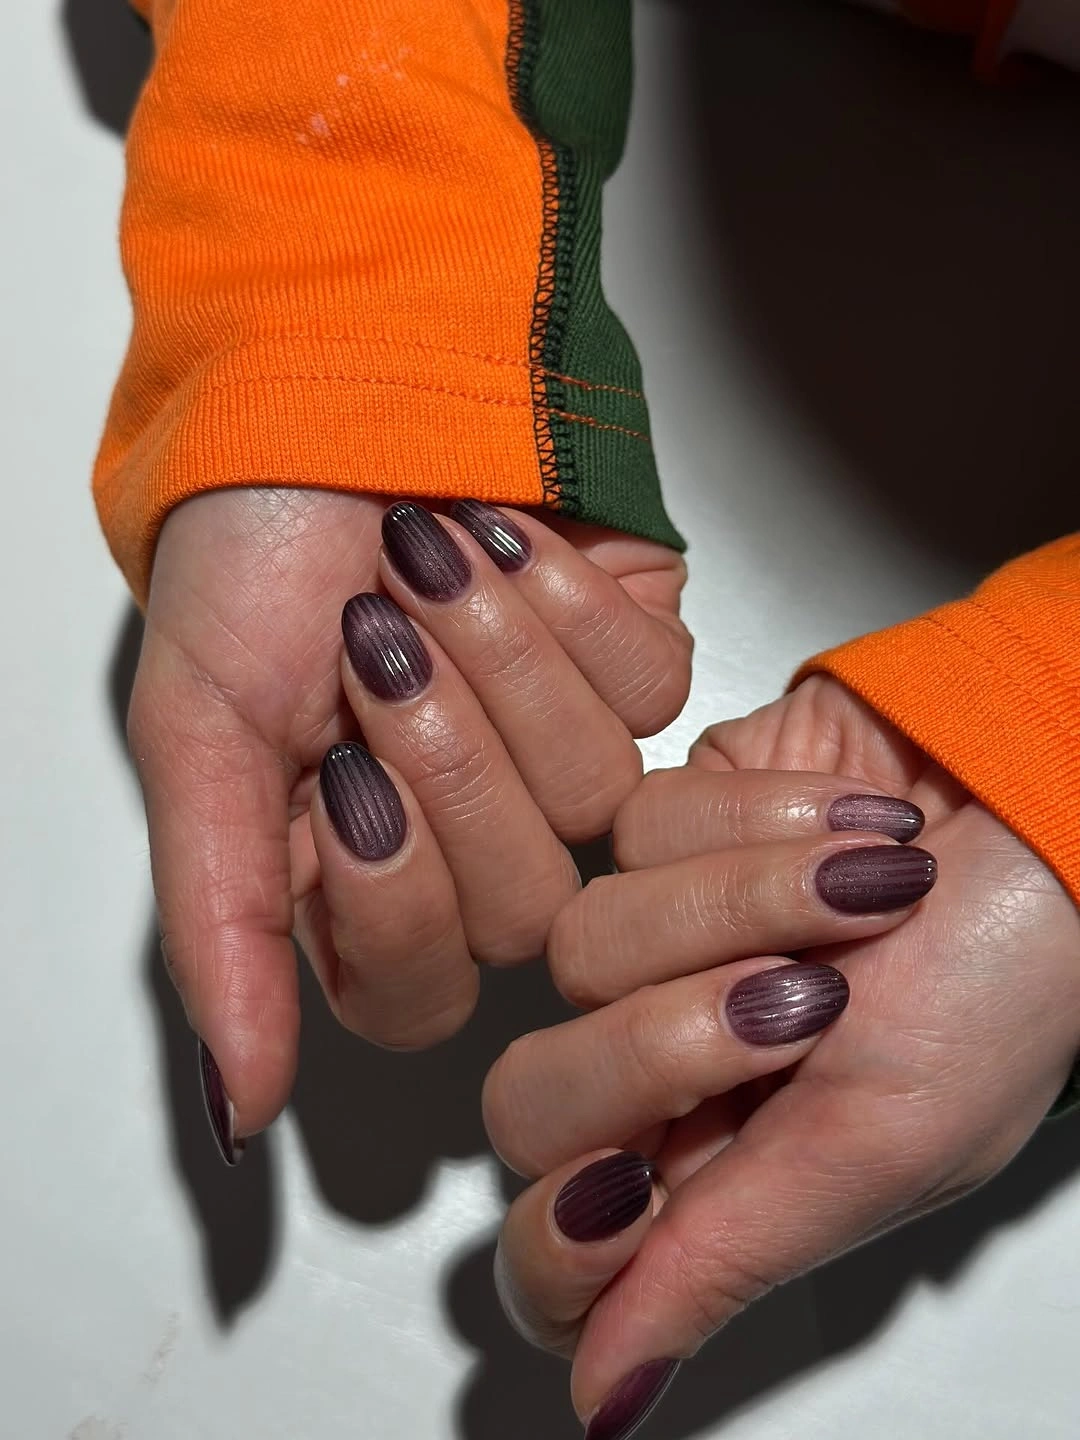
I would use a deep plum gel polish as the foundation and a compatible builder gel or textured gel product for the raised effect. A fine detail brush can help create the narrow vertical grooves, although a nail artist may have specialized products for achieving a more uniform texture. I would keep the color glossy rather than matte because the shine is what makes the ridges visible. If I wanted a softer version for everyday wear, I would choose a muted berry-plum instead of an almost-black purple.
To create it myself, I would prep and shape the nails into a short oval or softly rounded shape, then apply the plum color in thin, even layers. After curing, I would add the raised lines one at a time, working from the cuticle toward the free edge and keeping the pressure consistent. I would cure the texture before adding the final finish. This is one manicure where patience matters more than artistic ambition – uneven ridges can make the result look messy rather than intentionally tactile.
I think this one has the strongest cozy-season energy of all five. It reminds me of ribbed sweaters, dark berry lipstick, and that first evening when leaving the house without a jacket suddenly seems like a terrible idea. If I wanted a fall short nail design that felt sophisticated but still had something interesting happening, I would absolutely put this near the top of my list.
Sheer Pink Almond Nails With a Soft Glossy Finish
Sometimes October calls for the opposite of dramatic. These long almond nails use a barely-there pink base that softly blurs the natural nail underneath, creating an elegant, almost porcelain finish. The color is translucent enough to keep the manicure light, while subtle warm reflections add dimension without becoming obvious nail art. The almond shape stretches the fingers visually, and the overall effect is neat, delicate, and quietly expensive-looking. Nothing is screaming for attention here – and honestly, that can be the whole point.
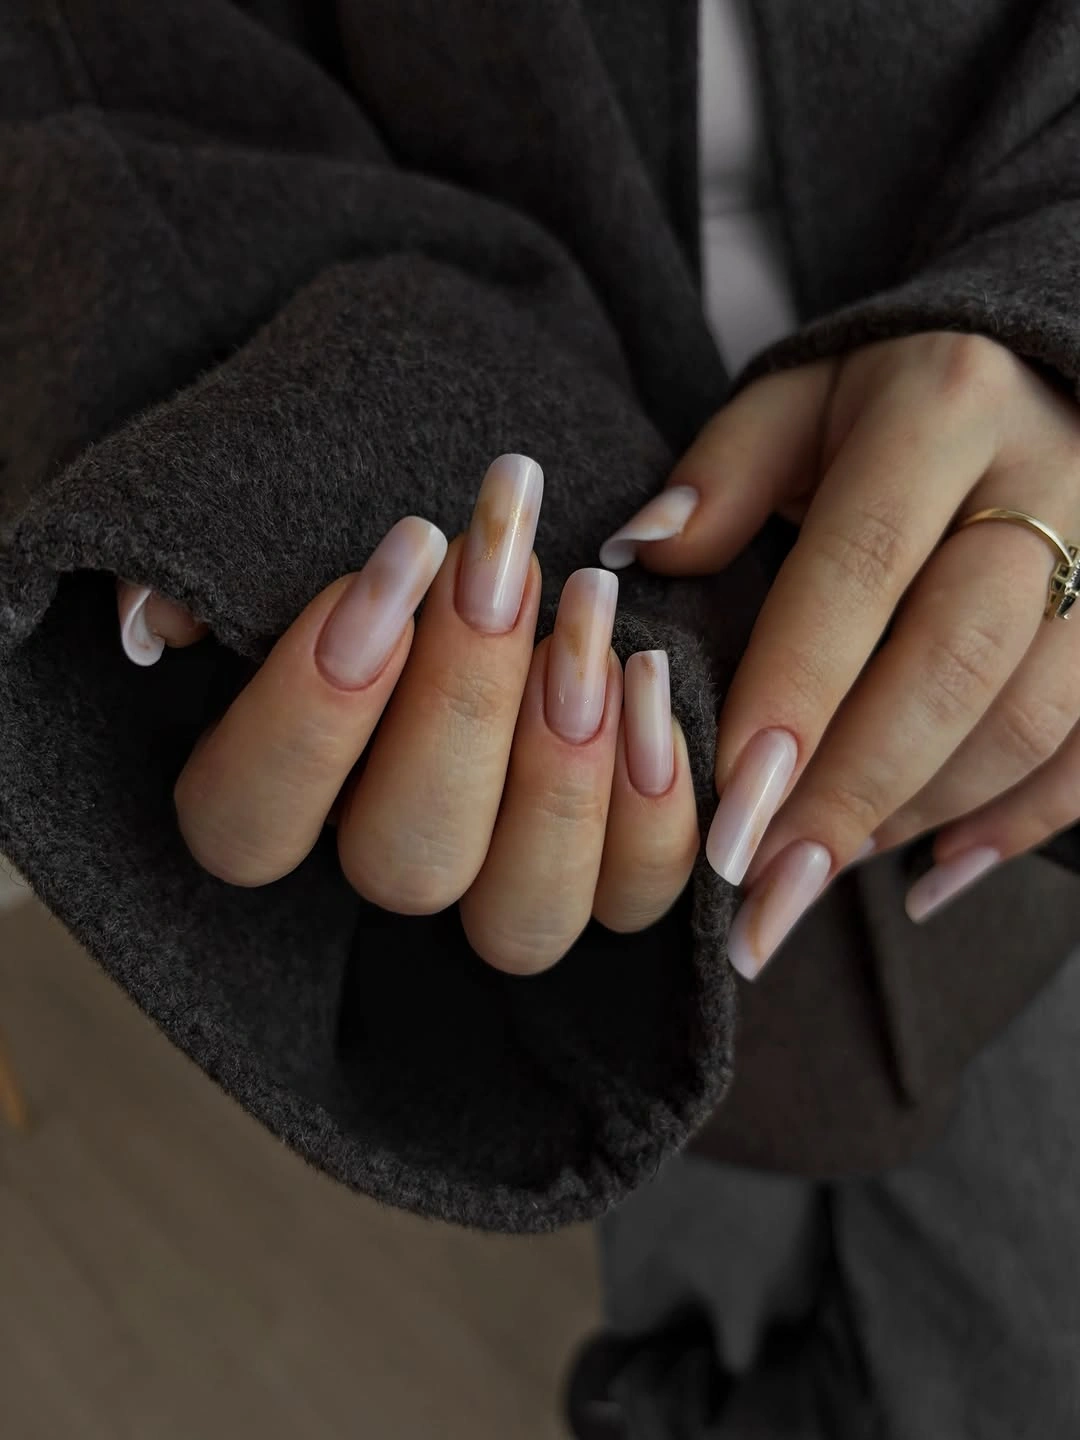
For this manicure, I would choose a sheer pink or milky nude gel rather than an opaque bubblegum shade. OPI Funny Bunny mixed with a soft pink sheer, Essie Ballet Slippers, or a similar translucent nude can create the right direction depending on the desired opacity. I would also use a strengthening base if my natural nails needed extra support, especially with a longer almond shape. The finish should be glossy and smooth because a thick matte top coat would take away much of the delicate quality.
I would begin with careful cuticle preparation and a clean almond shape, then apply the sheer color in very thin layers. I like the idea of building the opacity gradually because it keeps the manicure from looking flat or chalky. After curing, I would add one final glossy layer and check the nails from several angles for any unevenness. This is not the manicure where I would add five different embellishments – the beauty is in restraint.
I could easily wear this design through October, Thanksgiving, and well beyond. It works with chunky sweaters just as easily as it works with a tailored coat, and that versatility matters when I am choosing a manicure that needs to survive several weeks of outfits. If I want my nails to look polished without announcing that I spent hours thinking about them, this is the quiet winner.
Milky White Short Square Nails With Tiny Black Details
A milky white manicure with tiny black motifs feels playful in a much more controlled way. The nails are long enough to give the square shape room to show, but the overall silhouette remains clean and structured. Most of the nails are glossy white, while selected nails feature small black decorative motifs arranged across the surface. The contrast is sharp and graphic, almost like tiny pieces of black ink scattered over porcelain. It has a cute quality, but the limited palette keeps it from becoming overly sweet.
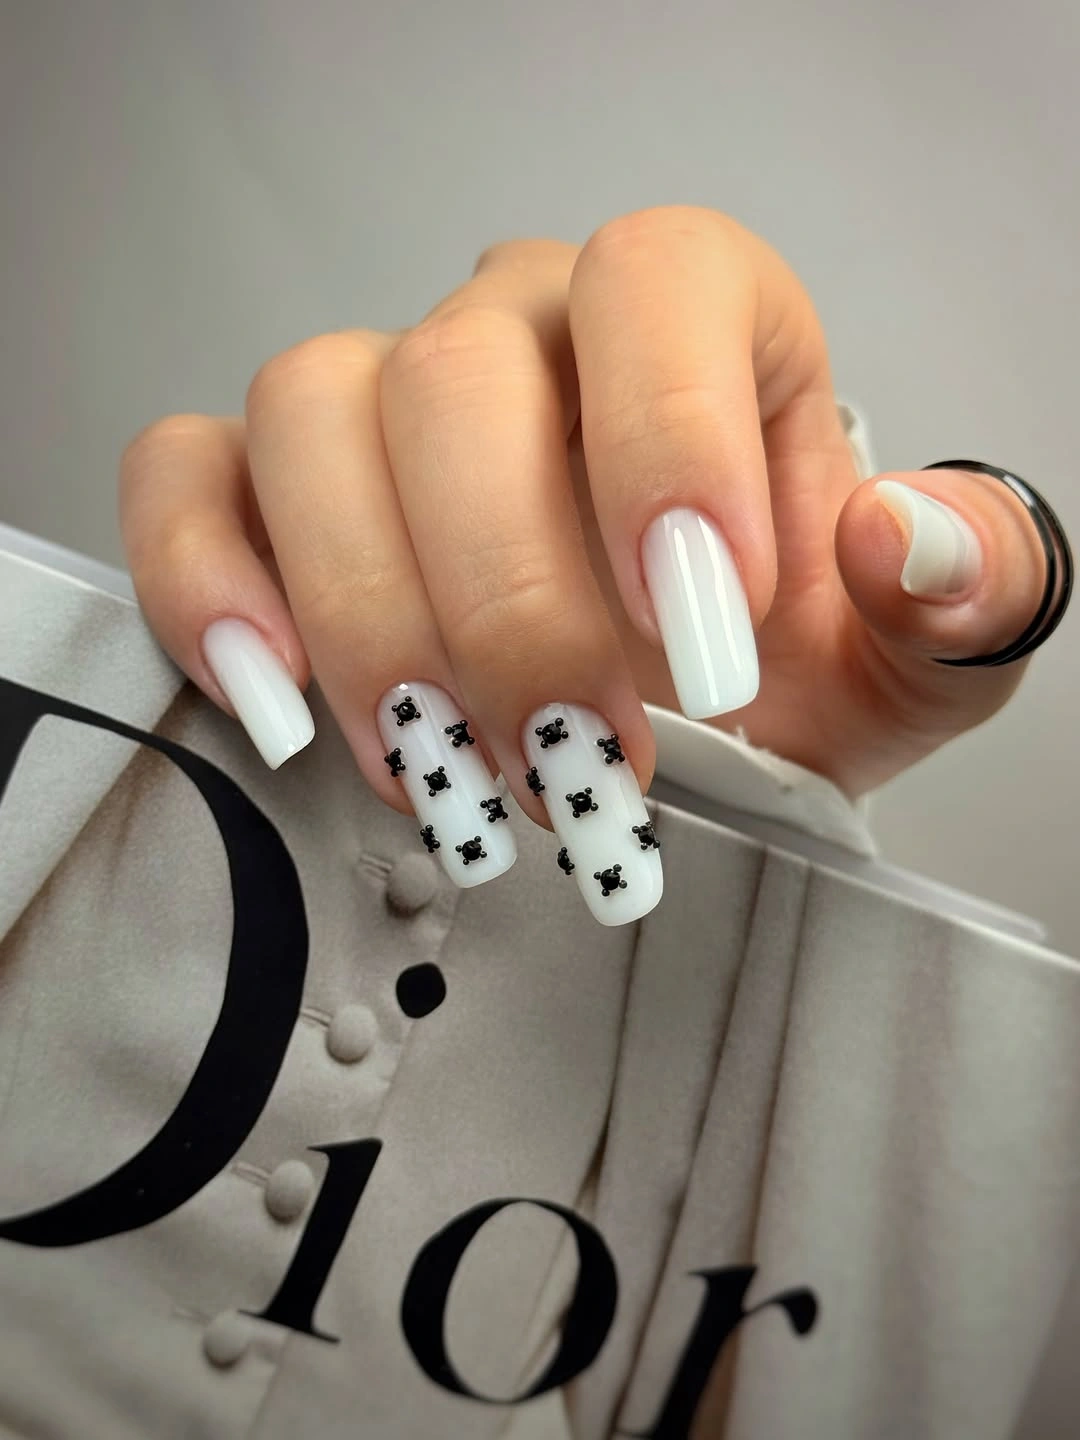
I would use a milky white gel polish with good coverage but enough softness to avoid a stark correction-fluid effect. For the tiny black decorations, highly pigmented black gel paint is ideal because it allows precise shapes without requiring several layers. A dotting tool and an ultra-fine nail-art brush would cover most of the work. I would finish with a glossy top coat so the white remains luminous and the black details look crisp.
The easiest way to recreate this at home is to keep the base extremely clean. After shaping the nails into a soft square, I would apply two thin coats of milky white and cure them properly. Then I would use the smallest brush or dotting tool to create the black motifs, placing them selectively rather than covering every nail. If tiny details feel intimidating, I would use nail stickers instead – there is absolutely no prize for making your manicure harder than it needs to be.
Classic Pink and White Almond French Tips
I keep coming back to this elegant almond manicure because it makes a classic French tip feel fresh again. The base is a glossy natural pink, while crisp white tips follow the sharp almond silhouette. The smile line sits slightly lower than a traditional French manicure, leaving plenty of pink visible and making the nails look longer and more graceful. For October, I love this as a polished alternative to darker fall colors.
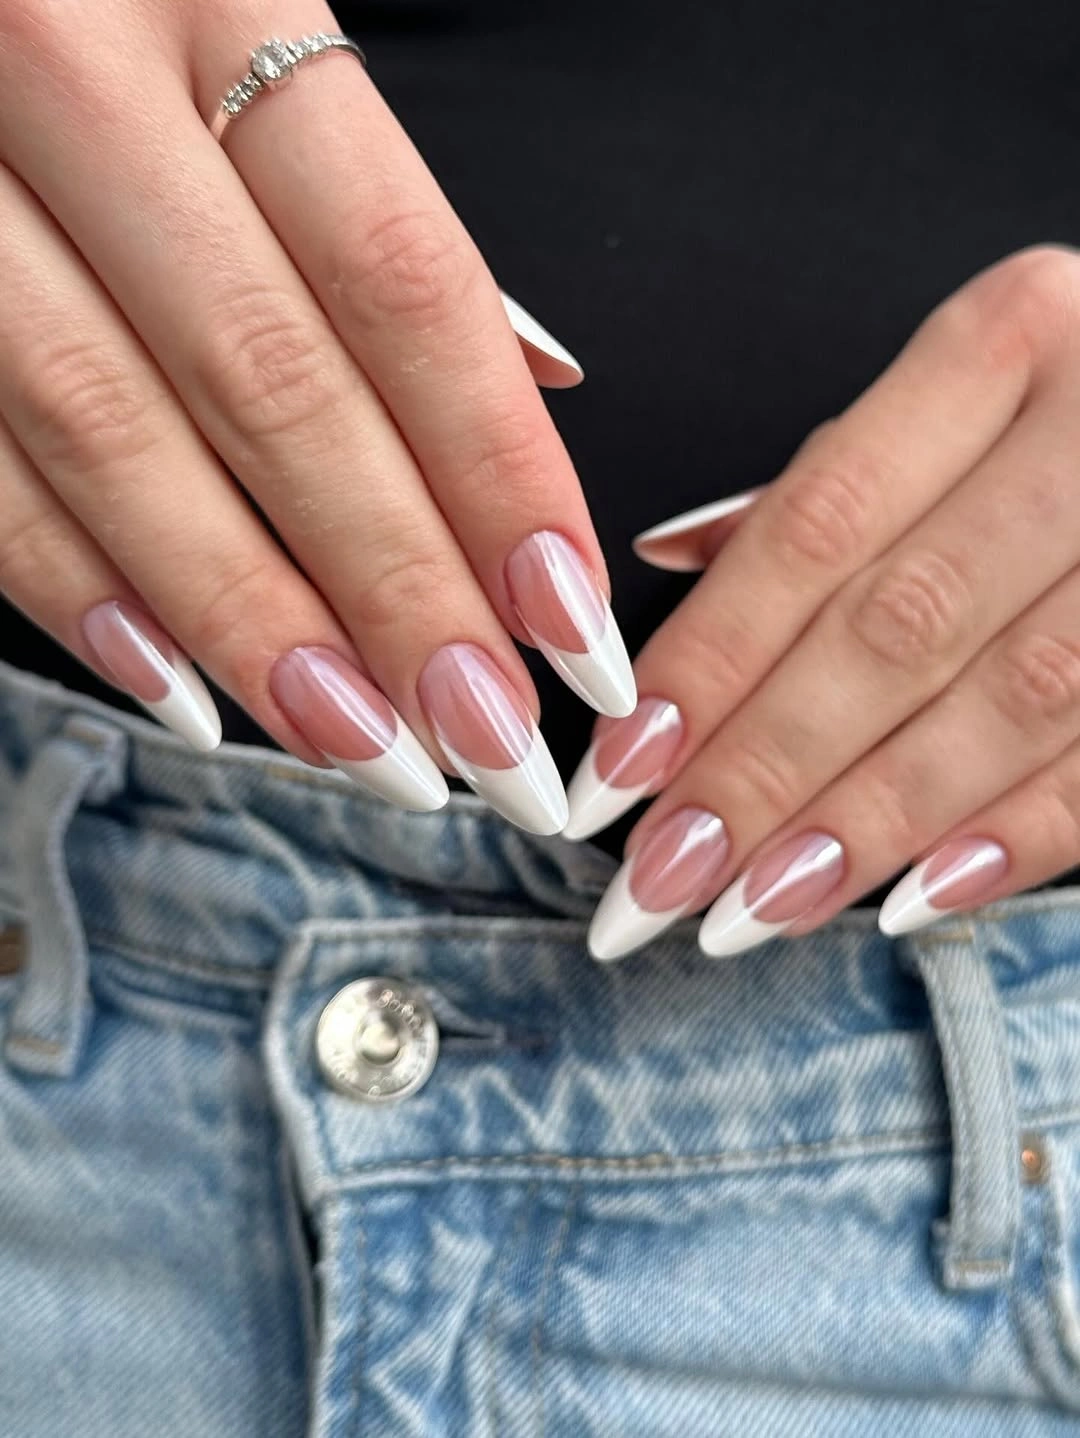
I would use a sheer blush gel for the base and an opaque white gel for the tips. OPI Bubble Bath or a similar translucent pink gives that clean, glossy foundation, while a fine liner brush helps create the pointed French edge. A high-shine top coat is essential here because the simplicity leaves nowhere for uneven texture to hide.
At home, I would shape the nails into a consistent almond first, then build the pink color in thin layers. I would mark the center of each tip before connecting the sides with white gel, curing between layers. I would not rush the smile lines – clean curves are what make this simple manicure look expensive.
This is my choice when I want October nails that work everywhere. With denim, a black coat, or a chunky fall sweater, the manicure feels effortless rather than overly seasonal. Sometimes classic really does win.
Opalescent Chrome Nails With a Futuristic Glow
These long almond nails take a pale base into a completely different direction with an iridescent chrome finish. The surface shifts between pearly white, lavender, silver, and hints of yellow depending on the light, creating that liquid-metal effect I love for a statement manicure. The nails stay minimal in decoration, so the finish itself becomes the star.
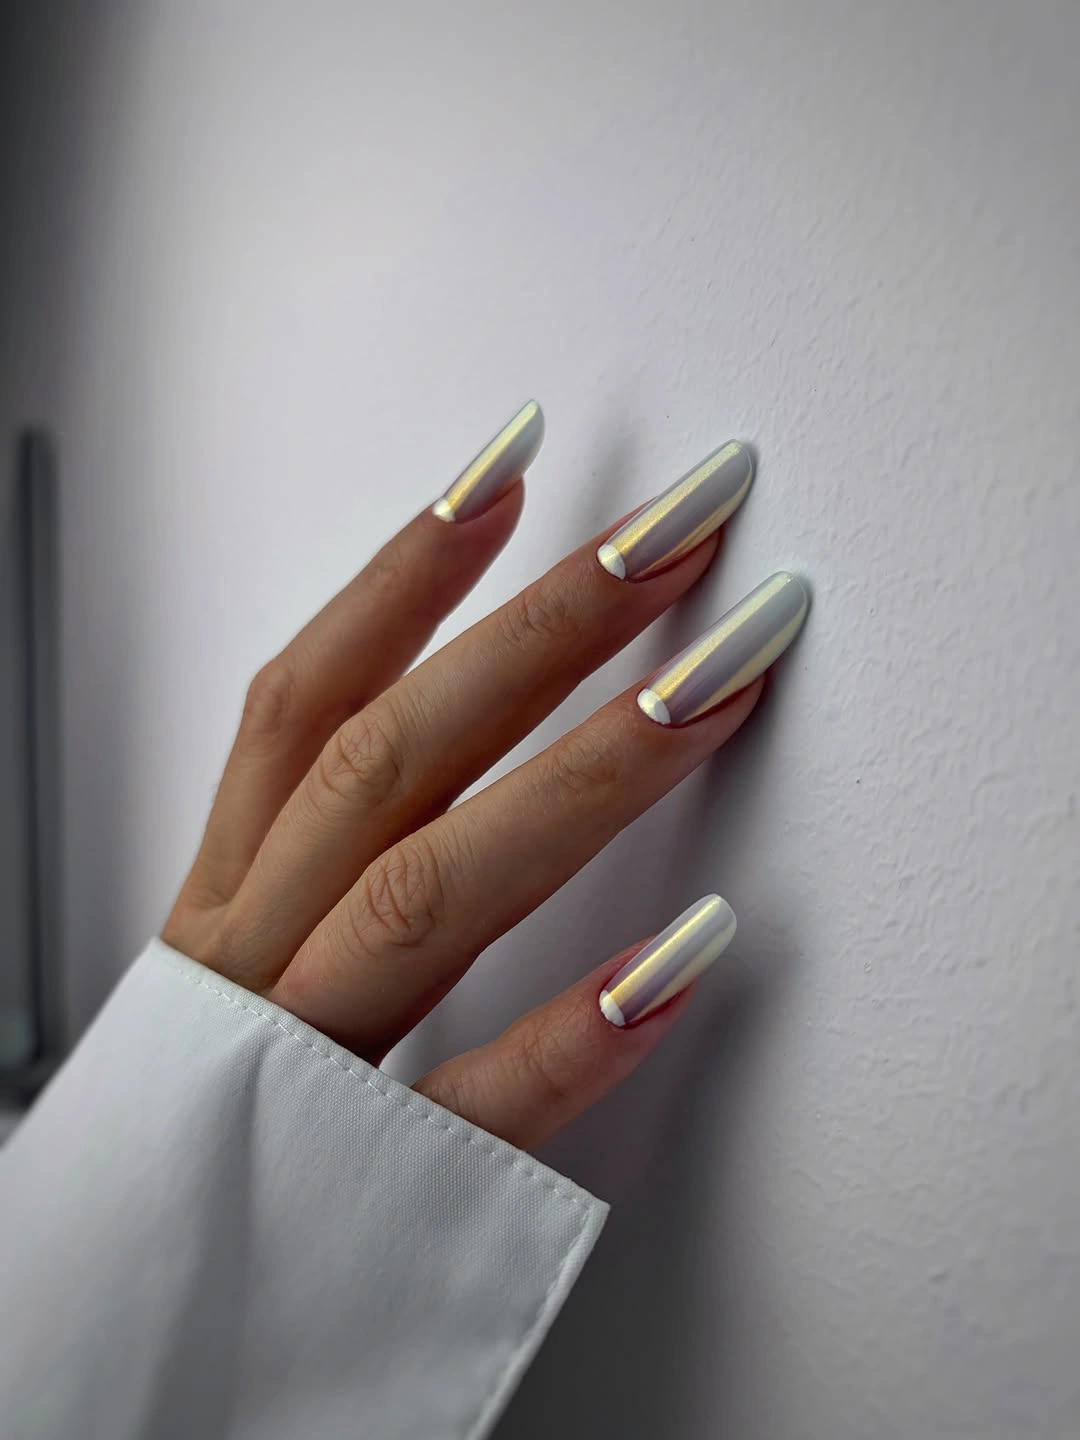
For this look, I would choose a soft white gel, a no-wipe top coat, and an aurora or pearl chrome powder. The exact powder can change the reflection dramatically, so I would test it over the white base before committing. A silicone applicator or sponge applicator helps buff the pigment evenly across the nail.
I would apply the white base smoothly, cure it, then add the no-wipe top coat and cure according to the product instructions. After buffing in the chrome powder, I would remove excess pigment from the skin and seal the edges carefully with top coat. The free edge deserves extra attention because that is where chrome manicures can wear first.
I see this as a beautiful October option for anyone who is bored with traditional autumn shades. It has a cool, crisp feeling that works especially well with silver jewelry and monochrome outfits. A little futuristic sparkle never hurts.
Caramel Brown Almond Nails With Gold Accents
Now this is where October really starts to feel like October. These pointed almond nails combine translucent nude, warm caramel, and deep brown sections with delicate gold outlining. Some nails feature full glossy brown or caramel color, while others leave part of the natural-looking base visible. The gold borders give the manicure a jewelry-like finish without covering every surface in glitter.
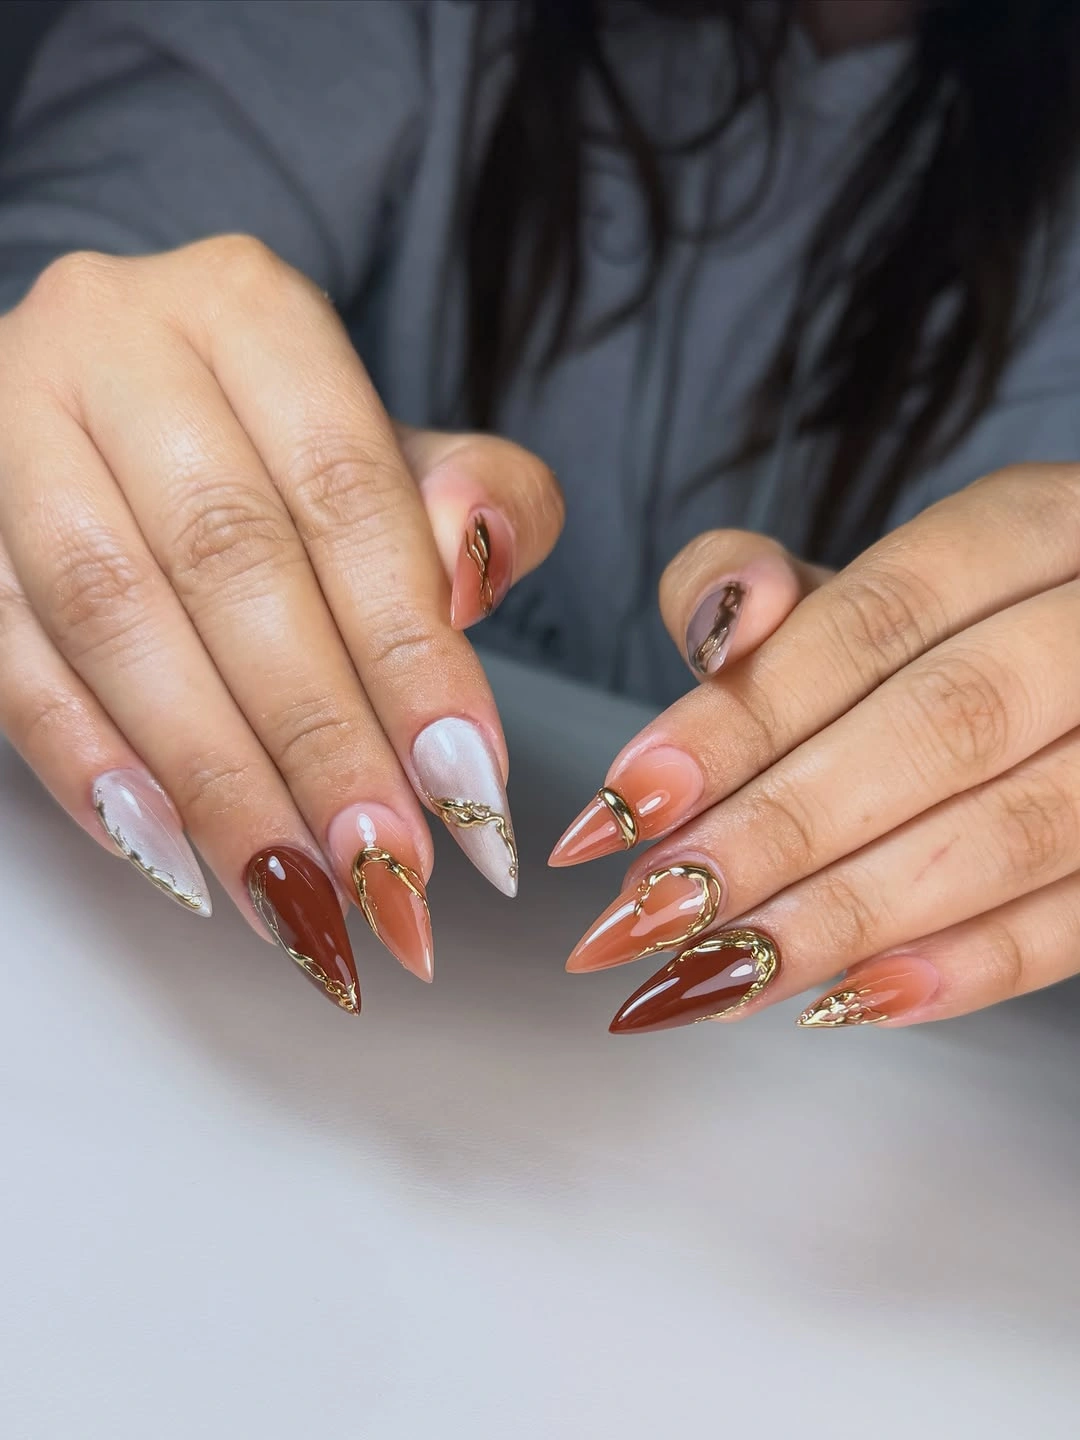
I would reach for warm caramel, chestnut, and chocolate gel shades, plus a sheer nude for the negative-space areas. A metallic gold gel or fine gold transfer foil would create the delicate edging, while a detail brush would help control the curves. I would keep the top coat ultra glossy to emphasize the rich, syrupy finish of the darker colors.
I would start with the almond shape, then map out which nails will carry the brown and caramel sections. After applying the color, I would outline selected edges with gold rather than trying to decorate every nail equally. That uneven distribution is what gives the set its editorial quality.
I love this manicure for late October because it feels warm without becoming predictable. It would look gorgeous with camel coats, denim, brown leather, or chunky gold rings. If I wanted one manicure to carry me straight from pumpkin-season errands to a dinner reservation, this would be it.
Soft Pink Stiletto Nails With Sparkling Tips
Soft pink meets serious drama here. The long stiletto nails begin with a sheer blush base before transforming into shimmering rose-pink tips. Tiny metallic accents appear near the transition between the natural-looking base and glittered section, adding a subtle jewelry effect. The pointed silhouette makes the manicure bold, while the pale color keeps it surprisingly delicate.
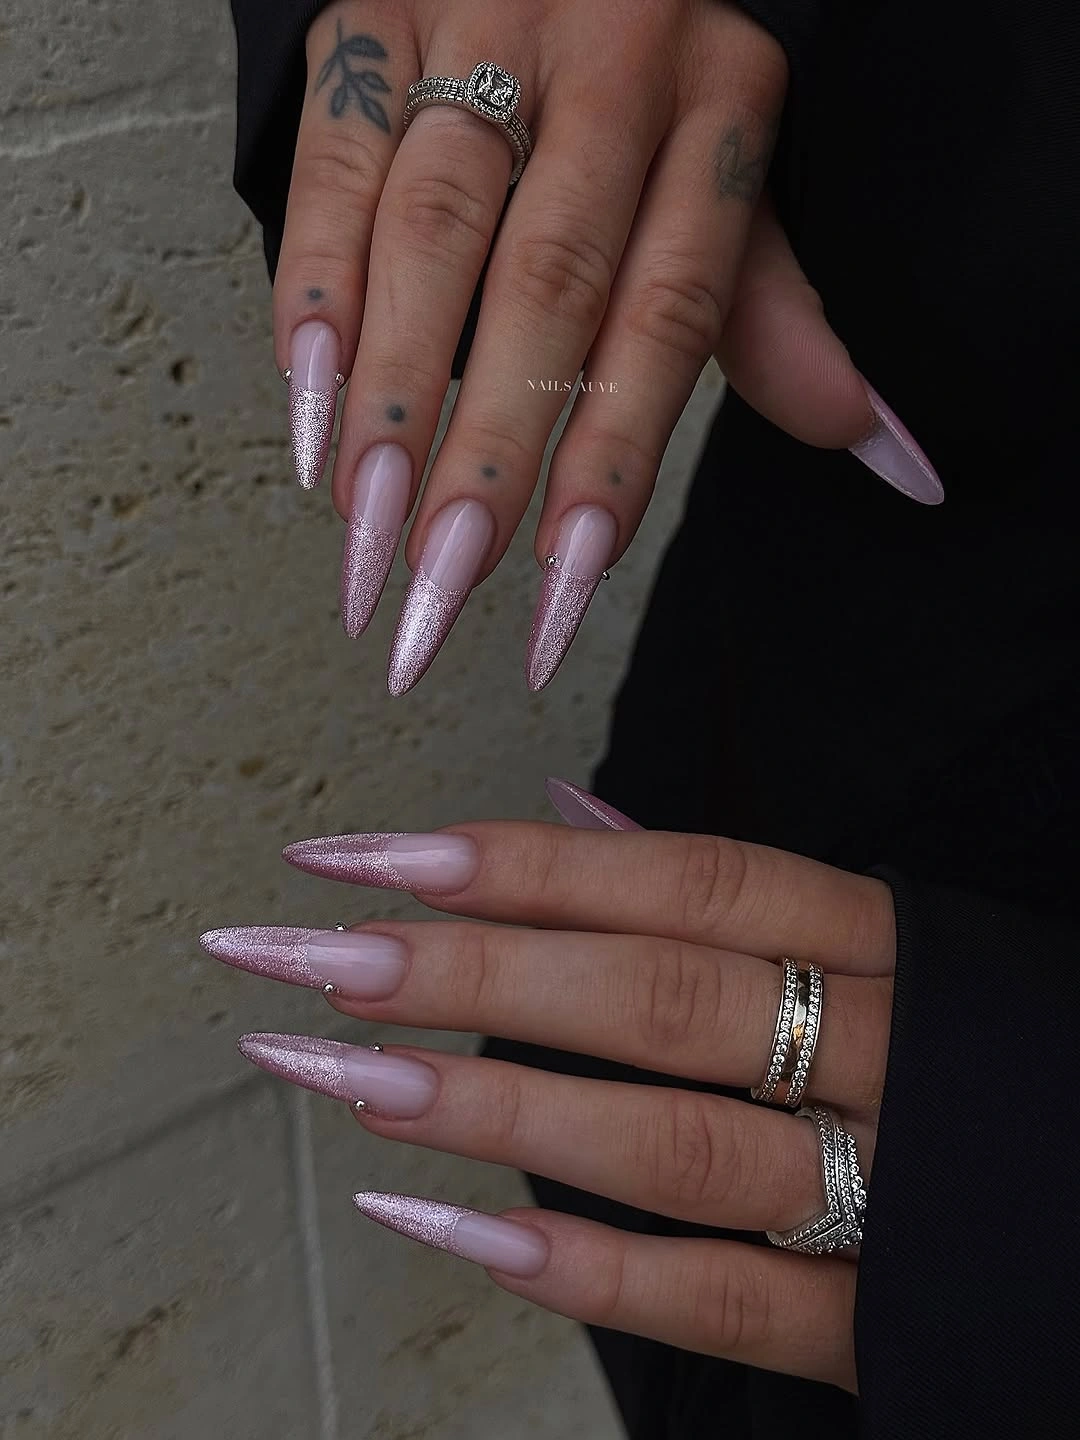
I would use a sheer pink gel, rose-pink glitter gel, and a few tiny crystals or metallic studs. A fine brush helps create the clean transition line, while builder gel can be useful for securing small embellishments. I would finish with a glossy top coat, taking care not to cover the textured sparkle too heavily.
For a home version, I would first create the stiletto shape and apply the sheer pink base. I would then concentrate the glitter toward the tips, keeping the boundary neat and symmetrical. A tiny crystal at the transition point is enough – I would resist the temptation to keep adding more.
This feels like the manicure I would save for an October party or a dressed-up weekend. It has the romance of pink but enough sparkle and length to feel dramatic. Not every fall manicure needs to be brown, after all.
Burnt Orange Short Nails With Silver Outlines
Short nails can make a major statement when the color is right. This rounded short manicure uses a deep burnt-orange shade with a glossy, almost translucent finish, then frames each nail with a thin metallic silver outline. The result reminds me of autumn leaves catching late-afternoon light, but the silver gives it a modern edge instead of making it look overly rustic.
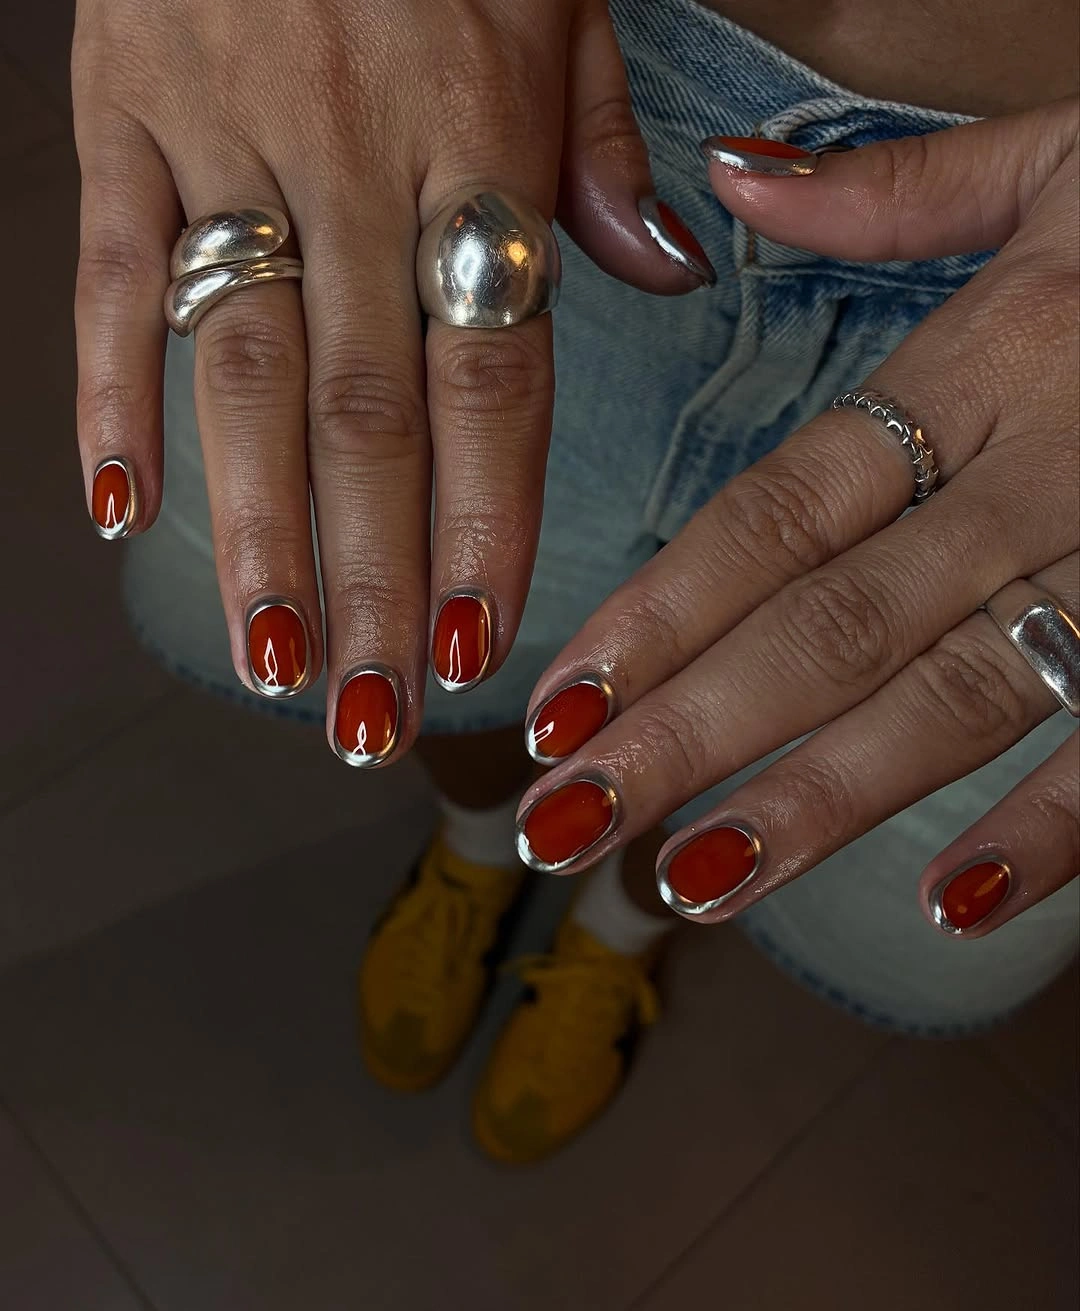
I would choose a rich rust or burnt-orange gel, a silver metallic polish or chrome gel, and a fine liner brush. A sheer orange can create the glassy depth seen here, while a more opaque terracotta gives a stronger fall effect. I would keep the rest of the products simple because the color and outline already do the work.
I would shape the nails short and softly rounded, apply the orange shade evenly, and cure it before adding the silver border. The easiest approach is to work in small sections around the perimeter rather than attempting one continuous line. After curing, I would seal the manicure with a glossy top coat.
This is probably the most practical October design of the new group for me. The short length is easy to live with, while the orange and silver combination still feels special. Add a denim jacket, oversized sweater, and a good coffee, and the fall mood is basically complete.
Olive Green Chrome Nails With Silver Starbursts
I love the unexpected mood of this olive green manicure. The nails are short to medium length with a softly rounded shape, covered in a metallic moss-green polish that shifts beautifully under the light. Bright silver starbursts are layered across the surface, giving the color a cosmic edge while keeping the overall look distinctly autumnal. It feels like October after dark, in the best way.
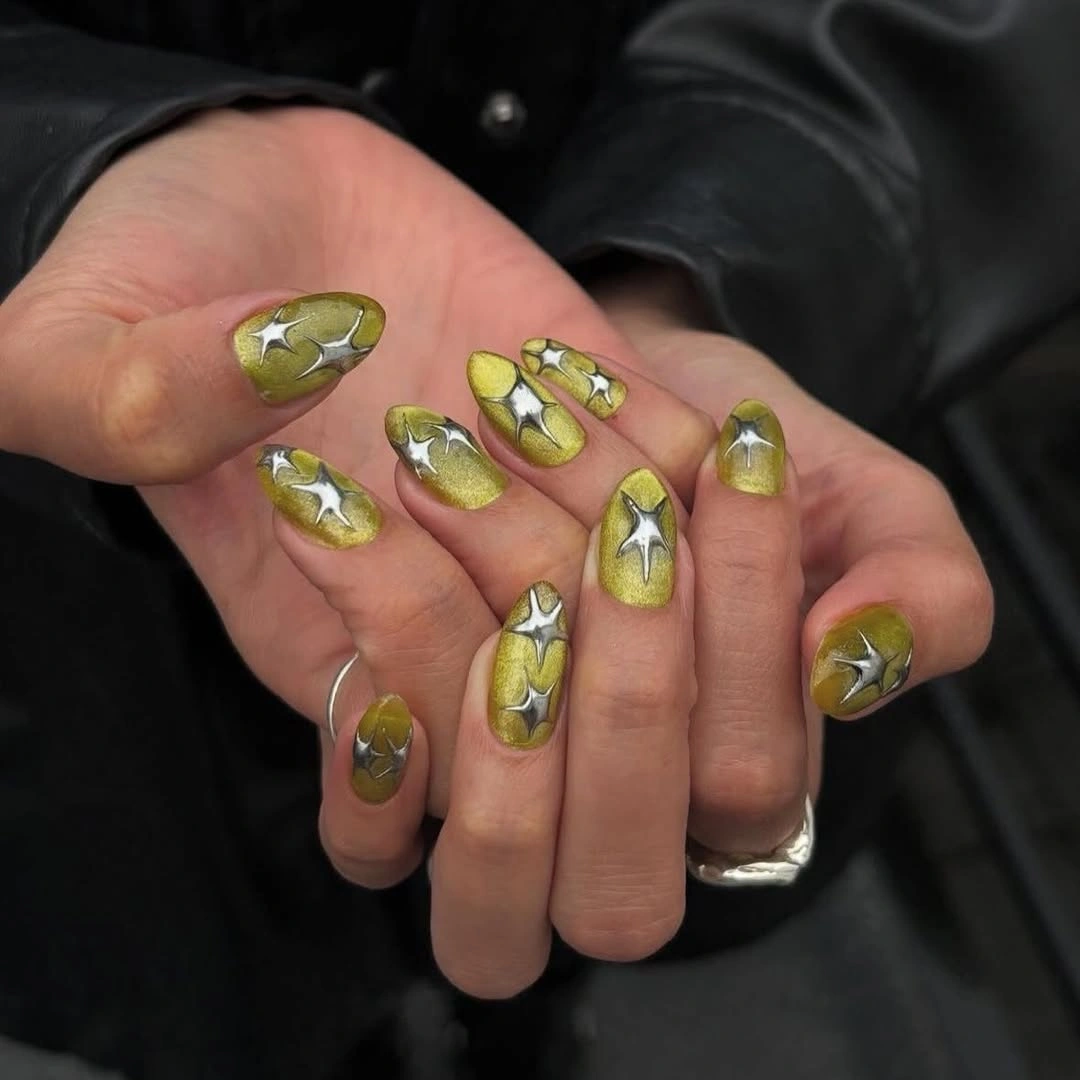
I would use a metallic olive or chartreuse-green gel, silver chrome or reflective gel for the starbursts, and a fine nail-art brush. A glossy top coat will help the green retain that liquid-metal appearance. For the brightest silver points, chrome pigment over a suitable no-wipe top coat gives a particularly reflective finish.
I would apply the green in thin layers, cure it, then sketch the star shapes with silver gel. I would vary their size and position rather than making every nail identical. Once cured, I would seal the details carefully and keep the cuticle area clean.
This is one of my favorite choices for someone who wants Halloween-adjacent nails without actual Halloween characters. The olive shade feels sophisticated, while the tiny stars bring just enough drama for an October night out.
Pink and Lemon Yellow French Nails
Here is a completely different take on fall nails. Long square nails carry a soft pink-to-yellow gradient, with the yellow concentrated toward the tips and finished with crisp white French edges. The transition is smooth and luminous rather than loud, giving the manicure a playful, almost sorbet-like quality. It is bright, but still surprisingly polished.
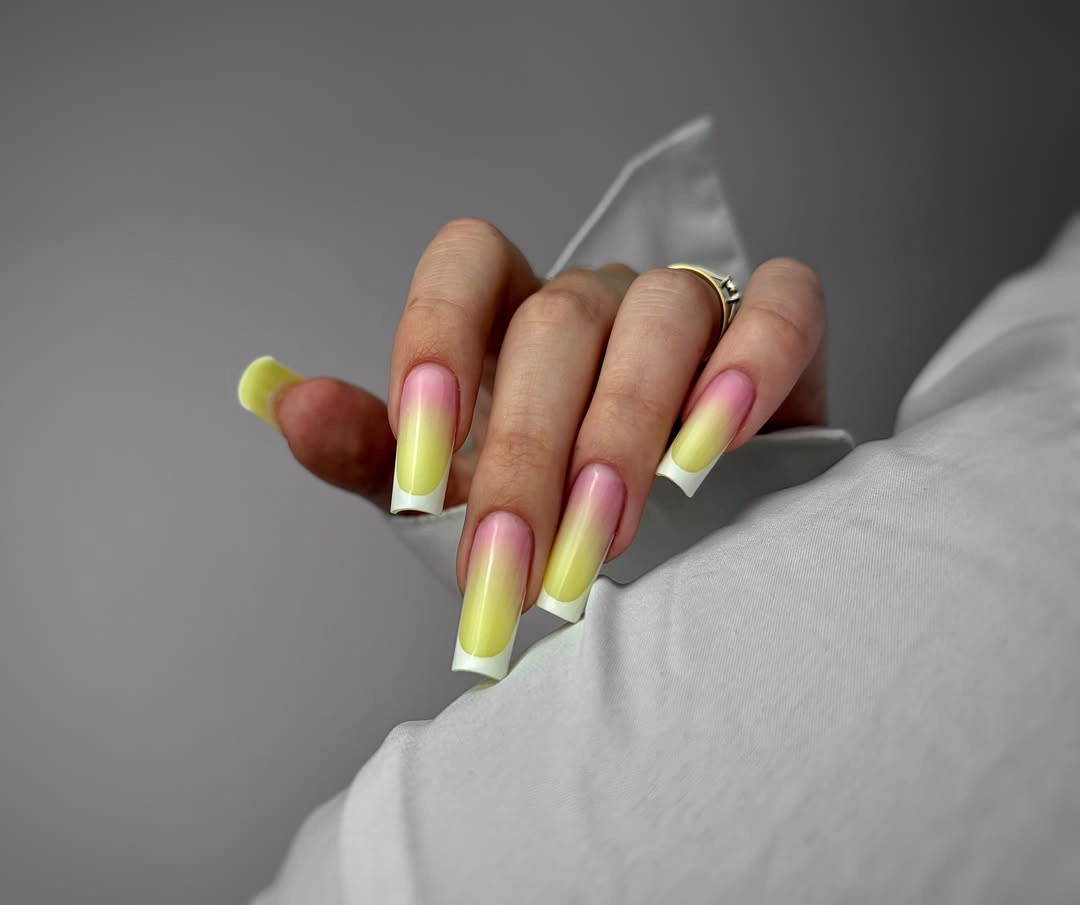
I would reach for a sheer pink base, a soft lemon-yellow gel, and a clean white polish for the French tips. A makeup sponge or small blending brush can help create the gradient, while a liner brush keeps the white tips sharp. I would finish with a glossy top coat to preserve the smooth, juicy effect.
I would build the pink base first, then blend yellow into the lower portion of each nail before creating the white tips. The key is keeping the gradient soft, so I would use several thin layers instead of one heavy application. After curing, the French edge can be refined with a fine brush.
For October, I see this as an early-fall option when I am not ready to give up lighter colors yet. It would look especially cute with white shirts, denim, and soft knits. Who says October has to be dark?
Retro Orange Heart Nails for Halloween Season
These short almond nails bring the Halloween energy without leaning into the usual pumpkins and ghosts. A sheer nude base lets vivid orange and red-orange shapes take center stage, with black outlines, tiny hearts, curved stripes, and sharp starburst details. The artwork has a distinctly retro feel, almost like a tiny 1960s graphic printed across each nail.
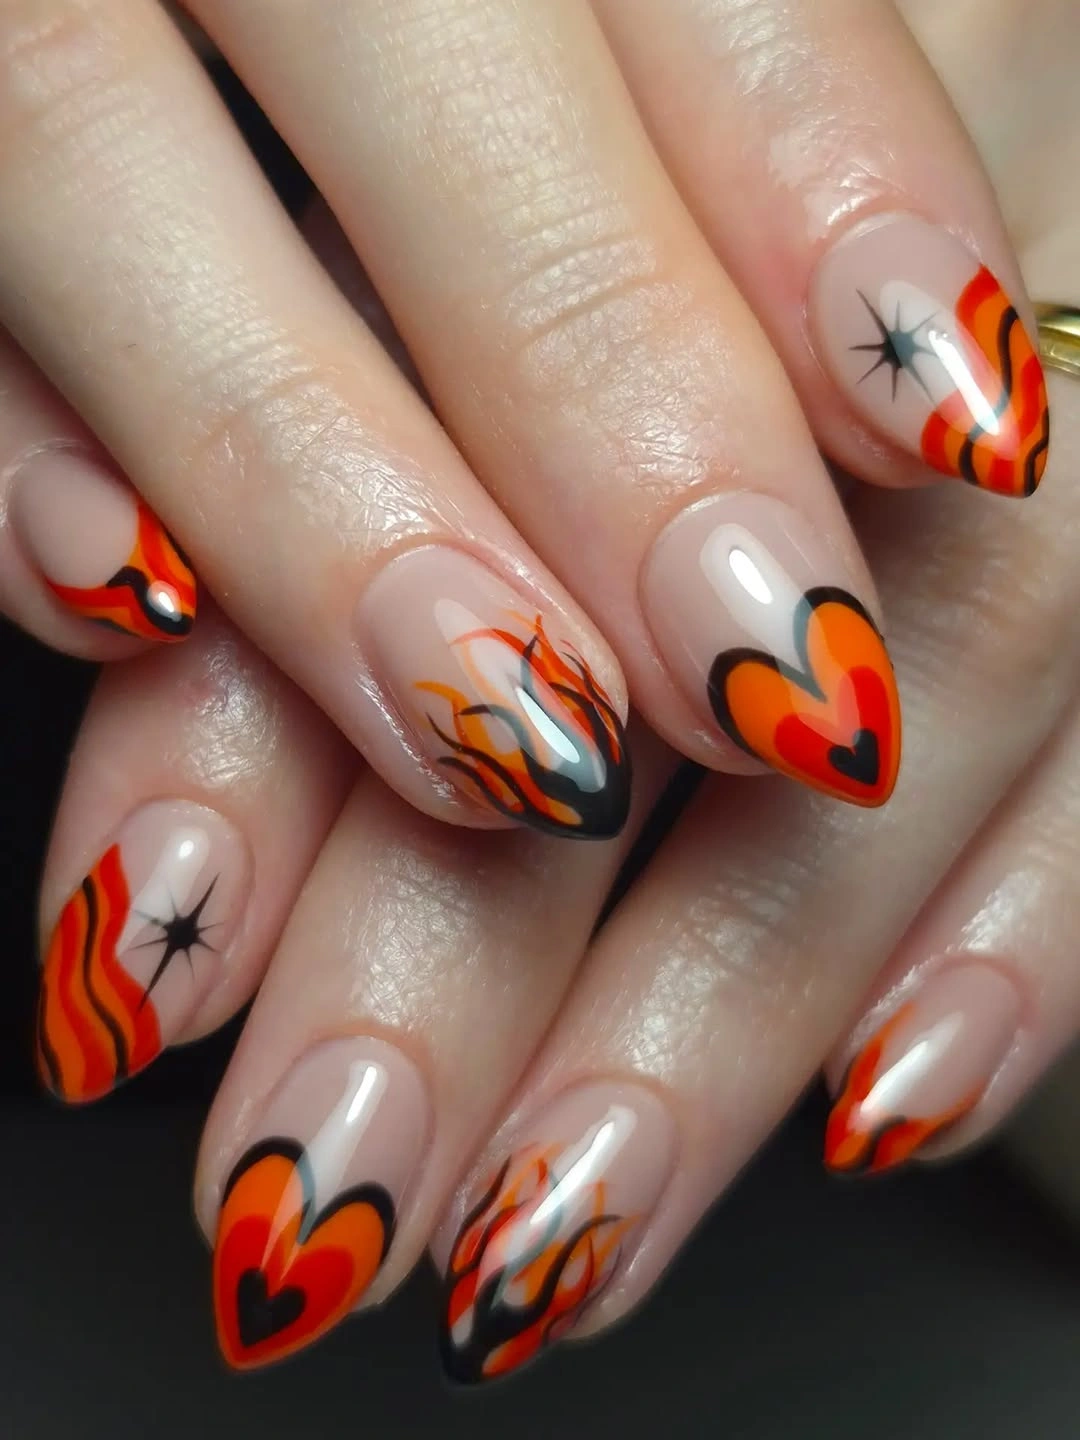
I would use a sheer nude or milky pink base with pumpkin orange, bright red-orange, white, and black nail-art gels. A very fine liner brush is essential for the black outlines and thin curved strokes, while a dotting tool can make the small heart details easier. A glossy top coat brings the whole design together.
I would work over the nude base and build each orange shape separately, curing as I go. Then I would outline selected sections in black and add the tiny starbursts and hearts. I would not try to make every nail perfectly symmetrical because the hand-drawn quality is part of its charm.
This is my pick when I want cute October nails with actual personality. The warm orange instantly feels seasonal, but the hearts and graphic lines make it wearable beyond Halloween night. It has a little attitude – exactly what a fun manicure should have.
Black Crocodile French Nails With Gold Details
Black French tips become seriously glamorous here. The nails are long and square, with a sheer nude base and dramatic black tips. Selected nails add a glossy crocodile texture along one side, framed by gold chains, metallic pieces, and tiny embellishments. It is bold, polished, and definitely made for someone who does not mind her manicure entering the room first.
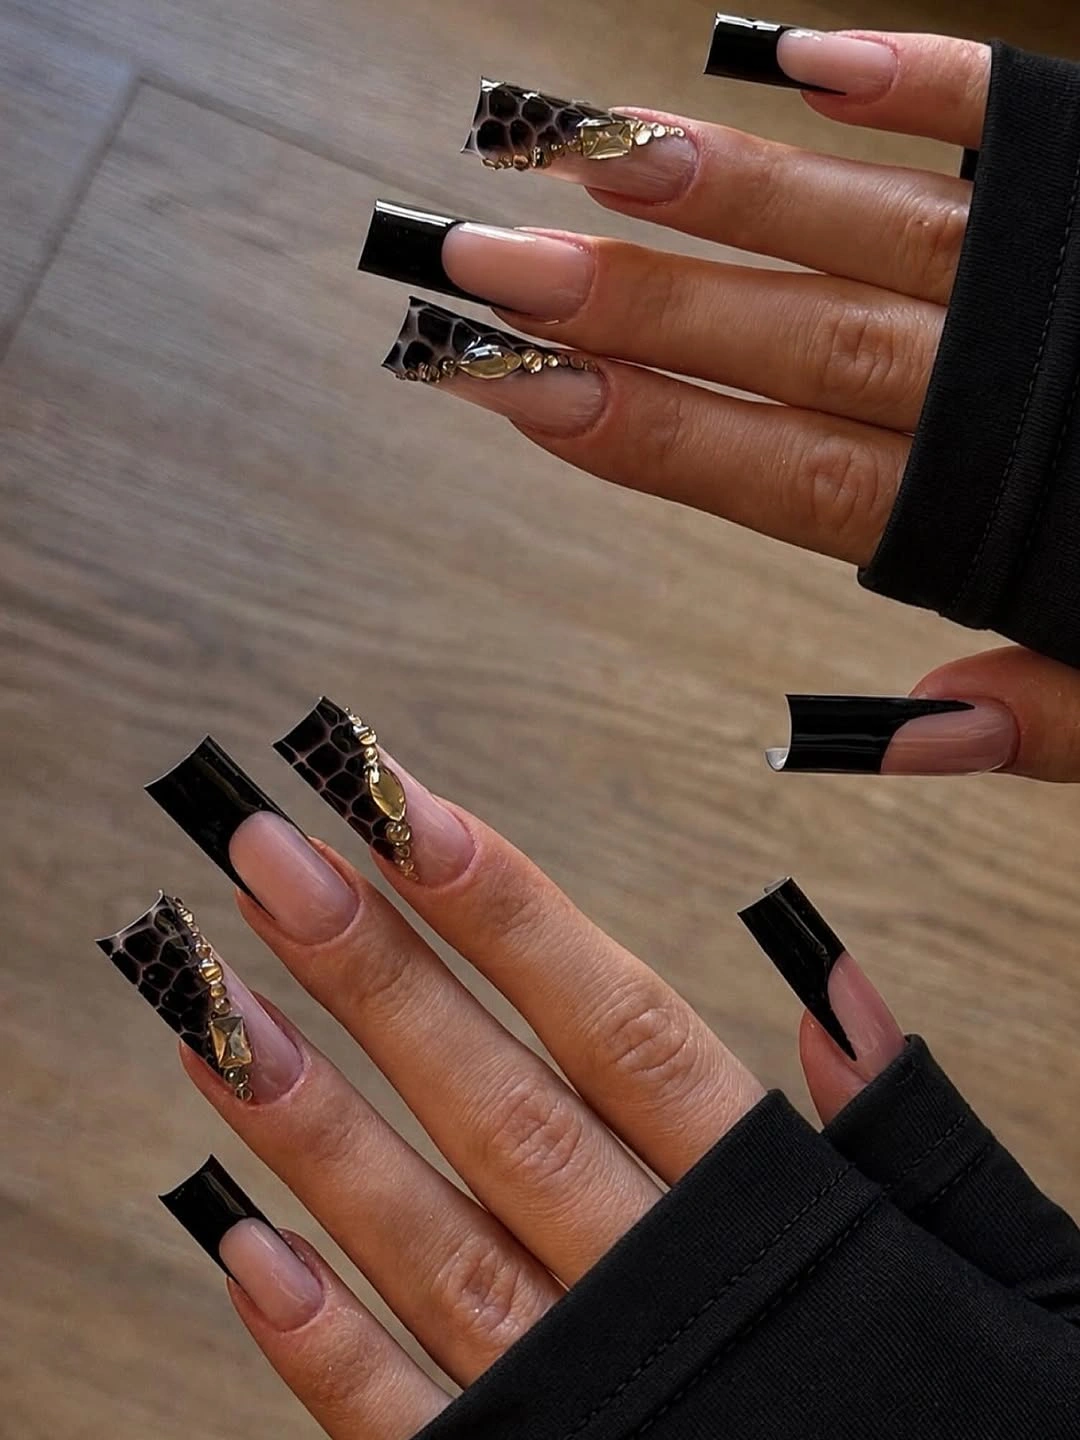
I would use a nude gel base, deep black gel polish, a crocodile or snakeskin nail-art effect, and gold charms or metallic foil. A fine brush helps define the black French tips, while builder gel can secure heavier embellishments. I would keep the base glossy so the black texture and gold details catch the light.
I would shape the nails into a clean long square, apply the nude base, and create the black tips first. After curing, I would add the textured sections and place gold details selectively along their edges. Heavy decorations need to be secured properly, so I would use an appropriate gel rather than relying on ordinary polish.
For me, this is the most fashion-forward design in this set. The black and gold combination feels perfect with leather, tailored coats, and evening outfits, while the crocodile texture gives a classic French manicure a much sharper personality.
Short Nude Nails With Gold and Silver Abstract Art
Short nails get an artistic upgrade with this soft nude manicure. The base is a translucent pink-beige, while individual nails feature small gold and silver shapes, rounded metallic dots, curved lines, and dimensional spiral-like accents. One darker metallic nail creates a beautiful focal point, while the rest stay delicate and understated. The result feels handmade, modern, and wonderfully imperfect.
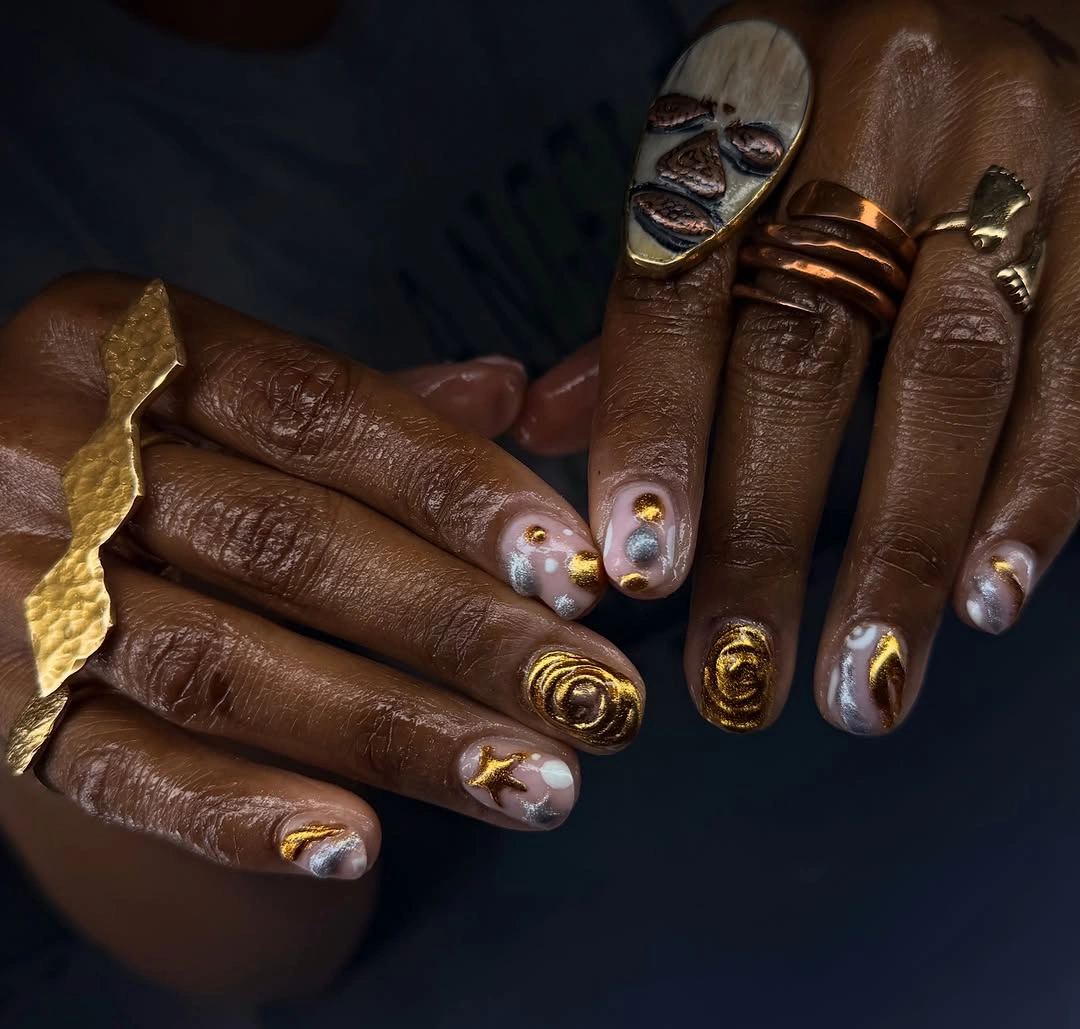
I would use a sheer nude-pink gel, metallic gold and silver gels, chrome pigments, and a small selection of nail-art brushes. Tiny metallic studs can add dimension, while a glossy top coat keeps the different finishes unified. I would avoid using too many colors because the restrained palette is what makes this manicure feel sophisticated.
I would begin with the nude base and then add the metallic details one nail at a time. I would mix dots, curved strokes, and small abstract shapes rather than repeating one motif across every finger. The gold and silver accents can be cured separately before the final top coat is applied.
This is exactly the kind of simple fall manicure I would choose when I want something interesting but still practical. The short length makes it easy to wear, while the tiny metallic details feel special under October’s softer light. Quietly artistic wins again.
Chrome Black Almond Nails With a Mirror Finish
I would choose these sleek almond nails when October calls for something darker and cooler. The entire surface is coated in reflective silver-black chrome, creating a liquid-metal effect that looks especially striking against dark clothing. The pointed almond shape adds drama without any extra decoration, so the finish gets to do all the talking.
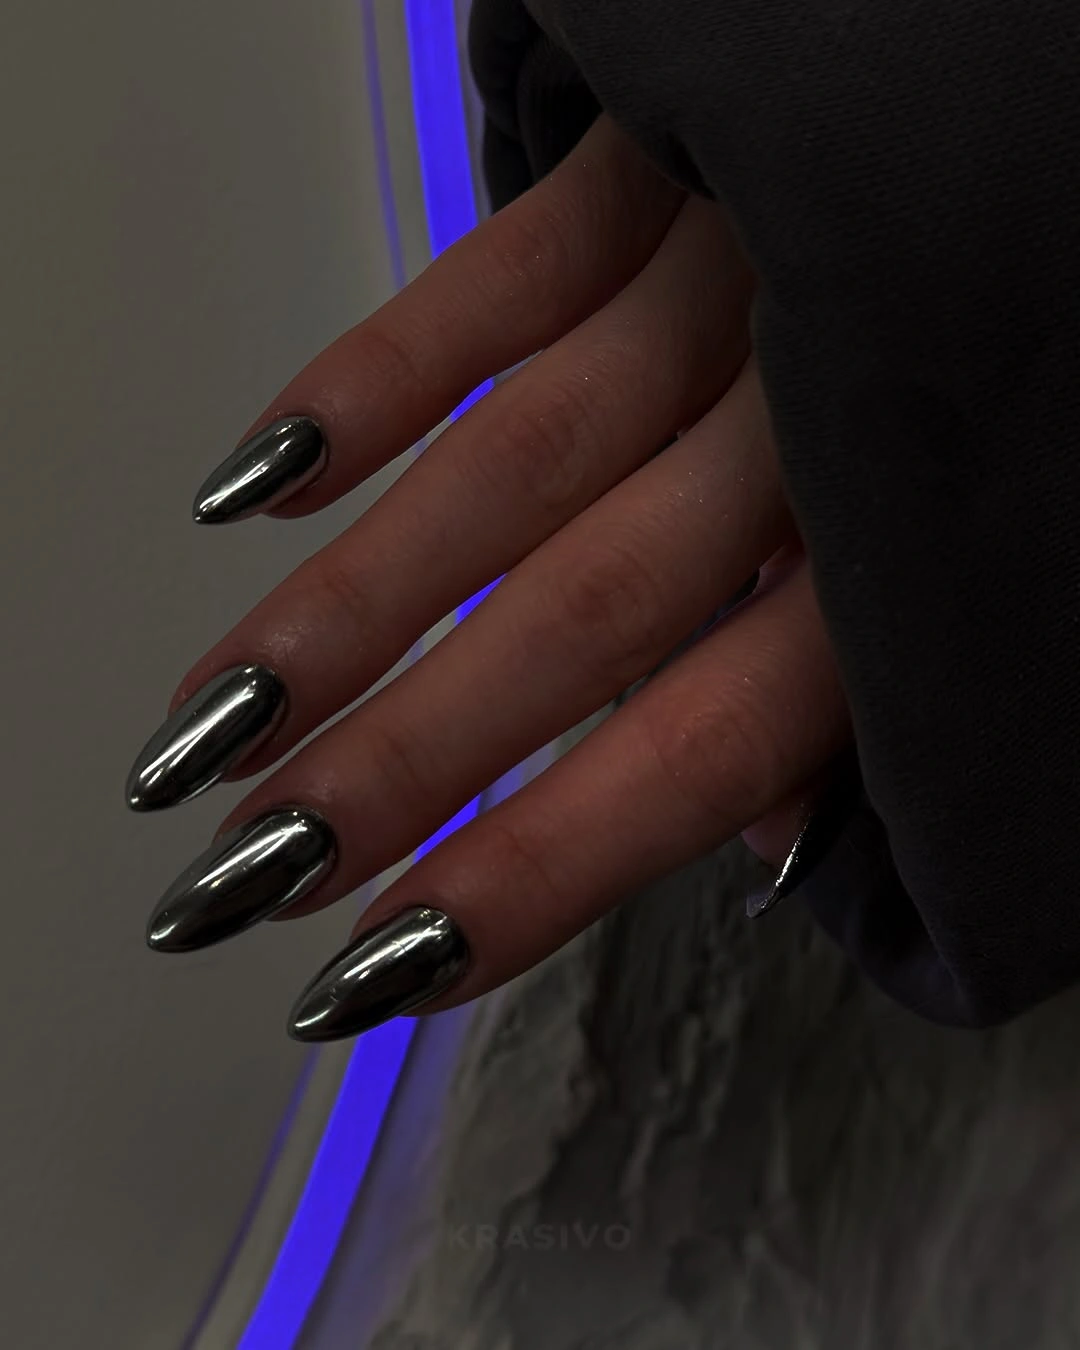
I would use a black or charcoal gel base, a no-wipe top coat, and a highly reflective chrome powder. The cleaner the base, the smoother the metallic effect will look. I would finish with a glossy top coat and carefully seal the free edges.
At home, I would shape every nail into a balanced almond, apply the dark base, and cure it completely. After the no-wipe layer, I would buff in the chrome powder until the surface looks almost mirror-like, then remove the excess and seal it. No complicated nail art required.
This is probably the easiest way for me to make a manicure feel instantly sophisticated for October. Add a black coat and silver jewelry, and the whole look becomes wonderfully moody.
Silver Sculptural Nails With Dimensional Details
These long almond nails take metallic manicure into a more sculptural direction. Cool silver surfaces are divided into rounded, pebble-like sections outlined with darker metallic borders, while tiny reflective embellishments appear between some shapes. The dimensional effect makes every nail look almost like a miniature piece of metalwork.
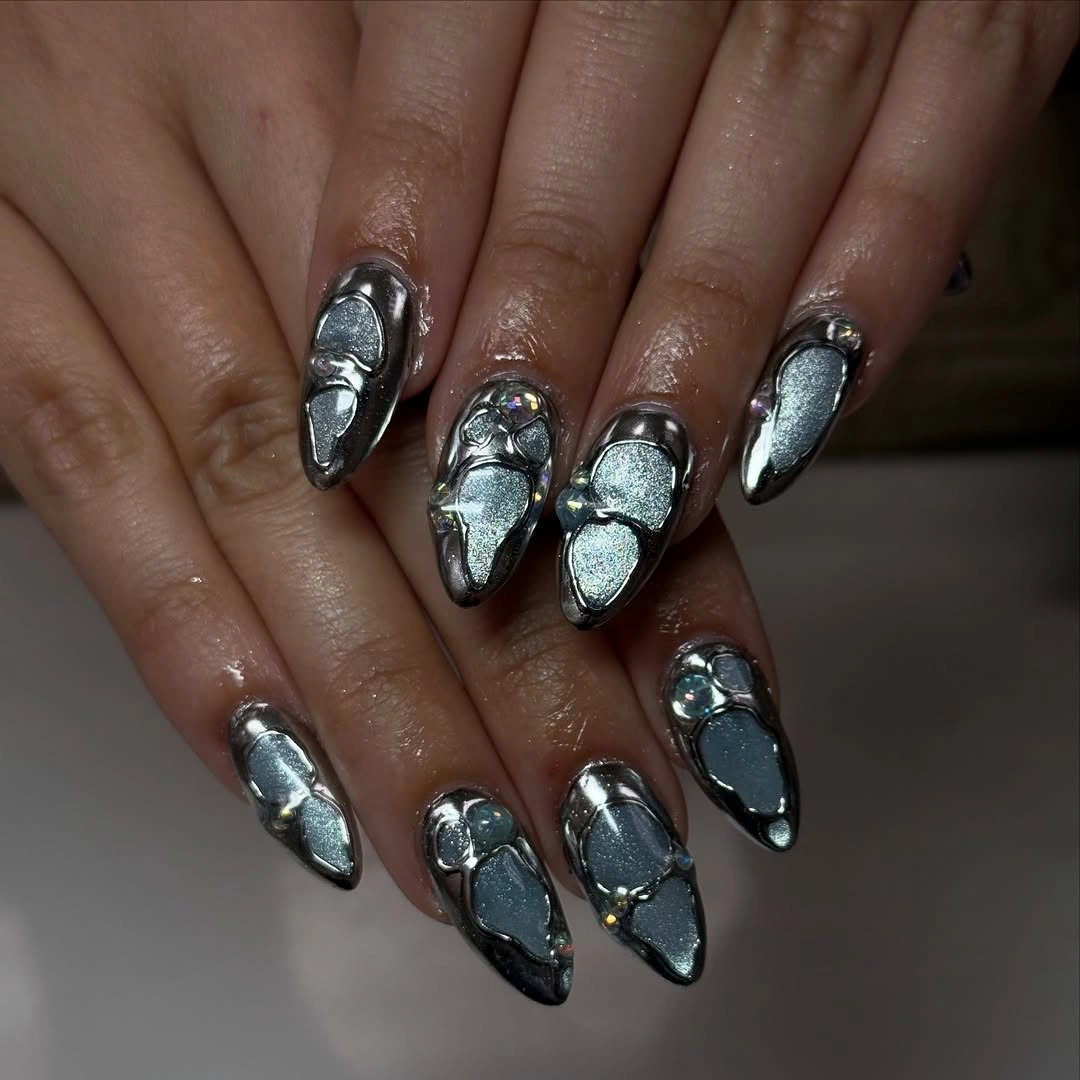
I would use silver chrome pigment, metallic gel, black or charcoal gel for the outlines, and a thick builder gel for raised sections. Small rhinestones can add occasional flashes of color without overwhelming the silver palette. A detail brush and dotting tool would be my essentials.
I would build the metallic base first, then create the raised organic sections individually with builder gel. After curing, I would outline the shapes and add a few embellishments. I would keep the dimensions controlled because too much height can quickly make this style impractical.
For me, this is the statement manicure of the group. It feels futuristic but still perfect for October’s darker evenings, especially when paired with simple clothes that let the nails take center stage.
Black and White Curved Stripe Nails
I love how much movement these short rounded nails create with such a simple palette. A deep black base is covered with narrow white curved stripes that bend and flow across each nail in slightly different directions. Tiny hints of blue shimmer peek through the design, giving the otherwise monochrome manicure an unexpected flash.
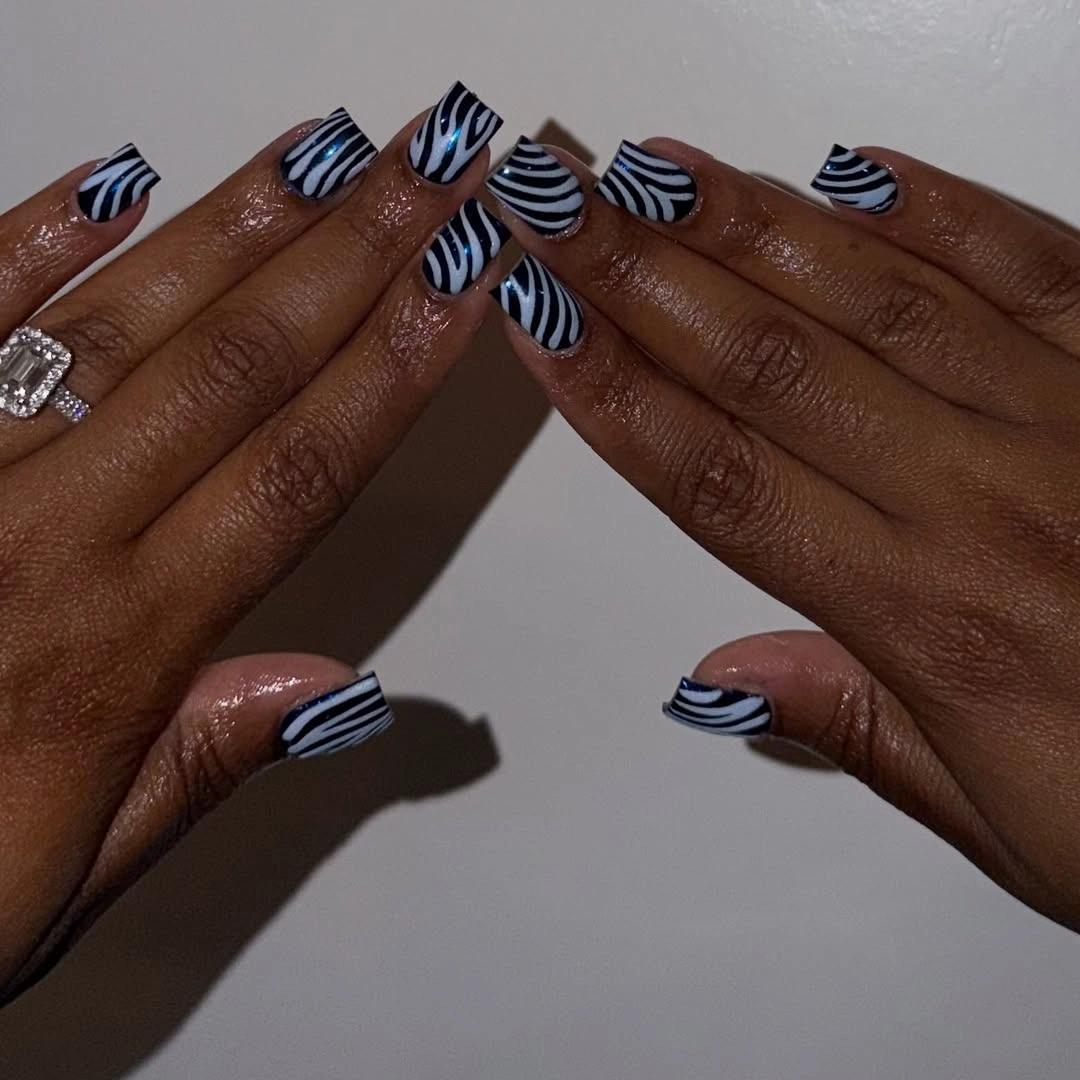
I would use black and white gel polish, plus a subtle blue shimmer if I wanted that extra glint. A very fine liner brush is the main tool because the stripes need to stay narrow and consistent. A glossy top coat will make the black base look especially rich.
I would apply the black base, cure it, and then draw the white lines from one side of the nail to the other, changing their curves slightly on each finger. I would avoid overcrowding the design because negative space between the stripes keeps it crisp.
This feels like a great fall short square or rounded manicure when I want something graphic rather than traditionally seasonal. It is simple enough for everyday wear but has enough attitude to make a basic sweater-and-jeans outfit feel intentional.
Soft Pink Nails With Delicate Gold Edges
This manicure proves that October nails can be incredibly understated. The nails are medium length with a softly squared shape and a translucent blush-pink base. Very fine gold lines trace the tips, while one accent nail carries a tiny gold heart. The result is delicate, feminine, and polished without looking overly decorated.
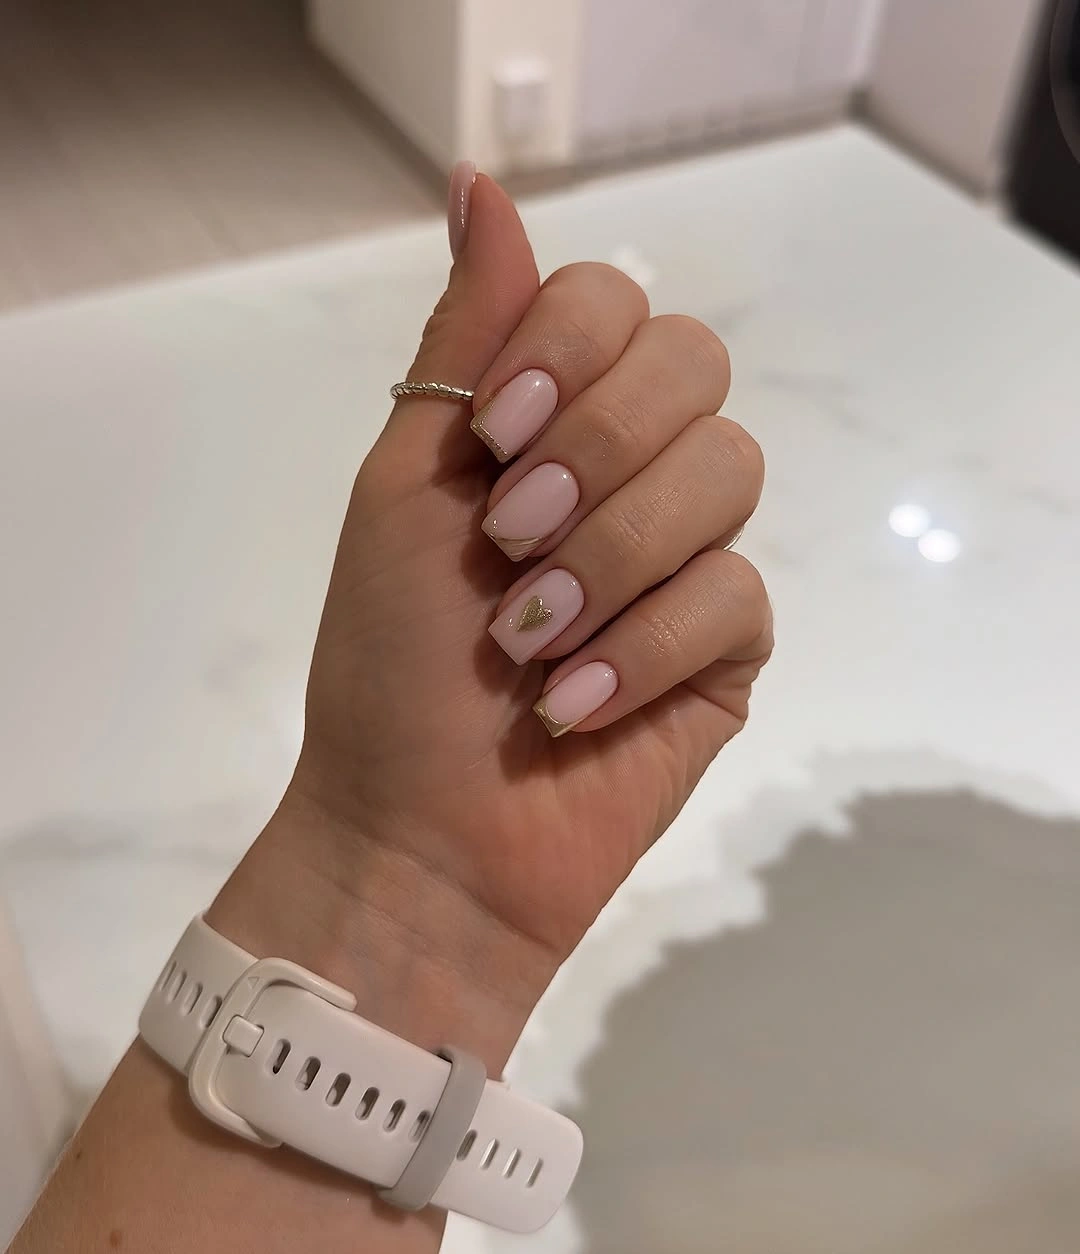
I would choose a sheer pink gel, a fine gold metallic gel, and a tiny amount of gold foil or metallic polish for the heart. OPI Bubble Bath or a comparable blush shade would give me the soft foundation I want. A liner brush is enough for the delicate gold edging.
I would shape the nails evenly, apply the sheer pink in thin layers, and cure before adding the gold details. I would trace only the very edge of each tip and keep the heart tiny on the accent nail. A final glossy top coat completes the clean finish.
This is the manicure I would save for those October days when I want my nails to feel pretty rather than dramatic. It works with everything, from cozy knits to a polished evening outfit, and that versatility makes it an easy favorite.