October has a funny way of making even the smallest details feel a little more dramatic. Suddenly, black polish looks chic instead of severe, tiny ghosts feel charming, and a spider web on a manicure becomes the finishing touch rather than a costume. So what are the cutest spooky Halloween nail art ideas for 2026, and how far do you really need to go with the theme?
I’ve been watching Halloween manicure trends for years, and my favorite thing about them is that there is no single right level of spooky. You can go all in with 3D gold accents and leopard print, keep things graphic in black and white, or choose tiny ghosts on a sheer pink base. These five ideas cover that whole spectrum, with plenty of inspiration for short nails, almond shapes, subtle manicures, and the more dramatic sets that make you want to book an appointment immediately.
Leopard Glam With Tiny Ghosts and Golden Details
I love this manicure because it refuses to choose between glamorous and spooky. The long square, almost coffin-shaped nails start with a sheer pink-nude base, while black French-style tips create a sharp frame. One nail brings in a vivid orange gradient that looks almost like a glowing Halloween pumpkin, while others are covered in warm brown and black leopard spots. The real stars are the tiny white ghosts, delicate spiderweb artwork, and raised gold embellishments that give the whole set a jewelry-like finish. It is Halloween nail art 2026 with a definite fashion-girl attitude.
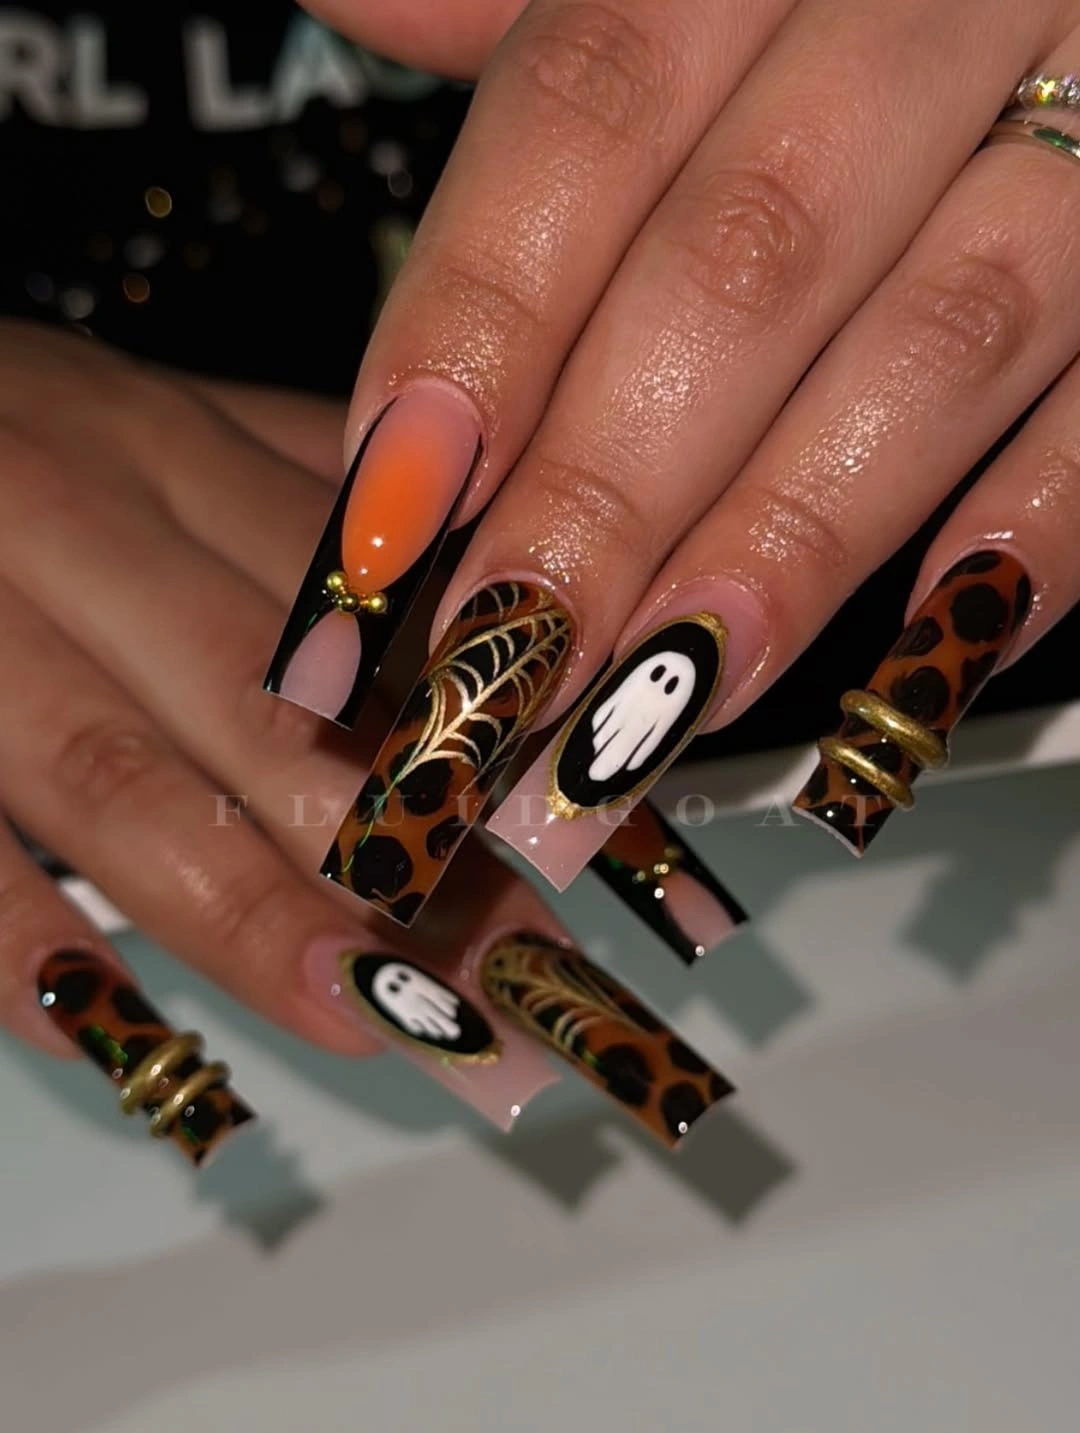
To recreate the look, I would start with a sheer pink builder gel or nude gel polish, then add a deep black gel for the tips and details. For the orange accent, a bright pumpkin-orange gel blended into a softer orange creates that glowing effect. A brown and black combination works beautifully for the leopard print, while white gel paint is enough for the ghosts and fine spiderweb lines. I would finish with tiny gold beads, metallic charms, or thin gold wire if I wanted the same extravagant 3D effect.
The trick is to build the manicure in layers rather than trying to paint everything at once. I would shape and prep the nails first, apply the nude base, cure it, and then create the black tips. After that, I would add the orange ombré and leopard pattern, keeping the spots deliberately irregular so they do not look too perfect. The ghost and web details come next with a fine liner brush, followed by carefully secured gold decorations and a glossy top coat around the raised elements. If you are doing this at home, I would keep the nail art concentrated on two or three statement nails and simplify the rest.
Colorful Stained Glass Halloween Nails
This manicure takes the spooky theme in a completely different direction. The nails have a short-to-medium almond or oval shape with a translucent pink base, while bold black outlines divide each nail into little stained-glass sections. Inside those frames are playful Halloween details in green, orange, lavender, pink, and yellow, including a spider, a ghost, and other tiny seasonal motifs. I especially like the balance between the dark outlines and soft colors because it makes the design feel cute rather than gloomy.
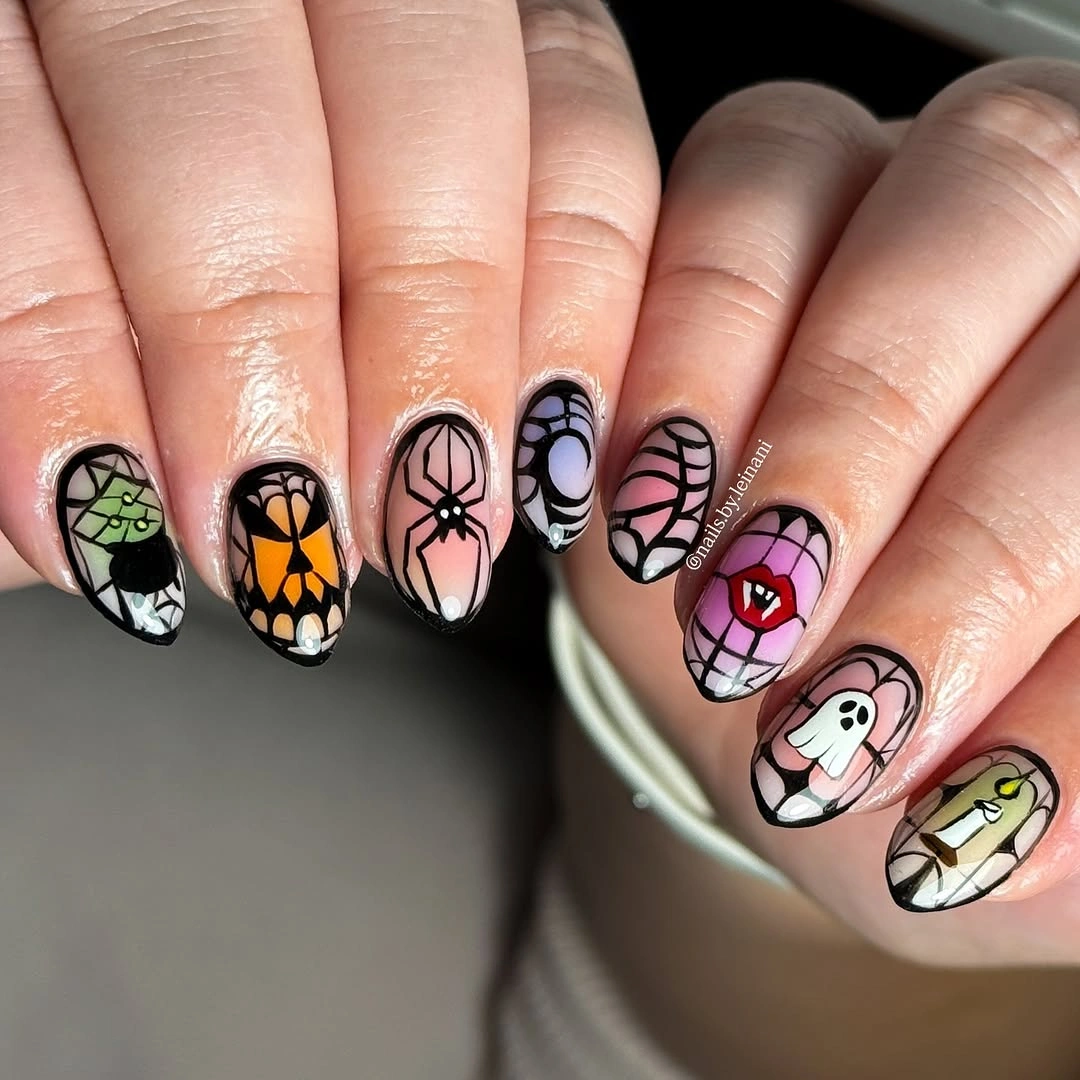
For this version, I would reach for a sheer milky pink or blush gel as the foundation and several small bottles of Halloween colors. Lime or leafy green, pumpkin orange, soft pink, lavender purple, white, and a bright yellow are enough to create the stained-glass effect. Black liner gel is essential because those thin dividing lines give the manicure its characteristic graphic finish. A glossy top coat keeps the colors looking almost glass-like and helps the little illustrations stand out.
I would make the black framework first and cure it before filling the individual sections with color. That makes the design much easier to control, especially on short nails where every millimeter counts. I would then add the little characters and symbols, keeping their faces and silhouettes simple rather than trying to create miniature paintings. A very fine brush is useful here, but nail art stickers can also help if freehand drawing is not your thing. The finished effect should look playful and slightly imperfect, not like a technical diagram.
Minimal Black Halloween Symbols on a Nude Base
Here I would call the mood subtle Halloween rather than full costume. The almond-shaped nails have a glossy nude base that leaves plenty of natural-looking space around the artwork. Black silhouettes and line drawings create the theme: a spiderweb, a coffin, bats, a little skull-like motif, and other recognizable Halloween symbols appear as individual accents. Tiny gold beads add a warm flash of metallic detail, making the manicure feel more polished and less like a novelty set.
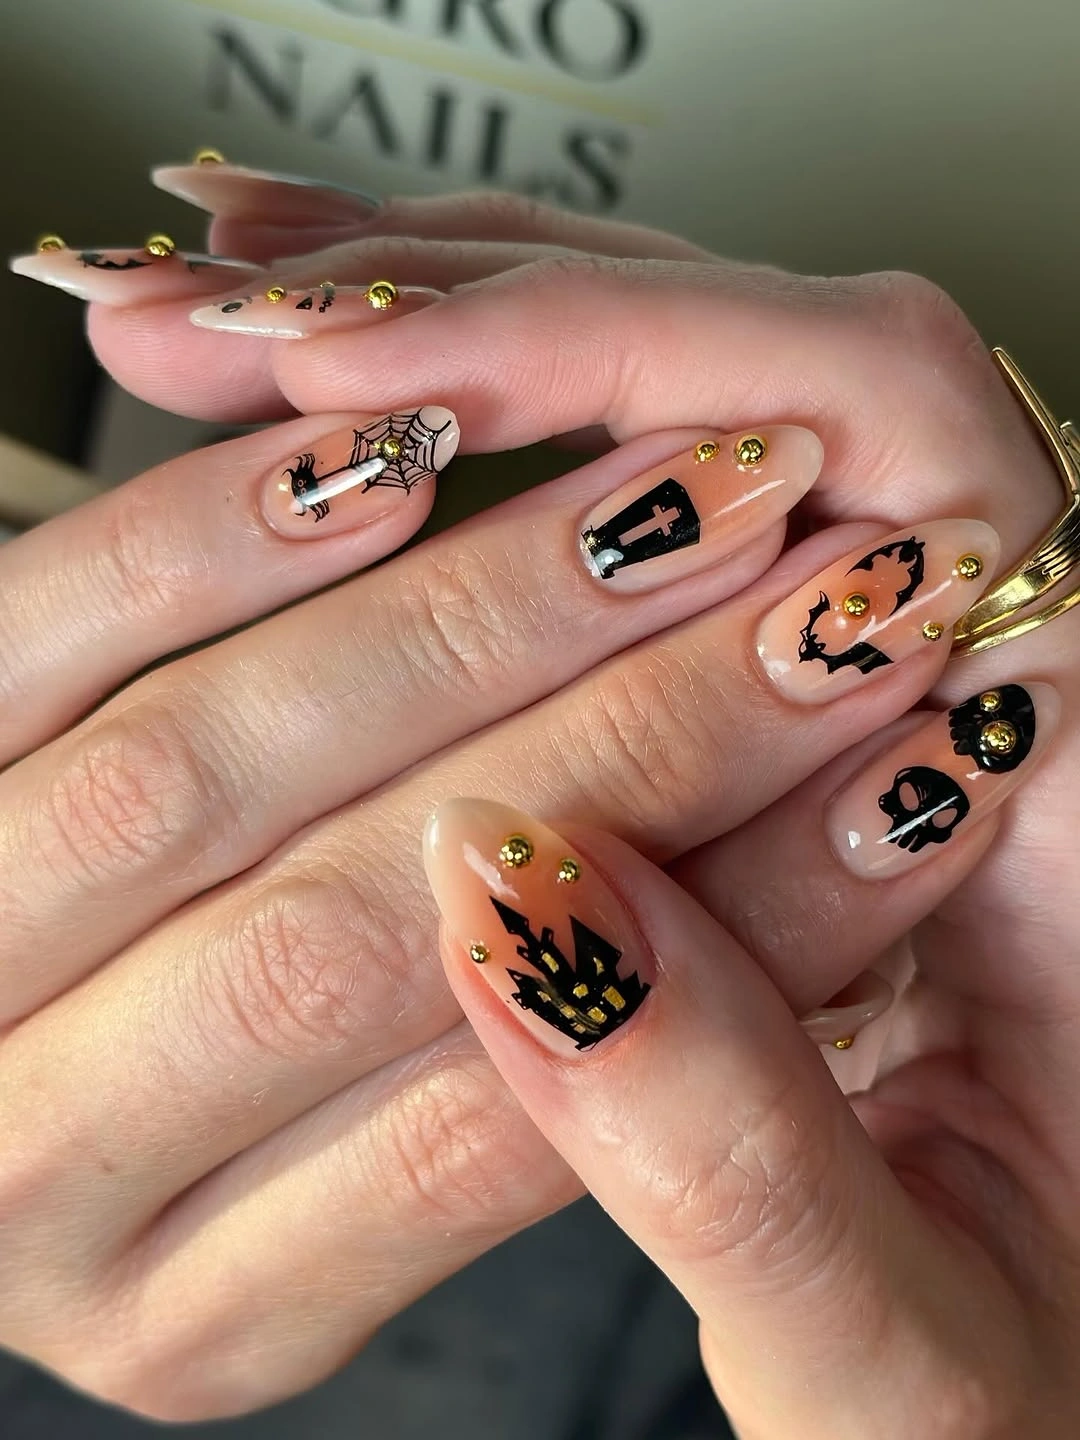
I would keep the color palette deliberately small for this design. A translucent nude or peachy-pink gel creates the clean background, while a highly pigmented black gel paint handles the spider, web, coffin, bats, and other silhouettes. Gold microbeads or tiny metallic studs provide the only real decoration beyond the painted details. A high-shine top coat is important because the contrast between glossy nude and saturated black is what makes this manicure look expensive.
At home, I would begin with a clean almond shape and a thin nude layer rather than an opaque beige polish. Once that is cured, I would sketch each symbol with a very fine brush, using the larger nails for the more complicated details and keeping smaller nails almost deliberately sparse. The gold accents can be attached with a small amount of nail adhesive or builder gel before the final top coat. I would resist the temptation to fill every empty space – the negative space is part of the design.
Black and White Spiderweb Stiletto Drama
Black and white is one of those combinations that never needs much explaining, and Halloween gives it an excellent excuse to become dramatic. These long pointed nails use crisp white and deep black in graphic bands, creating a striped effect that feels almost editorial. The standout detail is a large black spider drawn over a white nail, with its legs extending across the surface in clean, deliberate lines. The result is spooky, modern, and much sharper than a traditional orange-and-black manicure.
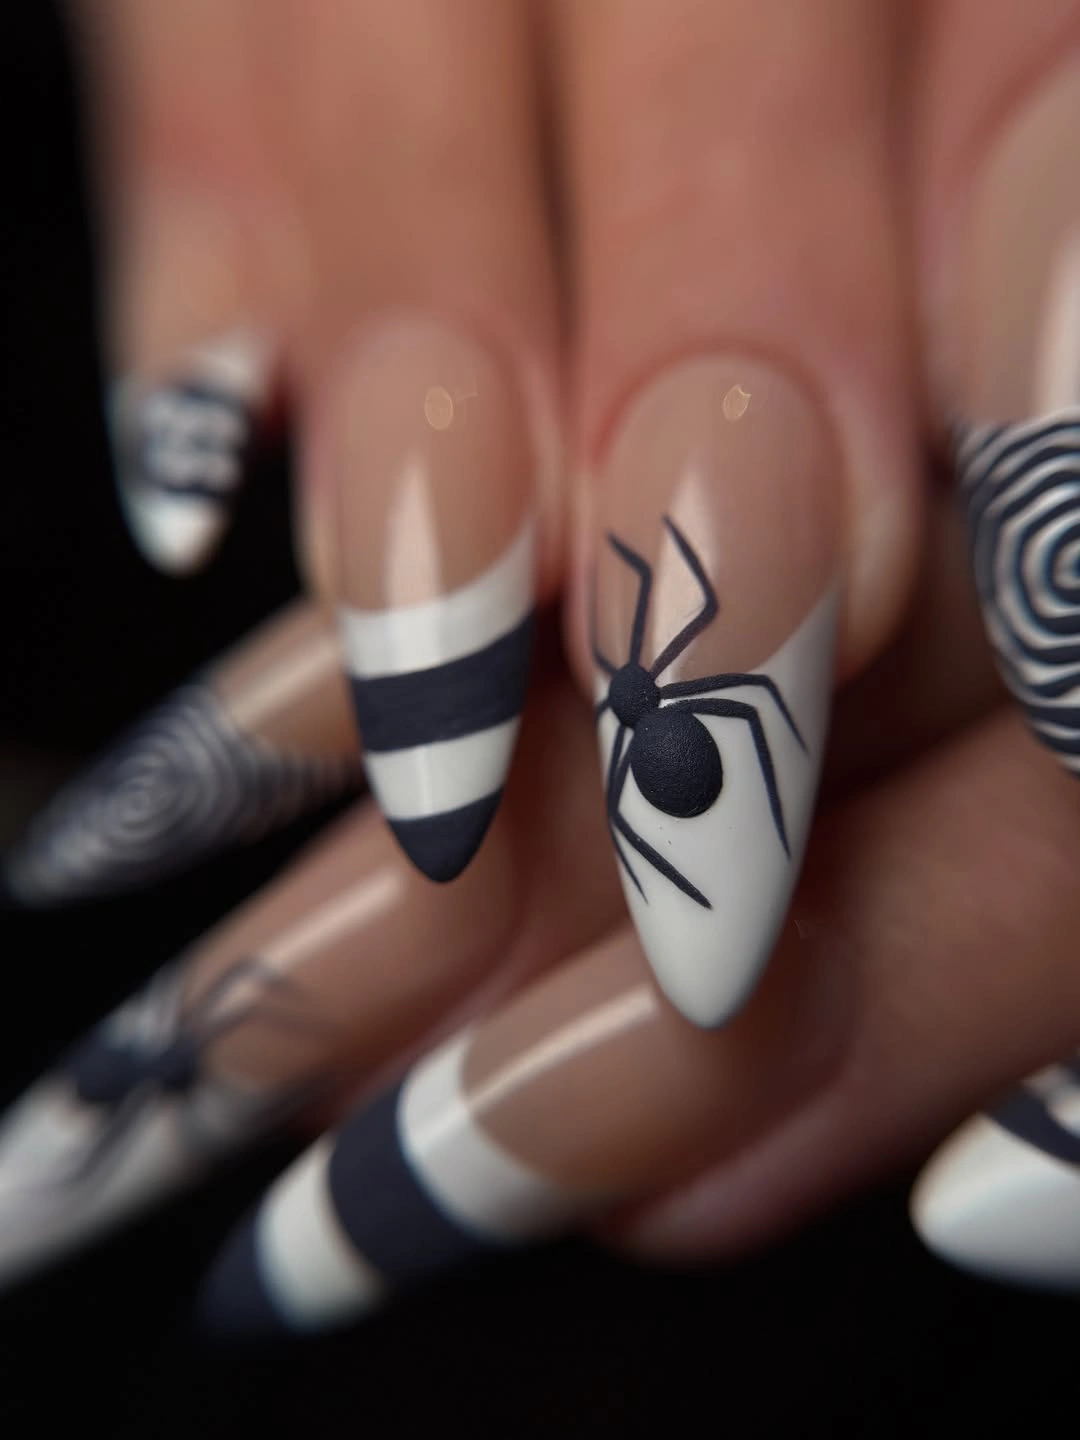
I would use a soft white gel polish, a dense black gel, and a very fine nail-art liner for this look. The white needs to be opaque enough to cover in one or two controlled layers, while the black should have a smooth, highly pigmented finish. A sheer nude can be used on the remaining nails to keep the set from becoming too heavy. Because the design depends on crisp geometry, I would also keep a detail brush and a little gel cleanser nearby for correcting lines before curing.
The easiest way to approach the striped nails is to work slowly and cure each section instead of attempting all the lines in one pass. I would create the white foundation first, then add the black bands with a liner brush, checking the symmetry from several angles before curing. For the spider, I would start with the body and then draw the legs outward, using thin strokes that become slightly more delicate toward the ends. On very long stiletto nails, keeping the lines clean matters more than adding lots of extra decoration.
Cute Little Ghosts for Short Halloween Nails
For anyone searching for easy Halloween nail designs for short nails, this is the sweet spot. The nails are kept short and softly rounded, with a glossy nude-pink base that lets the tiny white ghosts stand out. Each ghost has simple black eyes and a few colorful Halloween details around it, including tiny orange, red, and green accents. The shapes are intentionally uncomplicated, which gives the manicure a charming hand-painted feel instead of making it look overly polished or complicated.
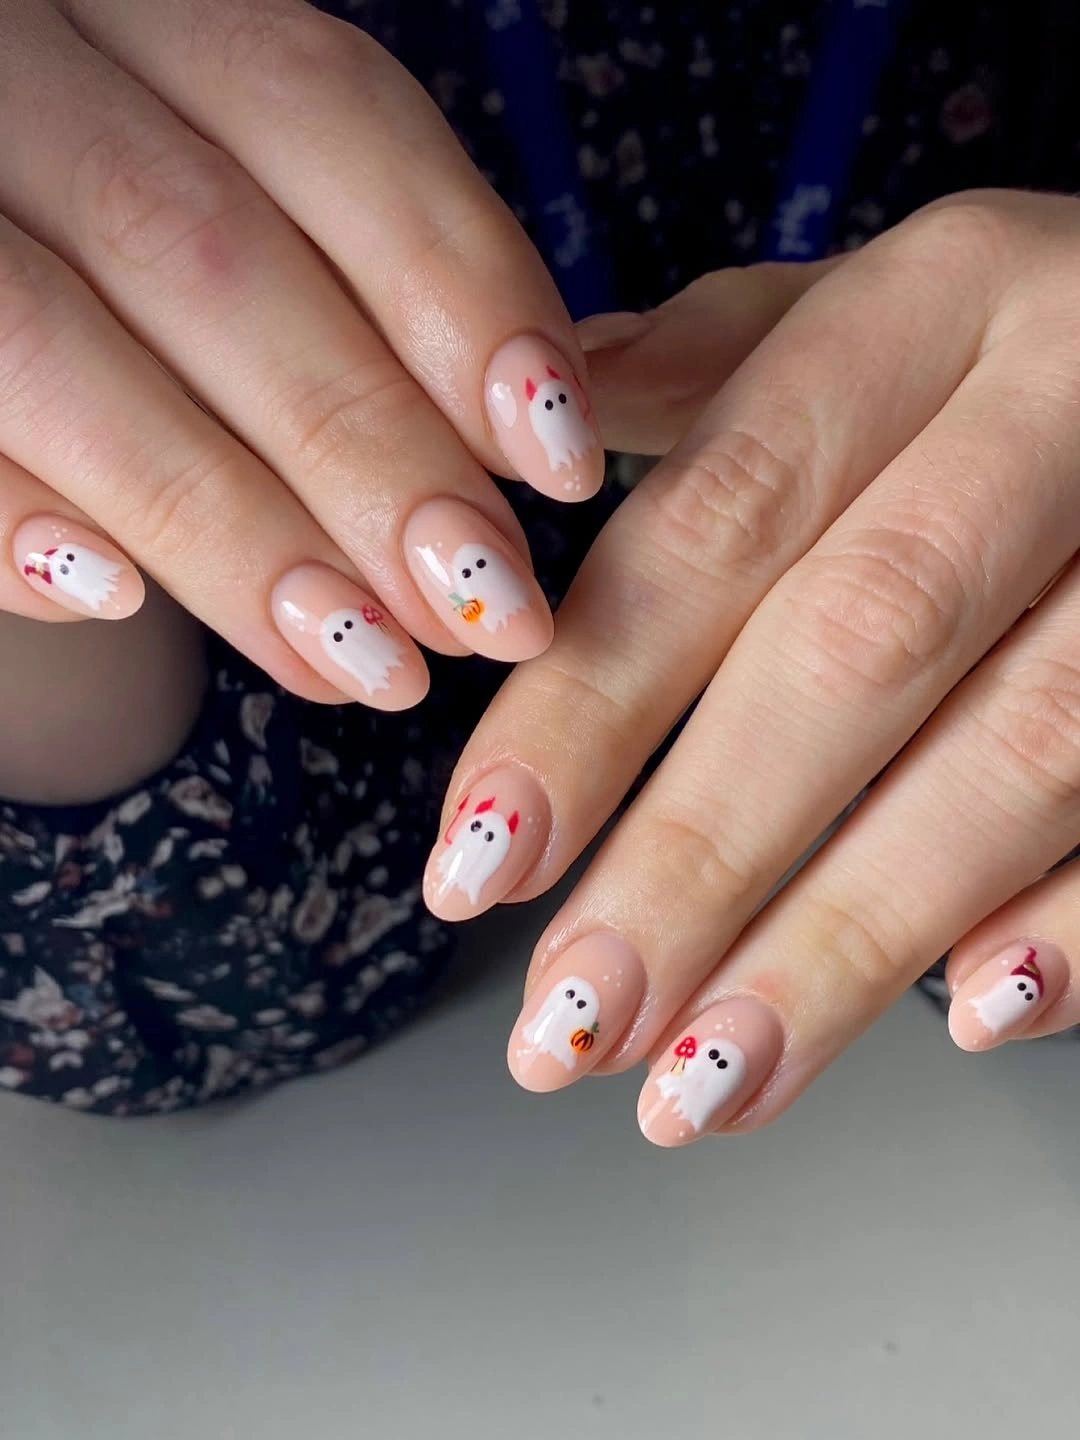
I would use a sheer nude-pink polish as the base, a creamy white gel for the ghosts, and black gel paint for their tiny eyes. A small selection of orange, red, green, and pink polish is enough for the miniature seasonal accents. I would not overload the manicure with glitter or rhinestones because the appeal here comes from the clean little characters. A glossy top coat gives the nude base that fresh, almost jelly-like finish that works particularly well with cute Halloween nail art.
To create the ghosts, I would first paint small white shapes with a rounded top and softly uneven bottom edge. After curing, I would add two tiny black dots for the eyes and then place the little pumpkins, bows, mushrooms, or other seasonal accents around them. Short nails do not leave much room for complicated illustrations, so I would simplify every element until it can be recognized in just a few strokes. That is also what makes this manicure approachable for a beginner – perfection is not really the point.
Cosmic Purple Halloween Nails
I would call this one Halloween night glamour with a little celestial magic. The manicure combines rich purple shimmer, glossy black, sheer nude, and crisp white details. Crescent moons, sparkling stars, delicate spiderwebs, and white pumpkins create a dreamy spooky effect, while the rounded shape keeps the set wearable rather than overly dramatic.
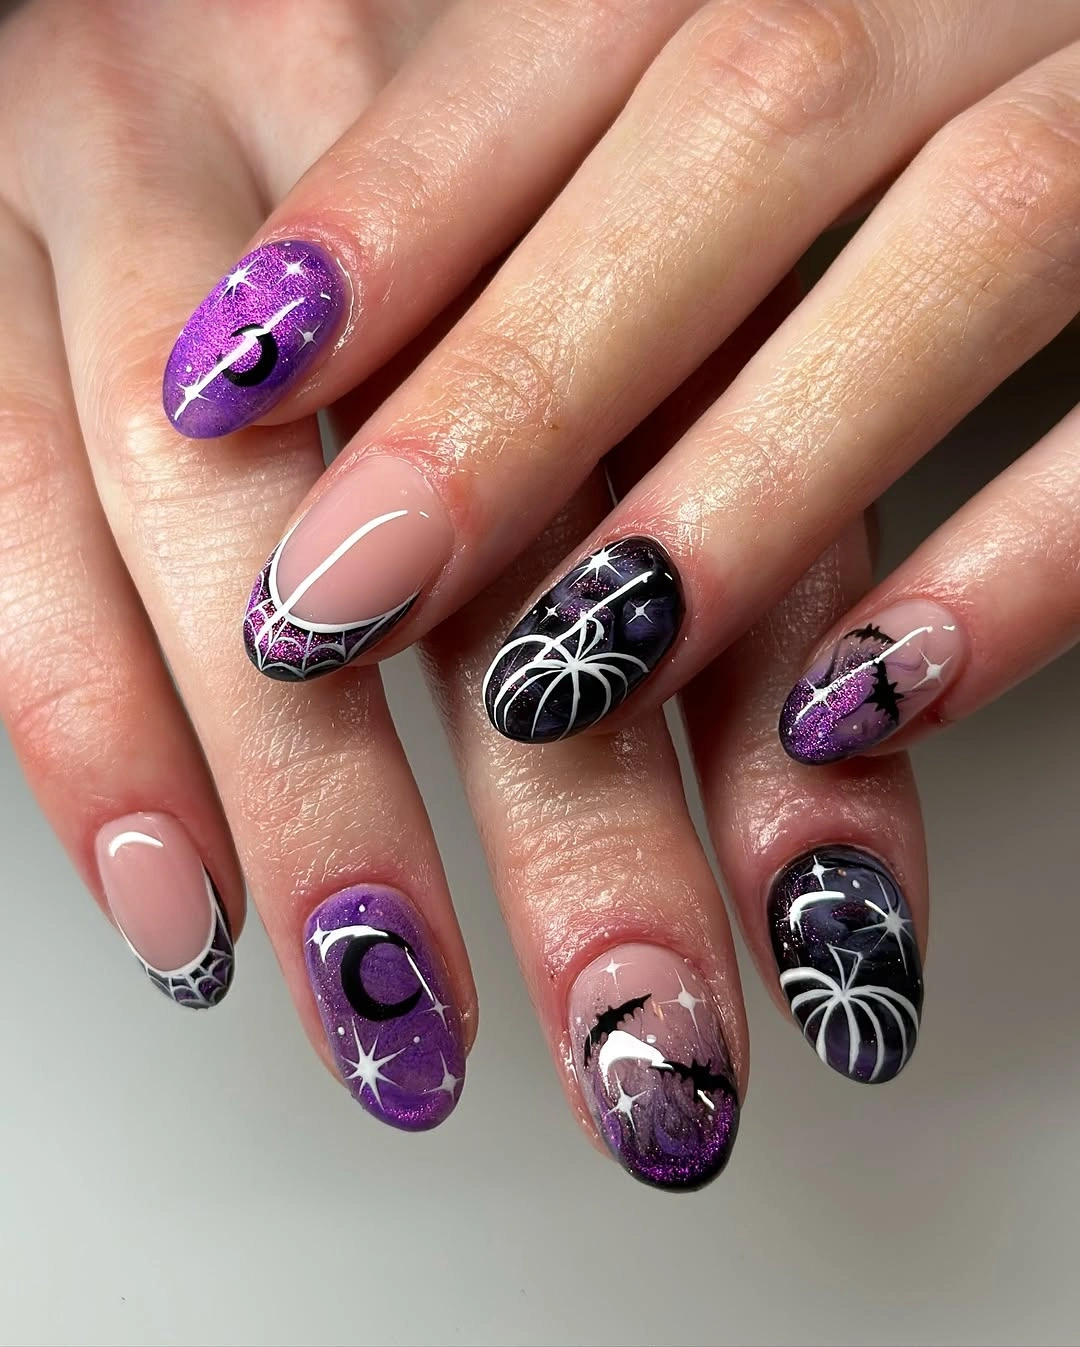
For the base, I would use a sheer pink nude, a glittering purple gel, and a deep black polish. White liner gel creates the moons, stars, webs, and pumpkin details, while a few holographic or silver accents add the twinkle. I would build the purple and black sections first, cure them, and then add the fine artwork with a detail brush.
This is one of my favorite ideas for an October evening because it feels festive without relying on orange. If purple is already part of your wardrobe, this manicure almost styles itself.
Blue Gothic Halloween Nail Art
This design takes Halloween somewhere cooler, using cobalt and midnight blue instead of the usual orange and black. The short almond nails feature a milky white base decorated with blue botanical-style details, gothic shapes, and a delicate skull. A few solid cobalt nails balance the intricate artwork and make the whole manicure feel more polished.
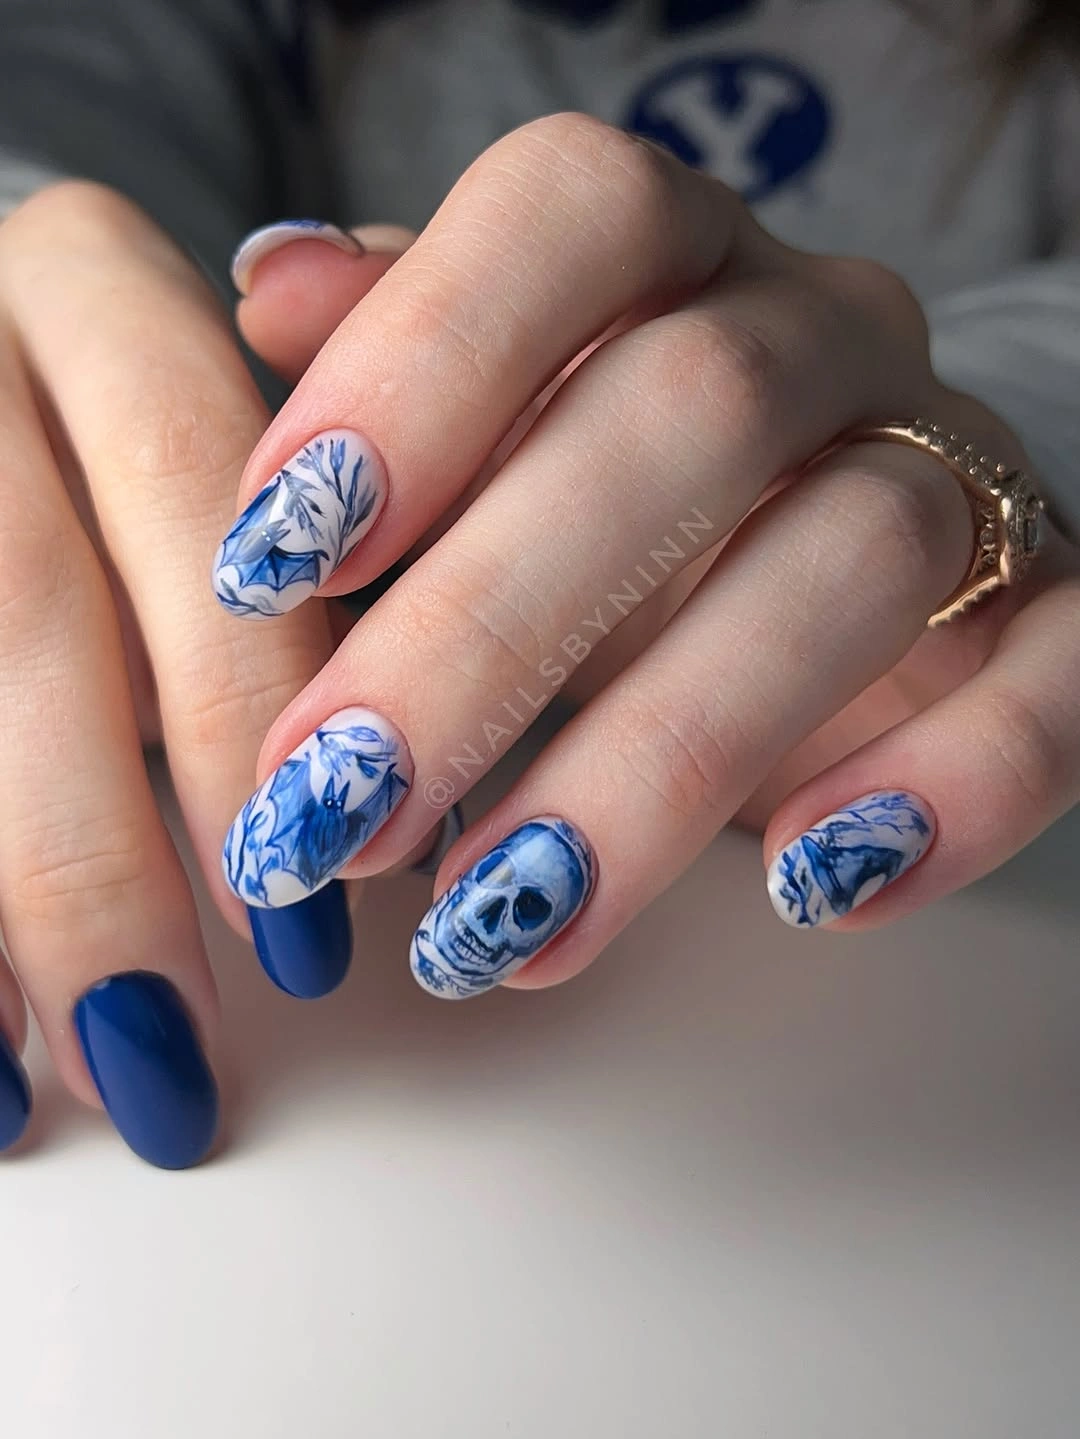
I would use a milky white gel, a vivid cobalt blue, and a darker navy for depth. A fine liner brush is useful for the branches, leaves, and skull, while a glossy top coat gives the finished set that porcelain-like shine. I would keep the detailed artwork concentrated on selected nails so the design stays visually clean.
I especially like this direction for someone who wants spooky nails without the traditional Halloween palette. The blue makes the manicure feel unexpected, almost like antique porcelain with a gothic twist.
Smoky Skull Halloween Nails
For a darker mood, I would choose this smoky nude and black manicure. The nails are short and rounded, with translucent taupe and blush tones melting into black at the edges. Soft smoky brushwork creates a shadowy effect, while one nail features a small skull that gives the manicure its unmistakable Halloween character.
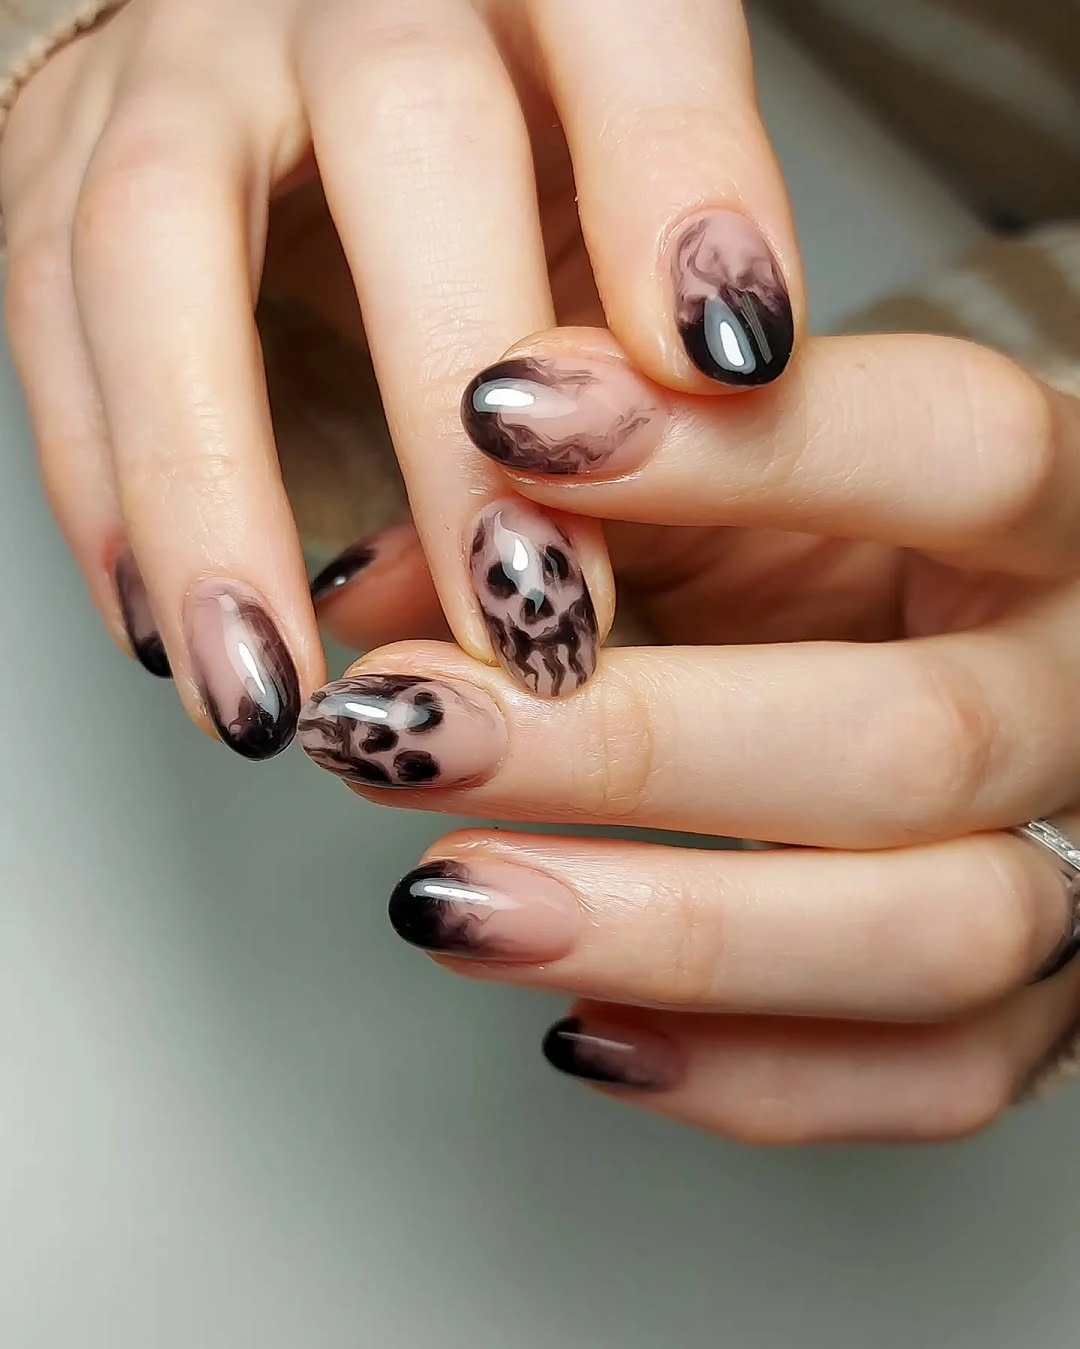
I would start with a translucent nude base, then layer brown, charcoal, and black gel in thin, irregular strokes. A fine brush can soften the edges and create the smoky transition. For the skull, I would use black and white detailing rather than adding too much decoration.
This is the kind of manicure I would pick when I want Halloween energy but still want my nails to look sophisticated. The smoky finish does the work quietly, which makes it especially good for everyday October wear.
Cute Halloween Almond Nails
These almond-shaped nails prove that spooky can also be incredibly sweet. A glossy blush-nude base keeps everything light, while tiny black spiders, bats, stars, pumpkins, skulls, and white ghosts appear mostly around the tips. Small orange details add just enough traditional Halloween color without overwhelming the soft background.
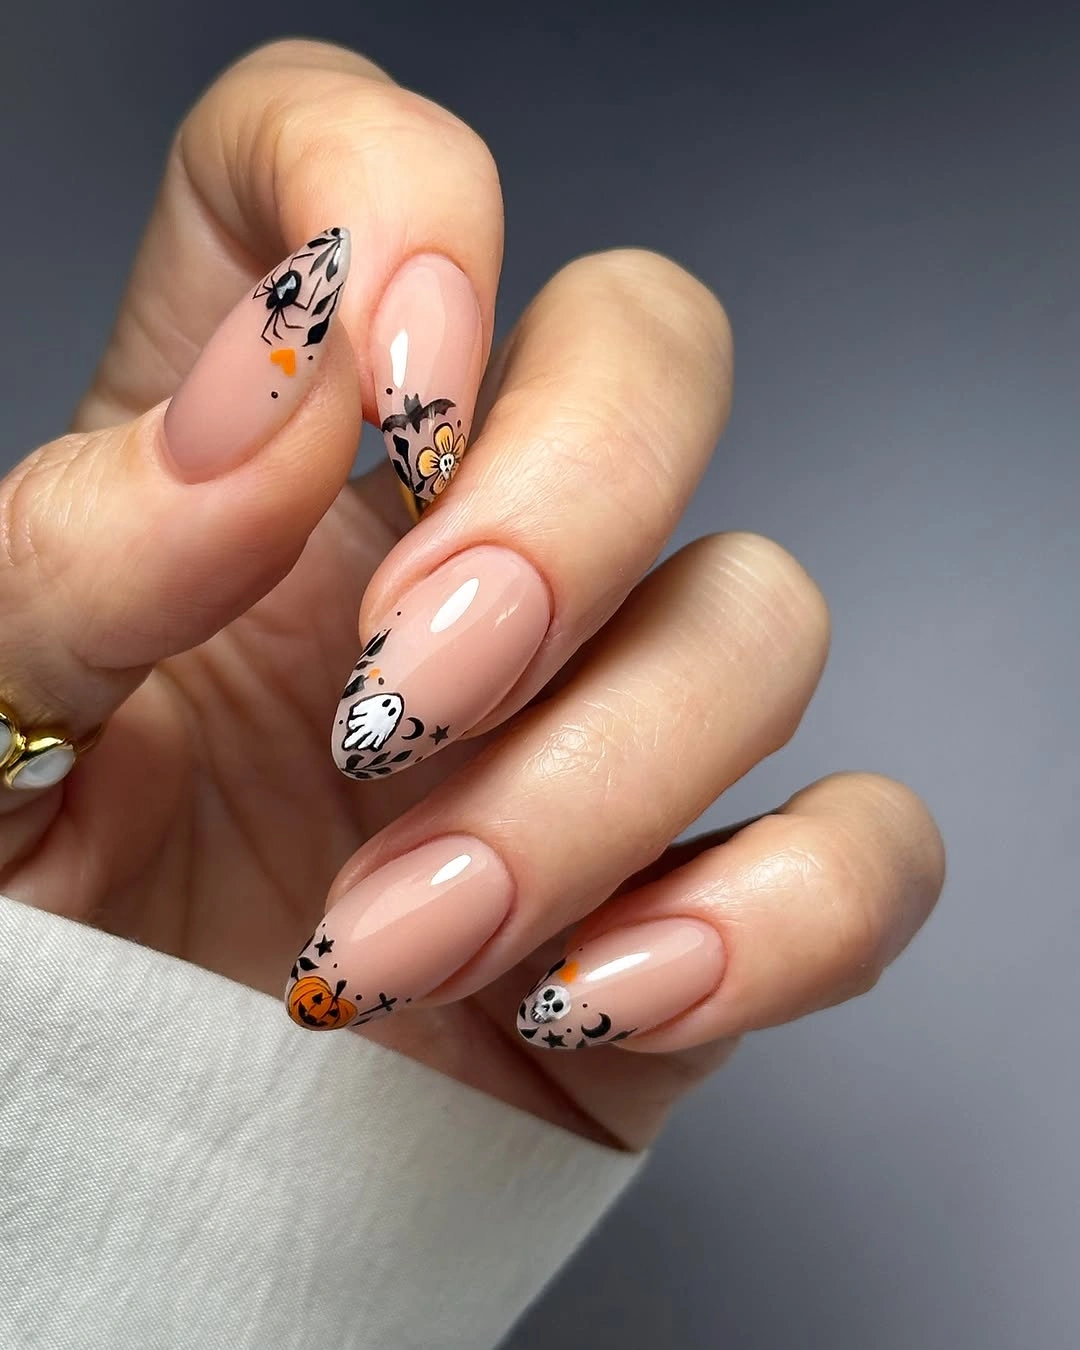
I would use a sheer pink nude, black and white nail-art gels, plus a small amount of pumpkin orange. The trick is keeping the illustrations tiny and leaving plenty of nude space around them. I would finish with a glossy top coat to preserve that clean, fresh appearance.
For me, this is an easy choice when the goal is cute rather than scary. It would work beautifully with a cozy sweater, denim, or even a simple black dress.
Black Hearts and Gothic Waves
This manicure brings a more graphic take on spooky Halloween nail art. The sheer nude base is paired with glossy black hearts, wavy black shapes, tiny white dots, and delicate silver-white linework. Some nails feature little heart-shaped compositions, while others use flowing abstract curves that almost resemble tiny ghosts or flames.
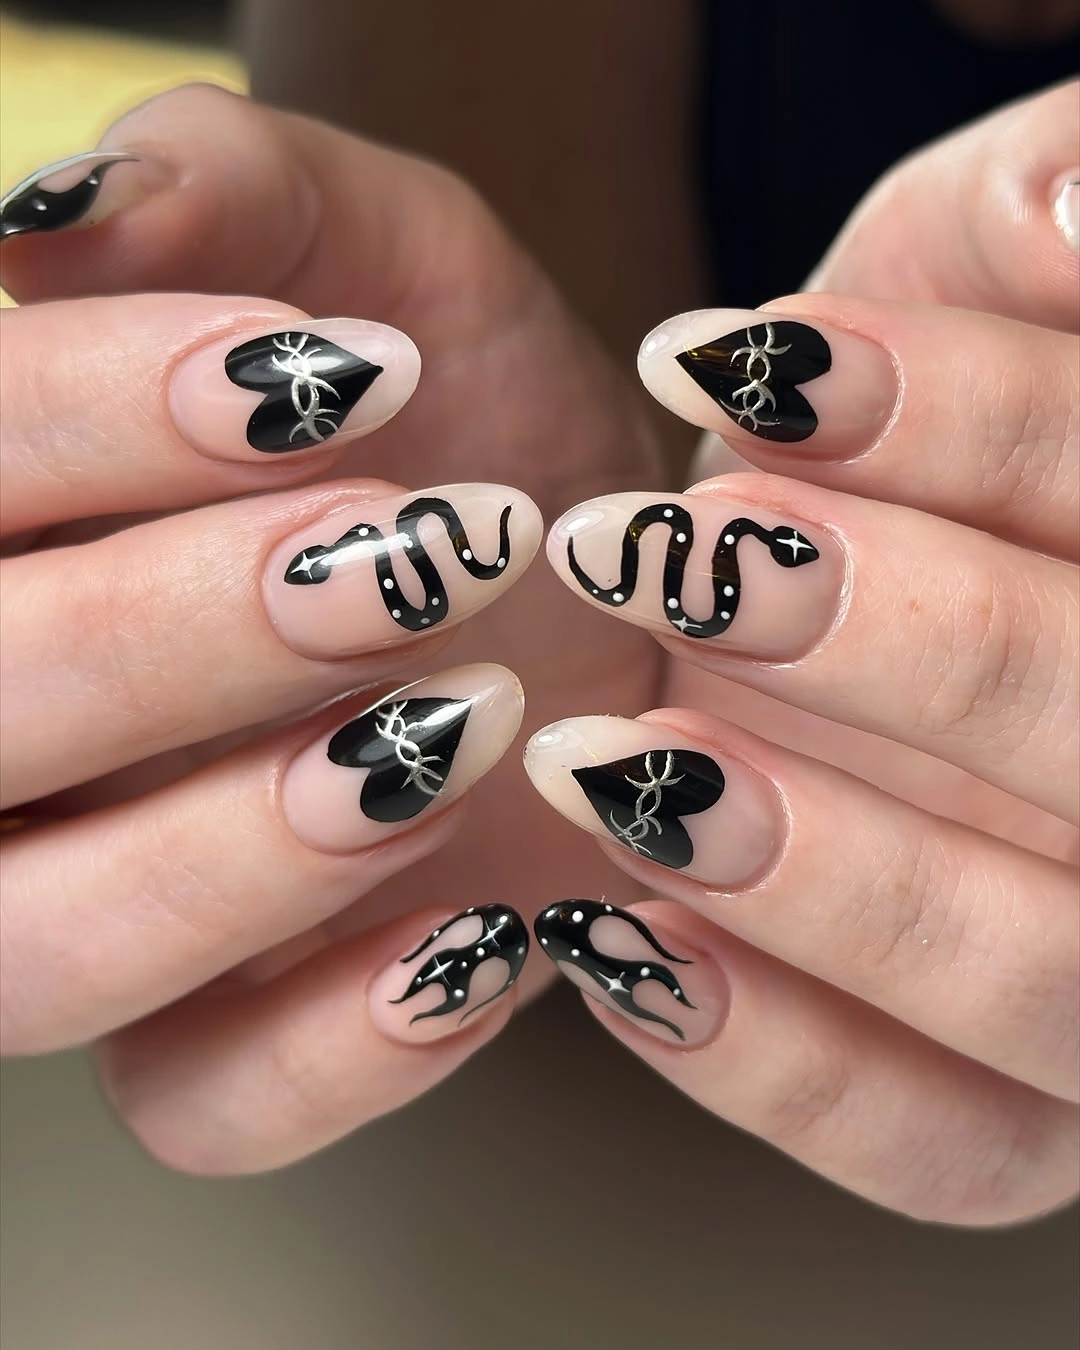
I would keep the palette extremely simple with sheer nude, black, white, and a touch of silver. A fine liner brush is enough for the curves and tiny dots, while a glossy black gel gives the hearts their dramatic shine. I would cure each small detail separately to keep the lines crisp.
This one feels less like a traditional Halloween costume and more like a gothic manicure with a seasonal wink. That is exactly why I would wear it beyond October 31.
Playful Retro Halloween Nails
I love how this manicure gives Halloween a bright retro twist instead of going straight for orange and black. The short rounded nails use a sheer milky base with turquoise, soft yellow, and black geometric shapes. Tiny spiders, bats, stars, and a bold black bat silhouette create the spooky details, while white sparkle marks make the whole set feel almost like vintage pop art.
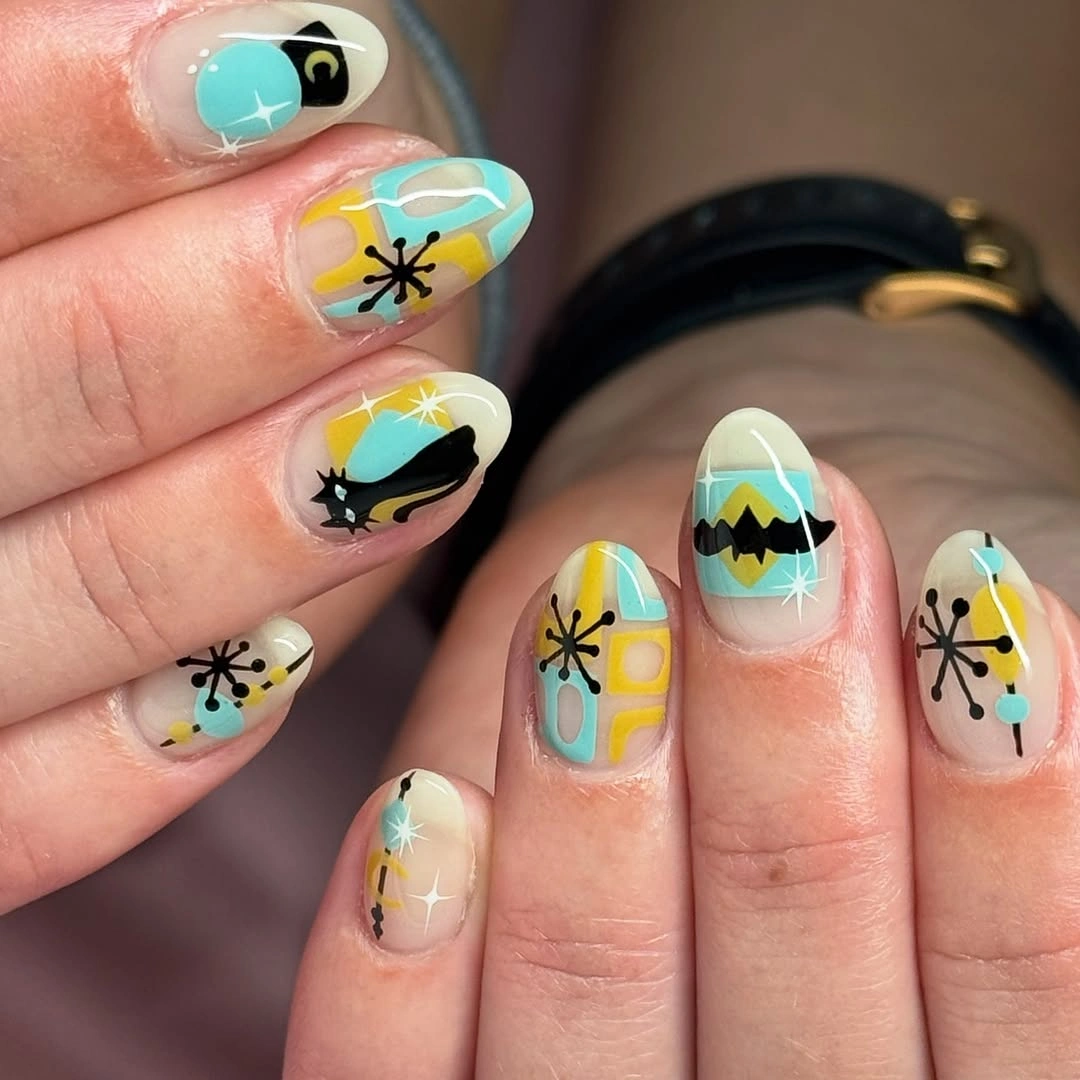
I would use a sheer nude base, turquoise gel, sunny yellow, black, and white liner gel. The design works best when the colored shapes stay slightly transparent and the black illustrations remain crisp. I would add the geometric blocks first, cure them, then draw the spiders and bats with a fine brush.
For me, this is such a fun choice when traditional Halloween colors feel a little predictable. It is cheerful, quirky, and especially flattering on short nails.
Cozy Witchy Halloween Nails
This short nail design feels like October in a sweater. A warm beige-nude base carries tiny black and olive-green illustrations, including a bubbling black cauldron, a broom, little stars, and delicate leafy details. The artwork is intentionally small and slightly sketch-like, which gives the manicure a handmade charm rather than a polished costume effect.
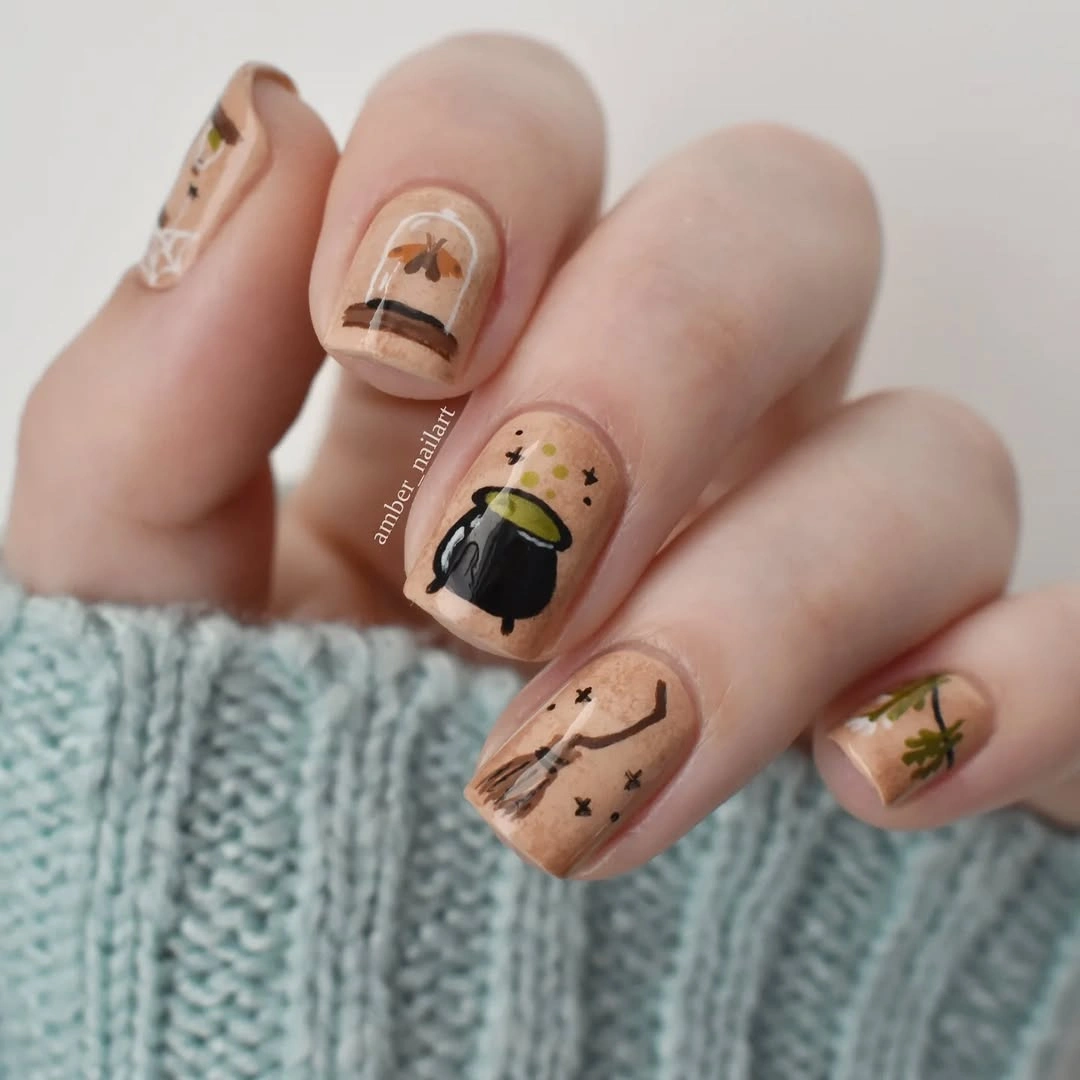
I would choose a warm nude or beige gel, black and dark brown liner colors, muted olive green, and a tiny amount of orange. A very fine detail brush is enough for the broom, cauldron, stars, and botanical accents. I would keep the top coat glossy but thin so the miniature artwork remains sharp.
This is the manicure I would save for a quiet October weekend. It has that cozy witch aesthetic without becoming overly themed, and the short length makes it genuinely practical.
Stained Glass Pumpkin Halloween Nails
These nails turn classic Halloween symbols into miniature stained glass. Rich black outlines divide the rounded nails into graphic sections filled with pumpkin orange, green, blue, muted purple, and pale yellow. One design features a smiling jack-o-lantern, while another brings in a bat-like silhouette, creating a colorful but unmistakably spooky finish.
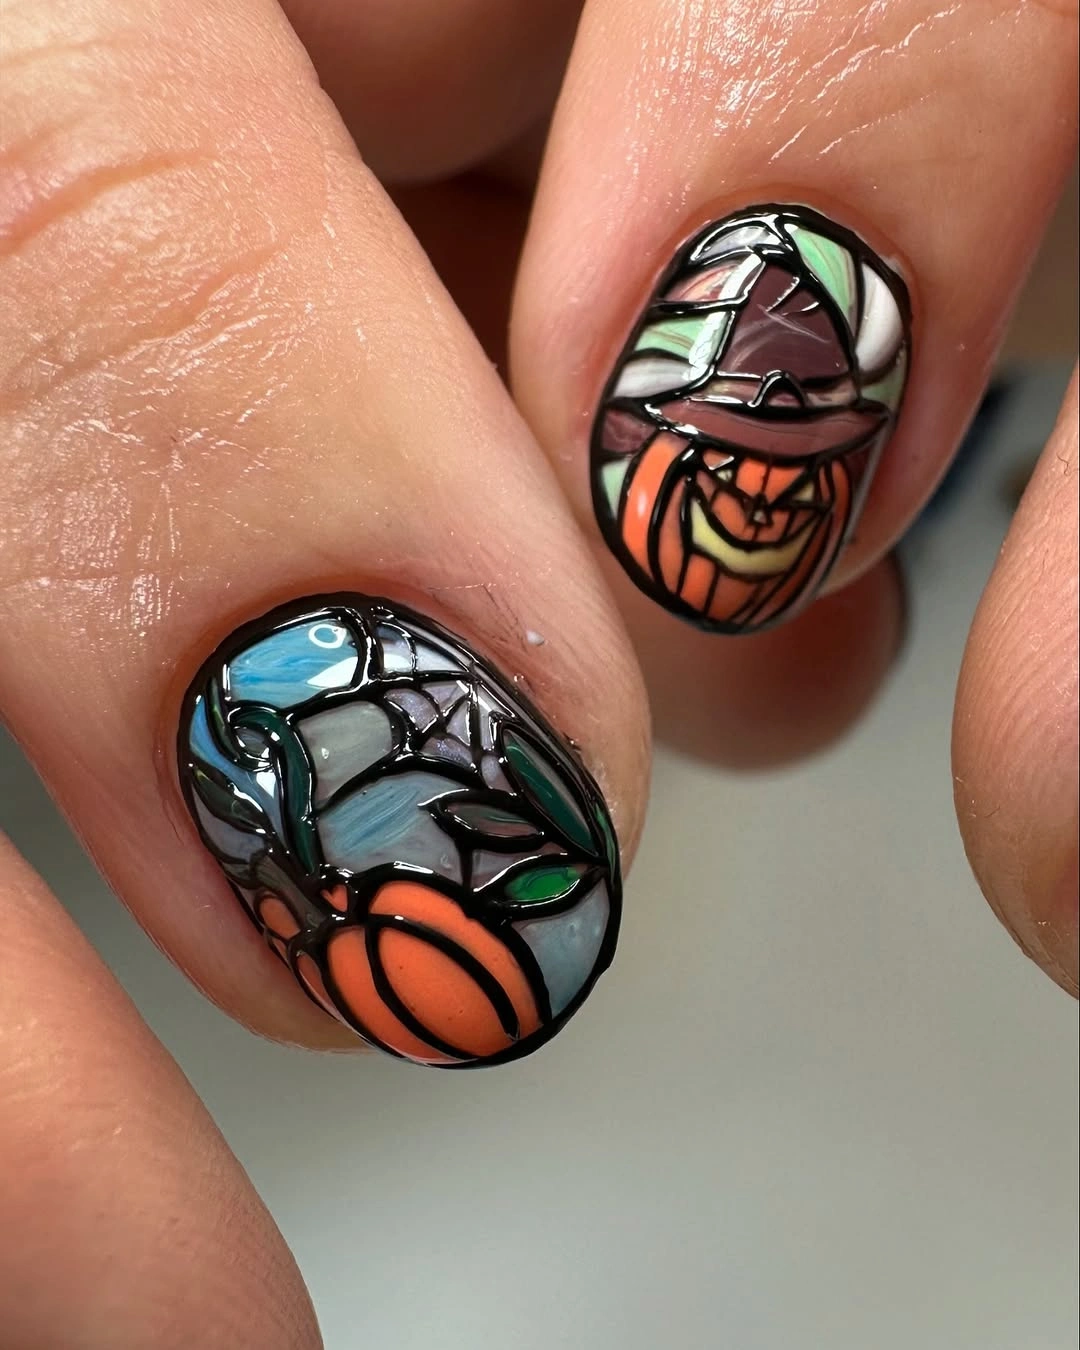
I would use a sheer or pale base, highly pigmented black gel, and several translucent jewel-toned colors. A fine liner brush is essential for the black framework, while a glossy top coat gives the finished manicure that glassy dimension. I would paint the outlines first and fill each section afterward.
This is definitely one for someone who wants the nail art to be noticed. I love the little vintage-stained-glass feeling because it makes familiar Halloween imagery look much more sophisticated.
Bloody Red Halloween Nails
Nothing says Halloween quite as directly as deep red, but this manicure keeps the effect elegant. The almond-shaped nails alternate between glossy wine-red polish and sparkling champagne-nude backgrounds decorated with dripping red accents. The contrast makes the drips look almost jewel-like rather than messy, especially against the smooth metallic shimmer.
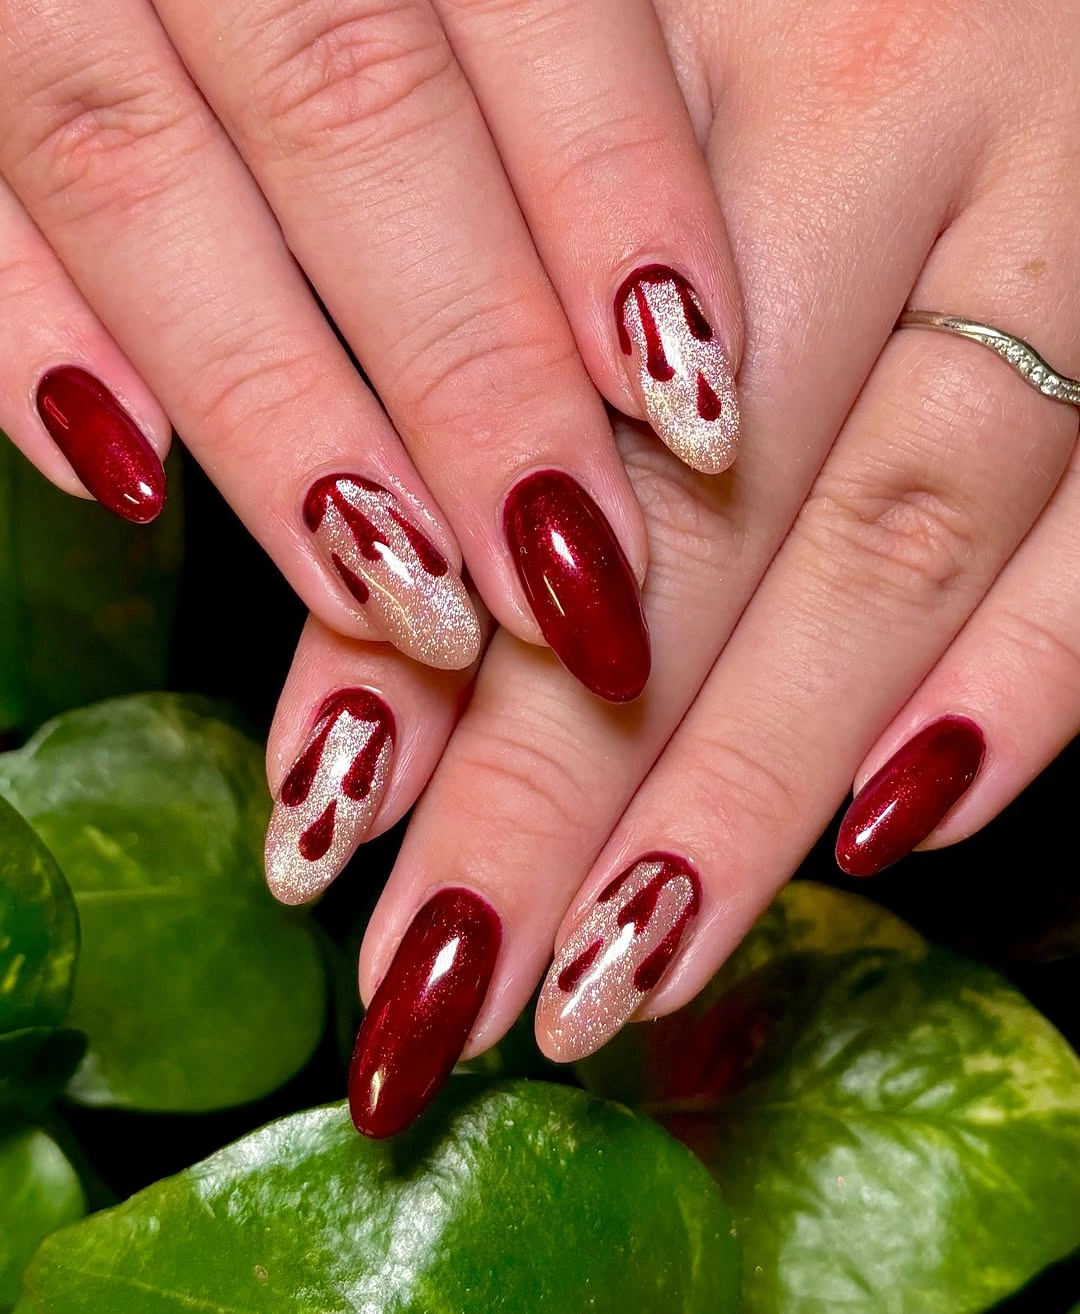
I would use a deep burgundy or blood-red gel, a champagne shimmer polish, and a fine liner brush for the dripping shapes. I would apply the solid red nails first, then create the shimmer base and add the drips in varying lengths. A glossy top coat brings out the richness of the burgundy.
I would choose this when I want something sexy and Halloween-inspired rather than cute. It also has the advantage of working beautifully with evening outfits long after October is over.
Black Skeleton Halloween Nails
For the most unapologetically spooky option, I would go straight to black and white skeletons. Long square nails are coated in a matte black base, while tiny white skeletons stretch across the surface with skulls, ribs, arms, and legs carefully arranged on each nail. The monochrome palette makes every little bone stand out.
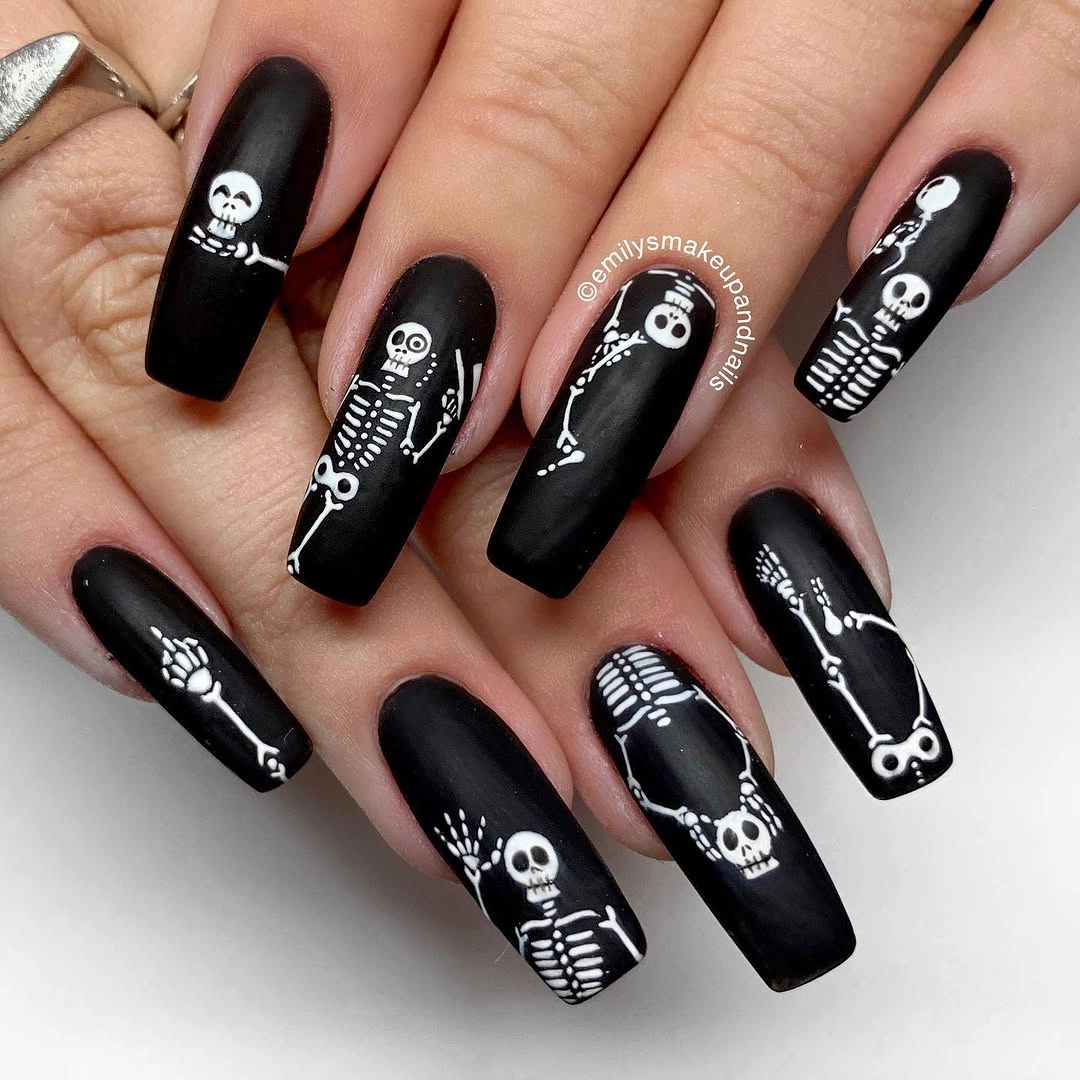
I would use a deeply pigmented black gel, white gel paint, a fine liner brush, and a matte top coat. The skeletons are easier to create if I begin with the skull and spine, then add the ribs and limbs in thin strokes. I would cure the artwork in small stages so the tiny white lines stay clean.
This is the set I would pick for maximum Halloween drama. It is bold, graphic, and wonderfully creepy – basically the manicure equivalent of turning the lights off and putting on a horror movie.